
Level 105
HARDHow to solve Sand Loop level 105? Get instant solution for Sand Loop 105 with our step by step solution & video walkthrough. Sand Loop 105 tips and guide.
Play Sand Loop Now
Experience the puzzle challenge firsthand
Game Screenshots
Sand Loop Level Guides
Level 105: Comprehensive Walkthrough Guide
Stage Overview and Analysis
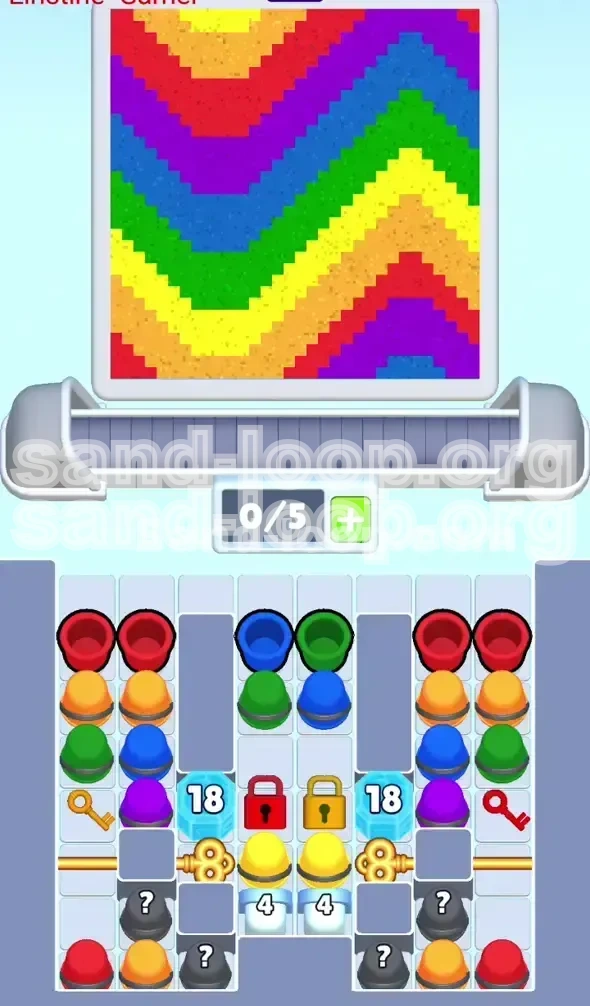
Welcome to the "Rainbow Zigzag," Level 105 of Sand Loop. This stage represents a significant shift in difficulty, moving from simple color matching to complex resource management and logic puzzles. Unlike previous levels where you could simply tap cups in any order, this level requires a strict sequence of operations to avoid running out of moves.
The difficulty here stems from the "Double Lock" mechanism located in the center of the supply tray. You are presented with a beautiful but demanding zigzag pattern on your canvas that requires six distinct colors. The challenge is not just the painting itself, but unlocking the necessary supplies to finish it.
Key features include:
- Resource Locking: Critical colors (Yellow and Blue) are trapped behind high-durability ice and padlocks.
- Key Dependency: You must clear specific side cups to get keys to open the center.
- Slot Management: With only 5 available slots, mismanaging your inventory will lead to a deadlock.
- Durability Hazards: Ice blocks with "18" and "4" HP require strategic clearing rather than brute force.
Primary Objectives
Your goal is not just to fill the canvas, but to engineer a solution through a locked board. To achieve a 3-star rating, you must complete the level without running out of space or moves.
The core objectives are:
- Excavate the Golden Keys: Clear the left and right edges to retrieve keys necessary for unlocking the central Red and Gold padlocks.
- Shatter the Blue Ice (18 HP): While digging for keys, you must simultaneously chip away at the massive side ice blocks to prevent your tray from clogging.
- Unlock the Center: Use the keys to access the Yellow supply and clear the 4-HP White Ice blocks.
- Execute the Rainbow Fill: Systematically paint the canvas from bottom (Purple) to top (Red) without blocking your slots.
Strategic Preparation and Mindset
Understanding the "Rainbow" Logic
The canvas in Level 105 is not random; it follows the spectral order: Purple, Blue, Green, Yellow, Orange, Red. This dictates your entire strategy. You cannot focus on Red at the start because the bottom layers (Purple/Blue) must be established first. If you fill the top Red zones too early, you will have no space to maneuver the sand for the lower colors later.
Slot Management Theory (5/5)
The most common failure point in this stage is filling all 5 slots with cups that cannot be used immediately. For example, if your slots contain 5 Red cups, but your canvas currently needs Purple, you are stuck.
The Golden Rule: Always keep at least one slot open, or fill it with a color you can immediately dump onto the canvas. Never hold onto a color for "later" unless you have less than 3 of that color type in your active inventory.
Durability Analysis: The 18 vs. 4 Problem
You face two types of obstacles: The "18" Blue Ice Blocks on the sides and the "4" White Ice Blocks in the center.
- The "18" Blocks: These are massive health sponges. You cannot break them with 3 or 4 adjacent clears. You need a continuous stream of clears from the adjacent columns (Columns 2 and 5) to whittle them down over time.
- The "4" Blocks: These are brittle but dangerous because they guard the Yellow. They require precise adjacent clicks to shatter.
Prioritizing the "Key" Columns
Many players fail because they start clearing the center. This is impossible. The center is locked. Your eyes—and fingers—must be glued to the far left (Column 1) and far right (Column 6). These columns are the only path to progression.
Mindset Shift: Ignore the pretty canvas for the first 20 moves. Treat this as a mining operation. You are not painting yet; you are digging for tools.
Phase 1: The Excavation (Moves 1-15)
Step 1: Target the Far Edges
Start the level by looking strictly at the outermost columns. Do not touch the center columns yet.
- Locate the Red Cups on the far left and far right edges. Tap them immediately. This sends them to your slots.
- Immediately follow up by tapping the Orange Cups revealed underneath.
- Finally, tap the Green Cups sitting directly on the Golden Key tiles.
Why this order? This sequence clears the vertical stack covering the key. Once the Green cup is removed, the Golden Key is freed, and the game will automatically use it to unlock the central padlocks.
Step 2: The "18" Ice Block Strategy
While clearing the edges for keys, you will notice Blue Ice blocks labeled "18" in the second and fifth columns. You cannot clear these directly.
The Action: You must clear the cups *adjacent* to them. Every time you clear a cup in the columns next to the ice, the ice takes damage.
- If you clear a Blue cup next to the "18" block, it drops the HP to 17.
- Focus on clearing the Blue and Green cups in the middle columns (Columns 2, 3, 4, 5) to keep the pressure on these ice blocks.
Step 3: Inventory Control
As you tap the Red, Orange, and Green cups from the edges, your slots will fill up.
Crucial Step: Do not let these cups sit in your slots if they don't match the bottom of the canvas. The canvas bottom is Purple. If you have Red/Green/Orange in your slots, pour them onto the canvas *only if* the conveyor belt allows it without blocking the Purple flow. If the belt is clogged, you must wait or use a power-up if available. Ideally, you are holding these colors to unlock the center, not to paint yet.
Step 4: Unlocking the Center
Once the keys are triggered (Step 1), the Red and Gold Padlocks in the center will vanish. This reveals the Yellow Cups sitting on top of White Ice Blocks (4 HP).
Do not tap the Yellow cups yet! They are trapped. If you tap them, they go to your tray, but the ice remains, blocking access to deeper supplies. You must break the ice first.
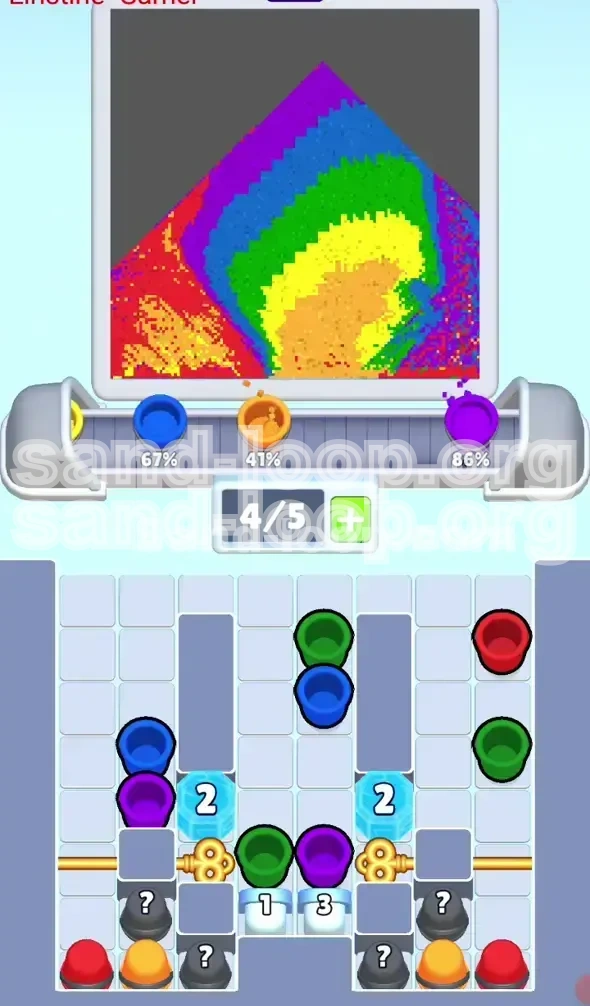
Phase 2: Breaking the Ice and Unlocks
Dealing with the "4" White Ice Blocks
Now that the center is unlocked, you see Yellow cups on ice. You need to break this ice.
The Method: You break the ice by clearing cups *next* to the ice blocks.
- Look at the columns adjacent to the trapped Yellow cups.
- You will likely find Purple or Blue cups there.
- Tap the adjacent Purple/Blue cups to clear them. Each clear damages the White Ice.
- Usually, it takes about 3-4 adjacent clears to shatter a "4" block.
Managing the "18" Blocks Cleanup
By now, your work in Phase 1 should have significantly lowered the HP of the side Blue Ice blocks. If they are not gone, continue to prioritize clearing cups in the columns next to them.
Warning: If these blocks are not cleared by the time you finish the bottom half of the rainbow, they will spawn cups that clog your tray. Make sure they are fully destroyed before you move to Phase 3.
Accessing the Yellow Supply
Once the White Ice (4 HP) is broken, the Yellow cups are free.
Action: Now you can tap the Yellow cups. However, only tap them if you actually need Yellow on the canvas. Since the canvas fills bottom-up, you need Yellow for the third band from the bottom. Ensure you have finished Purple and Blue sections before loading up on Yellow.
Establishing the Base Layers
At this point, the board is "open." No locks remain.
The Plan: Focus entirely on Purple and Blue.
- Pour Purple into the bottom-most section of the zigzag. It requires short bursts.
- Follow immediately with Blue. The zigzag pattern means Blue sits directly above Purple in some columns, but to the right in others. Follow the visual guide of the canvas strictly.
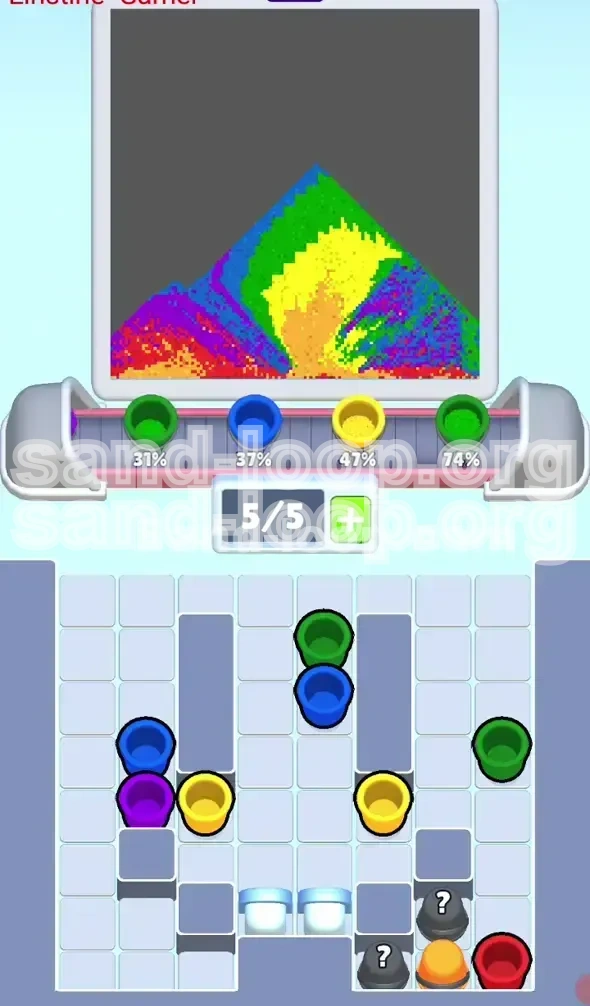
Phase 3: The Rainbow Fill Execution
Color Order and Timing
This is the execution phase. Follow this strict order to prevent mixing colors:
- Purple (Base): Fill all bottom areas first.
- Blue: Fill the layer above Purple.
- Green: This is the middle layer. Be careful not to spill into the Yellow zones.
- Yellow: Now use the supply you unlocked in Phase 2.
- Orange: The penultimate layer.
- Red: The final top layer.
Slot Management Crisis Management
During this phase, you will likely encounter a "Slot Full" crisis. You need a Blue cup, but your slots are full of Green, Yellow, and Red.
Solution: You must create a "dumping" opportunity.
- If the canvas has space for Green, pour the Green cups immediately to free up slots.
- If the canvas doesn't have space, you may need to pause. Check if any Mystery Cups (?) can be tapped to change their color.
- Emergency Tip: If you are truly stuck, tap a cup that is on the conveyor belt (if accessible) to cycle it, but this is risky.
Mystery Cup (?) Protocol
Level 105 features Mystery Cups. These are wildcards.
Strategy: Treat them as "Slot Fillers" or "Emergency Fixers."
- If you have 4/5 slots full, do not tap a Mystery Cup unless you know what it is (if a feature allows revealing) or if you have an open slot to waste.
- If you tap a Mystery Cup and it turns into a color you already have (e.g., you have 3 Reds, and it turns Red), you have wasted a slot.
- Best time to use: When you have 2 open slots. This gives you a 50% buffer if it's a bad color.
The Zigzag Precision
The "Zigzag" shape creates natural pockets where sand can get stuck.
Technique: Use short taps (0.5 seconds) rather than holding the screen.
- Long holds cause the sand to mound up and potentially spill over into the adjacent color band (e.g., Red spilling into Orange).
- Short taps keep the stream controlled.
- Aim for the center of the color band, not the edges.
Mastering the Game: Pro Tips and Speed Runs
Speed Run Strategy
If you are aiming for the fastest time (under 2 minutes), you must multitask during Phase 1.
The "Combo" Move: While tapping the Green cups on the far right to get the key, simultaneously visually track the Blue cups on the left. As soon as the key pops, immediately tap the Blue cups on the left. Do not wait for the animation to finish. Queue your inputs.
Common Mistakes to Avoid
1. Clearing the Center First: This is the #1 error. The center is locked. Attempting to clear it early wastes moves that should be used digging for keys.
2. Ignoring the 18-HP Blocks: If you ignore the side ice blocks, they will linger into the late game, clogging your screen when you are trying to place delicate Orange and Red colors.
3. Overfilling Slots: Picking up 5 Red cups at the start is a guaranteed loss. You have nowhere to put them, and you can't paint the top Red layer until the very end.
Solutions for When You Are Stuck
Scenario: "I have no moves and the ice isn't breaking."
- Diagnosis: You probably cleared the cups *on top* of the ice, but not *next* to it.
- Fix: Look at the columns immediately to the left and right of the ice block. There must be cups there. Clear those to damage the ice. If there are no cups, you may have hit a bug or a deadlock, requiring a restart.
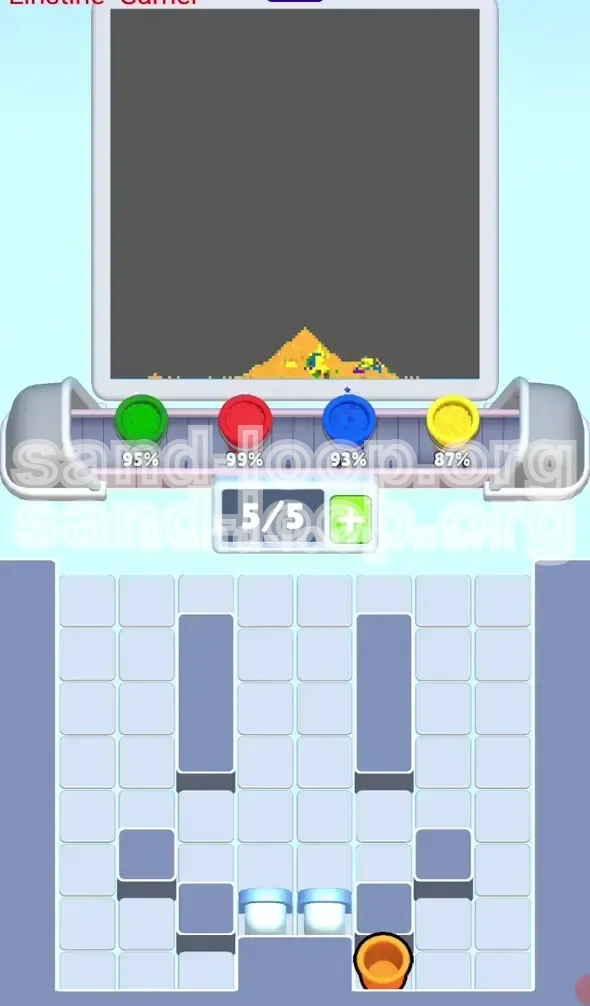
Final Polish and Victory
As you finish the final Red layer, ensure you haven't left any gaps in the Blue or Green sections. The zigzag pattern is unforgiving; a single pixel gap can cost a star. Take the last 10 seconds slowly. Pour the final Red sand, let it settle, and claim your victory. Level 105 is complete!