
Level 110
HARDHow to solve Sand Loop level 110? Get instant solution for Sand Loop 110 with our step by step solution & video walkthrough. Sand Loop 110 tips and guide.
Play Sand Loop Now
Experience the puzzle challenge firsthand
Game Screenshots
Sand Loop Level Guides
Level Overview: The Tropical Island Challenge
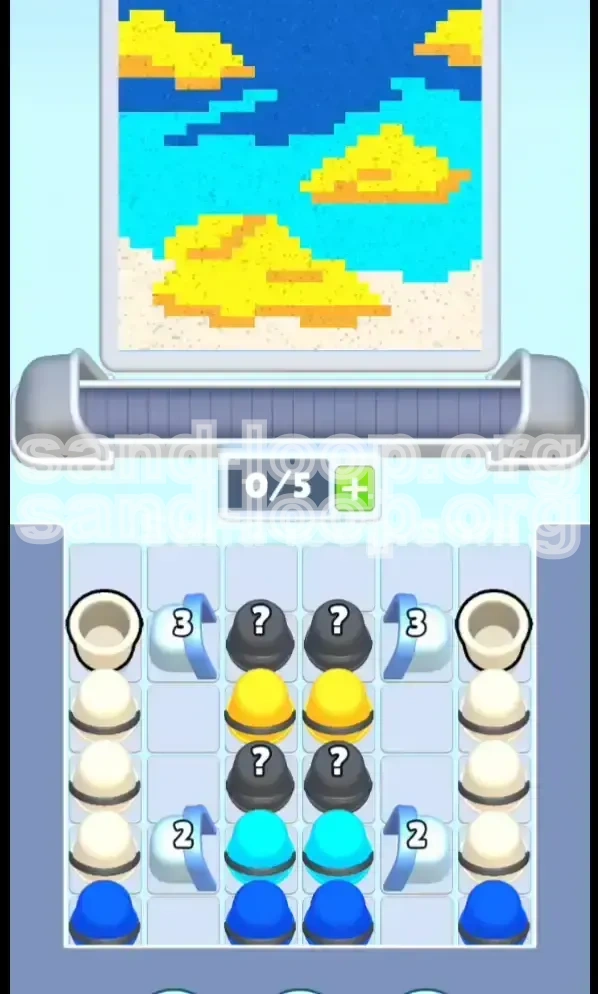
Welcome to the definitive walkthrough for Level 110 of Sand Loop, widely known by players as the "Tropical Island" challenge. This stage represents a significant shift in gameplay dynamics, moving away from simple color matching and into the realm of precise vertical resource management. The level is designed to test your understanding of how different sand densities interact within the game's physics engine.
The objective is deceptively simple: paint a pixel-perfect landscape featuring a sandy shoreline, deep blue ocean currents, shallow cyan waters, and distinct yellow sandy atolls. However, the difficulty lies in the "Sand Loop" mechanic. In this level, sand poured from higher cups will inevitably settle on top of sand poured from lower cups. If you prioritize the wrong color, you will bury essential landscape features under layers of incorrect sediment, making it impossible to complete the pixel art without restarting.
Visual Breakdown of the Target Image
Before you tap a single cup, take a moment to visualize the destination canvas. The image is split into four distinct vertical zones, each requiring a specific approach to layering.
- The Floor (Bottom 20%): This is the foundation. It consists entirely of beige sand representing the shoreline. Nothing can exist below this layer.
- The Deep Water (Lower Middle 30%): Just above the sand, you will see jagged stripes of dark blue. These represent the deep ocean currents and must sit directly on top of the beige, not mixed with it.
- The Shallow Sea (Upper Middle 30%): The vast majority of the middle canvas is a bright cyan. This acts as the water surrounding the islands.
- The Islands (Top 20%): Floating in the cyan are yellow pixels. These are your atolls. They must appear to float, meaning they need to be poured after the water base is established but before the frame is closed.
Understanding the "Gravity" Mechanic
The core physics rule in Level 110 is that sand seeks the lowest possible point. However, in Sand Loop, "lowest" refers to the existing stack of sand on the conveyor belt, not just the bottom of the screen. When you pour a cup, its contents are added to the top of the current sand column in that specific slot. Therefore, to create a beach at the bottom, you must pour the beige first. If you pour blue first, the beige poured later will sit on top of the water, creating a surreal and incorrect image of sand floating in the sky.
The Distribution Puzzle
Unlike earlier levels where cups are conveniently grouped by color, Level 110 scatters your resources. The beige cups are strictly relegated to the outer flanks (far left and right columns), while the blues and yellows dominate the center. This physical separation in the supply tray is your first hint: the game is forcing you to prioritize the sides to build the floor before you are even allowed to access the center stack for the water details.
The Role of Numbered Locks
Flanking the center column are two sets of Ice Locks marked with numbers. You will see '3' locks guarding the upper reaches and '2' locks situated near the bottom. These function as countdown gates. A '2' lock will only shatter when two adjacent cups have been cleared or specific interactions have occurred nearby. Do not view these as obstacles to be overcome, but rather as pacing mechanisms that prevent you from rushing the center stack and ruining the layering order.
Why Speed is Not the Priority
This is not a stage where rapid tapping will lead to success. In fact, playing this level too fast is the primary cause of failure. The conveyor belt moves at a steady pace, and your taps must be rhythmic rather than frantic. You have a limited window to position the beige sand at the very bottom of the frame. If you miss this window and the belt moves on, you will have no opportunity to place the beach layer, resulting in an immediate fail state.
Clear Objectives: The Layering Strategy
To successfully navigate Level 110, you must abandon the instinct to "clear" cups and adopt the strategy of "stacking" colors. Your goal is to fill the conveyor slots in a specific order that mimics the geological formation of an island. Here is the priority hierarchy you must follow to achieve the target 100% completion rate.
Primary Objective: The Beige Foundation
Your absolute first priority is to establish the beige floor. This accounts for approximately 15-20% of the total puzzle volume. You must aim to fill the bottom-most pixels of the canvas frame with beige. If you fail to place beige within the first few slots of the level, you will not be able to go back, and the "Sand" part of your "Sand Loop" will be missing. Do not touch any blue or yellow cups until a solid layer of beige is riding the belt.
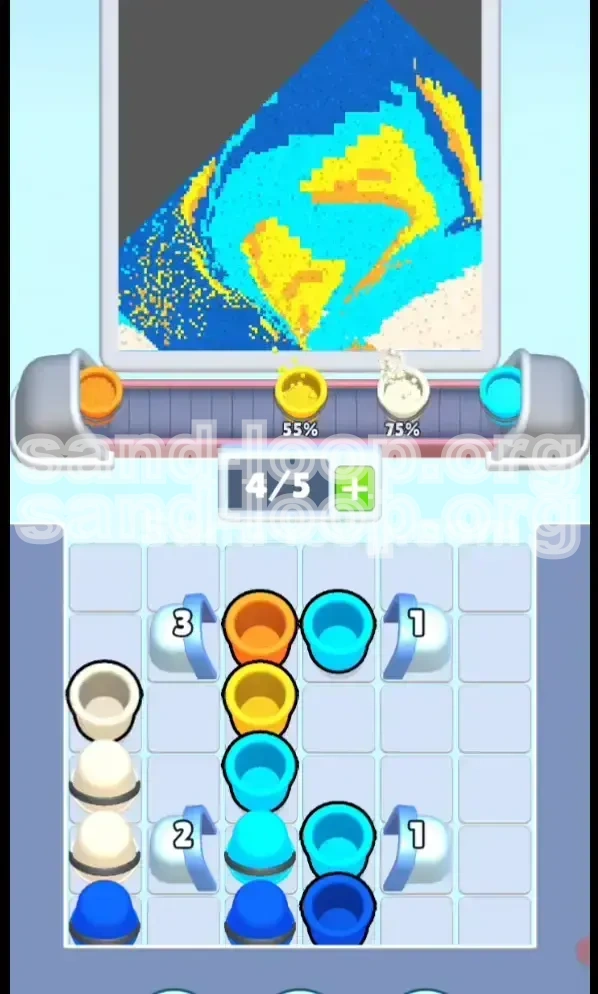
Secondary Objective: The Dark Blue Currents
Once the beige is in place, your focus shifts immediately to the Dark Blue cups. This color is the most scarce and most critical for the image's definition. The Dark Blue creates the contrast between the shallow beach and the deep ocean. It must be poured directly on top of the beige layer. If Dark Blue is poured too late, it will sit on top of the Cyan water, which will look like floating kelp rather than deep water currents.
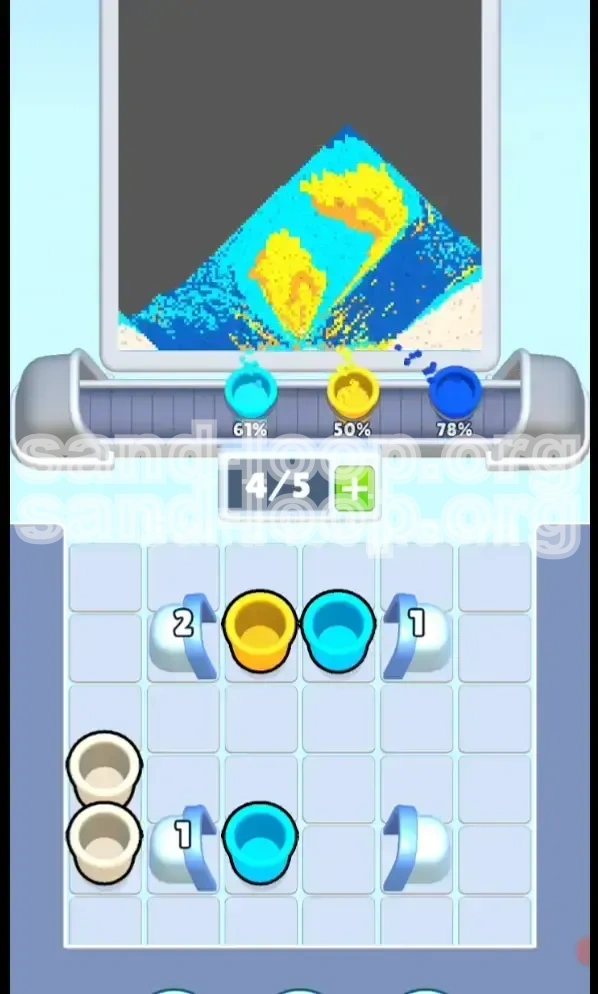
Tertiary Objective: The Cyan Filler
Cyan is your "filler" color. It makes up the bulk of the ocean (approx. 40-50% of the canvas). Once the foundation and currents are set, you can aggressively tap Cyan cups to build up the middle section of the image. This color is the most forgiving, as it serves as the background for most of the other elements.
Quaternary Objective: The Yellow Islands
The Yellow cups are the "frosting" on the cake. These represent the landmasses. Because they are the brightest color, they must sit on top of the Cyan water. However, they are often locked behind Mystery Cups or located in the center stack, meaning you will likely encounter them towards the middle-end of the level once the locks have shattered.
Managing the Mystery Cups
Scattered throughout the center stack are black cups marked with a '?'. These are wildcards. In Level 110, these Mystery Cups predominantly contain either Cyan or Yellow sand. While the temptation is to tap them early to clear the board, you should exercise patience. Tapping a Mystery Cup too early can reward you with Yellow sand, which you are not yet ready to place (since you haven't built the water base). Treat these as unpredictable variables to be utilized only after your foundation is secure.
The Completion Metric
The game calculates your completion percentage based on pixel-perfect alignment. A "muddy" transition—where beige mixes with blue, or dark blue is buried under cyan—will result in a failed level. The objective is not just to fill the canvas, but to fill it with the correct stratification. Aim for a clean 95%+ match before the conveyor belt finishes its run.
Step-by-Step Instructions: The Action Plan
This section provides a turn-by-turn execution plan. Follow these phases in order. Do not jump ahead. The success of Level 110 relies on maintaining the discipline to ignore "available" cups that do not fit the current phase of construction.
Phase 1: The Beachhead (Opening Moves)
As the level begins, your supply tray will load. Do not look at the center column. Immediately look to the far left and far right edges.
- Action: Rapidly tap the beige stacks located on the far left and far right columns.
- Target: Pour these into the first 2-3 available slots on the conveyor belt.
- Visual Confirmation: Look at the canvas preview. You should see the cream-colored sand forming a solid strip at the very bottom of the image.
- Lock Status: Ignore the center '2' locks for now. They are blocking the blue, which is exactly what you want.
- Stop Condition: Stop tapping beige once the bottom layer of the canvas appears fully formed. Over-pouring beige now will leave you with no room for water.
Phase 2: Breaking the Lower Dam (The '2' Locks)
Once the initial beige is poured, the side columns might be empty or blocked. Now, direct your attention to the center column, specifically the bottom-most cup.
- Action: Tap the Dark Blue cup at the bottom of the center stack.
- Mechanic: As you pour this and clear nearby cups, the '2' Ice Locks adjacent to the center will shatter. This usually happens automatically as you clear the initial debris.
- Placement: Ensure this Dark Blue pours directly onto the tail end of your Beige layer. It should look like the water is washing up on the sand.
- Warning: Do not touch the Cyan cups yet, even if they become accessible. The Dark Blue needs to be the next distinct layer.
Phase 3: The Ocean Expansion (Mid-Game)
With the floor (Beige) and the deep water (Dark Blue) established, you are now safe to open the floodgates for the bulk of the level.
- Action: Begin aggressively tapping the Cyan cups in the center stack.
- Strategy: You can now alternate between the center and any remaining side cups if they are unlocked. The goal is to fill the vertical middle of the canvas.
- Visual Check: The canvas should now be growing upwards. You have a brown bottom, a dark blue stripe, and now a growing expanse of light blue water.
- Mystery Cups: If you tap a Mystery Cup now and get Yellow, do not panic. A little bit of yellow falling into the blue is acceptable, as islands can be submerged or partially built now.
Phase 4: The Island Reveal (End-Game)
As you reach the top half of the supply tray, the '3' locks will shatter. This signals the final phase.
- Action: Prioritize Yellow cups. If Mystery Cups remain, tap them now to reveal the final Yellow reserves.
- Placement: Pour the Yellow sand on top of the Cyan. Since the belt is moving, this will create the "islands" floating in the upper portion of the image.
- Cleanup: If there are any leftover Cyan cups, pour them to fill the gaps between the yellow islands. You want the yellow to be distinct, surrounded by cyan.
- Final Check: Ensure no Beige cups are left. If you have Beige left at this stage, it means you missed the bottom layer, and you likely won't hit 100%.
Phase 5: The Final Push
In the last 10 seconds of the level, the supply tray will be nearly empty.
- Action: Tap whatever is remaining as fast as possible.
- Focus: Volume is key here. You want to maximize the height of the sand to reach the top of the canvas frame.
- Adjustment: Watch the pixel art preview. If you see a "hole" in the ocean, try to direct a pour into that specific slot (if your timing is precise enough).
Color Order: The Perfect Pour Sequence
Mastering Level 110 requires you to internalize a strict color processing order. While the game offers multiple paths, the following sequence has the highest success rate for achieving a "Perfect" rating. Think of this as the standard operating procedure for this level.
1. Beige (Priority Alpha)
Timing: 0% - 20% of Level Progress.
Reasoning: Gravity dictates that the first sand poured becomes the foundation. In the Tropical Island image, the beige sand is the geological bottom layer. Pouring this first ensures it settles at the absolute bottom of the screen, pushing the "Z-index" to zero. If you pour this second, it will cover your water, turning the ocean into a desert.
2. Dark Blue (Priority Beta)
Timing: 15% - 30% of Level Progress.
Reasoning: Dark Blue represents the deep water trenches. Visually, these need to be sandwiched between the light sand and the light water. Pouring this second ensures it sits immediately above the beige but below the incoming cyan. This creates the sharp contrast needed for the shoreline effect.
3. Cyan (Priority Gamma)
Timing: 30% - 70% of Level Progress.
Reasoning: Cyan is the volumetric filler. It constitutes the majority of the ocean. Pouring this third allows it to fill the space above the dark blue, effectively "drowning" the deep currents and creating the vast expanse of shallow sea. It is safe to pour this liberally as it serves as the background for the upcoming yellow islands.
4. Yellow (Priority Delta)
Timing: 60% - 90% of Level Progress.
Reasoning: Yellow is the "feature" color. The islands must float on the water. Pouring this last (or second-to-last) ensures they remain on the surface layer of the pixel art. If poured too early, they will sink beneath the cyan waves, becoming invisible and lowering your match percentage.
Handling the "?" Variable
Timing: Dependent on Context.
Reasoning: The Mystery Cups are the only wildcard in this sequence. If you tap one early and it reveals Yellow, you are in trouble. Strategic Tip: Avoid tapping Mystery Cups until you have established at least the Beige and Dark Blue layers. Once the Cyan is flowing, Mystery Cups are safe to tap because even if they reveal Yellow, it will simply float on the Cyan you just poured.
Key Tips and Notes for Mastery
To truly master Level 110 and ensure you can replicate your success, consider these advanced observations. These tips focus on the subtle mechanics that separate a "Clear" from a "Perfect Clear."
The "Side-First" Mantra
Develop a muscle memory to always check the left and right edges of the screen at the start of any Sand Loop level, but especially here. The game designers often hide the essential foundation colors on the periphery to force players to clear the board edges. By conditioning yourself to tap the sides first, you avoid the trap of getting sucked into the center stack's easy taps.
The Conveyer Belt Lag
Be aware that there is a slight delay between tapping a cup and the sand physically landing on the conveyor belt. If you are tapping at the very end of a belt's cycle (right before the slot moves off-screen), you might miss the slot entirely. When pouring critical colors like Beige or Dark Blue, ensure you are tapping with a healthy buffer of time so the sand settles into the correct "row" of the image.
Mystery Cup Gambling
If you find yourself stuck with no good colors but a stack of Mystery Cups, you have to gamble. However, you can mitigate the risk. Look at the ratio of remaining colors. If you have mostly Blue left, the Mystery Cup is statistically more likely to be Blue. Use probability to guide your taps when visibility is low.
The "Shatter" Effect
When the Numbered Locks ('2' and '3') shatter, they don't just disappear; they often release a small shockwave that can slightly disturb the sand settling on the belt. While this is mostly visual, it can sometimes cause a pixel or two of sand to shift columns. Don't panic if your perfectly aligned line jiggles a bit when a lock breaks; the game's physics usually settles it back into place correctly.
Audio Cues
Pay attention to the sound effects. The "shatter" of ice is distinct from the "plop" of sand. If you hear a shatter but don't see a lock break, it means a lock off-screen (perhaps in a stack you aren't focusing on) has opened. This is your cue to scan the full tray, as a new color priority might have just become available.
Restart Reflexes
Level 110 is punishing. If you realize you messed up the order (e.g., you poured Cyan before Dark Blue), do not try to "fix" it by hoping for a miracle. You won't get the percentage. Immediately hit the restart button. It saves time and frustration to fail fast and restart with the correct mental model than to finish a flawed level.
Common Mistakes to Avoid
Even experienced players can falter on Level 110 due to its deceptive simplicity. Here is a breakdown of the most common failure modes so you can recognize and avoid them.
The "Sky Sand" Error
The Mistake: Pouring Beige sand late in the level.
The Consequence: You end up with beige sand floating in the top half of the canvas, looking like a weird sky anomaly.
The Fix: If you have Beige left after the first 30% of the level, you have already failed the layering logic. Restart and focus on getting rid of all Beige immediately.
The "Muddy Water" Trap
The Mistake: Alternating Dark Blue and Cyan too frequently at the start.
The Consequence: Instead of distinct deep water and shallow water layers, you get a muddy, mix-blended blue blob that lacks definition.
The Fix: Treat Dark Blue as a distinct "stripe." Pour the batch, finish it, and then move to Cyan.
The "Premature Island" Launch
The Mistake: Tapping a Mystery Cup early, getting Yellow, and pouring it before the water is there.
The Consequence: Your yellow island sinks to the bottom of the ocean (floor of the canvas) and gets covered by blue water, making it invisible.
The Fix: Restraint. Hold off on Mystery Cups until the water (Cyan) base is established.
Ignoring the Numbered Locks
The Mistake: Trying to break the '3' lock by tapping it repeatedly (which is impossible).
The Consequence: You waste valuable seconds and rhythm, causing the conveyor belt to move while your hands are full.
The Fix: Remember the mechanic. Numbered locks break via adjacency/clearing, not force. Focus on clearing the cups *next* to the lock, and the lock will take care of itself.
The "Full Tray" Panic
The Mistake: Letting the supply tray get completely full because you are only tapping one column.
The Consequence: You lose visual clarity on what cups are where. A full tray makes it hard to spot the critical Dark Blue cup amidst a sea of Cyan.
The Fix: Manage the tray height. Try to keep all three columns (Left, Center, Right) descending at a roughly similar rate to maintain visibility.
Stuck Solutions and Troubleshooting
If you find yourself in a situation where the level seems impossible to finish, or you are stuck at 90% completion no matter what you do, use these diagnostic steps to troubleshoot your run.
Scenario: "I Can't Find the Dark Blue"
Symptom: You have poured Beige and Cyan, but the deep blue stripes are missing from the image.
Diagnosis: The Dark Blue cup is likely buried under a stack of Mystery Cups or locked behind a '2' lock that hasn't shattered yet.
Solution: Stop tapping Cyan. Look closely at the center column. You may need to tap the cups *adjacent* to the '2' lock to trigger the shatter mechanic. Alternatively, if it's under Mystery Cups, you have to tap the Mystery Cup to reveal the Blue underneath. If the Mystery Cup reveals Yellow, you have a bad RNG run—Restart.
Scenario: "My Islands Are Too Small"
Symptom: You finished the level, but the yellow islands look like tiny specks instead of distinct landmasses.
Diagnosis: You likely poured the Yellow too late, or you didn't pour enough of it because you were busy filling the background with Cyan.
Solution: In your next run, prioritize Yellow slightly more aggressively. Once the Cyan base is established (about 50% full), immediately switch to hunting for Yellow/Mystery cups to build the landmass volume.
Scenario: "The Bottom Layer is Incomplete"
Symptom: You ran out of Beige sand before the bottom of the screen was fully covered.
Diagnosis: You likely missed some Beige cups on the side columns, or you didn't tap them fast enough at the start.
Solution: Focus purely on speed for the first 10 seconds. Do not look at the center. Tap the side columns as fast as humanly possible to ensure 100% of the Beige is transferred to the belt immediately.
Scenario: "Stuck at 99% Completion"
Symptom: The image looks perfect to your eye, but the game gives you a "Fail" or 99% score.
Diagnosis: There is likely a single pixel of "noise"—a wrong color pixel sitting where it shouldn't. This is often a single grain of Cyan buried in the sand, or a single grain of Sand in the sky.
Solution: This is hard to fix mid-run. It usually means your pouring rhythm was slightly off, causing a splatter. The only reliable fix is to restart and aim for cleaner, more distinct pours. Avoid "dribbling" the sand; tap firmly to get a solid stream.
Scenario: "The Mystery Cup Ruined Everything"
Symptom: A Mystery Cup gave you the wrong color at the wrong time (e.g., Yellow at the start).
Diagnosis: Bad luck (RNG).
Solution: This is a hard stop. If a Mystery Cup gives you a top-layer color (Yellow) during the bottom-layer phase (Start), you cannot recover. The layering will be wrong. Pause and Restart immediately. Don't waste time finishing a run that is mathematically doomed to be under 100%.
Speed Run Tips and Shortcuts
Once you have mastered the logic of Level 110, you may want to improve your time or achieve a faster completion for leaderboard rankings. Here is how the pros optimize this level.
The "Dual Tap" Technique
Instead of tapping Left then Right, try to develop a rhythm where you tap two cups in rapid succession on the same side before switching. This is because the sand stream takes a moment to travel. By double-tapping, you ensure a solid, unbroken stream of color enters the slot, which is often faster than switching sides constantly.
Pre-loading the Tray
As the level starts, don't wait for the cups to fully settle into their final positions before you start tapping the side Beige cups. You can start tapping the Beige on the far left the split second the level loads, even as the center columns are still animating in. This micro-optimization saves precious seconds.
Ignoring the Preview
While beginners need to look at the canvas preview to check their work, speed runners know the pattern by heart. Keep your eyes locked on the Supply Tray, not the canvas. Watching the tray allows you to plan your next tap 0.5 seconds faster than if you were looking up at the art to verify.
The "Lock-Shatter" Rhythm
Learn the exact number of taps required to break the '2' and '3' locks. If you know that tapping 3 specific cups will shatter a lock, you can queue up those taps mentally. This allows you to clear the obstacles without pausing to wait for the animation, maintaining a constant flow of sand to the belt.
Optimizing Mystery Cup Usage
In a speed run, you don't have time to be cautious with Mystery Cups. The fastest strategy is to tap them as soon as the Cyan layer is roughly 50% established. If you get Yellow, great—you pour it. If you get Cyan, great—you pour it. By waiting until the mid-game to tap them, you ensure that either outcome is usable, which prevents the "Bad Luck" restart scenario from slowing you down.
Hand Positioning
Hold your device so that your thumb can easily reach the far left and far right columns without shifting your grip. A stable grip allows for faster tapping. If you have to adjust your hand to reach the Beige columns, you are losing time. Find a comfortable neutral position that covers the width of the screen.