
Level 131
HARDHow to solve Sand Loop level 131? Get instant solution for Sand Loop 131 with our step by step solution & video walkthrough. Sand Loop 131 tips and guide.
Play Sand Loop Now
Experience the puzzle challenge firsthand
Game Screenshots
Sand Loop Level Guides
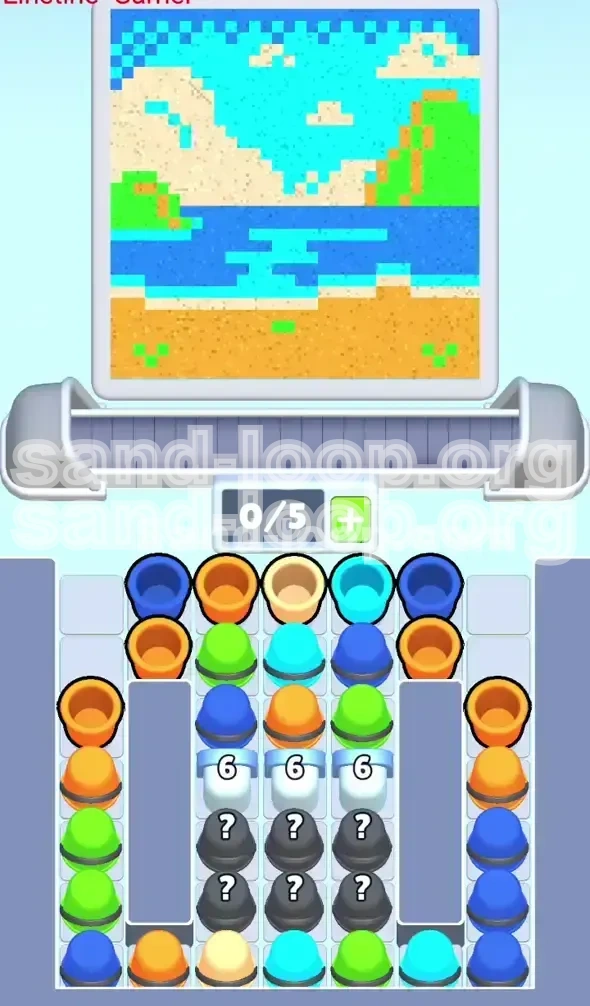
Level 131 Overview: The Beach Scene Challenge
Welcome to Level 131, a stage that masquerades as a relaxing pixel art landscape but functions as a rigorous test of resource management. Titled "The Beach Scene," this level presents a classic composition comprising a sandy shore, a deep blue ocean, and a vibrant sky. However, the visual simplicity is a trap. This is a high-difficulty Logic stage defined by a critical bottleneck in your supply chain.
The defining feature of this level is the "Ice Block Trinity" located in the central supply tray. These three ice blocks, each requiring 6 clears to shatter, sit directly atop the majority of your necessary Sky and Water colors. You begin the level with access mostly to earth tones (Beige, Green) and a limited supply of blues. If you mismanage your initial moves and waste these earth tones on the wrong pixels, you will enter a "soft lock" state where the board is cluttered with unusable colors, and the ice blocks remain intact.
The Logic Stage Trap
Unlike standard levels where you can simply pour colors as they appear, Level 131 requires you to view the board as a grid of dependencies. The ice blocks act as a dam. Breaking them too early floods your limited 5-slot conveyor belt with mystery cups, causing a jam. Breaking them too late leaves you without the colors needed to finish the upper canvas. You must strike a precise balance between clearing the existing board space to accept new colors and fulfilling the ice block break conditions.
The Visual Layout
The canvas is divided into three distinct horizontal zones, each requiring a specific strategy:
- Zone 1 (Bottom 30%): The Sandy Beach. This area is predominantly Beige but is peppered with small, frustrating Green vegetation dots.
- Zone 2 (Middle 40%): The Ocean. A large block of Deep Blue, bordered by lighter Cyan reflections.
- Zone 3 (Top 30%): The Sky. Mostly Cyan, featuring "Beige Clouds" that act as landmines—if you accidentally pour Cyan over a cloud pixel, you create a hard-to-fix error.
Supply Tray Analysis
Your initial tray is deceptive. It is heavy on Orange and Green cups. In this specific level design, Orange is largely a "filler" color used for minor shading in the sand or distant hills. It is not a primary structural color. The Green cups are high-priority but low-volume targets. The challenge is recognizing that you must aggressively clear these filler colors to access the locked Blue and Cyan reserves behind the ice.
The 5-Slot Constraint
The conveyor belt in this level is exceptionally short (5 slots). This is the primary cause of failure for most players. When the ice blocks break, they dump 3-4 cups instantly. If your belt is not perfectly managed (e.g., sitting at 2/5 capacity), the overflow will block new cups from entering, effectively stalling your run. Every move must account for the "space tax" of the upcoming block break.
Winning Condition Metrics
To secure a 3-star rating and avoid running out of moves, you need to maintain a board efficiency rating of over 90%. This means minimizing "waste pours" (pouring a color that only fills 1-2 pixels). Success depends on grouping your Green clears into single passes and saving your Beige pours for large swatches of the beach, rather than using them for the smaller cloud details early on.
Primary Objectives and Strategy
To conquer Level 131, you must abandon the instinct to paint from top to bottom. Instead, you will adopt a "Bottom-Up" clearing strategy with a specific focus on unlocking the ice blocks in a controlled sequence.
Objective 1: Clear the Earth Tone Bottleneck
Your immediate goal is to remove the initial wave of Beige and Green cups clogging your tray. These colors block access to the crucial columns beneath the ice blocks. You cannot effectively touch the Sky or Ocean until you have processed the earth tones. Treat the first 15-20 moves entirely as a "beach cleanup" phase.
Objective 2: Trigger the Ice Block Countdown
The ice blocks are activated by clearing cups in the columns directly adjacent to or beneath them (depending on the specific sub-mechanic active). In this layout, you must clear the visible top-layer cups (the Blues and Greens sitting above the ice) to reduce the counter. You need to plan your moves so that the final clear for an ice block happens exactly when you have 2 empty slots on your belt.
Objective 3: Isolate the Green Vegetation
The Green pixels are the most dangerous resource in the level. They are small and scattered. If you pour a Green cup when the surrounding sand (Beige) hasn't been filled yet, the Green will likely miss its target or land awkwardly. You must wait until the Beige around the vegetation is filled, creating a "landing pad" for the Green pixels.
Objective 4: The Sky Management Protocol
The sky is the final boss. It requires a massive amount of Cyan. However, it also contains Beige clouds. A common failure point is running out of Beige cups because they were used on the beach, leaving the clouds unpainted while the belt is full of Cyan. You must reserve 3-4 Beige cups specifically for the cloud layer in the late game.
Objective 5: Filler Color Management
You will see a lot of Orange cups. Do not try to force them into the canvas unless there is a clear Orange patch available. Instead, use these cups to "chain" combos or clear them by matching them if your game mode allows color matching for points. If they are purely for painting, pour them only on the darkest sand edges to get them out of the way.
Objective 6: The Mystery Cup Gamble
Once the ice breaks, you will deal with Question Mark cups. These typically transform into the color you need most (Cyan or Blue) or the color you have the most of. Strategy dictates that you should try to have a balanced tray (e.g., 2 Blue, 2 Cyan, 1 Empty) before triggering the reveal, to prevent the mystery cups from transforming into a color you don't currently need.
Step-by-Step Walkthrough Instructions
Follow this exact sequence of actions to navigate Level 131 without getting stuck. This walkthrough prioritizes keeping the conveyor belt moving and avoiding the "full board" stalemate.
Phase 1: The Foundation (Moves 1-15)
Action: Begin by scanning the tray for Beige cups. Pull them immediately.
Target: Focus exclusively on the bottom 20% of the canvas—the sandy beach. Do not touch the water or sky yet.
The "Green Sandwich" Maneuver: Look for the Green vegetation tufts on the bottom left and right. You want to pour a Green cup *immediately after* a Beige cup creates a border around it. If you pour Green too early, it spreads into the water area. Wait for the sand to create a barrier.
Orange Handling: If you pull an Orange cup, look for the "dried seaweed" or shaded sand spots near the water's edge. If there are no clear targets, hold onto it if you have space, or use it on a low-priority sand pixel just to clear it from the tray.
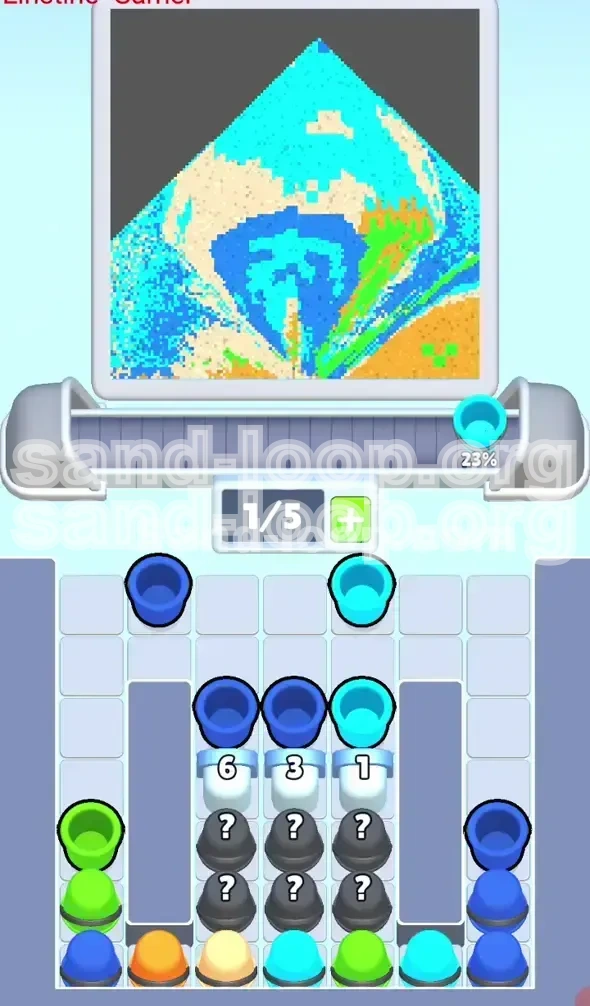
Phase 2: Cracking the Code (Moves 16-30)
Analyze the Ice Counters: Look at the three ice blocks. Note which ones have a counter of "6" or lower.
The Side Column Clear: Shift your focus to the far left and right columns of the canvas (not the tray). These often contain the specific colors needed to chip away at the ice block health.
Action: Pull any Deep Blue cups that appear, but DO NOT pour them on the main water body yet. Instead, look for small "connector" pixels of water that link the beach to the ocean. Pouring Blue here helps chip the ice count without committing to the big ocean fill.
Strategic Pause: Before making a move that shatters an ice block, check your conveyor belt. Ensure you have maximum 3 cups on the belt. If you have 4 or 5, pour or match cups immediately to create space. You never want to break ice with a full belt.
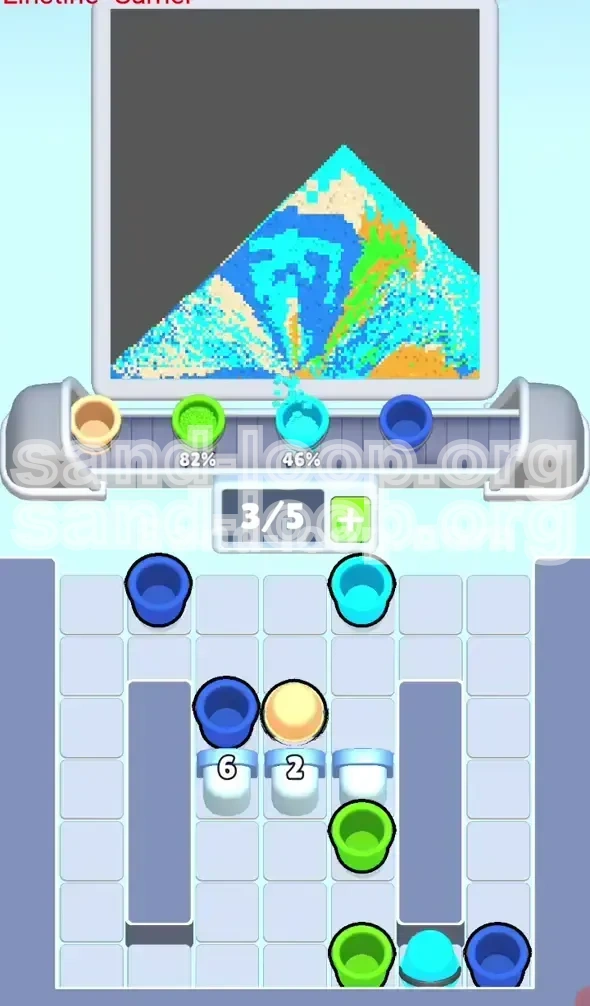
Phase 3: The Mid-Game Flood (Moves 31-50)
Breaking Ice Block #1: Target the leftmost Ice Block. Once it shatters, it will release Mystery Cups.
Mystery Cup Protocol: As soon as the mystery cups drop, check their color. They will likely turn into Cyan or Deep Blue.
The Water Fill: Now that you have access to Blues, begin filling the Deep Ocean section. Start from the horizon line (middle of canvas) and work downwards. This prevents the Blue from bleeding into the sand.
The Sky Cloud Warning: If the mystery cups turned into Cyan, do NOT pour them on the sky yet. The clouds are vulnerable. Instead, use the Cyan to fill the "light reflection" areas on the water surface.
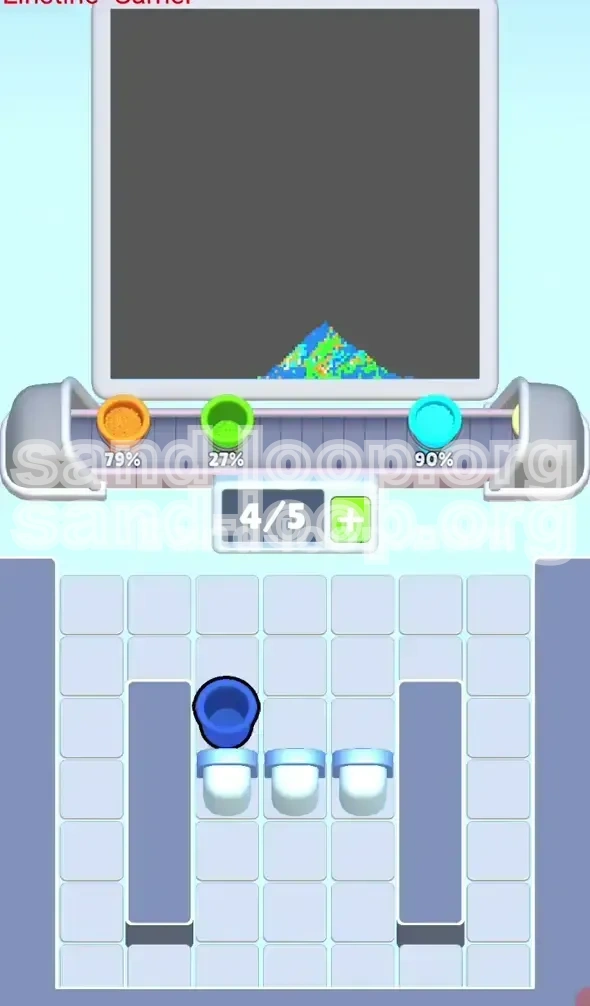
Phase 4: The Sky and The Endgame (Moves 50+)
Breaking the Remaining Ice: Once the water is ~80% filled, break the remaining ice blocks. This should flood your tray with Cyan.
The Cloud Operation: Before you unleash the torrent of Cyan on the sky, locate the Beige Clouds. If you have any Beige cups left (or stored in the tray), pour them on the clouds now. Once the sky is Cyan, you cannot fix the clouds easily.
The Cyan Pour: With the clouds secured, aggressively pour Cyan. Fill the top of the canvas. At this stage, efficiency matters less than speed—get the canvas percentage to 100%.
Final Cleanup: You will likely be left with 1-2 pixels of Green or Orange scattered on the beach. Use your remaining cups to pick these off. If you run out of the specific color, you may need to use a Hammer or Brush tool if available, or simply undo a move to free up a cup.
Color Order and Processing Guide
The specific order in which you process colors is the mathematical difference between a win and a loss in Level 131. Do not deviate from this priority list unless the board state forces a specific adjustment.
Priority Tier 1: Beige (The Anchor)
Beige is your currency. It is needed for the largest area (the beach) and the most delicate area (the clouds). You must process Beige first to establish the "floor" of the level. If you save Beige for the end, you will inevitably run out of space to store the other colors, or you will have missed the cloud window and be forced to pour Cyan over cloud pixels.
Priority Tier 2: Green (The Spike)
Green has a low total volume but a high "difficulty" rating because the pixels are isolated. Process Green immediately after the surrounding Beige is laid down. If you wait until the late game to do Green, the surrounding pixels will likely be filled with Blue or Cyan, making it impossible to pour Green without hitting the wrong color. Process Green early to "secure" those pixels.
Priority Tier 3: Deep Blue (The Dam Breaker)
Deep Blue is the key to the mid-game. You generally have enough Blue to do the water, but not enough to do it early. Process Blue only after you have cleared the columns adjacent to the Ice Blocks. Using Blue to help clear the path to the Ice Blocks is a valid strategic use of this color.
Priority Tier 4: Cyan (The Flood)
Cyan is the finisher. It is required for the largest area (the sky) but is useless until the bottom is done. Process Cyan last. If you process Cyan too early, it will sit in your tray taking up valuable slots that you need for Green and Beige. Think of Cyan as the "final boss health bar"—you only chip away at it when the rest of the board is secure.
Priority Tier 5: Orange (The Filler)
Process Orange only when you have no other moves available, or when you need to clear a slot on the conveyor belt immediately. It is the lowest priority color. If you have a "Trash" or "Recycle" bin mechanic, Orange is the first candidate to go.
Common Mistakes to Avoid
Players lose Level 131 not because they can't match colors, but because of mismanagement of the "Ice Block" mechanic. Here are the specific scenarios that lead to failure.
The "Premature Sky" Error
The Mistake: Seeing Cyan cups early and deciding to fill the top of the canvas while waiting for other colors.
The Consequence: By filling the sky with Cyan first, you lose the ability to easily place the Beige Clouds. You are then forced to overwrite Cyan pixels with Beige, which is a massive waste of moves and percentage points. Furthermore, filling the sky early leaves no room for error in the complex bottom sections.
The "Full Belt" Disaster
The Mistake: Breaking an Ice Block when your conveyor belt has 4 or 5 cups already on it.
The Consequence: The game releases 3 Mystery Cups. They have nowhere to go. This causes a "jam" where new colors stop spawning, or the Mystery Cups merge into a color you don't need, clogging your slots permanently. Always ensure you have 2 empty slots before breaking ice.
The "Green Spillover"
The Mistake: Pouring Green vegetation before the sand is fully established.
The Consequence: Green is a liquid in this game logic. If you pour it on an unfinished edge, it will run into the water or sky zones, creating tiny green dots that are impossible to clean up later without wasting a whole cup of the correct color.
The "Mystery Cup" Panic
The Mistake: Assuming Mystery Cups will turn into the color you *want*.
The Consequence: You break the ice, hoping for Cyan, and the cups turn into Orange (because you had a lot of Orange on the belt). Now your belt is full of junk. Strategy: Balance your belt colors *before* the break to influence the probability of the Mystery Cup result.
Ignoring the "Ice Count"
The Mistake: Playing normally and ignoring the numbers on the ice blocks.
The Consequence: You reach the end of the level with 90% completion, but the ice blocks are still at "1/6". You have no moves left to clear the adjacent columns, and you lose. You must actively aim for the ice counters, treating them as a secondary objective.
Speed Run Tips and Shortcuts
For players looking to achieve a high score or complete the level in under 60 seconds, efficiency is paramount. Here are advanced techniques to bypass the standard grind.
The "Combo Starter" Method
Instead of pouring cup-by-cup, look for "chain reactions." If you pour a Beige cup that completes a sand dune, check if that completion triggers a refill of a specific color on the tray. Sometimes, clearing a section immediately spawns the *next* color you need in the top chute. Learn the spawn order and you can predict what comes next.
The "Ice Snipe" Technique
You do not always need to clear the entire column to break the ice. Look for the specific cups that contribute to the "Ice Break" count (often highlighted or specific to the mechanic). If you can identify these specific "Snipe" targets, you can break the ice blocks in 3 moves instead of 6, dramatically speeding up the mid-game.
Pre-Positioning for Mystery Cups
Before breaking the final Ice Block, try to empty your tray of all colors *except* Cyan (or Blue). This forces the Mystery Cups to transform into the dominant color or the color needed for the sky. It saves you the time of having to clear out unwanted Orange cups that appear from the break.
The "Cloud Batch" Move
Do not pour the clouds one by one. Wait until you have 3 Beige cups on the tray simultaneously (this requires careful belt management). Then, pour them in rapid succession on all cloud pixels. This prevents the game logic from "switching" context between sand and sky, keeping your input flow smooth.
Utilizing "Unused" Space
There are often pixels on the far edges of the canvas (corners) that are technically "sand" but visually irrelevant. If you have a surplus of Beige and nowhere to put it, dump it in the corner to clear the slot. This keeps the speed up better than hunting for the perfect 1-pixel gap in the main beach area.