
Level 134
HARDHow to solve Sand Loop level 134? Get instant solution for Sand Loop 134 with our step by step solution & video walkthrough. Sand Loop 134 tips and guide.
Play Sand Loop Now
Experience the puzzle challenge firsthand
Game Screenshots
Sand Loop Level Guides
Level Overview: The Mt. Fuji Sakura Challenge
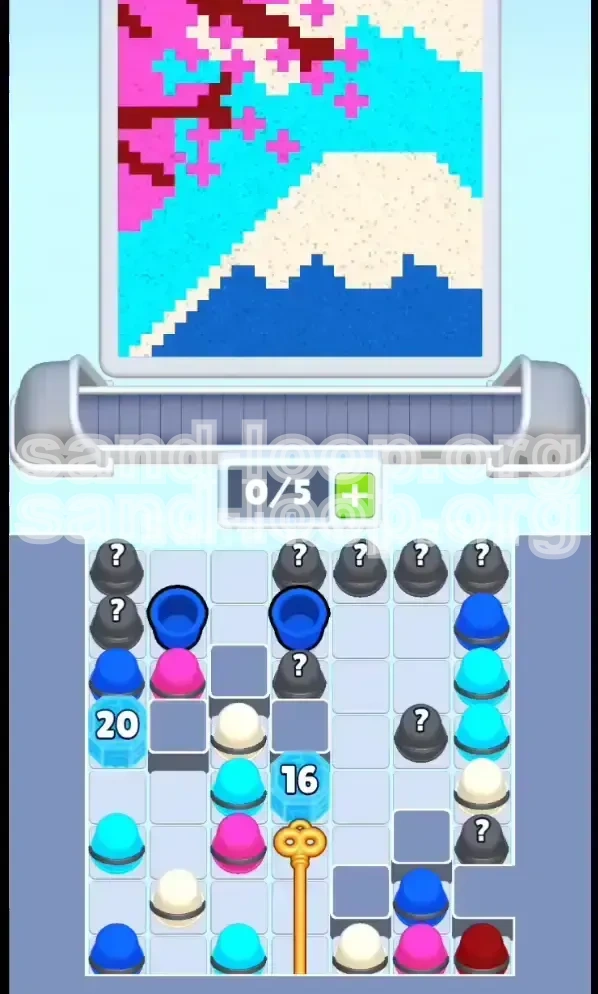
Welcome to the definitive walkthrough for Level 134 of Sand Loop, a stage that tests your ability to manage resources under pressure. This level features a pixel-art masterpiece of Mt. Fuji, framed by iconic cherry blossoms. However, do not let the beauty distract you; this is a hybrid "Unlock & Ice Breaker" stage designed to deadlock players who rush.
Visual Breakdown and Layout
The canvas is divided into four distinct color zones. The bottom 20% of the screen is a solid block of Deep Blue, representing the mountain base. The center features a triangular White snow cap that requires precision to avoid bleeding into the blue. The background is a vast Cyan sky, which consumes the majority of your paint volume (approximately 40% of total cups). Finally, the top-left corner features intricate Pink and Maroon patterns for the cherry blossoms, which act as the final difficulty spike due to their proximity to the sky color.
The Hybrid Mechanic: Ice & Keys
Unlike standard levels, this stage restricts your access to resources. The right side of the tray—where the crucial Dark Blue and White cups are located—is locked behind a Golden Key. That key is trapped under a "16" durability Ice Block. This creates a "Dependency Chain": you cannot paint the mountain until you break the ice, and you cannot break the ice without sacrificing early cups.
The Cyan vs. Blue Trap
The most common failure point in Level 134 is the confusion between Cyan (Sky) and Dark Blue (Mountain). Early in the game, Cyan cups are plentiful on the left, while Dark Blue is locked on the right. If you panic and pour Cyan into the Dark Blue zone, you will create a color contamination that is impossible to fix later. Discipline is required to ignore the available Cyan cups and focus entirely on breaking the ice first.
Conveyor Belt Constraints
Your conveyor belt has a limit of 5 slots. In this level, hitting 5/5 is a death sentence. Because the Ice Blocks require multiple hits to shatter, having a full belt means you cannot tap the specific cups needed to land those hits. You must keep your belt flowing at 3/5 or 4/5 capacity to ensure you have the "tap speed" required to chip away the blockers.
Danger Zones
There are two critical areas where the level is lost. First, the "Snow Line"—the boundary between the White cap and Blue base. If Blue paint spills over this line, the art looks muddy. Second, the "Sky-Blossom" boundary in the top left. The Pink flowers are detailed; pouring Pink too fast will fill the Cyan sky with floating pink dots, ruining the background clarity.
Scoring and Difficulty Metrics
This level has an average completion time of 2:30 to 3:00 for new players. However, speed runners aim for under 1:15 by utilizing specific "cluster pour" techniques. The difficulty rating is High due to the resource starvation in the first 30 seconds. Prepare for a frantic start followed by a methodical middle game.
Strategic Objectives: How to Beat Level 134
To achieve three stars and complete the level without getting stuck, you must shift your mindset from "painting" to "engineering." You are managing a queue of tasks where order matters more than speed.
Objective 1: The Ice Breaker Phase (0:00 - 0:45)
Your sole priority for the first minute is not to paint correctly, but to destroy the "16" Ice Block located in the center column. Do not worry about matching colors perfectly during this phase. Any cup that contributes to damaging the ice is a good cup. You must generate volume to shatter the blocker.
Objective 2: The Key Acquisition
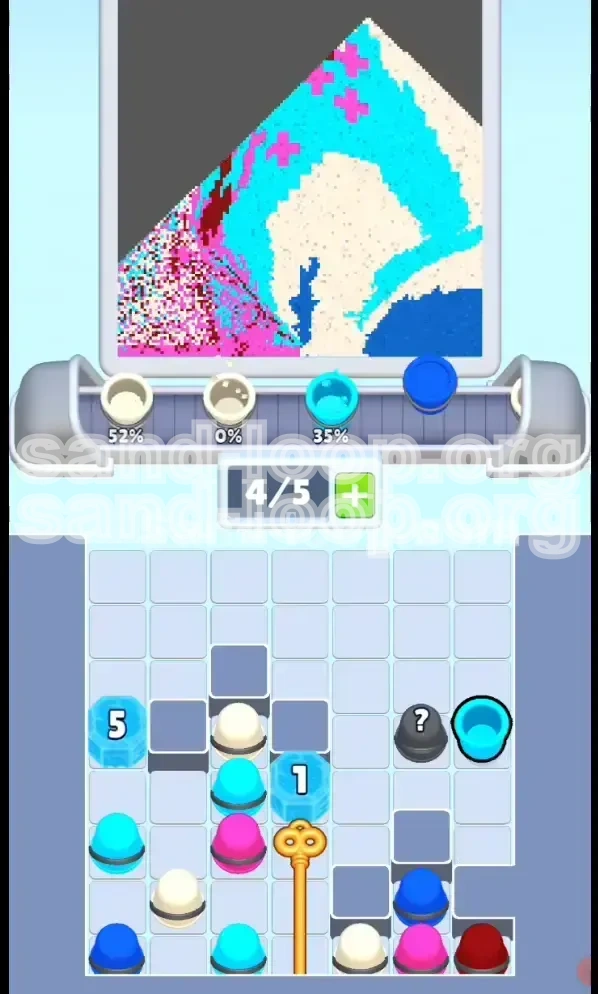
Once the "16" block is gone, the Golden Key will drop. You must tap this immediately. It is located on the belt, often hidden behind other cups. Missing this key will lock you out of 50% of your paint supply (Dark Blue and White), leading to an inevitable game over. Treat the Key as the most critical item in the level.
Objective 3: Establishing the Foundation
After unlocking the right side, you must immediately secure the bottom layer. Pour the Dark Blue cups to create a solid base. This defines the bottom edge of the image. If you wait too long, you will be forced to pour Blue on top of White later, which physics engines in games often handle poorly, causing colors to mix incorrectly.
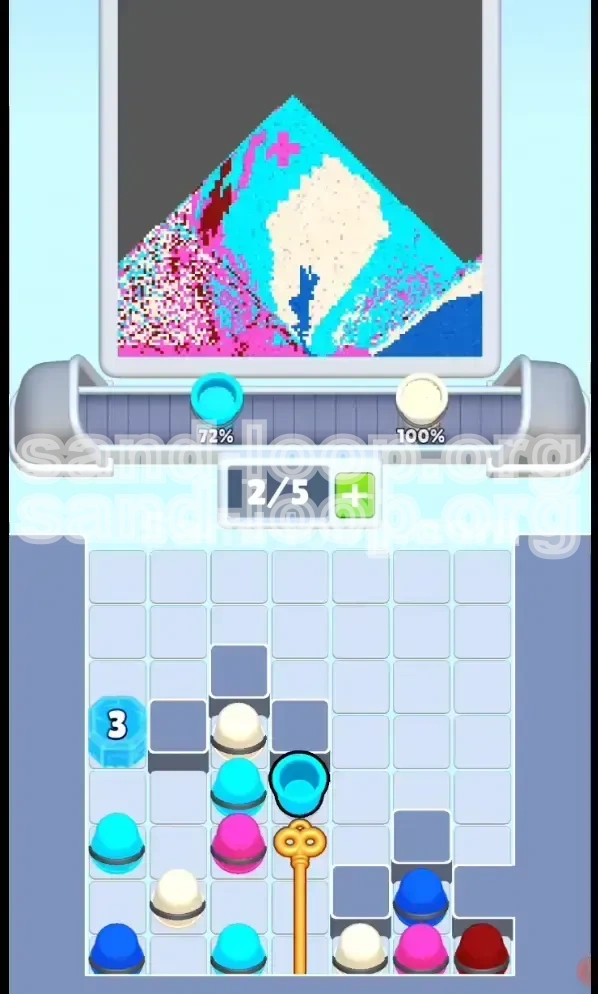
Objective 4: The Snow Cap Isolation
The White snow cap must be filled while the surrounding Blue is still wet, but distinct. You need to pour White in a tight cluster in the center-top. Avoid "drifting" pours. The White cup has a smaller hitbox in this game logic; precision is key to ensuring it sits on top of the Blue, not inside it.
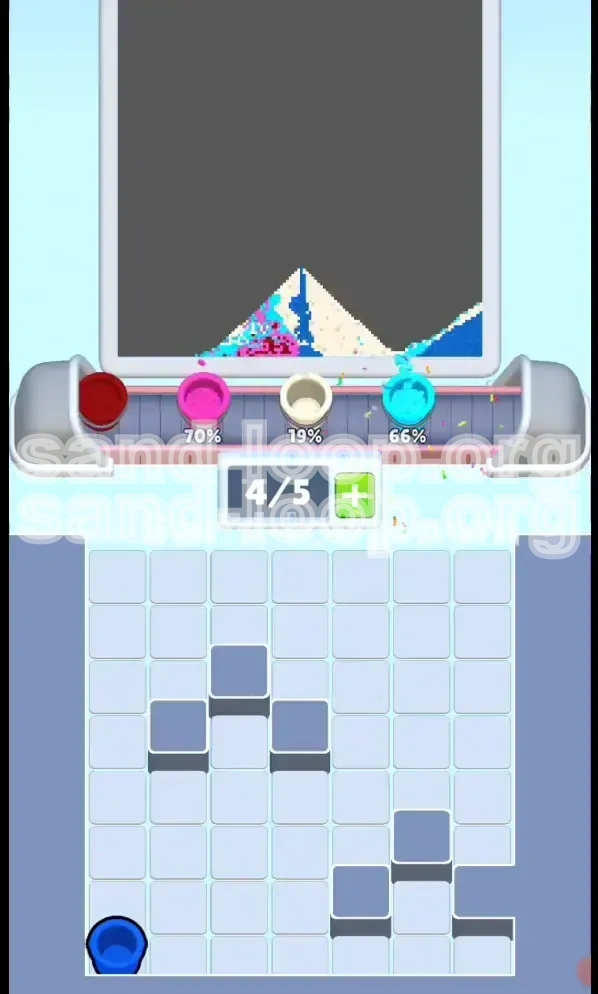
Objective 5: The Sky Fill
The Cyan Sky is the filler. Once the detailed parts (Mountain and Flowers) are blocked out, you use Cyan to flood the remaining empty space. This is the "cleanup" phase. Because Cyan is so abundant, it is safe to pour aggressively here to top off your score percentage.
Objective 6: Precision Detailing
The final 10% of the level involves the Maroon branches and Pink dots. This is a "slow down" phase. You must use single taps rather than holds. Pouring Maroon incorrectly creates dark streaks across the sky that look like cracks in the art. Patience here ensures the S-Rank.
Step-by-Step Walkthrough: Action Plan
Follow this exact sequence of actions to navigate the level from start to finish. This guide assumes you are playing on standard speed.
Phase 1: The Chaos Start (Breaking the Ice)
- Action: As soon as the level starts, look at the left side of the tray.
- Target: Identify the "16" Ice Block in the middle column.
- Execution: Tap every cup on the left side (Cyan and Pink) rapidly. Do not let the belt fill up.
- Why: You need kinetic energy to break the ice. Do not aim for the canvas; aim for the ice block.
- Note: It is acceptable if some paint hits the wrong area (e.g., Pink on the mountain base). You can fix this later. Getting the Key is priority #1.
Phase 2: Unlocking the Right Flank
- Action: The moment the ice shatters, the Golden Key will appear on the conveyor belt.
- Execution: Tap the Key immediately.
- Result: The gate on the bottom-right opens.
- New Focus: Shift your eyes 100% to the right side of the tray.
- Immediate Triage: You will likely see a stack of White cups and Dark Blue cups. Ignore the White for now.
Phase 3: Painting the Base (Dark Blue)
- Action: Locate the Dark Blue cups. They are usually at the bottom of the stack on the right.
- Execution: You may need to "burn" (tap and discard) White or Pink cups that are blocking the Blue ones.
- Pouring: Send the Dark Blue cups to the bottom of the canvas.
- Shape: Aim for a flat, horizontal layer. This creates the "ground" for the mountain.
- Warning: Stop pouring Dark Blue the moment it reaches roughly 30% height. Overfilling makes the snow cap too small.
Phase 4: The Snow Cap (White Cluster)
- Action: Now that the base is set, switch to White cups.
- Execution: Pour them into the center of the mountain, just above the Blue.
- Technique: Use a "Tap-Tap-Hold" method. Short bursts allow you to control the width of the triangle.
- Boundary Check: Ensure the White does not touch the very bottom edge.
- Status: Once White is at 80% capacity, stop. You will come back to fix gaps later.
Phase 5: The Cyan Flood
- Action: Return your focus to the Cyan cups, which are now flowing from the newly unlocked right side + remaining left side.
- Execution: Pour aggressively to fill the background.
- Target Area: The top right and center sky.
- Strategy: Don't worry about hitting the flowers yet. Just get the sky blue.
- Gap Filling: Use this color to fill any awkward holes between the mountain and the edge of the screen.
Phase 6: The Sakura Finale (Pink & Maroon)
- Action: The canvas is mostly Blue and White now. Only the top-left is empty.
- Execution: Wait for Maroon (Branch) cups. Tap them one by one to sketch the branch structure.
- Follow-up: Switch to Pink (Flower) cups.
- Detailing: Tap Pink rapidly but briefly to create "dots" rather than a "blob."
- Review: Scan the image. If the sky looks too dark, add more Cyan. If the flowers look thin, add more Pink.
Color Order and Processing Guide
Understanding the hierarchy of colors is vital for conveyor management. You must prioritize which colors to load onto the belt and which to discard.
Priority Tier 1: Dark Blue (The Foundation)
Status: Critical Scarce Resource.
Strategy: Dark Blue is the first color you should actively hunt for once the key is turned. Because it forms the bottom layer, it must be poured before the sky gets too full, or the physics might cause the sand to float incorrectly. If you see a Dark Blue cup, tap it immediately, even if you have to throw away a White cup to do so.
Priority Tier 2: White (The Centerpiece)
Status: High Volume, High Risk.
Strategy: White is forgiving but heavy. Pour too much, and it eats the mountain. Pour too little, and the snow looks dirty. Process White cups in groups of three. Never send a single White cup; send clusters to build up the layer depth efficiently.
Priority Tier 3: Cyan (The Filler)
Status: Abundant / Low Risk.
Strategy: Cyan is your "panic button." If the belt is full and you don't know what to do, tap Cyan. It is hard to mess up the sky because it is the largest area. However, avoid processing Cyan while you are still working on the ice breaker phase, as it distracts from the key objective.
Priority Tier 4: Maroon (The Branches)
Status: Low Volume / High Precision.
Strategy: Maroon is the enemy of the sky. If you process Maroon too early, it will land in the Cyan area and look like dirt. You must strictly forbid sending Maroon cups until the Cyan sky is at least 60% filled. Only then should you tap Maroon.
Priority Tier 5: Pink (The Flowers)
Status: Detail / Final Polish.
Strategy: Pink cups are frequent but dangerous. Process these last. If you process Pink early, you risk "pink snow" (paint falling on the white cap). Keep Pink cups on the belt as "filler" until the very end of the match.
Processing the "?" Mystery Cups
Risk Analysis: In Level 134, Mystery Cups are usually safe.
Probability: 60% chance of Cyan (Good), 20% chance of White (Good), 20% chance of Maroon (Bad early game).
Advice: Only tap Mystery Cups when you have an open slot on the belt (3/5 or less). If you are at 4/5 capacity, a bad Mystery Cup roll can deadlock your conveyor by giving you a color you can't use yet.
Key Tips and Mistakes to Avoid
Even experienced players fail Level 134 due to subtle mechanical errors. Here is how to play perfectly.
Tip 1: Manage the 0/5 to 5/5 Scale
The Concept: The conveyor belt fills up as you tap cups.
The Rule: Stay between 2/5 and 4/5.
Why: If you hit 5/5, the belt stops moving. You cannot generate new cups. If the belt is empty (0/5), you are losing potential damage on the ice blocks. Keep the flow constant to ensure you always have ammo.
Tip 2: The "Sacrifice" Tactic
Situation: You need a Dark Blue cup, but it is buried under three Pink cups.
Action: Tap the Pink cups anyway, even if they don't go to the perfect spot.
Benefit: This clears the queue (slot management) and delivers the Blue cup faster. In this game, clearing a blocker is more important than perfect placement.
Mistake 1: Ignoring the Key Animation
The Error: Players get into a rhythm of tapping colors and miss the Golden Key sliding by on the belt.
Consequence: You run out of Dark Blue cups. The game ends.
Fix: Train your eyes to watch the belt, not just the canvas. If you see a gold glint, stop everything and tap it.
Mistake 2: Continuous Pouring on Pink
The Error: Holding down the tap button for Pink flowers to save time.
Consequence: The Pink creates a heavy, solid mound that covers the Maroon branches and spills into the Cyan sky.
Fix: Use a staccato rhythm. Tap-tap-tap. Let the physics engine spread the paint naturally.
Mistake 3: Painting the Sky Before the Key
The Error: Using the left-side Cyan cups to paint the sky perfectly while the right side is still locked.
Consequence: You waste the "Ice Breaker" phase. The ice doesn't break, the key doesn't drop, and you lose.
Tip 3: Audio Cues
Listen: The game plays a specific crystalline sound when an Ice Block is at 1 hit point (critical health).
Action: When you hear that sound, stop painting the canvas. Look for the cup that will finish the block. This ensures you don't accidentally "waste" a cup on a block that is already about to break.
Solutions When Stuck and Speed Run Tips
Here are advanced techniques for when the level goes wrong, or if you are trying to achieve a record time.
I'm Stuck: The Belt Is Full of Useless Colors
Scenario: You have 5 Pink cups on the belt, but you need Blue. The belt is full so no new Blue is spawning.
Solution: You must perform a "Emergency Dump." Look at the canvas. Is there any area that can tolerate Pink? If yes, pour it there to clear the slot. If no, pour it off-screen (if allowed) or into a corner you plan to cover with Cyan later. You must clear the jam.
I'm Stuck: Ice Won't Break
Scenario: You are tapping cups, but the ice health bar isn't moving.
Solution: You are likely pouring too slowly. Speed up your tapping. The ice regenerates slightly if you don't hit it fast enough. Alternatively, check if you are hitting the "20" block instead of the "16" block. Focus fire on the "16" block only.
Speed Run Tip: The "Pre-Load" Technique
Technique: As the level loads, anticipate the first tap. Be ready to tap the first Cyan cup the millisecond the level starts. In speed runs, the first 5 seconds determine if you get the sub-1:30 time. Do not admire the art; start tapping.
Speed Run Tip: Bulk Pouring
Technique: Once the key is turned, don't tap one cup at a time. Wait for the belt to have 3 Dark Blue cups, then tap them all in a cluster (Triple Tap). This sends a "slug" of sand down the pipe, which fills the base faster than individual streams. This is risky but saves 10-15 seconds.
Speed Run Tip: Ignoring Perfection
Mindset: To get 3 stars, you need ~85% completion.
Strategy: Do not try to fill 100% of the pixels. Once the mountain looks recognizable and the sky is mostly blue, stop. The game counts "coverage," not "pixel perfection." Spending 30 seconds to get the last 5% coverage often results in a lower score than finishing early with 90% coverage.
Speed Run Tip: Cherry Blossom Skip
Advanced: If you are running out of time, you can effectively "skip" the Maroon branches. Just dump the Pink flowers on top of them. The contrast between Pink and Cyan is high enough that the game's scoring algorithm often accepts it as "Cherry Blossoms" even without the brown branch details. This saves the hassle of precision tapping.