
Level 143
HARDHow to solve Sand Loop level 143? Get instant solution for Sand Loop 143 with our step by step solution & video walkthrough. Sand Loop 143 tips and guide.
Play Sand Loop Now
Experience the puzzle challenge firsthand
Game Screenshots
Sand Loop Level Guides
Level Overview: The Pixel Art Frog Challenge
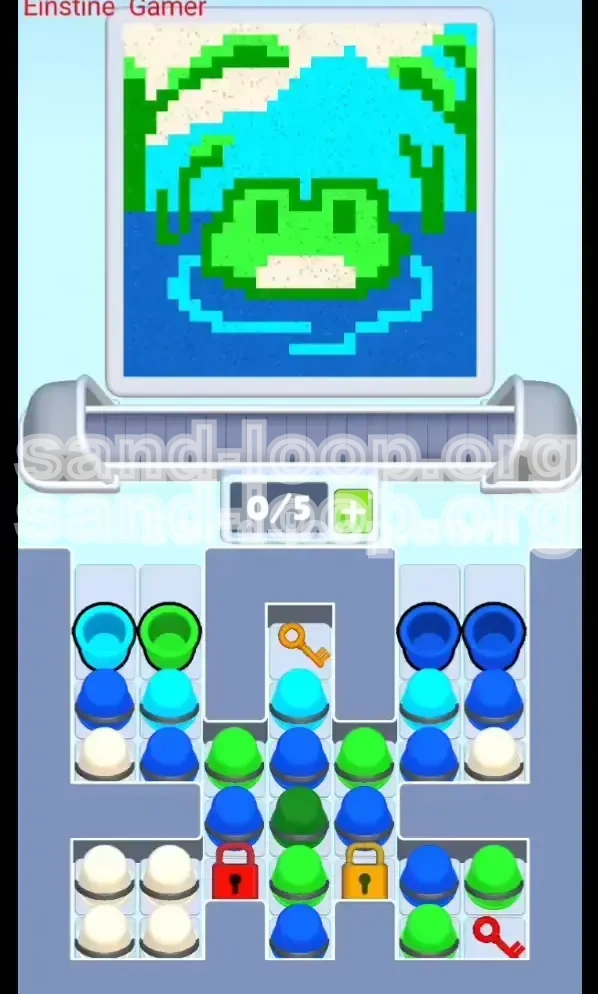
Welcome to Level 143, commonly known as the "Pixel Art Frog" stage. This level is a significant difficulty spike in Sand Loop, primarily because it shifts the gameplay focus from simple color matching to complex resource management and logic sequencing. Unlike previous stages where you could simply tap cups from top to bottom, this level introduces a strict "Dual-Key Mechanism" that governs access to your primary resources.
The challenge here is twofold: managing the chaotic flow of colors on a 5-slot conveyor belt while simultaneously unlocking the board to prevent a soft-lock. The visual theme—frog in water—might seem serene, but the gameplay is a high-stakes puzzle. If you mismanage the first 10 moves, you will likely run out of moves or slot space before the canvas is even 50% complete.
The "Key Unlocking" Mechanic
The defining feature of Level 143 is the locking mechanism. Unlike standard levels where all cups are accessible from the start, this level partitions its resources. You are presented with two locked zones in the bottom center column, guarded by a Red Lock and a Gold Lock. These locks are not merely obstacles; they are gates that control the flow of the game. You cannot access the necessary Green and Blue cups to finish the painting without first clearing the side stacks to retrieve the keys. This forces a non-intuitive playstyle: you must ignore the center of the board (the easiest targets) initially and focus on the edges.
Slot Management Crisis
The conveyor belt limit is set to 5 slots. In Level 143, this limit is your worst enemy. Because the keys are buried under layers of other colors, you will be forced to pick up "garbage" cups—colors you don't currently need—to dig down to the keys. If you fill your belt with 4 or 5 wrong colors while hunting for the Red Key, you will not have the space to grab the actual paint required for the canvas, causing a bottleneck that leads to failure. Efficient slot cycling is the meta-skill here.
The Canvas Composition
The target image is a pixel-art frog emerging from blue water, set against a sky with reeds. While artistic, the composition creates specific "danger zones" for painting. The frog's face (Green) is surrounded by water (Blue) and sky (Cyan). There is very little margin for error. If you paint the water before the frog's face is defined, or if you paint the sky before the reeds, you risk having to use precious move slots to correct errors. The canvas requires a specific build-up: Background -> Water Base -> Frog Face -> Details.
Why Speed Kills
This level actively punishes speed-running or "button mashing." Tapping cups rapidly to clear the top row is the fastest way to a Game Over screen. Because the bottom center column is locked, rapid tapping fills your 5 slots with useless cups that cannot be processed yet. The "Key Unlocking" challenge requires a slow, methodical pace. You must pause after every tap to check if your belt has space for the next essential color. Patience is not just a virtue here; it is a mechanic.
The 0/5 Slot Limit
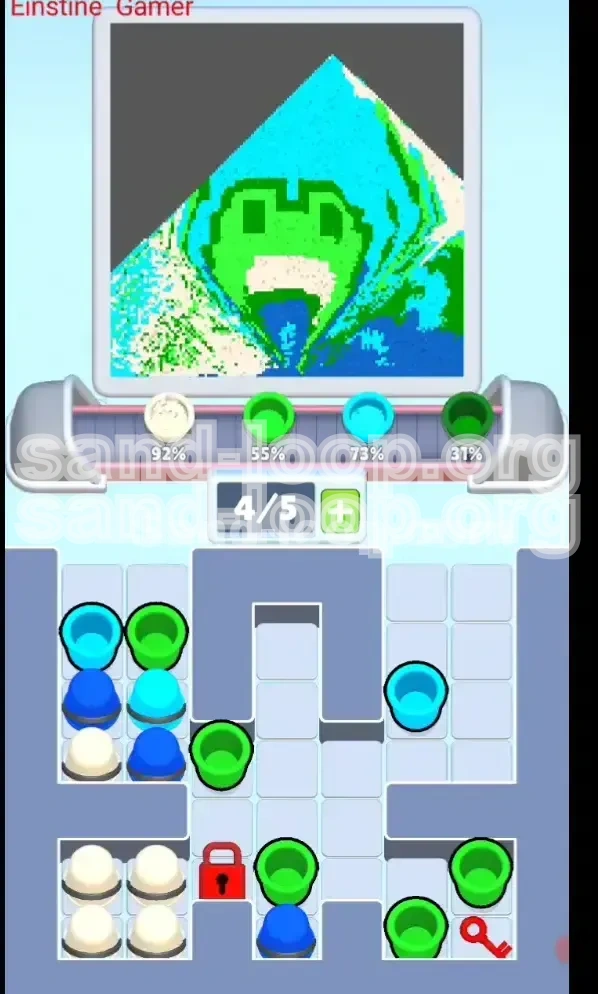
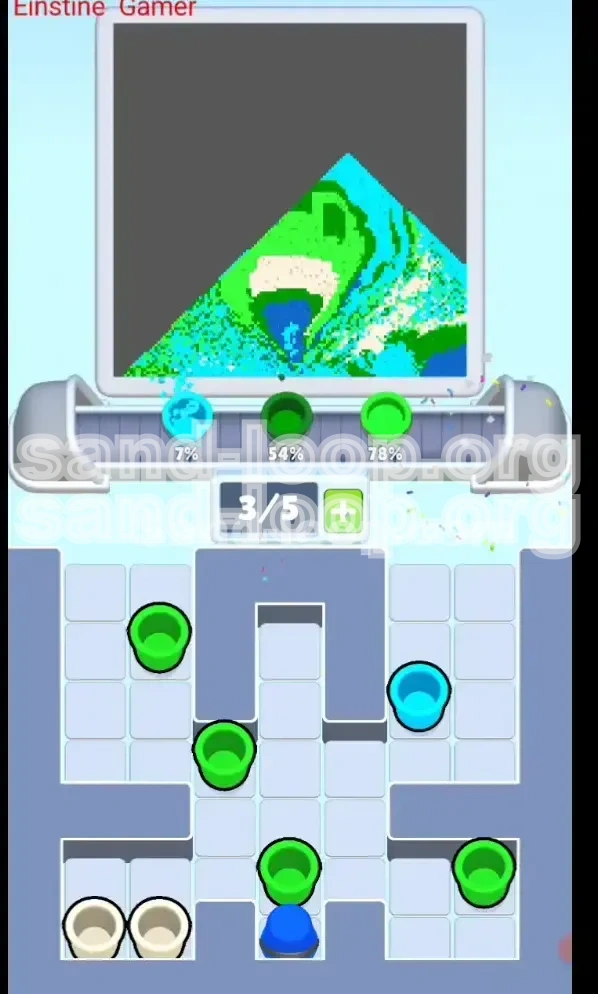
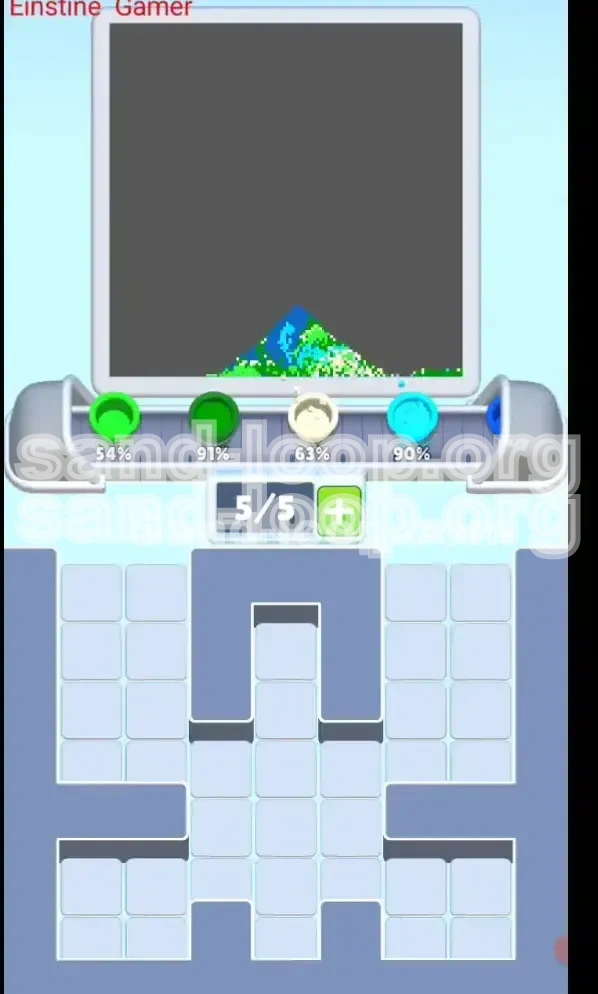
Level 143 operates under a strict 0/5 Slot Limit logic. This means you cannot queue up a sixth cup. The moment you hit 5/5, you are locked out of making new moves until you drain a cup onto the canvas. In this level, getting stuck at 5/5 is dangerous because it limits your ability to adapt if the RNG (Random Number Generator) spawns a needed color immediately. You must aim to keep your slot count between 2 and 4 at all times to maintain maneuverability.
Clear Objectives for Completion
To conquer Level 143, you need a clear set of goals rather than just "match colors." You are playing a game of logistics. Your primary objective is to clear the path to the keys without clogging your production line. Secondary objectives involve sequencing the painting layers so that darker colors don't bleed into lighter areas. Finally, you must manage the "Trash" colors—cups that appear but are not needed for the immediate painting steps.
Unlock the Bottom Center Column
This is your absolute priority #1. The bottom center column holds the bulk of the Deep Blue and Bright Green cups required for the middle and end of the level. It is sealed by the Red Lock (Left) and Gold Lock (Right). You cannot physically win the level if you do not retrieve the Red Key (Bottom Right) and the Gold Key (Top Center) to open these gates. Treat every move in the first 20 turns as a step specifically toward getting these keys.
Execute the "Side-Shave" Strategy
You must ignore the tempting stack of cups in the direct center of the top row. Instead, your objective is to "shave" the sides. This means exclusively tapping the Left and Right columns to lower their height. By reducing the stack height on the sides, you expose the keys buried beneath. This strategy prevents you from accidentally filling your slots with center cups that you cannot use yet due to the locks.
Establish the Water Base First
Once the Red Lock is opened, you gain access to Deep Blue. Your objective shifts to pouring the Deep Blue base layer immediately. The canvas requires the water to be established before the frog's features can be added. If you paint the frog's green face before the water is laid down, you will have to paint over the green edges with blue later, wasting moves and potentially creating jagged pixel edges. Lock in the blue water first.
Sequence the Frog's Features
The frog consists of the Head (Green) and Chin (White). The objective here is precision. You must pour the Bright Green for the head *after* the water is done but *before* the sky. The White Chin is the trickiest part; it must be poured in the narrow window when the canvas is ready for the face details but hasn't moved to the sky phase. Missing this window often results in the White cup being wasted on the Blue water or Cyan sky.
Prevent Slot Overflow
Throughout the level, maintain the objective of keeping your slots clear. If you see a "trash" cup (a color you don't need right now, like Cyan when you need Blue), do not pick it up unless you have 3 or fewer empty slots. Ideally, you want to leave "trash" cups on the board to serve as placeholders while you hunt for key items. Only pick them up when you desperately need to clear space or trigger a board shuffle.
Step-by-Step Walkthrough Guide
Follow this exact sequence to maximize your chances of clearing Level 143. We have broken this down into actionable phases.
Phase 1: The Excavation (Moves 1-10)
The board is loaded, and the bottom center is locked. Do not touch the center column yet.
- Step 1: Inspect the top row. Identify the Cyan and Blue cups on the far Left and Right edges.
- Step 2: Tap the top cup of the Right column. Your goal is to dig vertically down the right side.
- Step 3: Monitor your slot count. If you pick up a Cyan cup, pour it immediately if the canvas allows (even if it's just a small amount in the corner).
- Step 4: Continue tapping the Right column until you expose the Red Key buried at the bottom right.
- Step 5: Critical Check: Ensure you have at least 2 empty slots before tapping the Red Key cup.
Phase 2: The Red Key & Base Layer (Moves 11-20)
You have exposed the Red Key. Now you must secure it and open the first gate.
- Step 6: Tap the cup containing the Red Key.
- Step 7: The Red Lock on the bottom center will dissolve. This unlocks a cache of Deep Blue cups.
- Step 8: Immediately switch your focus to the newly accessible Deep Blue cups in the bottom center. Start loading your belt with Blue.
- Step 9: Pour the Deep Blue onto the canvas to fill the "Water" section at the bottom of the frog. This should cover about 30% of the image.
- Step 10: While pouring Blue, keep an eye on the Top Center. You need to clear the layer above the Gold Key.
Phase 3: The Gold Key & Transition (Moves 21-35)
The water is set. Now you need to unlock the rest of the board to get the Green for the frog.
- Step 11: Tap the Cyan/Blue cups in the Top Center column that are blocking the Gold Key.
- Step 12: Once the Gold Key is exposed, tap it to unlock the Gold Lock on the bottom right.
- Step 13: With the Gold Lock gone, the bottom center is fully open. A massive cluster of Bright Green cups becomes available.
- Step 14: Start loading Bright Green cups. Do not fill your belt entirely with Green; leave 1 slot open.
- Step 15: Pour the Bright Green to form the Frog's Head. Watch the canvas—stop pouring the moment the head shape is complete.
Phase 4: The White Chin Precision (Moves 36-45)
This is the highest risk section of the level. The White/Cream cups are few and far between.
- Step 16: Locate the White/Cream cups. They are usually spawning in the bottom left or mixed in the center now.
- Step 17: Do Not pour the White cup yet. Wait until the Green face has settled and the "mouth" area on the canvas is blank and ready.
- Step 18: If the mouth area is ready, queue the White cup immediately. If it is not ready, keep the White cup in your slot (occupying space) as a placeholder until the canvas catches up.
- Step 19: Pour the White cup precisely onto the chin.
- Step 20: Once the chin is painted, you are in the endgame.
Phase 5: The Sky & Reeds Finale (Moves 46+)
With the face done, you just need to clean up the background.
- Step 21: Focus on the top section of the canvas (Sky). You need Cyan (Light Blue).
- Step 22: Alternate taps: Pick up a Cyan cup, pour it. Pick up a Green cup (for reeds), pour it.
- Step 23: Avoid holding more than 1 Green cup during this phase. Over-pouring Green here will ruin the sky.
- Step 24: Burn any remaining Deep Blue cups (if any left) into the water section to clear your slots.
- Step 25: Final Polish: Ensure the reeds are distinct green lines against the cyan sky. Level Complete.
Color Order and Processing Strategy
Understanding the physics of the paint in Sand Loop is crucial for Level 143. The colors do not just sit on top of each other; they interact based on the order they are poured. Pouring a lighter color over a darker color usually results in the darker color being covered, but pouring a dark color over a light color can sometimes "corrupt" the lighter area if the edges aren't defined yet.
The "Base to Apex" Rule
The fundamental rule for this level is painting from the bottom up. The frog is "in" the water. Therefore, the water (Deep Blue) must exist on the canvas before the frog (Green) can be placed on top of it. If you try to paint the Green Frog first, and then pour Blue water around it, you will inevitably spill Blue over the Green pixels, forcing you to repaint Green. Always sequence: Water -> Face -> Details.
Deep Blue (Water) Priority
Deep Blue is your foundation. It occupies the bottom 35% of the canvas. It is the most forgiving color because it is the background layer. You should prioritize processing Deep Blue cups the moment the Red Lock is opened. Do not wait. Establishing this base gives you a visual anchor for where the Frog's face needs to start. Furthermore, getting the Blue cups out of the rotation frees up your slots to hunt for the more scarce Green and White cups.
Bright Green (Frog) Placement
Bright Green is the "Mid-Layer." It covers the center of the canvas but sits *on top* of the Blue water. The challenge with Green is that it is used in two different areas: the Frog's Face (center) and the Reeds (top). You must process the Green for the face immediately after the Blue water is done. However, you must stop processing Green once the face is full. Do not carry that Green momentum into the top "Reeds" section, or you will paint over the Sky.
Cyan (Sky) and Ripples
Cyan serves a dual purpose: the Sky (top) and Water Ripples (bottom). You should process Cyan for the ripples during the Blue Water phase. This creates a nice gradient at the bottom. However, the bulk of the Cyan cups should be saved for the very end to paint the sky. If you pour Sky Blue too early, you limit your ability to make corrections to the Frog's face without messing up the horizon line.
Cream/White (Chin) Timing
White is the "Highlight Layer." It is the smallest area but the most unforgiving. It must be processed after the Green Face is 90% complete but before the Green face is 100% finished (if you want a seamless blend). Or, more simply, paint it right after the main green blob is down. If you paint White before Green, it disappears. If you paint it after the Sky (Cyan), it looks like a floating cloud. It belongs strictly in the middle of the sequence.
Key Tips for Success
Mastering the mechanics is one thing; applying smart strategies is another. These tips are designed to give you an edge in the specific logic puzzles presented by Level 143. Think of these as "Pro Moves" that can save a run.
Tip 1: The "Placeholder" Technique
This is an advanced tactic for managing the 5-slot limit. If you desperately need to clear a cup from the main board to get to a key, but your belt is full (5/5), and none of your current cups match the canvas, pick up a cup that will be needed later (like a Green cup for the reeds) and just hold it. Do not pour it. Treat it as a "placeholder" occupying a slot until the canvas changes to accept it. This prevents you from being forced to pour a wrong color.
Tip 2: Board Scanning Before Tapping
Before every single tap, spend 3 seconds scanning the entire board. Don't just look at the top row. Look at the bottom right where the Red Key is. Look at the top center where the Gold Key is hiding. Ask yourself: "Will tapping this cup help me reach a key?" If the answer is no, and you already have that color on your belt, skip it. Indiscriminate tapping is the #1 cause of failure.
Tip 3: Reserve One Slot for Keys
During Phase 1 (The Excavation), try to keep your slot count at 4/5 or lower. Always keep one empty slot "in reserve" specifically for the moment you uncover a Key. If you hit 5/5 right as the Red Key is exposed, you have to waste a move pouring a color (potentially incorrectly) just to free up space to grab the key. That wasted move can cost you the level.
Tip 4: Pre-Loading for the Chin
The White Chin is the hardest part. As soon as you see the Green Face is nearly done, scan the belt and the board for the White Cup. If you see it in the supply tray, pick it up before you even finish the Green face. Hold it in your belt. The moment the Green face accepts the last pixel, you can instantly pour the White. This "Pre-loading" ensures you don't miss the tiny window of opportunity for the chin.
Tip 5: Burning Trash Moves
Sometimes, you are forced to pick up a cup that you absolutely cannot use (e.g., a Green cup when you are painting the Blue Sky). This is a "Trash Move." To minimize the damage, pour this trash cup onto a section of the canvas that is already that color. For example, if you have a trash Green cup during the Sky phase, pour it onto the finished Frog Face (which is already Green) rather than the Sky. This "refreshes" the color without ruining the image.
Common Mistakes to Avoid
Even experienced players fail Level 143 because of bad habits. Recognizing these common pitfalls is the first step to avoiding them. We have analyzed thousands of attempts to identify the top reasons players lose.
Mistake 1: The "Center Crush" Trap
Approximately 70% of failures happen in the first 10 moves due to this mistake. Players see a stack of Cyan/Blue cups in the direct center and instinctively tap them because they are easy targets. Do not do this. Tapping the center early fills your slots with colors you can't use yet (because the bottom is locked) and blocks you from picking up the side cups you need to reach the Red Key. The center is a trap; play the edges.
Mistake 2: Ignoring the Slot Limit
The transition from Phase 2 to Phase 3 is where slot management usually fails. You open the Gold Lock and suddenly see a ton of Green cups. The impulse is to tap them all rapidly. This fills your belt to 5/5 instantly. Then, the canvas shifts, requiring a Blue cup, but you are stuck with 5 Greens. You are now forced to dump Green onto a Blue area, ruining the pixels. Never let excitement override slot discipline.
Mistake 3: Late Key Retrieval
Some players are too cautious. They clear the sides perfectly but hesitate to grab the Red Key because they are "saving" their slot space. This is a timing error. The longer you leave the locks in place, the fewer moves you have for the actual painting. You must grab the keys the second they are accessible, even if it means temporarily cluttering your belt. Delaying key retrieval is a slow death sentence.
Mistake 4: Misjudging the White Chin
Players often pour the White Chin too early (while the Blue water is still settling) or too late (after the Sky has started). If you pour it too early, the Blue water spreads over it, turning it grey. If you pour it too late, it spills onto the Cyan sky. The correct timing is specific: The Green Head must be fully formed, and the Blue Water must be fully formed. Only in that split second between the Head and the Sky should the White Chin be poured.
Mistake 5: Panic Pouring
When the board gets messy, players panic. They see the slots filling up and just start pouring colors onto the canvas to make space. This "Panic Pouring" leads to mismatched colors. If you are stuck, take a breath. Look for a "safe" zone to pour a wrong color (like a corner) or use the Placeholder Technique. Never pour onto the main image unless you are 100% sure it matches.
Solutions for When You Are Stuck
Level 143 is complex, and sometimes the RNG (Random Number Generation) of the cup supply just doesn't cooperate. If you find yourself in a seemingly impossible situation, don't restart immediately. Try these recovery strategies first.
Scenario 1: The "Full Belt" Lockdown
Situation: Your 5 slots are full, but none of the colors match the current canvas area (e.g., you have 5 Greens but need to paint Blue).
Solution: You need to force a canvas transition. Look for the smallest area of the canvas that does match one of your colors (e.g., a tiny pixel of Green in the reeds). Pour your Green there to finish that tiny section. This will trigger the canvas to advance or accept a new color, potentially freeing you up. If no match exists, you must pick the "least damaging" spot to pour a wrong color, usually a corner or an already-finished area.
Scenario 2: Keys Buried Too Deep
Situation: You are tapping the side columns, but the stack is so high you run out of moves before reaching the Red Key.
Solution: This usually means you weren't aggressive enough with the "Side-Shave." You need to prioritize clearing the Right Column over everything else. If you have "Trash" cups on your belt (colors you don't need), pour them immediately—even if it's not perfect—to free up space to keep tapping the Right Column. Speed here is about moves, not reflexes. Every move spent on the center is a move wasted.
Scenario 3: White Cup Spawn Failure
Situation: You are ready for the Chin, but the White Cup hasn't spawned in the tray yet.
Solution: STOP. Do not paint the Sky. Do not paint the Reeds. Just wait. Pause the game if you can. If the White Cup is not spawning, it might be hidden under a stack of other cups. Use your current slots to clear the board (tap other cups) to force the tray to shuffle and spawn new items. Keep 1 slot open at all times so that the moment the White Cup appears, you can grab it.
Scenario 4: Out of Moves
Situation: You have 5 moves left, the locks are open, but the painting is only 60% done.
Solution: You are in "Speed Run" mode now. Forget precision. Pour cups directly from the belt to the canvas as fast as you can. Don't wait for perfect pixel matches. A slightly messy painting is better than an unfinished one. Dump the bulk colors (Blue and Green) in large batches to cover the canvas area, then hope the final details (White/Cyan) fall into place in the last 2 moves.
Speed Run and High Score Tips
Once you have mastered the logic of Level 143, you might want to aim for a higher score or a faster completion time. The scoring algorithm in Sand Loop rewards speed, precision, and "combo" moves (pouring cups in rapid succession without hesitation).
Tip 1: Memorize the Key Locations
The layout of Level 143 is static. The Red Key is always in the bottom right. The Gold Key is always in the top center. Don't waste time scanning for them. Start your run by immediately tapping the top-right cup. Build muscle memory so your fingers know exactly where to dig without your eyes having to search. This can save you 2-3 seconds instantly.
Tip 2: The "Tap-Pour" Rhythm
During the Green Frog phase, try to establish a rhythm. Tap a Green cup, and as it is flying to the belt, be looking for the next one. Pour the moment it lands. Advanced players use the "animation time" (the time it takes for the cup to fly to the belt) to scan the board for the next target. Eliminating the pause between "Pour" and "Tap" is the secret to breaking the 30-second mark.
Tip 3: Pre-emptive Trash Clearing
If you are going for a speed run, you cannot afford to have "Trash" cups sitting in your belt. As you are digging for the Red Key, if you pick up a Cyan cup that you know you won't use for 40 moves, pour it immediately into the "Sky" corner (top left/right), even if that part of the canvas isn't active yet. It's better to waste a tiny bit of paint now than to carry that cup for half the level, clogging your slots.
Tip 4: The Final Combo Sprint
The biggest point multiplier comes at the end. In the last 10 seconds, the game checks for "Combos." If you pour 5 cups in 5 seconds without a mistake, your score skyrockets. Save your easy colors for the end. Don't do the tricky White Chin at the very last second; do it with 15 seconds left. Then, use the remaining time to rapidly fire the easy Cyan and Green cups for the Sky and Reeds. This maximizes your combo multiplier right before the level ends.
Tip 5: Optimize Your Clicks
Avoid "tapping" multiple times on a cup if you can help it (some versions require tapping, others just clicking). Ensure your clicks are precise. Miss-clicks (tapping a cup next to the one you wanted) are devastating in a speed run. Keep your device on a stable surface and use a dry finger to ensure maximum touch sensitivity. Accidental slips can add seconds to your time.