
Level 150
HARDHow to solve Sand Loop level 150? Get instant solution for Sand Loop 150 with our step by step solution & video walkthrough. Sand Loop 150 tips and guide.
Play Sand Loop Now
Experience the puzzle challenge firsthand
Game Screenshots


Sand Loop Level Guides
Level Overview: The Carrot Bunny Challenge
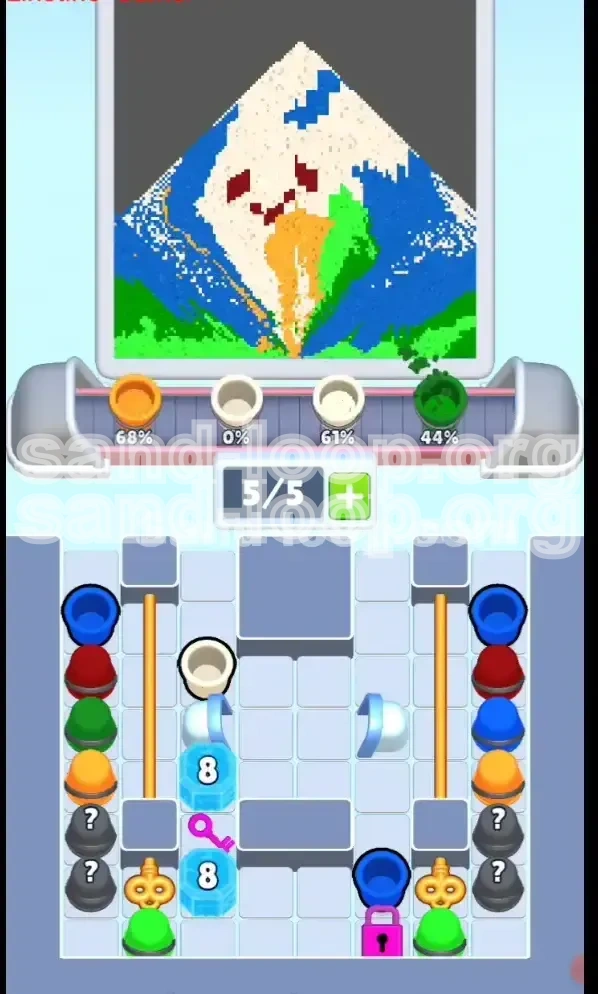
Welcome to Level 150 of Sand Loop, a pivotal stage often referred to as "The Carrot Bunny Challenge." This level marks a significant shift in gameplay dynamics, moving away from simple color matching and into the realm of heavy resource management and strategic gridlock prevention. The visual goal is to paint a pixel-art White Rabbit holding a large orange carrot against a vibrant outdoor backdrop. However, do not let the serene imagery fool you; this is a high-stakes logic puzzle that punishes hesitation and rewards aggressive prioritization.
The Aesthetic Breakdown
The target image is composed of five distinct color zones. The White Rabbit dominates the center of the canvas, requiring approximately 50% of the total sand volume. To its right, the Orange Carrot serves as a focal point, while the bottom of the screen is filled with Green Grass. The background is a deep Blue Sky, punctuated by a Yellow Sun and the Rabbit's Red eyes. Understanding this color distribution is the first step toward victory, as not all colors are created equal in terms of priority.
The Slot Economy Crisis
The defining feature of this level is the restrictive slot economy. Unlike previous levels where you could afford to let several cups cycle idly, Level 150 limits your active belt capacity to just 5 cups at a time. Every slot is a precious resource. Allowing a "dead" cup—such as a Red cup after the eyes are painted—to occupy a slot can lead to a board deadlock, where no new cups can enter, and progress halts completely.
The Ice Block Disparity
Your primary obstacles are the formidable ice blocks encasing your keys. The layout is brutally asymmetrical. On the left side of the board sits a massive blue ice block with 22 HP (Hit Points). On the right side, there is a smaller block with only 8 HP. This 22 vs. 8 split is the core puzzle mechanic. If you attempt to chip away at both equally, you will fail. The math dictates that you must focus your efforts on the right side first to unlock board space rapidly.
The Logic vs. Speed Dynamic
This is not a level where spamming taps will lead to success. The conveyor belt moves at a set speed, and your resource generation is tied to the breaking of specific ice blocks. Rushing the "wrong" colors early (like filling the sky with Blue before unlocking the necessary keys) will clog your belt with useless cups, preventing you from accessing the tools needed to break the ice. Patience and logical ordering are your greatest weapons here.
Why Most Players Fail
The vast majority of failed attempts on this stage happen because players treat the "22 HP" block and the "8 HP" block as equals. By the time the left block is halfway down, the right block should be completely gone. Failing to prioritize the right side means you run out of board real estate to maneuver your cups, leaving you trapped with a full screen of unfinished art and no way to generate the keys needed to clear it.
Clear Objectives: Your Path to Victory
To conquer Level 150, you need a rigid set of objectives that guide your every move. Your mindset should be one of "unlocking" rather than just "painting." The painting is the byproduct of successfully unlocking the board's mechanics. Below are the four critical milestones you must hit to secure the win.
Phase 1: The Initial Breach
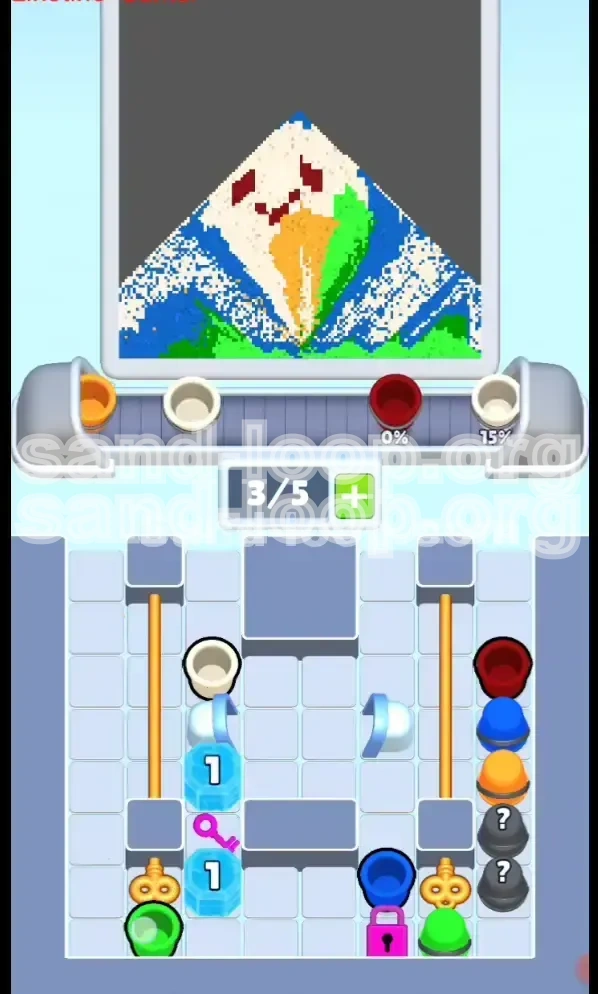
Your first objective is to free the central White cups. At the start, the essential White cups are trapped behind small "3 HP" ice blocks. Your immediate goal is to utilize the freely available Green and Orange cups to cycle through the conveyor and generate enough impacts to shatter these "3" blocks. You cannot begin the main painting process until the White supply is unleashed.
Phase 2: The Red Key Rush
Once the Whites are free, your sole focus must shift to the right side of the screen. You must generate enough sand volume to destroy the "8 HP" ice block and retrieve the Red Key. This key unlocks the bottom-right Red Padlock. Opening this lock is not just for show; it provides the Golden Key cup and, more importantly, opens up the grid, allowing for better cup management.
Phase 3: The Marathon Grind
After securing the Red Key, you will enter a long grinding phase. The "22 HP" block on the left is a sponge. It will take roughly three times as long to break as the right block did. Your objective here is to maintain a steady rhythm of high-volume colors (White, Green, Blue) to keep the belt moving and the impacts hitting the ice without clogging your slots.
Phase 4: The Final Polish
The final objective is cleanup. Once the "22 HP" block breaks and the Purple Key is obtained, the board is essentially yours. The only remaining tasks are the precision details: the Red Eyes and the Yellow Sun. These are "low volume" tasks, meaning they require very little sand but high precision. Doing these too early is a waste of valuable slot space.
Managing the 0/5 Limit
Throughout all phases, you must constantly monitor your slot counter (displayed as X/5). A critical objective is to keep this number flexible. Try to hover between 3/5 and 4/5. If you hit 5/5 (full capacity), you lose the ability to bring new cups from the sides onto the belt, which is fatal if you need a specific color to break an ice block.
Efficiency Metric
Aim for a "3-cycle efficiency." This means that every cup you place on the belt should ideally complete at least 3 full loops before being removed or finished. If you are placing cups that finish after half a loop (like Red or Yellow early on), you are wasting the conveyor's travel time and lowering your overall efficiency against the high-HP ice blocks.
Step-by-Step Instructions: The Action Plan
This section provides the exact sequence of actions required to beat the level. Follow these steps in order, and do not skip ahead. The early game is fragile; one wrong move can cost you the run.
Step 1: Activate the Free Agents
As soon as the level starts, locate the Orange and Green cups in the center tray. They are not blocked by ice. Tap them immediately to send them onto the conveyor belt. Do not touch the side columns yet. Let the Orange and Green cups flow. Their movement is the only thing generating the impact damage needed to free your White cups.
Step 2: Liberate the White Supply
Watch the "3 HP" ice blocks guarding the White cups closely. As the Orange and Green cups cycle past, they will chip away at the ice. The moment the "3" blocks shatter, the White cups will slide onto the belt. Immediately prioritize the White cups. If the belt is full, you may need to stop adding new Greens or Oranges until the Whites are securely in the cycle. White is your most valuable resource.
Step 3: Target the Right Side (The "8" Block)
With the Whites, Greens, and Oranges flowing, direct your attention to the right side of the screen. You should see the ice block with an "8" on it. Ensure that your active cups are flowing in a way that maximizes passes over this right-side mechanism. You do not need to worry about the left side yet. Just keep the sand pouring.
Step 4: Unlock the Red Padlock
When the "8" block breaks, a Red Key will drop. Automatically (or manually, depending on game settings), this key should target the Red Padlock at the bottom right. Unlocking this area is your trigger to breathe slightly easier. It clears a major obstruction and usually introduces the Golden Key cup into the pool. Do not pull the Golden Key yet; let it cycle.
Step 5: Initiate the "Blue Sky" Grind
Now that the right side is clear, you have a long wait for the "22" block on the left. This is the time to pull Blue cups from the side columns. Pull a Blue cup onto the belt. Use the Blue sand to fill the sky background. This serves two purposes: it progresses the painting and, because the sky is huge, it keeps that specific Blue cup cycling for a long time, dealing constant damage to the "22" block.
Step 6: Clear the Left and Finish
Continue the cycle of White/Orange/Green/Blue until the "22" block finally shatters. This releases the Purple Key. Use the Purple Key on the bottom-left lock. At this point, the only unpainted areas should be the tiny Red eyes and the Yellow sun. The board is now open. Pull the Red and Yellow cups, do a quick burst to fill the remaining pixels, and clear the level.
Color Order: The Strategic Hierarchy
Understanding the correct order to process colors is the secret weapon of this level. If you process colors in the wrong order (e.g., background first), you will lose. The hierarchy below ranks colors by their priority and when they should be introduced.
Tier 1: The Critical Core (White)
White is the king of this level. The Rabbit's body is massive, comprising roughly 50% of the puzzle area. Furthermore, White cups are trapped at the start. You must mobilize White immediately. Without a steady flow of White sand, you cannot hope to cycle the belt enough times to break the 22 HP block. White should be on your belt from the moment it is unlocked until the very end.
Tier 2: The Structural Colors (Orange & Green)
Orange and Green are your "workhorse" colors. They are available immediately and are required for the Carrot and the Grass. These colors have medium-sized hitboxes, meaning they will stay on the belt for a decent amount of time, generating consistent "value" for every loop. Keep these active throughout the first half of the level to maintain your slot economy.
Tier 3: The Background Filler (Blue)
Blue is a Tier 3 color despite its large volume. Why? Because you can survive without it for a long time. If you pull Blue too early, it clogs a slot that could be used for White. Only introduce Blue once the Red Key is secured and you need a "long-loop" color to grind down the 22 HP block. Blue is best used for the boring middle section of the level.
Tier 4: The Detail Colors (Red & Yellow)
Red and Yellow are dangerous. They represent the "Trap." The Red eyes and Yellow sun are tiny—perhaps 1% of the total canvas each. If you pull a Red cup, it fills the eyes in 0.5 seconds and then spends the next 5 minutes cycling uselessly, taking up a slot that could be used for a White cup. Do not pull these until the absolute end of the game.
The "Utility" Colors (Purple & Gold)
Purple and Gold are keys, not paints. Treat them as utility items. The Golden Key cup is high value because it often clears major board obstacles. The Purple Key is your endgame trigger. Prioritize getting these cups onto the belt not for their sand, but for the unlocking function they provide. They are the "Get Out of Jail Free" cards of this level.
Order Summary
To summarize the optimal flow: Start with Orange/Green to free White. Switch to White/Green/Orange to break the "8". Switch to Blue/White to break the "22". Finish with Red/Yellow. Any deviation from this sequence increases the difficulty curve significantly.
Key Tips & Analysis
To truly master Level 150, you need to look beyond the basics. Here are advanced tips and analytical notes that explain the "why" behind the strategy, helping you adapt if the RNG (Random Number Generation) of cup drops isn't perfect.
The "8 vs 22" Ratio Analysis
Let's look at the math. The right block has 8 HP, and the left has 22 HP. The right side is roughly 27% of the total ice HP, while the left is 73%. However, the reward for the right side (Red Key) unlocks board space that makes the remaining 73% easier to clear. If you spend 50% of your effort on the left and 50% on the right, you will clear the right quickly but be left with a massive, untouched chunk on the left and no room to maneuver. The "Right-First" strategy is statistically optimal.
The Mystery Cup Risk
In the side columns, you will see mystery cups marked with a "?". These are tempting but risky. A mystery cup can contain a bomb (great for ice), a new color, or a duplicate of a color you don't need. In Level 150, hitting a bomb can be a lifesaver for the 22 HP block. However, if you are at 5/5 capacity, the mystery cup is useless because you can't pull it. If you are at 4/5, only pull it if you are desperate for ice damage.
Belt Velocity Management
Notice how the belt slows down when you interact with cups? Use this to your advantage. If a cup is about to complete a loop but you need just a few more pixels of damage on an ice block, you can gently tap other cups to slightly delay the "collection" of the finished cup, keeping your slot count optimal. Conversely, if you need to clear a slot fast, tap the finished cup aggressively.
The "Dead Loop" Phenomenon
A "Dead Loop" occurs when a cup has finished painting its target object but continues to cycle because no other cup needs to go to the finish area. This is wasted energy. Level 150 has a lot of "Dead Loop" potential with the Red and Yellow cups. Be vigilant. If a cup has served its purpose, prioritize finishing it or swapping it out for a productive cup.
Visual Cue Recognition
Train your eyes to spot the "Flash." When an ice block is about to break, it usually flashes or cracks visibly. When you see this on the "8" block, start preparing your mental shift to the left side. Anticipation is key. If you wait until the key actually drops to change your strategy, you lose valuable seconds where your belt might be cycling "idle" colors.
The Psychology of Patience
Level 150 is designed to induce panic. The screen looks full, the ice blocks look huge, and the slots look full. The key tip here is: Do not panic. The "22" block *will* break if you just keep the main three colors (White, Green, Orange) flowing. Trust the process. Panic-tapping side columns usually leads to the wrong color entering the mix and causing a jam.
Common Mistakes to Avoid
Even experienced players make errors on this level. By identifying these common pitfalls, you can self-correct in real-time. Avoid these specific behaviors to ensure a smooth clear.
Mistake 1: Early Red/Yellow Deployment
This is the number one killer of runs. Players see the tiny red eyes or yellow sun and think, "I'll just get that out of the way." Do not do it. Pulling a Red cup at the start is a death sentence. It fills the eyes instantly, then occupies a slot for 50 loops, contributing nothing but wasted time. Leave the details for the end.
Mistake 2: Balancing the Ice Blocks
Many players feel a psychological urge to "balance" their attacks, alternating between the left and right ice blocks. This feels satisfying but is strategically wrong. The "8" block is a sprint; the "22" block is a marathon. Treat them as such. Ignoring the "8" to chip away at the "22" leaves you locked out of the Red Key utility for too long.
Mistake 3: Ignoring the Slot Counter
The 0/5 counter is not just decoration; it is your heartbeat. If you are sitting at 5/5 and you pull a mystery cup from the side that turns out to be a color you already have, you are now stuck. You have no way to get rid of the extra cup, and you have blocked your ability to bring in a potentially useful cup. Always keep an "emergency slot" open if possible.
Mistake 4: Over-reliance on the Center Tray
The center tray provides a steady stream of basics, but the side columns are where you find the tools to break specific ice blocks (like bombs or heavy hitters). If you only tap the center cups, you might run out of momentum. You must incorporate the side columns intelligently, specifically for the Blue grind later in the level.
Mistake 5: Wasting the Golden Key
The Golden Key cup is a high-priority item. Sometimes players accidentally merge it or waste it on a low-value lock because they aren't paying attention. The Golden Key often leads to significant board clearing. Treat its appearance as a critical event and ensure it is used to maximize board space.
Mistake 6: Filling the Sky Too Early
The Blue Sky is tempting because it's a large area. However, filling it early consumes the Blue cups which are better used later for the "grind" phase. Furthermore, early Blue cups can distract from the immediate need to free the White cups. Stick to the core colors first.
Stuck Solutions & Recovery Tactics
What happens when everything goes wrong? You are at 5/5 slots, the ice isn't breaking, and you are gridlocked. This section covers recovery tactics for specific "Stuck" scenarios.
Solution 1: The "Full Board" Gridlock
Scenario: You have 5 cups on the belt. None are finishing. You cannot pull new cups. The ice blocks are regenerating or not breaking.
Fix: You must sacrifice. Identify the color that has made the least progress or is least useful (likely Red or Yellow if they are on there). You have to wait for them to finish their loop, then quickly tap them off the belt *before* they re-enter. Do not pull replacements immediately. Clear the slot, then pull only what you need.
Solution 2: The "One Pixel" Stuck
Scenario: An object is 99% finished, but that last pixel won't fill, and the cup keeps looping.
Fix: This is a common visual glitch or precision issue. Tap the cup furiously to try and force the pixel update. If that fails, try to "overwrite" the area with a different color cup and then switch back. As a last resort, let the cup cycle off the belt and bring a fresh cup of the same color.
Solution 3: Ice Block Not Cracking
Scenario: You are cycling cups, but the "8" or "22" block isn't losing HP.
Fix: Check your cup types. Are you cycling low-impact cups? Some specific "light" cups might do less damage. You need "heavy" colors (White/Orange) or explosive mystery cups. Switch your belt composition to prioritize high-volume colors. Ensure the cups are actually passing *over* the ice block mechanism, not just floating nearby.
Solution 4: Key Collection Failure
Scenario: The ice broke, the key dropped, but it didn't unlock the lock.
Fix: Sometimes the path is blocked by another cup. Manually drag the key to the lock if the automation failed. If the key is grayed out, it means you haven't met the prerequisite (maybe you need to clear a cup from the lock's tile first). Clear the obstruction, then the key will snap into place.
Solution 5: Mystery Cup Flop
Scenario: You pulled a "?" hoping for a bomb, and it was a useless color, filling your last slot.
Fix: Don't panic. Let that "useless" cup cycle. While it cycles, use the time to plan your next move. Is there a small patch of that color somewhere on the canvas you can fill to make the cup useful? If not, just wait for the cycle to end and eject it. Patience is the only recovery here.
Speed Run Tips & Shortcuts
Once you have mastered the level, you might want to aim for a faster completion time or a higher score. These tips are for players looking to optimize their playstyle.
The "Pre-Load" Technique
As the level loading screen fades, you can often tap the center Green and Orange cups *before* the UI fully locks in. This can save you 1-2 seconds in the initial "Breaking the 3s" phase. It's a small advantage, but in speed running, every second counts.
The "Blast" Finish
Instead of carefully painting the Red eyes and Yellow sun at the end, wait until you have 3 open slots. Pull the Red, Yellow, and any other remaining detail cups all at once. Let them flood the screen. This "messy" finish is faster than doing them one by one because the game often auto-completes tiny pixels when multiple colors are flooding the board simultaneously.
Maximizing Ice Damage
Try to time your cup releases so that they hit the ice block at the exact same moment. If you have 3 cups stacked on the belt, they will impact the ice block in a cluster, potentially triggering a combo or crack effect faster than individual hits. Sync your taps to the rhythm of the conveyor belt.
Skip the "Perfect" Blue
Don't aim for 100% completion on the Blue Sky until the very end. It's faster to get the sky to 80% coverage and then switch to breaking the ice. Once the ice is gone and the level is essentially won (keys obtained), you can come back and top off the Blue. This prevents the "Blue Bottleneck" where you are stuck filling sky while keys remain locked.
Mystery Cup Gambling
For a high-risk, high-reward speed run, rely heavily on the "?" mystery cups. If you get lucky with two bombs early, you can smash the "22" block in record time. However, this is not a consistent strategy for a guaranteed win; it is strictly for speed running attempts where luck is a factor.
Endgame Optimization
In the final seconds, when the Purple lock is open, stop worrying about slot management. Spam every remaining color onto the belt. The "0/5" limit doesn't matter if the level is about to end. Flooding the board with all remaining colors is the fastest way to trigger the "Level Complete" validation once the structural integrity of the puzzle is solved.