
Level 159
HARDHow to solve Sand Loop level 159? Get instant solution for Sand Loop 159 with our step by step solution & video walkthrough. Sand Loop 159 tips and guide.
Play Sand Loop Now
Experience the puzzle challenge firsthand
Game Screenshots
Sand Loop Level Guides
Level Overview: The "Farmyard Logic" Challenge
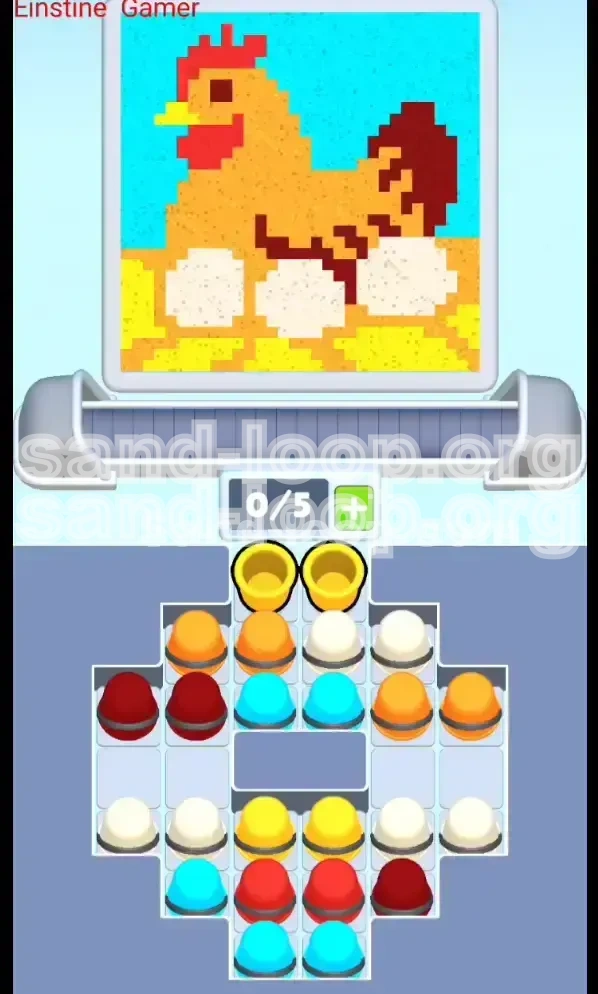
Welcome to the intricate puzzle of Level 159. This stage is deceptive; while the visual of a Hen sitting on a nest appears peaceful and simple, the underlying mechanics are a strict test of logic and inventory management. Unlike previous stages where you could rely on brute force or luck, Level 159 is a "Logic Level." This means there are no keys to collect, no ice to smash, and no hidden power-ups. Your success depends entirely on your ability to manage the 5-slot conveyor belt limit and execute a precise color filling order.
The primary difficulty here is the "Tray Jam." The supply tray is crowded with colors that look similar—specifically the Golden Orange of the chicken body and the Bright Yellow of the straw nest. If you confuse these two, the level becomes unsolvable. Furthermore, the critical cups needed to start the level (Yellow and White) are buried deep in the tray, blocked by Gold cups that cannot be used immediately. You will need to master the art of "Parking"—moving unusable cups to the conveyor belt not to pour them, but simply to get them out of the way.
The Visual Layout
The canvas depicts a classic scene split into distinct horizontal zones. At the very bottom is the "Nest Zone" consisting of straw and eggs. The middle section is the "Body Zone," a large, complex shape requiring careful color management. The top section is the "Sky Zone," which acts as a simple filler. Understanding these zones is crucial because the game's nozzle moves automatically; you must anticipate which zone the nozzle will enter next and queue up the correct color in advance.
Core Mechanics
This stage operates on a strict 5-slot conveyor limit. Once you pull a cup onto the belt, it takes up space until it is poured. You cannot discard cups. Therefore, pulling a cup is a commitment. You must prioritize cups that are immediately useful and find ways to temporarily store or "park" cups that are needed later but are currently blocking your progress.
The "Similar Color" Trap
The biggest visual challenge is distinguishing between the "Body Gold" and the "Straw Yellow." Under the pressure of the timer, these two can look identical. The Straw Yellow is a very bright, almost neon yellow, while the Body Gold is a more muted, orange-tinted gold. Mixing these up will result in "paint bleed" where you ruin the outline of the nest or the body feathers.
The Buried Start
At the start of the game, the conveyor feed is blocked by two Gold cups sitting directly on top of the feed column. However, the nozzle starts at the bottom, requiring White and Yellow. You are essentially locked out of the useful colors until you clear the top Gold cups. This creates a unique opening puzzle where you must waste time and space on the belt to access the rest of the tray.
Success Metrics
To achieve a high score or simply pass this level, you need to minimize "idle time" where the nozzle waits for paint. Efficient players aim for a 90% fill rate accuracy, meaning they rarely pour the wrong color. The level is designed to be tight; you have very little margin for error regarding queue management. One wrong cup pulled can clog the belt for 10-15 seconds, which is often enough to fail the level.
Strategic Objectives: How to Beat Level 159
Before you tap the screen, you need a battle plan. Level 159 is won in the preparation phase, not just the execution phase. Your primary goal is to establish a "rhythm" of pouring that matches the nozzle's movement pattern without letting the belt get clogged.
Objective 1: The Bottom-First Protocol
Do not be tempted by the large Gold clusters in the tray. Your absolute first objective is to secure the bottom layer (Straw and Eggs). This is the foundation of the puzzle. If you fail to clear the bottom layer quickly, the nozzle will move up to the body zone while you are still trying to find Yellow cups, leading to a chaotic mix of colors that ruins the level.
Objective 2: Clearing the Feed Blocker
You must treat the two Gold cups at the top of the feed as obstacles rather than resources. Your second objective is to maneuver these cups out of the feed slot to unlock the columns of White and Yellow underneath them. This requires sacrificing slots on your conveyor belt.
Objective 3: Parking Strategy
You will frequently find yourself with a full belt of cups that you cannot use yet (e.g., holding a Red cup when you need White). You must learn to "park" these cups at the far right end of the conveyor belt. The game allows a cup to sit at the end without pouring if the nozzle is far away. Use this buffer zone to store unusable cups while you wait for the nozzle to move into their target zone.
Objective 4: Managing the Similar Colors
You must mentally categorize the yellows. Create a mental rule: "Bright Yellow is only for the bottom bumps; Gold is only for the middle." Never cross these streams. If you are unsure which cup is which, look at the pixel art on the canvas. The Straw Yellow is usually contained within the rough, textured outline of the nest, whereas the Body Gold is contained within the smooth, curved outline of the chicken.
Objective 5: The Sky Cleanup
The Cyan/Sky Blue cups are your "relief" colors. Once the chicken and nest are fully formed, the rest of the level is a simple sprint. Your objective is to reach this phase with as many Cyan cups remaining in the tray as possible. If you accidentally pour Cyan too early, you might run out of paint for the sky background at the end, forcing a restart.
Step-by-Step Walkthrough: Action Plan
This section provides a turn-by-turn execution guide. Follow these steps in order to navigate the opening deadlock and establish a winning flow.
Phase 1: The "Unblocking" Maneuver
Step 1: As soon as the level starts, identify the two Gold cups blocking the main vertical feed column in the center of the tray. Tap the top-most Gold cup first. Do not panic if the nozzle is not over the body yet. Pull it onto the belt.
Step 2: Immediately tap the second Gold cup behind the first. You now have two Gold cups on your 5-slot belt. The nozzle is likely still moving towards the bottom starting position (Straw/Eggs).
Step 3: Look at the far left and far right sides of the tray. You should see White cups clustered there. Tap one White cup. It should queue behind the two Gold cups.
Step 4: If the nozzle is still moving towards the start position and hasn't reached the paintable area yet, you have a brief window. Tap a Cyan cup from the bottom row if it's accessible, or another White cup. Your goal is to shift the entire tray down to expose the Yellow cups buried in the center.
Phase 2: Laying the Foundation (Eggs & Straw)
Step 1: Once the nozzle enters the bottom-left corner (the start of the Straw), your first Gold cup should be approaching the pouring mechanism. If the nozzle is over Yellow (Straw), do not pour the Gold! You must let the Gold cup "ride" past the pouring point if possible, or time it so it pours only when the nozzle jumps to the body (though this is risky). Ideally, you want the White cup to be ready.
Step 2: Target the three Eggs. These are usually the first targets the nozzle hits. Pour your White cups as soon as the nozzle highlights the egg pixels. You need to be precise here; missing an egg means the nozzle will linger there, waiting for you to correct it, wasting precious seconds.
Step 3: Move to the Straw. The nozzle will sweep from the eggs into the straw texture. Now, release the Yellow cups you exposed in Phase 1. Pour these rapidly. The straw area is large but requires the specific Bright Yellow.
Step 4: Alternate rhythmically. The pattern at the bottom is often: Egg (White) -> Straw (Yellow) -> Egg (White) -> Straw (Yellow). Keep tapping White and Yellow cups in this alternating sequence to match the nozzle's back-and-forth movement.
Phase 3: Constructing the Body (Gold & Red)
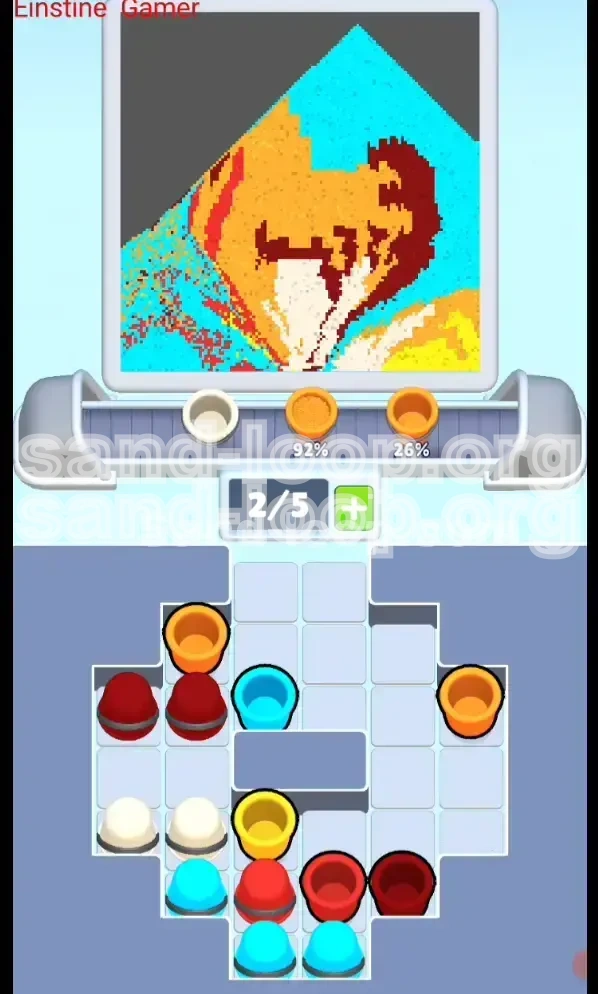
Step 1: Once the bottom is 100% complete, the nozzle will jump to the main body of the chicken. Now, those two Gold cups you "parked" on the belt earlier become your best friends. They should be at the front of the queue. Let them pour.
Step 2: Initiate the "Gold Rush." The body is 70% Gold. Rapidly tap all remaining Gold cups from the tray. You want a continuous stream of Gold paint to fill the bulk of the chicken. This is the fastest phase of the level.
Step 3: Watch for the "Comb and Wattle." As the body fills, the nozzle will eventually snap to the red details on the head (comb) and the tail feathers. You must interrupt your Gold stream to insert a Red cup here.
Step 4: Weave the Reds. Don't pour all your Reds at once. The tail feathers are often checkered or interspersed with body feathers. Pour one Red, then let the nozzle move back to the body (Gold), then pour the next Red. This "weaving" prevents you from running out of Gold while the nozzle is stuck on a red feather.
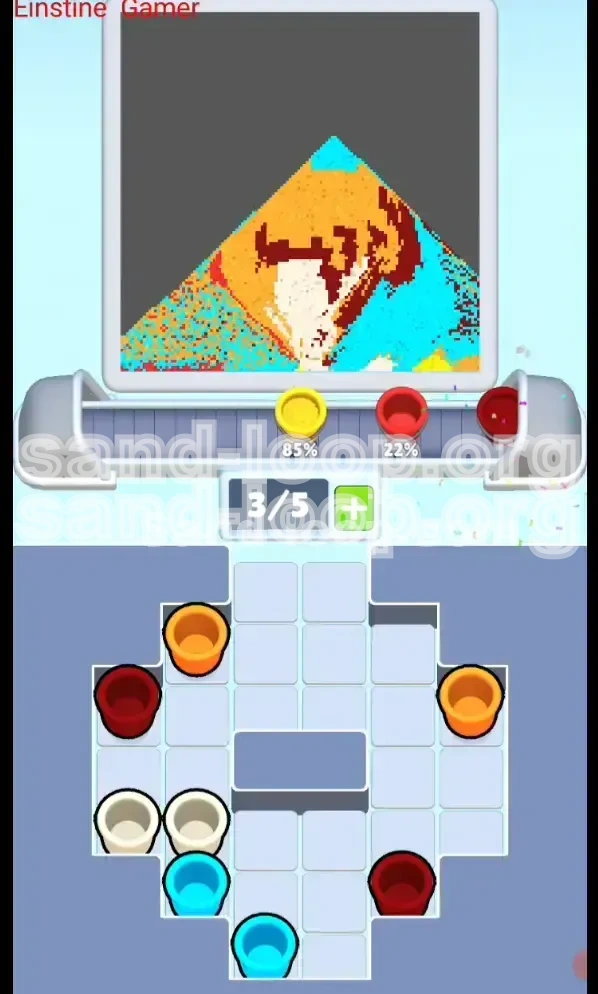
Phase 4: The Sky and Cleanup
Step 1: After the body details are finished, the nozzle will move to the top area for the Sky. Check your tray. You should have a majority of Cyan/Light Blue cups left, perhaps with a few stragglers of other colors.
Step 2: Clear the stragglers. If you have a single Red or White cup left, get it onto the belt immediately. Pour it wherever the nozzle is (as long as it's not a critical error zone). The priority is to get the belt clear of non-Cyan colors.
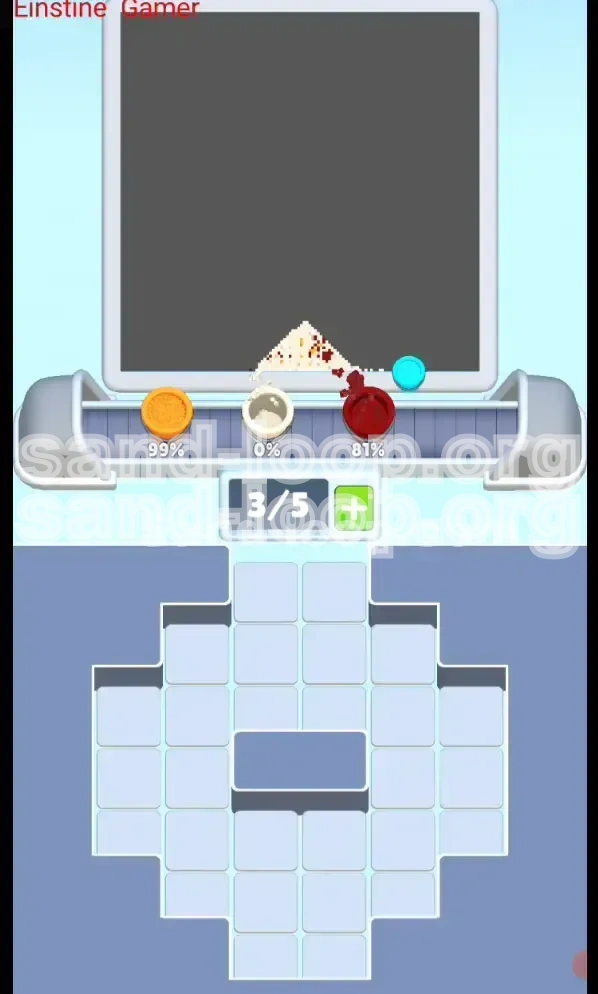
Step 3: The Cyan Flood. Once the belt only has Cyan cups, tap them all as fast as you can. The Sky is a single, solid color block with no complex edges. You can't mess this up. Flood the zone to finish the level.
Color Processing Order & Logic
Understanding the hierarchy of colors is vital for inventory management. Not all colors are equal in this level. Some are "fillers" while others are "critical path" items.
Tier 1: The Critical Bottom Colors (White & Bright Yellow)
These are the most important colors in the level. They are your Tier 1 priority. If you run out of White or Yellow, you lose. Why? Because you cannot start the body or the sky until the bottom is done. If the bottom is incomplete, the nozzle will keep bouncing back and forth between the incomplete egg pixels and the straw, refusing to let you progress to the easier Gold body phase. You must hoard these.
Tier 2: The Dominant Body Color (Gold/Orange)
This is your volume color. There are more Gold cups in the tray than any other color (roughly 40% of the tray). However, it is a Tier 2 priority because you cannot use it until the bottom is finished. The strategy here is to suppress the urge to tap Gold early. Treat the large stacks of Gold as temporary walls hiding the more valuable Yellow and White cups behind them.
Tier 3: The Detail Color (Deep Red)
Red is a "interrupter" color. You don't need many of them, but you need them at specific times. The mistake players make is treating Red like a primary color and clogging their belt with it. You should only pull Red cups when the nozzle is actively painting the tail or the head. Do not queue them up early.
Tier 4: The Background Filler (Cyan)
Cyan is the lowest priority item. You can completely ignore Cyan cups until the very last 20% of the level. In fact, tapping Cyan early is a strategic error because it takes up a belt slot that could be used to shuffle White or Yellow cups. Leave the Cyan stacks untouched until the chicken is fully formed.
The "Hidden" Color Logic
Be aware of the pixel overlaps. The red tail feathers actually "sit on top" of the gold body in terms of layering. If you paint the tail Red before the body Gold is fully filled, you might see Gold pixels bleeding into the Red later. Always try to fill the base Gold of the tail area *before* you finalize the Red details on top. This ensures clean edges.
Order of Operations Summary
The logical flow is: White (Eggs) -> Yellow (Straw) -> Gold (Body Base) -> Red (Details) -> Cyan (Sky). Memorize this sequence. If you ever find yourself confused about what to pull next, ask: "Is the bottom done?" If no, find White/Yellow. If yes, find Gold. If Gold is done, find Red. If the chicken looks complete, find Cyan.
Pro Tips & Common Mistakes to Avoid
Even with a strategy, small errors can snowball. Here are the professional tips to keep your run smooth and the common pitfalls that cause most players to fail.
Pro Tip: The "Tap-Hold" Check
Unsure if a cup is Gold or Yellow? Before you tap it to pull it onto the belt, look at the pixel preview on the cup itself. The Straw Yellow is usually a lighter, more saturated shade. The Body Gold is slightly darker and more orange. If your vision fails, look at the position. Cups in the center column are often Yellow (needed for start), while cups on the sides are often Gold. Prioritize center column access.
Common Mistake: The "Gold Rush" Trigger
The most common failure in Level 159 is starting the Gold phase too early. Players see the two Gold cups at the top of the feed and pull them immediately. This clogs the belt with unusable paint while the nozzle waits for White. The Fix: Be patient. You *must* pull those top Gold cups to unblock the column, but you must treat them as trash to be parked, not paint to be used immediately. Do not pour them until the bottom is secure.
Pro Tip: Conveyor Belt Parking
Master the "End of the Belt" buffer. If you have a Gold cup that you can't pour yet, but you need to pull a White cup from the tray, pull the White cup *behind* the Gold cup. As long as the Gold cup is at the front, it will hold the White cup in the queue. This allows you to shuffle inventory without pouring the wrong color.
Common Mistake: Ignoring the Nozzle Path
The nozzle doesn't move randomly; it has a set path. It often goes: Bottom-Left (Egg) -> Bottom-Center (Straw) -> Bottom-Right (Egg) -> Middle (Body). A common mistake is tapping all the Whites at once. If you tap 5 Whites, but the nozzle alternates between White and Yellow, your 3rd or 4th White cup will pour over the Yellow straw, ruining it. The Fix: Only pull 2-3 cups at a time to maintain color rhythm.
Stuck Solution: Reset the Rhythm
If you get stuck with a full belt of the wrong color (e.g., you have 3 Reds but need White), you are in a "Deadlock." Do not panic. Wait for the nozzle to move to a "neutral" zone or a zone where the wrong color will do the least damage (like a solid part of the body if you have Red). Sacrifice a small bit of accuracy to pour the wrong color just to free up a slot, then frantically tap the correct color (White) to recover.
Pro Tip: Speed Run Shortcuts
For experienced players looking to max out their time bonus, there is a shortcut. During the "Body Phase," if you have a very fast finger, you can actually pour the Red tail feathers *before* the body is 100% complete if you time the nozzle movement perfectly. This saves a few seconds of weaving back and forth. However, this requires knowing the nozzle path by heart. For 99% of players, it is safer to finish the Gold body completely before touching Red.