
Level 172
HARDHow to solve Sand Loop level 172? Get instant solution for Sand Loop 172 with our step by step solution & video walkthrough. Sand Loop 172 tips and guide.
Play Sand Loop Now
Experience the puzzle challenge firsthand
Game Screenshots

Sand Loop Level Guides
Level Overview: The Autumn Phoenix Challenge
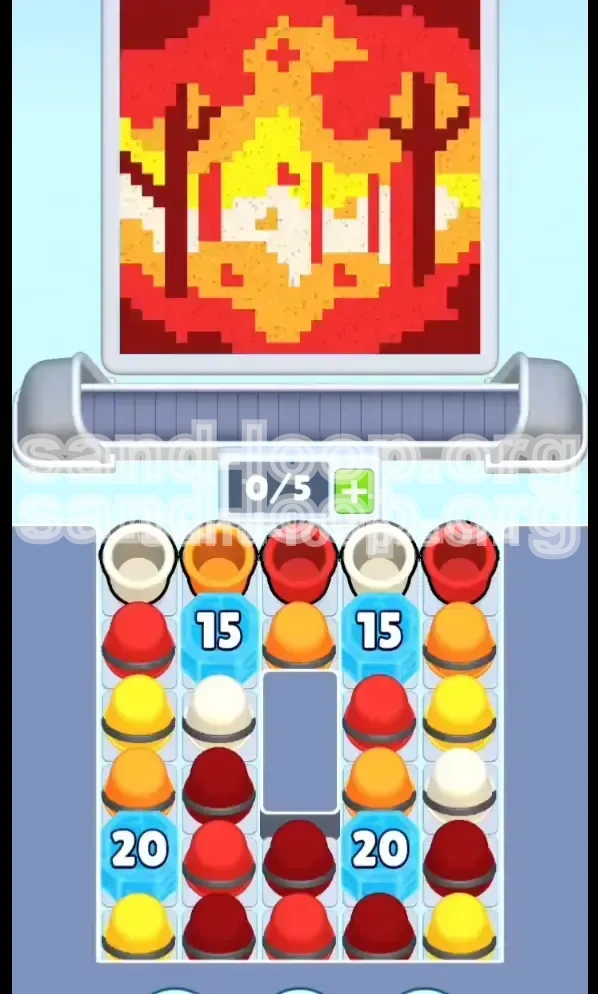
Welcome to Level 172 of Sand Loop, commonly known among players as the "Autumn Phoenix" stage. This level marks a significant shift in gameplay difficulty, moving away from speed-based reflexes and towards strict resource management and spatial logic. The visual theme depicts a majestic bird rising from flames, utilizing a warm, intense color palette of reds, oranges, and yellows contrasted against deep browns and stark whites. However, the beauty of the artwork belies the frustration of the mechanics. You are not just painting a picture; you are fighting a battle against limited inventory space and a gridlocked board.
The defining feature of this level is the "Four-Pillar Ice Defense." Your ability to access the lower half of the inventory is literally frozen behind four high-hitpoint barriers. With a conveyor belt capacity limited to a mere 5 slots (0/5), you have almost zero room for error. Unlike previous levels where you could hoard specific colors for later, Level 172 forces you to adopt a "just-in-time" inventory strategy. If you hold onto a cup for too long, you risk filling your tray and entering a deadlock state where no valid moves are possible.
Furthermore, the pixel art layout is deceptive. Large swathes of the canvas appear to be uniform red or orange, tempting you to clear them quickly. However, doing so without considering the "adjacency" rules for the Ice Blocks will lead to a swift game over. The level requires a delicate balance of chipping away at the ice barriers while simultaneously filling in the background. You cannot ignore the ice, but you cannot ignore the painting, creating a constant tension between your short-term moves (breaking ice) and long-term goals (completing the phoenix).
The Core Mechanics of Resource Management
In Level 172, resource management is defined by your 5-slot limit. This is approximately 40-50% smaller than the average inventory in earlier stages. This constraint means that "buffering" or holding extra cups is not an option. Every slot on your conveyor belt must be considered an active asset. You are constantly cycling through colors: Pull -> Process -> Dispose. This cycle must be uninterrupted. If you pull a cup that does not have an immediate target on the canvas, you are effectively wasting a slot and bringing yourself closer to a deadlock.
Understanding the Ice Block HP System
The Ice Blocks in this stage are not just visual obstacles; they are mechanical gates with specific Health Points (HP). The two upper blocks possess 15 HP each, while the two lower blocks are fortified with 20 HP. This means you need to perform a specific number of "actions" adjacent to these blocks to break them. It is crucial to understand that only matches made by cups physically touching the ice block count toward this HP. Randomly matching red cups in the center of the screen will not help you access the bottom inventory. You must methodically target the cups hugging the ice walls.
The Danger of Inventory Deadlocks
The most common cause of failure in Level 172 is the "Inventory Deadlock." This occurs when your 5 slots are filled with colors that you cannot currently use (e.g., holding three White cups when the canvas requires Red), or when the available cups on the screen do not match your current inventory needs. When the belt is full, you cannot pull new cups, and if you cannot match the cups you have, the game ends. To prevent this, you must maintain a "fluid" inventory, ensuring that at least 3 out of 5 slots can be dumped or used immediately at any given moment.
The Autumn Phoenix Color Structure
The artwork is divided into three distinct visual zones, each requiring a different approach. The "Background Zone" consists of broad strokes of Red and Orange. These are your "dump colors"—safe bets to clear space when your inventory is full. The "Detail Zone" consists of Yellow and Maroon. These are medium-priority colors that define the wings and feathers. Finally, the "Highlight Zone" is the White and pale Yellow mix in the phoenix's core. These are high-risk, high-reward colors. Misplacing a single White pixel can ruin the contrast of the entire center, requiring precious moves to fix. Understanding these zones helps you prioritize which colors to pull and which to leave on the tree.
Why This Level Isn't About Speed
Do not rush Level 172. While the game may have a timer, the limiting factor here is move efficiency, not speed. A rushed player will pull the first available cup they see, often filling their belt with useless colors. A strategic player will wait 2-3 seconds to analyze which cup pull will simultaneously clear the canvas *and* damage an Ice Block. The difference between a failed run and a successful one is often just 2-3 wasted moves. Patience allows you to visualize the "next state" of the board, ensuring that every move serves a dual purpose: progression of the art and destruction of the barriers.
Clear Objectives: Your Path to Victory
To conquer Level 172, you need a clear set of goals that go beyond simply "filling the picture." You must approach the level with a checklist of priorities that change dynamically as the game progresses. Your primary objective in the first phase is territorial expansion, specifically breaking the 15 HP Ice Blocks that guard the middle inventory. Without achieving this, you cannot access the specific Maroon and Yellow cups required for the mid-game details.
Your secondary objective is maintaining "Inventory Fluidity." Throughout the entire level, you must ensure that you never enter a state where all 5 slots are occupied by non-matching colors. This requires aggressive "trash dumping"—using parts of the canvas that don't matter yet (like the far corners) to offload excess cups. Finally, your end-game objective is precision color placement. Once the ice is broken, the challenge shifts from macro-management (breaking walls) to micro-management (pixel-perfect placement of the White and Yellow core).
Phase 1: Breach the Upper Defenses (0-15 Moves)
The immediate goal is to shatter the 15 HP Ice Blocks located in the middle rows. These blocks are preventing access to the vital "connector" colors needed to bridge the background and the foreground. You cannot afford to spend moves on the outer edges of the screen. Every move in this phase must target the rows immediately adjacent to the ice. Your success metric for this phase is simple: Did you break the ice before your inventory filled up? If yes, you are ready for Phase 2. If not, restart and try to be more aggressive with your initial cup pulls.
Phase 2: Unlock the Lower Inventory (15-35 Moves)
Once the upper blocks are gone, you gain access to the middle rows, but the 20 HP blocks at the bottom remain. The objective here is to "chain" your matches. You want to create vertical lines of color that connect the top of the screen to the bottom ice blocks. This allows you to deal damage to the lower blocks while simultaneously filling in the vertical streaks of the phoenix's tail. Your focus must shift from random matching to creating these vertical pathways to accelerate the breaking of the 20 HP barriers.
Phase 3: The Core Detailing (35-50 Moves)
With the ice fully broken and the entire inventory available, the objective becomes color conservation. You now have access to every color in the palette, including the rare Whites and Dark Maroons. The goal here is to complete the "body" of the phoenix without running out of specific colors. You must prioritize the Maroons (tree trunks/feathers) before the Whites (highlights). If you leave the Maroons until the very end, you may find yourself stuck with a full inventory of Red and Orange, unable to clear the final dark lines.
Phase 4: The Cleanup (End Game)
The final objective is pixel perfection. The background will likely be 80% complete, and the core will be messy. Your goal is to isolate the remaining pixels and use "gap pouring" techniques to fix errors without undoing your progress. You are looking for single-pixel errors or "stray" colors that don't belong. The challenge here is psychological: the urge to rush and finish the level often leads to careless spills. Stay focused until the "Complete" notification triggers.
Maintain a 60/40 Split: Ice vs. Art
A good rule of thumb throughout Level 172 is the 60/40 split. 60% of your attention should be on the Ice Blocks and the colors needed to break them. 40% of your attention should be on the actual artwork. If you flip this ratio and focus 100% on the art, you will inevitably hit a wall where the ice remains intact, but you have no space to maneuver. By keeping the ice as your primary focus, the art will naturally fill itself as a byproduct of your strategic matching.
Step-by-Step Instructions: The Action Plan
This section provides a linear, actionable walkthrough of exactly what to do from the moment the level starts. Follow these steps in order, but remain flexible; the randomness of the cup dispenser means you may need to improvise slightly while sticking to the core strategy.
Step 1: The Initial Analysis (First 5 Seconds)
Do not touch anything immediately. Pause and look at the starting inventory. Identify the cups that are physically touching the 15 HP Ice Blocks. These are your "Key Cups." Usually, this will be a mix of Red and Orange cups located in the second row. Your first pull must be one of these Key Cups. Avoid pulling any White or Maroon cups at this stage, even if they are available, unless they are touching the ice. They are too valuable to waste on early-game chipping.
Step 2: Aggressive Ice Chipping (Moves 1-10)
Start pulling cups that match the colors adjacent to the upper 15 HP blocks. Pour them onto the canvas immediately. Do not try to make "perfect" shapes. Your goal here is volume. You need to cycle through as many cups as possible to deal damage to the ice. If you have a Red cup touching the ice and a Red patch on the canvas, dump it there. Even if the Red patch isn't perfectly placed, clearing that cup is more important than perfect aesthetics early on. You need to free up the slot for the next ice-breaking cup.
Step 3: The "Trash Run" Maneuver
Inevitably, you will encounter a situation where your belt has 4/5 cups, and the remaining available cups on the screen are not colors you need (e.g., you have Red, but the screen offers White). You are at risk of a deadlock. Perform a "Trash Run": Look for the largest contiguous block of your dominant color (usually Red or Orange) on the canvas. Pour your current inventory there—even if it's not the optimal spot—just to empty your belt. The goal is to reset your slots to 0/5 so you can pull fresh cups and look for the colors that actually touch the ice.
Step 4: Breaching the 15 HP Barrier
As you approach the 10-15 damage mark on the upper ice blocks, you will notice the screen shaking or the blocks cracking visually. Intensify your focus here. Do not switch targets to the bottom blocks yet. Finish the upper blocks completely. Once they shatter, you will see a cascade of new cups fall from the top inventory. This is a critical moment. Do not pull the new cups immediately. Check your current belt. Finish pouring whatever you have in hand first, then pull the new stock. This ensures you don't accidentally mix a "Phase 2" color with a "Phase 1" strategy.
Step 5: Vertical Column Strategy for 20 HP Blocks
With the middle inventory open, shift your gaze to the bottom of the screen. The 20 HP blocks are tougher. To break them efficiently, stop painting horizontally and start painting vertically. Look for columns where the top cup is, say, Yellow, and the bottom cup (touching the ice) is also Yellow. By matching this column, you deal damage to the bottom ice while clearing the top canvas. This "two birds, one stone" approach is essential for conserving moves in the mid-game.
Step 6: The Great Inventory Sort
Once the 20 HP blocks are around 50% damaged (10 HP remaining), take a moment to sort your inventory. You should be transitioning from "Red/Orange dominance" to "Yellow/Maroon dominance." Deliberately stop pulling Reds for a moment. Let them sit on the tree. Instead, pull the Yellows and Maroons that are now accessible. Use your belt slots to store these transition colors. You are building the arsenal you need for the final phase of the level (the phoenix details). If you keep pulling Reds, you will run out of slots when the rare Maroons start spawning.
Color Order: Processing the Palette
The order in which you process colors in Level 172 is counter-intuitive. Normally, you paint from background to foreground. However, due to the Ice Blocks, you must paint based on "accessibility" rather than artistic layering. Processing the colors in the wrong order is the number one reason players get stuck with a full belt of unusable paint.
1. Primary Processing: Red & Orange (The Bulk)
Priority: High. These are your workhorse colors. They make up approximately 60% of the canvas's pixel count and are the primary colors adjacent to the initial Ice Blocks. You should process these aggressively and without mercy. It is better to over-paint with Red (creating a slightly larger area than needed) than to under-paint and leave gaps that will be hard to fill later when your belt is clogged with rare colors. Treat Red and Orange as your "currency" to buy inventory space.
2. Secondary Processing: Dark Maroon (The Structure)
Priority: Medium. The Dark Maroon color represents the "branches" or "feather lines" in the phoenix. These are usually vertical or diagonal lines. Do not start on these until the 15 HP blocks are broken. Once they are, target the Maroon cups. They are less common than Red, so when you see one, pull it immediately if you have the space. Getting the Maroon structures out of the way early clears the "clutter" on the canvas, making it easier to place the final Yellow and White pixels accurately.
3. Tertiary Processing: Yellow (The Bridge)
Priority: Low (Early Game) / High (Late Game). Yellow is dangerous because it often sits right next to White on the palette and the canvas. If you process Yellow too early, you risk "bleeding" into the White zones, creating a dirty, cream-colored mess that is hard to fix. Wait until the bottom ice is broken and the Red/Orange background is mostly solid before you start大规模 Yellow placement. Yellow acts as the bridge between the warm background and the hot core.
4. Final Processing: White (The Highlight)
Priority: Critical. White is the "boss" color of this level. It is the least abundant and the most spatially constrained. White pixels are typically surrounded by Yellow pixels. If you pour White while you still have Yellow cups on your belt, you will almost certainly mix them. The Golden Rule: Only pull White cups when your belt is empty (0/5) or contains only other White cups. Pour the White, clear the slot, and then move on. Never treat White as a "filler" color. It is a precision surgical strike.
Understanding Color Bleeding Risk
In the "Phoenix Fire" section of the canvas (the center), the pixels transition from Red to Orange to Yellow to White. The "Red-Orange" transition is safe; they are similar tones. The "Yellow-White" transition is high-risk. The game's physics engine allows for a small amount of liquid spread. If you pour Yellow directly adjacent to a wet White patch, it will tint the White greenish or dirty. To mitigate this, try to leave a 1-pixel "dry" gap between Yellow and White sections, and fill that gap last with the exact required color.
Key Tips and Common Mistakes
Even with a solid strategy, the specific mechanics of Sand Loop can trip up experienced players. These tips highlight the subtle mechanics of Level 172 that are often overlooked, while the "Common Mistakes" section outlines the pitfalls that result in a "Game Over" screen.
Tip: The "Gap Pouring" Technique
The "Gap Pouring" technique is essential for the final phase of the level. When your belt is full, and you need a specific color that isn't available, do not just wait. Instead, find a color on your belt that you *don't* need right now (e.g., an extra Red). Pour it into a "gap"—a spot on the canvas that is already correct or nearly correct. This overfills that spot slightly but clears the slot from your belt. This frees you to pull the cup you actually need. It is better to have a small mistake on the canvas than a full belt and no moves.
Tip: Identifying "Ice Touching" Cups
Not all cups of the same color are equal. A Red cup at the top of the screen is useless if there are no Red spots nearby. However, a Red cup at the bottom, touching the 20 HP Ice Block, is gold. Train your eyes to scan the board from the bottom up, not top down. Prioritize pulling cups that are physically touching the blue ice hexagons. These cups have "double value": they add to the painting AND remove the obstacle. Non-adjacent cups have "single value."
Tip: Managing the "Maroon Trap"
Maroon is a tricky color. It looks like Red, but it doesn't match Red. In the heat of the moment, players often mistake Maroon cups for Red and try to pour them into Red patches. This creates a "dirty" mix that doesn't register as a match and wastes the cup. Always double-check your cup against the canvas target before pouring. If you are unsure, hold the cup and wait. It is better to be safe than to ruin a perfect Red background with a stray Maroon pour.
Common Mistake: The "Perfect Paint" Syndrome
Many players fail Level 172 because they try to paint the picture perfectly from the start. They spend minutes trying to find the exact spot for a specific cup. In this level, approximate is okay. As long as you are hitting the correct color zones, you can fix the edges later. Prioritize breaking the Ice Blocks over making the art look pretty. If the ice breaks and you have a messy canvas, you can still win. If the art is pretty but the ice isn't broken, you lose.
Common Mistake: Ignoring the "Next" Preview
The "Next" cup preview is small, but in Level 172, it is vital. Before you pull a cup, look at the "Next" one. If you currently have 4/5 slots, and the "Current" cup is White (which you don't need), but the "Next" cup is Red (which you do need), do not pull the White. Wait. See if you can make a move with your current inventory to clear a slot, then pull the Red. Passing up a bad cup to get a good one is a hallmark of a high-level player.
Common Mistake: Early White Cup Hoarding
You will see White cups spawn early in the game. The temptation is to pull them "to save for later." Don't do it. White cups occupy valuable slots in your limited 5-slot belt. If you hoard a White cup for 20 moves, you have reduced your effective capacity by 20%. Only pull White when you are ready to paint White. Let them sit on the tree until the late game. If they disappear and respawn, that is better than clogging your belt.
Stuck Solutions and Speed Run Tips
Sometimes, despite your best efforts, the board will lock up, or you'll find yourself moving too slowly. This section provides emergency procedures for when you are stuck, as well as advanced techniques for players looking to achieve a fast time or high score.
Solution: The Full Belt Deadlock
Scenario: Your belt is 5/5 full. You have two Reds, one Yellow, one Maroon, and one White. The screen shows no matching spots for any of them. You are stuck.
The Fix: You must sacrifice a cup. Look for the color that has the *largest* existing area on the canvas (usually Red). Pour that Red cup onto an existing Red spot, deliberately overfilling it slightly. This "wastes" the paint but clears the slot. Once the slot is empty (4/5), a new cup will spawn on the tree. There is a 70% chance this new cup will match something on your belt or the canvas. This "controlled burn" is the only way to reset a deadlock.
Solution: The "Ice Block Wall"
Scenario: You have broken the 15 HP blocks, but the 20 HP blocks are stuck at 1-2 HP. You have been matching adjacent colors, but the ice won't break.
The Fix: You are likely suffering from "visual fatigue" and missing the adjacency. The cups touching the ice might be slightly offset. Use the "Tap and Check" method: Tap every single cup that is even remotely close to the ice block. Look for the "highlight" or "snap" effect that indicates a match is valid. Sometimes, a cup looks like it's touching but isn't registered by the game's grid. Find the one cup that *actually* connects and pour it to finish the break.
Speed Run Tip: The "Pre-Pull" Optimization
Speed runners don't wait for the belt to empty before pulling the next cup. While your current cup is pouring (the animation is playing), you should already be tapping the next cup on the tree. This "queues" the action, reducing downtime between pours. In Level 172, where inventory management is tight, saving 0.5 seconds per move adds up to 10-15 seconds saved overall. Mastering the rhythm of "Pull -> Pour -> Pull" without pausing is key to a sub-2-minute run.
Speed Run Tip: Bulk Color Dumping
In a speed run, ignore the "Trash Run" advice of careful placement. Instead, identify the "dominant quadrant" of the canvas (usually the top-left or top-right corner). Dump all your excess cups there in a rapid-fire sequence. Who cares if it looks messy? It clears your belt instantly. Once the ice is broken, you can come back and fix that quadrant. Speed is about momentum, not aesthetics. Keep the belt moving at all costs.
Speed Run Tip: Ignore the Small Details
Don't aim for 100% completion until the very end. Speed runners often leave the "single pixels" scattered around the canvas until the final 10 seconds. Focus on the "big chunks" of color. Breaking the Ice Blocks is the only timer that matters. If the ice breaks at the 1-minute mark, you have plenty of time to clean up the details. If you spend 2 minutes on details and the ice isn't broken, you have failed the run. Prioritize mechanics over perfection.