
Level 176
HARDHow to solve Sand Loop level 176? Get instant solution for Sand Loop 176 with our step by step solution & video walkthrough. Sand Loop 176 tips and guide.
Play Sand Loop Now
Experience the puzzle challenge firsthand
Game Screenshots
Sand Loop Level Guides
Sand Loop Level 176: Mastering the Gift Box Puzzle
Visual Breakdown and Objective
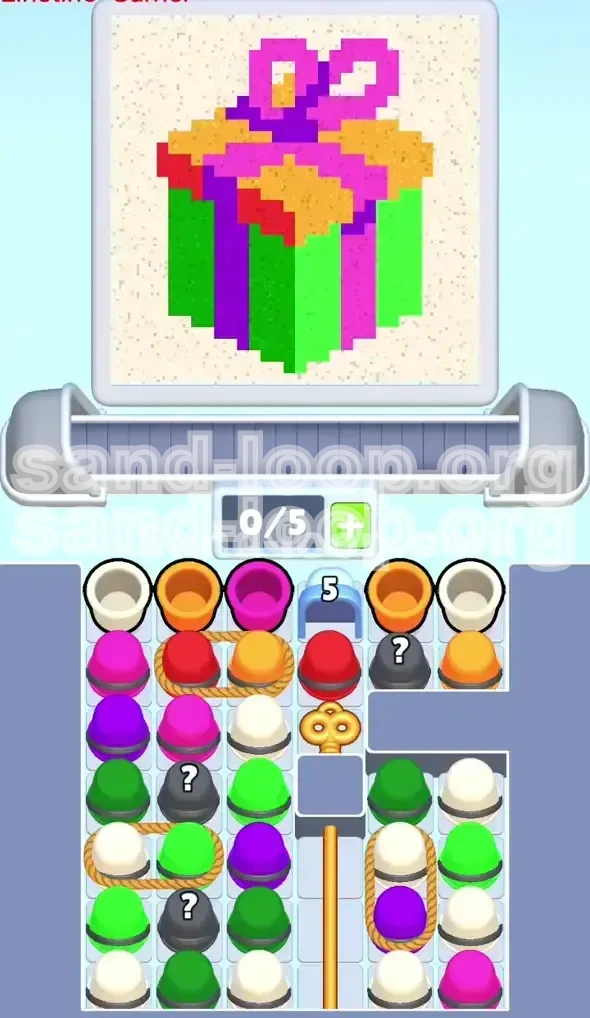
Sand Loop Level 176 features a vibrant, symmetrical "Gift Box" design centered on a light cream canvas. The primary visual elements are bright magenta ribbons, lime green sides, golden yellow accents, and royal blue details. While the background appears empty, it is actually the largest area requiring the cream pigment.
Core Challenge
The deceptive simplicity of this level lies in the supply tray. While you have access to all necessary colors (Magenta, Green, Yellow, Blue, Cream), the critical cups—specifically Cream and Green—are buried deep under layers of Red and Magenta. The primary bottleneck is resource management amidst transport lag.
The Layout
You begin with a standard 5-slot conveyor belt, all empty. The supply tray is stacked vertically. You will notice immediately that the easily accessible cups are mostly warm colors (Red, Magenta, Orange), while the cool colors and Cream are obstructed.
Win Condition
To secure victory, you must fill the pixel grid to 100% completion. This requires balancing the fill rates of the large Cream background with the smaller, high-intensity areas of the Magenta ribbon and Green sides. Overshooting any single color will lock you out of a win.
Why Players Fail
Most players fail because they fill their conveyor belt too early with the first available colors (usually Magenta). This creates a "traffic jam" where the necessary Cream and Green cups cannot be loaded because the belt is full of unusable paint.
Strategic Color Prioritization: The Order of Operations
Phase 1: The Foundation (Cream)
Although the Magenta ribbon catches the eye, the Cream background constitutes approximately 45-50% of the total canvas area. You must establish a Cream flow immediately. If you ignore Cream to focus on the ribbon details, you will run out of conveyor space to clear the background later.
Phase 2: The Structural Elements (Green)
Green blocks act as the main structural support for the gift box sides, making up about 25% of the image. These cups are often buried under Magenta in the tray. Prioritize unblocking Green access only after you have a steady stream of Cream loaded.
Phase 3: The Highlights (Magenta and Yellow)
Magenta is high-impact but low-volume compared to the background, roughly 15% of the total fill. Yellow is even less, acting as an accent at about 10%. These should be treated as "filler" colors between your primary Cream and Green loading cycles.
Phase 4: The Detail Work (Blue)
Royal Blue is the sparsest color, likely accounting for less than 5% of the canvas. Only load Blue cups when you have exhausted immediate supplies of the other colors, or specifically when the Blue meter is lagging significantly behind the others (below 80% relative progress).
Relative Fill Ratios
Aim for a fill ratio of approximately 5:2.5:1.5:1:0.5 (Cream:Green:Magenta:Yellow:Blue). Keeping this mental math in the back of your head prevents the "Magenta Overshoot" trap where the ribbon is finished but the box is empty.
The 60% Rule
Never let any single color meter exceed 60% completion until *all* colors have reached at least 40%. This balanced growth ensures that when you enter the end-game precision phase, you aren't locked out by a maxed-out color meter.
Step-by-Step Walkthrough: The Unblocking Method
Step 1: The Cream Initiation
As the level starts, immediately scan the tray for the top-most Cream cup. Load exactly one (1) Cream cup into Slot 1. Do not fill Slot 2 yet. Watch the belt move. This initial cup buys you time while the first pour cycle begins.
Step 2: The Green Excavation
While the Cream cup travels, identify the Green cups. They are likely buried. To unblock them, you may need to temporarily move a Magenta or Red cup. If a Green cup is accessible, load it into Slot 2 immediately after the Cream cup passes the sensor.
Step 3: The Magenta Buffer
You will have a gap in pouring while the first two cups process. Fill this gap by loading one (1) Magenta cup into Slot 3. This keeps the production line moving but prevents a Magenta spike since it is isolated between Cream and Green pours.
Step 4: Tray Management (Unblocking)
At this point, your tray is likely congested. Do not load cups into Slots 4 and 5 yet. Use this downtime to tap and move cups in the tray specifically to reveal the *second* layer of Green or Cream. You are clearing the "debris" (Red/Orange) to access the core resources.
Step 5: The Cycle Establish
Once the first Magenta cup pours, immediately load the newly unblocked Green cup. Your sequence should look like: Cream (Active) -> Green (Waiting) -> Magenta (Loading) -> [Empty Slot] -> [Empty Slot]. Maintain this rhythm until the Cream meter hits 30%.
Step 6: The Meter Re-Evaluation
Pause loading when Cream is at 30%. Check the other meters. If Green is lagging below 15%, load two Green cups in a row. If Magenta is climbing too fast (above 20%), stop loading it entirely and focus on clearing space for more Cream.
Mid-Game Tactics: Maintaining the Balance
The "Two-Slot" Buffer Strategy
Resist the urge to fill all 5 conveyor slots. Keeping slots 4 and 5 empty serves as a crucial "reaction buffer." If a color meter spikes, you need empty slots to prevent the belt from auto-loading a color you no longer need.
Handling the Tray Jam
Inevitably, the tray will become a stack of unusable Red or Orange cups blocking your needed colors. When this happens, you must perform a "Clearing Cycle." Load the obstructing cups into the conveyor belt just to get them out of the tray, but prioritize them low in the pouring queue or accept a small amount of waste to clear the blockage.
The Color Swap Maneuver
Notice that Sand Loop mechanics allow for a slight delay between loading and pouring. If you accidentally load a Magenta cup when you needed Green, immediately load a Green cup behind it. While you can't stop the Magenta pour, the immediate follow-up of Green can help correct the color balance before the meters update again.
Monitoring the Progress Bars
Your eyes should be on the top progress bars 60% of the time, not the canvas. The canvas is purely visual feedback; the numbers determine your win condition. If Magenta hits 50%, Green is at 40%, and Cream is at 30%, you must stop loading Magenta immediately and switch to a strict Cream/Green diet.
Dealing with "Dry Spells"
Sometimes, despite unblocking, the specific color you need (e.g., Yellow) just isn't spawning in the tray. Do not panic and fill the belt with random colors. Wait. Let the belt run empty if necessary. It is better to lose a few seconds of efficiency than to overload a color and cap out your progress.
Utilizing the Background Fill
Use the Cream background fill to your advantage. Since Cream covers such a large area, it fills the meter slowly but steadily. You can afford to let Cream sit at a higher percentage (e.g., leading by 15%) while you frantically catch up the smaller, faster-filling colors like Yellow and Blue.
End-Game Protocol: Precision Finishing
The Single-Slot Load Rule
Once any color meter passes the 80% threshold, change your loading strategy completely. Load only one cup at a time. Wait for it to pour. Check the meter. Then decide on the next cup. This eliminates the risk of "overflow" where a queued cup pushes a meter to 101%.
The Lag Compensation
Remember the conveyor delay. If you are at 98% Cream and load a Cream cup, it might take 3-4 seconds to pour. In that time, you might think you have room and load another, resulting in a double-pour that ruins the level. Always account for the cups currently in transit.
Synchronizing the Finish
The ideal win state sees all meters crossing the finish line within seconds of each other. If you have Magenta at 95% and Cream at 80%, focus entirely on Cream. Magenta is effectively "done"—treat it as filled. Do not load any more Magenta cups until Cream has caught up to at least 90%.
Identifying the "Lockout" Risk
A lockout occurs when you have 100% of a color but still have cups of that color stuck on the belt taking up space. In the final 10%, if a Red or Magenta cup is on the belt and you don't need it, you may have to restart the level. Avoid this by keeping the belt clear of unwanted colors in the final stretch.
The Final Sprint
When all meters are above 90%, speed is key. You can now load cups slightly faster, but ensure they are alternating colors perfectly. (e.g., Cream, Green, Cream, Green). This rapid-fire alternation prevents the meters from stalling while ensuring no single color dominates the final input.
Post-Completion Analysis
If you fail, look at the final meter spread. Did you finish with Magenta 100% but Cream 60%? You failed to unblock the tray early enough. Did you finish with all colors at 95%? You fell victim to the Lag Compensation issue. Adjust your unblocking priority in the next attempt based on this data.