
Level 187
HARDHow to solve Sand Loop level 187? Get instant solution for Sand Loop 187 with our step by step solution & video walkthrough. Sand Loop 187 tips and guide.
Play Sand Loop Now
Experience the puzzle challenge firsthand
Game Screenshots
Sand Loop Level Guides
Level Overview: The Pixel Art Cottage Challenge
Visual Breakdown of the Canvas
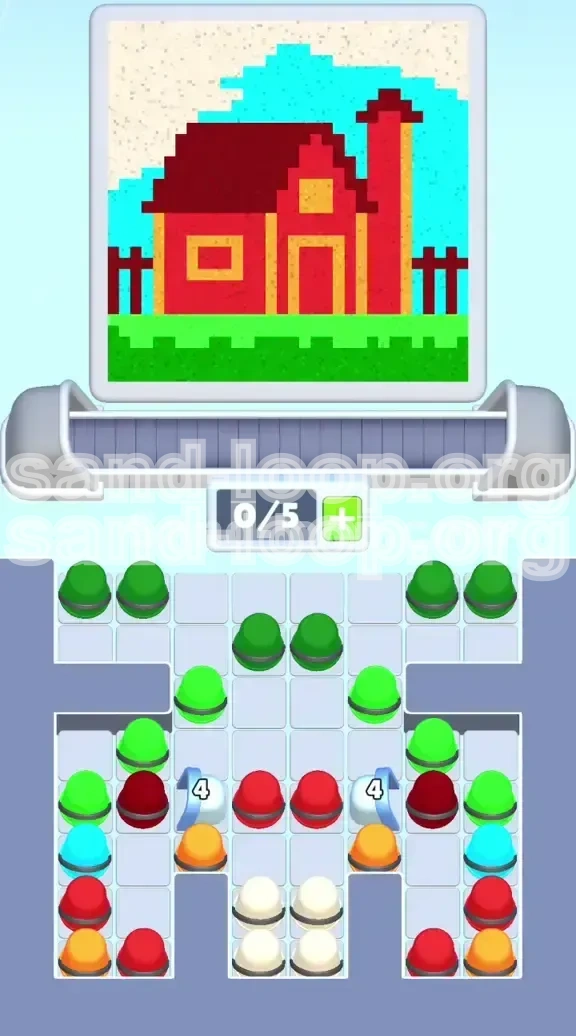
Level 187 presents a deceptively simple pixel-art scene: a standalone cottage featuring a distinct cyan sky, a dual-tone red roof, and a grassy foreground. The canvas is divided into five primary color zones: Cyan (Sky), Green (Grass), Bright Red (House Body), Dark Red (Roof), and Yellow/Beige (Details). The challenge lies not in the complexity of the image, but in the strict ratios of paint required. The Cyan and Green zones are large, consuming significant resources, while the Red zones require precise differentiation between two similar shades to avoid mixing errors.
The Capacity Constraint
You begin the level with a conveyor belt capacity of 7 slots. However, the board starts with 5 cups pre-loaded, leaving you with only 2 free slots to maneuver before the belt becomes full. This tight margin means you cannot simply load all the colors you want at once; you must cycle cups through the painting station efficiently to free up space for incoming colors. If you fill the belt before unloading painted cups, you will enter a "deadlock" state where no further moves are possible.
Supply Tray Layout Analysis
The supply tray is organized to test your spatial planning. The Green cups are abundant but located in the lower tiers, requiring you to clear the path before they can be loaded. The Cyan cups are scattered on the peripheries. Crucially, the White and Dark Red cups are sandwiched in the center stack, blocked by primary colors. This setup forces a specific loading order: you cannot access the necessary White for highlights or Dark Red for the roof until you have moved the obstructing cups.
The "Hidden" Difficulty: Shade Differentiation
The most difficult aspect of Level 187 is distinguishing between the Red and Dark Red targets. On the canvas, the roof requires Dark Red, while the main house body requires standard Red. In the supply tray, these cups look similar and are stacked closely together. Misidentifying one for the other is the leading cause of failure, as pouring Dark Red into the Bright Red zone wastes a scarce resource that is difficult to replenish later in the level.
Victory Conditions
To achieve 100% completion, you must fill the progress bar for all five color zones. The game ends if you run out of moves while a color zone is still incomplete. Importantly, the game does not penalize you for "overfilling" a zone with a few extra percentage points, but it does penalize you severely for "locking" the board. Therefore, the strategy focuses on maintaining board fluidity rather than pixel-perfect efficiency on every single drop.
Clear Objectives: Your Mission Goals
Primary Goal: Unblocking the Center
Your first major objective is not to paint, but to organize the tray. The center stack contains vital Dark Red and White cups that are currently inaccessible. You must prioritize loading cups that sit on top of these blockers to free up the colors underneath. Failing to unblock the center stack within the first 10 moves will inevitably leave you unable to finish the roof or the door details later in the game.
Secondary Goal: Balancing the Sky and Grass
The Cyan (Sky) and Green (Grass) zones compete for dominance. You cannot focus exclusively on one without starving the other. Your objective is to maintain a ratio where Green is roughly 10-15% ahead of Cyan at all times. This is because Green cups are more plentiful in the supply, whereas Cyan cups are limited. If you paint the sky too fast, you will run of Cyan cups while the grass is still only half-done.
Tertiary Goal: The Roof Precision
You must reserve the Dark Red cups exclusively for the roof area. The roof is a small, distinct geometric shape at the top of the cottage. Pouring standard Red here will not fill the meter correctly. Your objective is to identify and queue the Dark Red cups exactly when the conveyor belt aligns with the roof sector, ensuring that every drop counts toward that specific meter.
Resource Management: The "Two-Slot" Rule
A constant objective throughout this level is to keep at least one slot empty on your conveyor belt. You start with 2 empty slots (out of 7). Try to never let the belt fill up completely. That empty slot is your buffer, allowing you to load a crucial color (like a blocker-clearing cup) immediately when it becomes available, without waiting for a pour to finish. Treating the empty slot as a strategic resource rather than wasted space is key to advanced play.
Completion Target: The 80% Threshold
Your intermediate goal is to reach 80% completion on the larger zones (Cyan and Green) before you dip below 3 cups in the supply. Once you hit this threshold, you can switch your focus from "bulk filling" to "detail work." This involves using the White and Yellow colors to clean up the edges and windows. Reaching 80% safely means you have avoided the early-game traps of overfilling and belt jamming.
Step-by-Step Walkthrough: The Cyan-Open Strategy
Phase 1: The Initial Cycle (Moves 1-7)
Move 1: Load a Green cup. The grass is the largest area, and starting here establishes a baseline.
Move 2: Load a Cyan cup. Do not load Red yet; we need to clear the Cyan stack first.
Move 3: Load the Red cup that is blocking the White stack.
Move 4: Load a Green cup.
Move 5: Load the Orange/Yellow cup blocking the Dark Reds.
Move 6: Load a Cyan cup.
Move 7: Load the newly revealed Dark Red cup.
Result: Your belt should now have a mix of colors, and you have successfully unblocked the critical Dark Red and White cups in the tray. The first Green cup should be pouring now.
Phase 2: Establishing the Rhythm (Moves 8-15)
At this point, your first cup is emptying. Look at the canvas. If the Green meter is rising, continue to prioritize it.
Move 8: Load White. (Even if you don't need it yet, get it on the belt).
Move 9: Load Dark Red. (Align this for the roof).
Move 10: Load Green.
Move 11: Load Cyan.
Move 12: Load Red (Standard).
Move 13: Load Green.
Move 14: Load White.
Strategy: You are alternating between bulk filling (Green/Cyan) and detail filling (Reds/White). This ensures that when the belt jams, it jams with a variety of colors rather than a single blockage.
Phase 3: The Mid-Game Correction (Moves 16-25)
By now, you should have about 40% completion on the background. Check your meters.
- If Cyan > 45%: Stop loading Cyan. Load Greens and Reds only until the other meters catch up.
- If Green < 30%: Prioritize Green aggressively. You are behind on the grass.
- Action: If the belt is full (7/7), you must wait. Do not load random cups. Let the current cup pour to free up a slot. Once you have a slot, immediately load the color that is most deficient on your canvas.
Phase 4: The Roof Detail (Moves 26-35)
This is the danger zone for the Dark Red. You likely have 2 or 3 Dark Red cups queued or on the tray.
1. Wait until the conveyor belt arrow is pointing directly at the Roof area.
2. Tap the Dark Red cup exactly as it aligns with the roof.
3. Do not pour Dark Red into the house body. It is inefficient.
4. If you accidentally pour Dark Red into the wall, don't panic. You will need to recover by using standard Red cups to fix the balance, but you may lose a move. Precision here saves moves for the end game.
Phase 5: The Final Sprint (Moves 36+)
You are now in the "Clean Up" phase. The large zones are 90% full.
1. Cyan/Red/Green: Only load these if the meter is below 95%.
2. Yellow/White: These are your finishers. Use them to top off the windows and door.
3. Empty the Belt: If you have 3 cups left and 3 slots open, load them all. The order matters less now because the zones are mostly full. Just ensure you don't leave a single color at 98% while the others are 100%. Watch the meters and tap the color that is lagging behind.
Key Tips: Mastering the Mechanics
Understanding the "Lead Time" Lag
There is a delay between when you tap a color in the tray and when it arrives at the pour point on the conveyor. This delay is usually equal to the time it takes for 2-3 other cups to pour. Use this to your advantage. If you see that you will need Green in 3 turns, load it now. If you wait until the meter is empty to load the next color, you will lose valuable seconds staring at a pouring station that is doing nothing.
The "Safe Zone" for Overflow
In Level 187, you can safely overfill a color by about 5-7% without failing. This is crucial for the Green grass. Since Green cups are often the last ones left on the tray, it is better to slightly overfill the grass (turning it a deeper shade) than to leave it at 99%. If you have a choice between a risky move to get a Red cup or a safe move to overfill Green, take the Green overfill.
Visual Identification of Dark Red
The game does not always label cups textually. How do you spot the Dark Red cup? Look at the Highlight. Standard Red cups often have a flat, bright color. Dark Red cups will appear slightly brownish or maroon, and crucially, they are often located in the specific stack that was initially blocked by Orange/Yellow cups in the starting layout. Train your eye to spot the shade difference rather than relying on position alone.
Timing the "Tap"
You do not have to tap the cup the millisecond it enters the painting zone. You can let the conveyor run for a second. This is useful if the zone on the canvas is partially painted but not full. Let the conveyor align the cup with the "thickest" part of the unpainted area. For example, when painting the sky, try to time your tap so the cup pours into the largest gap of blue, rather than the edges.
Recovering from a Full Belt
If your belt is full (7/7) and you desperately need a color that is currently on the tray but not on the belt, you are in a jam. The only way out is to accelerate the current pour. If the game mechanics allow tapping the painting station to speed up the flow, do it. If not, you must wait. This is why the "Two-Slot Rule" (keeping 2 empty slots) is vital. It prevents this exact scenario where you are powerless to act.
Managing the "Small Details" Early
A common mistake is leaving the Yellow door and White windows until the very end. While logical, this is risky because if you run out of moves, you fail with 99% completion. A pro tip is to chuck a small detail cup (like White or Yellow) onto the belt in the mid-game (around 50% progress) even if you aren't ready for it. It rides the belt as a "spacer," keeping your rhythm going, and you can pour it off quickly when it reaches the end, knocking out a small percentage of the requirements early.
Common Mistakes: What to Avoid
The "Cyan Sky" Trap
The sky is big and blue, and it feels satisfying to fill it. However, do not load three Cyan cups in a row at the start. The Cyan meter fills up deceptively fast. Because the background is uniform, the game calculates coverage generously. You will find yourself at 80% Cyan while your grass is still at 20%. Once the Cyan is full, you cannot use the remaining Cyan cups on the grass. You will be forced to discard them, losing moves. Always alternate Cyan with Green.
Confusing Roof Red with House Red
This is the most specific error for Level 187. The roof requires Dark Red. The house requires Bright Red. These are not interchangeable. If you pour Bright Red on the roof, the meter will barely move (maybe 1-2%). If you pour Dark Red on the house, it will count, but it wastes the specific resource needed for the roof. Always double-check the shade. If you aren't sure, look at the canvas hint: the roof is a darker pixel color than the wall.
Ignoring the Blocker Cups
At the start, you see White cups you need, but they are buried. You might think, "I'll get to them later." This is a mistake. If you don't clear the cups sitting *on top* of the White cups early, those blocking cups will clog your belt in the late game. You will be frantically shuffling Red and Orange cups just to get to the one White cup you need to finish the window. Clear blockers immediately.
Over-Reliance on "Undo"
If you are playing a version with Undo buttons, relying on them for this level is a crutch that will hurt your score. The "bottleneck" in this level is space, not mistakes. If you make a wrong move and Undo, you regain the cup, but the belt has moved on. You are now out of sync. It is often better to make a "bad" pour (wasting a bit of paint) to keep the belt moving rhythmically than to constantly pause and rewind.
Waiting for 100% Precision
Do not wait for a zone to hit exactly 0% remaining before switching colors. If a zone is at 95% and you have a cup ready for a different zone, switch. The final 5% of a zone is often the hardest to paint because you are trying to hit tiny pixel gaps. It is faster to bring another zone from 50% to 60% and then come back with a fresh cup to finish the 95% zone.
Misreading the Supply Tray
The supply tray changes as you remove cups. Colors that were abundant (like Green) can suddenly run out if you aren't watching. Keep a mental count of how many Green cups you saw initially (usually 7-8). If you have used 6, assume you are in the end-game for Green. Don't build a strategy assuming infinite Green. Similarly, don't assume the game will give you more Cyan; there is a finite number of cups on the tray.
Stuck Solutions: Troubleshooting
Scenario: Belt Jam at 7/7 Capacity
The Problem: Every slot is full, the conveyor is moving slowly, and the color you need is stuck on the tray.
The Fix: Stop tapping the tray. Look at the cup currently at the painting station. Let it pour completely. As soon as it leaves, you have 1 slot. Do not fill it immediately. Wait for the *next* cup to arrive and pour. Now you have 2 slots. This creates breathing room. Now, look at the tray. Identify the cup that is blocking others (usually a useless color). Load that useless cup just to get it off the tray. You are sacrificing a move to unblock the tray, but it is necessary to regain control.
Scenario: Cyan is Full, But Sky isn't Blue?
The Problem: Your Cyan meter says 100%, but the sky still looks patchy or white.
The Fix: This is a visual glitch or a threshold issue. The game considers the level "done" for that color even if it looks imperfect. Stop loading Cyan immediately. Loading more will not improve the visual quality; it will just waste the cup. Pivot to Green or Red. Trust the meter, not your eyes.
Scenario: Roof Won't Fill Up
The Problem: You are pouring Red on the roof, but the Dark Red meter isn't moving.
The Fix: You are using the wrong Red. You are using "Bright Red" (House Body color) on the "Dark Red" (Roof) zone. The game is very strict here. Look at the tray. Is there a cup that looks slightly darker or more brownish? That is the one you need. If there are no Dark Reds left on the tray, you may have accidentally used them on the house walls. In this case, you might be stuck. Restart the level and focus on identifying the Dark Red cups first.
Scenario: Only 3 Moves Left, 10% To Go
The Problem: You are running out of time/moves and multiple colors are unfinished.
The Fix: Prioritize the easiest colors to finish. Green is usually the easiest because the area is large and forgiving. Don't try to finish the tricky Yellow door details if you have a massive Green gap. Fill the big gaps first. If you fill Green and Cyan, you might scrape by with a partial fill on Red. If you try to do everything perfectly, you will fail everything.
Scenario: Accidentally Wrong Color Pour
The Problem: You tapped Green by mistake when you meant to tap Red.
The Fix: Don't panic. One wrong pour of Green on the Red wall is not a death sentence. It might cost you 1-2% efficiency. The bigger loss is the time spent worrying about it. Immediately adjust your plan. You now need one more Red cup than you originally planned. Load it as soon as possible. Do not restart the whole level for one minor slip; the time lost restarting is worse than the minor paint spill.
Speed Run Tips: Optimizing Your Time
The "Fast-Forward" Technique
If you are confident in your color order, you can speed up the conveyor mechanics. As soon as a cup is *mostly* poured (about 80% empty), tap the next cup on the tray or the next painting station. The game often allows you to queue the next action before the previous animation fully completes. Over the course of a 50-move level, this "animation canceling" can save you 10-15 seconds, which is huge for speed running.
Pre-Loading the End Game
Most players wait until the end to load the final details. Speed runners know what the final cups will be (usually White/Yellow). As soon as you see the White cups unblocked in the early game, get them onto the belt, even if they ride the belt for 20 cycles. This "pre-loads" the win condition. When the bulk of the level is done, your finishers are already in position, ready to pour immediately without you having to dig through the tray.
Memorizing the Tray Layout
Level 187 has a fixed tray layout. The Green is always bottom-left, Cyan top-right, etc. If you play this level multiple times, memorize the location of the Dark Red. Knowing exactly where to look for the Dark Red saves seconds that would otherwise be spent scanning the stack. Speed running is as much about memory as it is about reflex.
Minimizing Meter Checks
Beginners check the progress meters after every pour. Speed runners check them only at milestones (25%, 50%, 75%). Learn to "feel" the progress. If you have poured 4 Green cups and 2 Cyan cups, you know Green is likely ahead. Save the time of moving your eyes to the top of the screen to check the bars. Keep your eyes on the tray and the belt. Only check the bars when you are about to switch colors.
The "Bulk Load" Shortcut
In the mid-game, if you have 3 empty slots and you know you need 3 Green cups to finish the grass, load all 3 in rapid succession. Don't wait for them to pour. Loading them in a burst clears the tray faster, allowing you to see if any new colors (like hidden Dark Reds) were revealed underneath the stack you just cleared. This keeps your information updated and your options open.