
Level 197
EXPERTHow to solve Sand Loop level 197? Get instant solution for Sand Loop 197 with our step by step solution & video walkthrough. Sand Loop 197 tips and guide.
Play Sand Loop Now
Experience the puzzle challenge firsthand
Game Screenshots
Sand Loop Level Guides
Sand Loop Level 197: Complete "Country Cottage" Walkthrough Guide
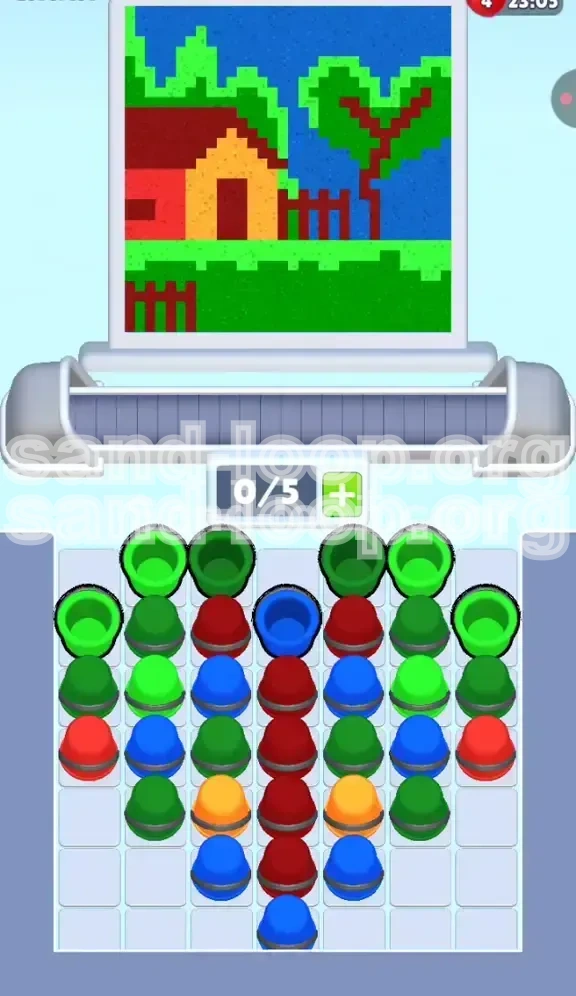
Welcome to the ultimate strategy guide for Sand Loop Level 197. This stage, known as the "Country Cottage," is a deceptive challenge that combines a pixel-art aesthetic with punishing logic mechanics. While the image of a cottage, a heart-shaped tree, and a white picket fence looks peaceful, the gameplay is strictly strategic. This is a Logic stage, meaning your reflexes are secondary to your ability to manage inventory and predict color sequences.
The primary difficulty in Level 197 stems from the strict 5-slot conveyor belt limit. The supply tray is densely packed into a heart shape, effectively burying the colors you need most (Blue for the sky) behind colors required for intricate details (Reds and Greens). If you haphazardly tap cups to dig for a specific color, you will clog your belt and face an immediate Game Over. This guide will break down exactly how to peel back the layers of the heart stack to paint the cottage efficiently.
1. Level Overview: Mechanics and Challenges
Before you tap the screen, you must understand the structural constraints of this level. Unlike speed stages, Level 197 is about precise timing and inventory flow.
The Logic Constraint
This level operates on a Logic classification. You are not racing against a fast clock; you are racing against a filling inventory bar. With only 5 slots available, you have zero margin for error. Every tap must be calculated.
The "Heart" Prison Structure
The supply tray is arranged in a heart shape. This isn't just for decoration. The top lobes of the heart (the "atria") are filled with obstruction colors—primarily Reds and Greens—that you must clear to access the lower ventricles, which contain the crucial Orange cups for the house wall.
The "Sky Bottle-neck"
The vast majority of the image is the Blue sky. However, Blue cups are concentrated at the very bottom tip of the heart stack. You cannot access them until you have cleared almost the entire upper structure. This forces you to paint the image in a specific order: details first, background last.
Precision Dispensing
The game’s nozzle logic in this level is unforgiving. It will often switch from a large pour (Sky) to a micro-pour (Fence Post) instantly. If you have queued multiple cups for a large pour, you will fail when the nozzle switches to a color you don't have ready.
2. Clear Objectives: What You Need to Do
To secure the 3-star rating on the Country Cottage, your goal isn't just to finish, but to maintain a fluid rhythm that prevents the dispenser from pausing.
Decode the Color Hierarchy
Understand that not all colors are equal. Blue is your volume filler (approx. 50% of the canvas). Green (Light and Dark) is your structural base (approx. 30%). Red, Orange, and Dark Red are detail colors (approx. 20%). You must prioritize the details first to unlock the volume filler.
Maintain Inventory Fluidity
Your secondary objective is buffer management. You should never let your conveyor belt sit static. If you have 3 cups on the belt and the nozzle is active, you are in danger. You need a constant flow of cups entering and leaving the belt to keep the slots open.
Target 100% Completion
The "fence posts" and "window frames" are single-pixel wide. Missing these will drop your accuracy percentage below the threshold for a perfect score. You must specifically queue Dark Red cups exactly when the nozzle targets these thin lines.
3. Step-by-Step Walkthrough: Phase 1 - The Foundation
The level begins with the nozzle targeting the bottom of the image: the Grass and the Fence base. This phase is about managing the Greens and Dark Reds.
The Opening Sequence: Greens
As the level starts, immediately look at the top-left and top-right of the heart stack. You will see Light Green and Dark Green cups. Tap these first. The nozzle will begin filling the grassy ground. Do not touch any other colors yet. Let the Green cups flow until the grass layer is about 40% complete.
The Fence Interception
Watch the nozzle indicator closely. While filling grass, it will abruptly switch to Dark Red to paint the fence posts. This is your first major check. You must have a Dark Red cup tapped and ready on the belt *before* the nozzle switches. Since Dark Reds are mixed in the center of the heart's top lobes, tap one Dark Red after every 2-3 Greens to keep it in your rotation.
Buffer Management Strategy
Keep your belt count between 2 and 4. Do not fill it to 5/5. Keeping one slot open gives you the flexibility to tap a "blocker" cup (like a Red you don't need yet) and move it to the front of the queue if you are desperate to clear space in the supply tray.
Excavating the First Layer
Your goal in this phase is to flatten the top "curve" of the heart. By tapping Greens and Dark Reds strategically, you will clear the first two rows of the supply tray. This reveals the first layer of the Red cups needed for the roof.
4. Step-by-Step Walkthrough: Phase 2 - The Cottage Construction
Once the grass is established, the nozzle moves up to the cottage structure. This is the most dangerous part of the level.
The Roof and Walls Dilemma
The nozzle will alternate between Red (Roof/Side Wall) and Orange (Front Face). The Orange cups are trapped deep in the middle of the heart stack. To reach them, you must tap the Red cups blocking them.
The "Shift and Hold" Technique
Here is the critical strategy: If the nozzle is painting Red, and you see Orange cups buried behind Reds in the tray, do not tap all the Reds. Tap only enough Red to keep the nozzle happy (1 or 2), then quickly tap the exposed Orange. Even if the nozzle isn't asking for Orange yet, get it onto your conveyor belt. Let it sit in the back of your queue. This is called "pre-loading."
Handling the Window Details
Occasionally, the nozzle will switch to a tiny Blue pour for the cottage windows. This is a trap. If you have a full belt of Reds and Oranges, you cannot fit the Blue. You must keep one slot open for these sporadic Blue micro-pours. If you miss the window, you lose the percentage bonus.
The Tree Trunk Transition
As the house finishes, the nozzle will move to the tree trunk. This requires Dark Red again. If you cleared all your Dark Reds in Phase 1, you will be stuck. Ensure you saved one Dark Red cup from the early game or kept a slot open to grab one from the deeper pile now.
5. Step-by-Step Walkthrough: Phase 3 - The Sky Flood
If you have survived the cottage construction, the heart stack should now look like a "U" shape, with only the bottom tip remaining.
The Blue Reservoir
The bottom of the supply tray is 90% Blue. This matches the final phase of the painting: the massive sky. Now, your strategy shifts from caution to aggression.
Rapid-Fire Tapping
You can now tap 3, 4, or even 5 Blue cups in rapid succession. Since the sky is a single, continuous block of color with no interruptions, you can fill your conveyor belt to maximum capacity (5/5) and let it drain. The "Safe Zone" has arrived.
The Tree Canopy Finale
Be careful: the very last touches are the Green tree canopy leaves at the top of the image. Just as you think you are done with the Blue sky, the nozzle will snap back to Green for the treetop. Do not tap *every* last Blue cup if the supply tray is almost empty. Leave 1 or 2 slots open so you can grab the final Green cups for the leaves without getting stuck.
Final Clearing
Once the tree canopy is green, the level ends. If you managed your queue correctly, the final cup should pour exactly as the image completes.
6. Color Order and Sequence Analysis
Understanding the strict painting order is vital for knowing when to tap specific colors.
Priority Tier 1: Dark Red (The Fence)
Dark Red is the highest priority color because it appears first (fence base) and in the most difficult pattern (1-pixel width). If the nozzle flashes for a fence post, you must have Dark Red ready immediately. There is no "waiting" for Dark Red.
Priority Tier 2: Orange (The House)
Orange is high priority because it is physically buried. It requires advanced planning (pre-loading) to ensure it reaches the nozzle in time. Orange always appears sandwiched between Red pours.
Priority Tier 3: Green (The Grass & Tree)
Green is low priority for retrieval (it is accessible at the top) but medium priority for usage. You need a lot of it, but since it's at the top of the stack, it's easy to grab when needed.
Priority Tier 4: Blue (The Sky)
Blue is the lowest retrieval priority (buried at the bottom) but the highest usage priority. You cannot touch it until Phase 3. Treat Blue cups as "unavailable" inventory for the first 60% of the level.
7. Key Tips for Success
These pro-tips will help you maintain consistency when replaying the level.
The 2-Slot Buffer Rule
Never let your active cups on the belt drop below 2. If you have only 1 cup pouring and the nozzle switches color, you have zero time to react. Keeping 2 or 3 cups on the belt ensures you have a "buffer" cup that might match the next color, buying you a split second to find the next match in the tray.
Watch the Nozzle, Not the Cup
A common mistake is staring at the supply tray looking for colors. You should be watching the dispenser nozzle in your peripheral vision. The moment it stops pouring one color and starts vibrating for the next, your eyes should snap to the tray. Anticipation is key.
Don't Clear the "Trash"
Sometimes, to get to a color, you have to tap a color you don't need. If you tap a "useless" Red cup to get to an Orange, and the nozzle suddenly wants Blue (for a window), don't panic. Let the Red cup ride the belt. It will eventually recycle or, if you are lucky, the nozzle might cycle back to Red before the cup falls off the end.
Memorize the Heart Layout
The heart stack is static. It doesn't change. Memorize where the Dark Red is located (usually the center column) and where the Orange is buried (middle-left). This muscle memory will save you seconds.
8. Common Mistakes to Avoid
Learning what not to do is often faster than learning new strategies.
The "Slot Max" Panic
Do not fill your 5 slots unless you are 100% certain the next 5 pours are the same color (i.e., the final Sky phase). Filling your slots early with mixed colors is a guaranteed loss. You become unable to adapt to the nozzle's changes.
Ignoring the Fence Pixels
The fence posts are tiny. Many players focus on the "big" colors (Red/Orange) and miss the Dark Red flash for the fence. Missing a single fence post ruins the "Perfect" bonus. Always prioritize Dark Red availability.
Pre-Tapping Blues Too Early
It is tempting to try to clear the bottom of the heart (Blue) early to "get it out of the way." Do not do this. If you tap Blues early, they will sit on your belt, blocking slots, while you desperately need Red and Green for the house. The Blues will time out or force a Game Over.
Wasting Orange Cups
Orange is scarce. Do not use Orange cups on anything other than the front wall of the house. If you accidentally pour Orange on the roof (which is Red), you cannot undo it, and you have wasted a precious resource that takes 10 seconds to dig out again.
9. Solutions for When You Are Stuck
If you find yourself failing repeatedly, use these diagnostic checks to fix your run.
Problem: Constant Clogging / Belt Full
Solution: You are tapping cups too fast. Stop tapping. Watch the nozzle. Only tap a cup when your belt count drops to 3 or below. You are trying to manage inventory too far in advance.
Problem: "Wrong Color" Errors
Solution: You are not pre-loading your queue. If the nozzle switches to Orange and you don't have it, you fail. Start looking for Orange while the nozzle is *still* pouring Red. Get the Orange ready on the belt before the nozzle asks for it.
Problem: Running Out of Dark Red
Solution: You are using Dark Red on the fence too early or missing the recycles. Check the supply tray. If you are out of Dark Red, you might have missed a stack hidden behind the Greens. Use a "Wide View" if available to spot hidden clusters.
Problem: Time Runs Out
Solution: Paradoxically, in Logic stages, rushing makes you slower. If you are running out of time, it's because your belt is clogged, causing the dispenser to stop. Clear your belt, reduce your queue to 2 cups, and let the flow normalize. Speed comes from fluidity, not fast tapping.
10. Speed Run and Shortcuts
For players aiming to top the leaderboards or just finish quickly, here is the aggressive route.
The "Chain Tap" Opener
At the very start, if the nozzle begins with Grass, you can rapidly tap 3 Green cups in a row. Since the first 10 seconds are almost entirely Green/Dark Red alternating, you can force-fill the belt with these two colors to clear the top of the heart instantly.
Skip the Window Blues
If you are going for pure speed (and not 100% accuracy), you can ignore the sporadic Blue window pours. Let the nozzle try to pour Blue, fail (pause), and then switch back to Red. This skips the need to manage Blue inventory during the house phase, saving you the mental overhead of swapping slots. (Note: This risks a "Game Over" if the pause timer is too long, so use with caution).
The Heart Collapse Strategy
Focus all your tapping energy on the left side of the heart stack. The physics of the game often cause cups to slide to the center-left. By aggressively mining the left side of the heart, you can cause a cascade that reveals the Orange cups faster than if you tapped symmetrically on both sides.
Pre-Load the Sky
In the final seconds of the House phase (while the roof is finishing), start tapping Blue cups even if the nozzle is still on Red. Get 3 Blue cups queued up. The moment the nozzle switches to Sky, your Blues are already in position, eliminating the 2-3 second delay usually spent digging for them. This shaves off crucial seconds from your final time.