
Level 212
HARDHow to solve Sand Loop level 212? Get instant solution for Sand Loop 212 with our step by step solution & video walkthrough. Sand Loop 212 tips and guide.
Play Sand Loop Now
Experience the puzzle challenge firsthand
Game Screenshots
Sand Loop Level Guides
Level Overview: The Peace Dove Challenge
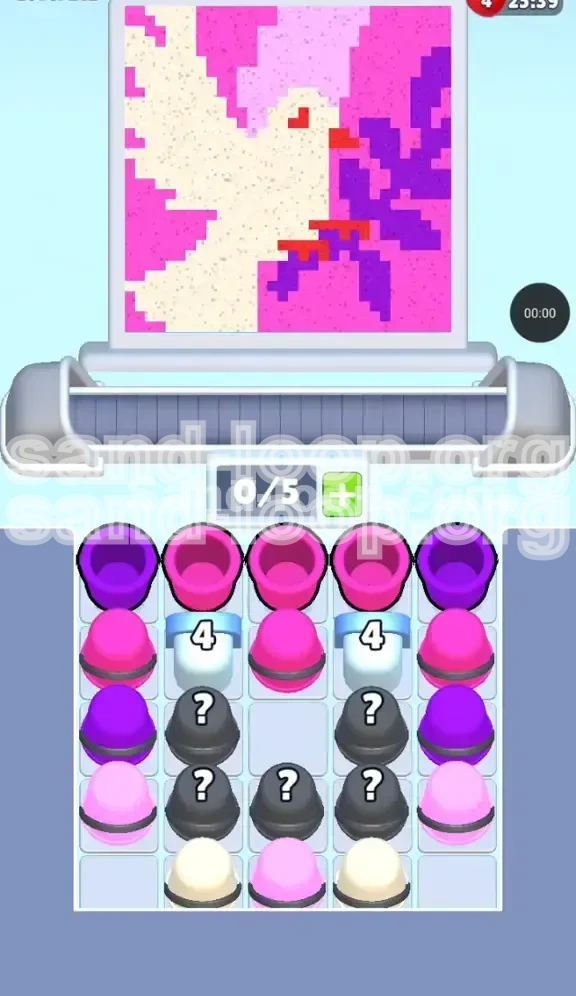
Welcome to the definitive walkthrough for Sand Loop Level 212. This stage presents a unique puzzle often referred to by the community as the "Peace Dove Challenge." While the visual of a white dove holding an olive branch suggests serenity, the gameplay mechanics are designed to test your logic regarding layering and resource management. This is not merely a coloring task; it is an excavation challenge where the order of operations is strictly enforced by the game's layout.
The primary difficulty in Level 212 lies in the "Inverse Layering" mechanic. Unlike standard levels where you might paint the focal point first, the White sand required for the dove is buried at the very bottom of the supply tray (Row 5). You physically cannot access the white sand until you have cleared the upper layers of the tray. This forces you to paint the background and the branch before the bird itself, requiring careful planning to avoid contaminating the canvas with incorrect colors.
Statistically, this level requires a higher volume of precise clicks compared to previous stages. With a tray capacity of only 5 slots and a supply tray divided into obstructed sections, your efficiency rate must be high. You will be dealing with approximately 40% background colors, 20% branch details, and 40% white dove details. The spatial constraints imposed by the "Count Blocks" mean that you cannot rely on spamming clicks; you must use a surgical approach to clear the board.
Core Objectives and Winning Strategy
Objective 1: Clear the "Count Blocks" Immediately
Your first priority is not to paint, but to clear space. The "4" blocks (blue numbered tiles) act as choke points. They sit in the middle columns of the tray, preventing the lower rows from sliding up. As long as these blocks are active, your access to the bottom of the tray is blocked. You must reduce these counters to zero within the first 10-15 moves to open up the board.
Objective 2: Execute the Background Layering
You must fill the Magenta (bottom-right background) and Purple (olive branch) sections first. This is counter-intuitive because the dove is the main subject. However, filling these areas first serves two purposes: it clears the necessary cups from the tray and creates the boundaries that will contain the White sand later. Think of this as painting a negative image; you are carving the dove out of the background colors.
Objective 3: Manage Tray Capacity
The "Belt" (the active dispensing slots) has a capacity of 5. You must maintain a rhythm of pulling and pouring to keep these slots open. If your belt is full (5/5) and a critical color appears at the dispenser, you cannot pull it without pouring something else first. This can lead to a "soft lock" where you are forced to waste sand on already completed sections.
Objective 4: Solve the Mystery Cup Sequence
Mystery Cups (marked with a question mark) appear in the middle rows. These are RNG (Random Number Generator) elements that can provide Red sand for the beak or trap you with useless colors. You must identify when to pull these and when to let them pass. A wrong move here dumps unwanted sand into your White Dove zone, ruining the run.
Objective 5: The White Sand Finale
Once the "4" blocks are gone and the upper rows cleared, the White cups will slide into position. The final objective is to unleash a continuous stream of White sand to fill the dove. This is the "Payoff" phase where the game logic guides the sand into the remaining empty pixels. If you have done the previous steps correctly, this final phase is automatic and satisfying.
Step-by-Step Walkthrough
Phase 1: The Breaking Ground (Moves 1-10)
Start the level by observing the top two rows. You will see Magenta cups on the left and right, and perhaps some Light Pink. Do not touch the Light Pink yet. Focus entirely on the Magenta cups that sit directly above the "4" blocks.
1. Pull the Magenta cups from the edges.
2. Pour them into the Magenta zones on the canvas (bottom right).
3. As you clear these cups, the game will register "adjacent clears" and chip away at the "4" blocks.
4. Repeat until the "4" blocks shatter.
5. Once the blocks are gone, the Mystery Cups and lower rows can slide up.
Phase 2: The Branch and Background (Moves 11-25)
With the board open, you now have access to Purple and more Magenta cups. The Purple cups correspond to the olive branch.
1. Pull Purple cups whenever they appear in the center.
2. Pour them into the branch on the right side of the dove.
3. Alternate with Magenta pours to finish the background.
4. Avoid pouring Magenta over the branch area, or vice versa.
5. Keep an eye on your belt count—try to keep 2 slots open for incoming Mystery Cups.
Phase 3: The Mystery Cup Gamble
As the upper layers thin out, Mystery Cups will enter the playfield. These are black cups with "?" marks.
1. Check your belt capacity before pulling. If you have 4 or 5 cups, do NOT pull a Mystery Cup yet.
2. Ensure you have 1 or 2 empty slots.
3. Pull the Mystery Cup.
4. If it is Red (for the beak), pour it immediately into the small beak pixel.
5. If it is a color you don't need, let it ride on the belt until you find a "Trash" spot (an already filled area that won't be ruined by excess sand) or until it cycles off the screen.
Phase 4: Unblocking the White Supply
This is the transition phase. The background and branch should be 100% complete. The top of the tray should be empty.
1. Stop pulling colors that are already finished on the canvas.
2. Allow the tray to slide up naturally.
3. You will see the White cups rising from Row 5.
4. Do not panic if they are not immediately accessible; clear any remaining "garbage" cups (Light Pink/Magenta) blocking them.
5. Once a White cup is reachable, move to Phase 5.
Phase 5: The Dove Fill (Finale)
The canvas should now look like a stencil: a fully colored background with a white, bird-shaped hole in the middle.
1. Pull the first White cup.
2. Pour it anywhere on the dove; the game logic will find the pixels.
3. Immediately pull the next White cup.
4. Chain these pulls: Pull -> Pour -> Pull -> Pour.
5. Since the rest of the canvas is full, you cannot make a mistake here.
6. Continue until the Victory screen triggers.
The Correct Color Processing Order
Priority Tier 1: Magenta (Dark Pink)
This is your "Key" color. It is the primary color used to break the "4" blocks and fill the largest background area. Processing Magenta first is essential because it clears the most space in the tray and establishes the boundary for the dove's underbelly and wing. If you ignore Magenta, you will be gridlocked immediately.
Priority Tier 2: Purple
Purple is the "Detail" color for the olive branch. While it is visually distinct, it is technically secondary to Magenta because it occupies less space. However, you must process Purple before White because the branch cups are located in the middle rows (Row 2-3), whereas the White cups are at the bottom (Row 5). Failing to clear Purple cups creates a physical dam that stops the White cups from rising.
Priority Tier 3: Light Pink
This color fills the top-left corner. It is isolated from the main action in the center. You can process this color at any time during Phase 1 or 2, provided you have spare belt capacity. It is low priority because it doesn't interact with the "4" blocks.
Priority Tier 4: Red (The Accents)
Red is the "High Risk, Low Volume" color. It is needed for tiny pixels (the beak and feet). You should only process Red when it appears via Mystery Cups, and only when you are ready to make a precise pour. Do not hold Red cups on the belt for long; they take up valuable space needed for White cups later.
Priority Tier 5: White
White is the "Final" color. It is the subject of the painting, but the last step of the process. The order of operations dictates that you cannot process White until the tray is excavated. Attempting to force White early is impossible due to its starting position.
Common Mistakes to Avoid
The "Early Bird" Mistake
The most common error is trying to paint the dove's head or chest with White sand as soon as you see a tiny bit of white available, or worse, clearing the background incorrectly and leaving gaps. If you pour White sand before the background is fully sealed, that white sand will spill into the Magenta or Purple zones, creating a permanent gray stain that ruins the purity of the background colors.
The "Full Belt" Trap
Players often get greedy and pull cups to fill all 5 belt slots immediately. This is dangerous. When a Mystery Cup appears containing Red sand, and your belt is full of Magenta, you have no room to maneuver. You are then forced to either pour the Red sand into the wrong spot or pour Magenta onto a completed spot to make room. Both options waste resources. Always keep at least 1 slot (ideally 2) open.
The "Count Block" Blindspot
Ignoring the numbers on the blue blocks is a fatal strategy. Some players focus purely on color matching and ignore the blocks. This results in a "Gridlock" scenario where you have cleared all accessible colors, but the bottom half of the tray is stuck because the blocks remain. You are then left with no moves and no space. Always prioritize clearing blocks over painting pretty pixels.
The "Mystery Cup" Panic
When a Mystery Cup reveals a color you don't want (e.g., White appearing early), panic sets in. Players often immediately pour it onto the nearest empty spot to get rid of it. This contaminates the canvas. If you get a color you don't need, simply let it sit on the belt until you find a safe place to dump it, or wait for the Mystery Cup to cycle out if the game allows (though in this level, you usually have to trash it).
What to Do If You Get Stuck
Solution 1: Diagnose Your Blockage
If you cannot make any moves, pause and look at the blue blocks. Are they still there? If yes, your problem is structural. You need to look for any cup sitting *on top* of or *adjacent* to those blocks. You may have missed a single Magenta cup hiding behind a Mystery Cup. Clear that cup to reduce the block number.
Solution 2: The "Trash Dump" Maneuver
If your belt is clogged with colors you don't need (e.g., you have finished the Purple branch but still hold a Purple cup), you need to dump it. Pour the excess sand into an area of the canvas that is already 100% full of that same color. The game will absorb the excess without penalty, freeing up your belt slot.
Solution 3: Reset the RNG (Mystery Cups)
If you are waiting for a specific color (like Red) to finish the beak, but the Mystery Cups are giving you junk, you might be stuck waiting. Use this time to perfect the background edges. Pour sand into the corners of the Magenta zone to sharpen the lines. This "busy work" keeps the game moving and cycles the tray faster, eventually bringing the color you need to the top.
Solution 4: Check for Hidden Pixels
Sometimes you think you are done with a color, but a single pixel remains unfilled. The game will not let you clear that color cup until that pixel is filled. Zoom in (if possible) or carefully scan the edges of the canvas for that one missing pixel. It is often hidden in the tail feathers or the corner of the branch.
Speed Run Tips and Shortcuts
Shortcut 1: Pre-Loading the Belt
As you finish breaking the "4" blocks, try to time your pulls so that your belt is already loaded with the next set of necessary cups (Purple/Magenta) before the blocks even fully shatter. This saves seconds on the animation of cups sliding up.
Tip 2: Batch Pouring
Instead of Pull -> Pour -> Pull -> Pour, try to Pull -> Pull -> Pour -> Pour. Group your actions. If you have two Magenta cups on the belt, pour the first one, and while the sand is flowing, tap the second one to queue it up or pour it immediately after. This minimizes the downtime between animations.
Tip 3: Ignore Perfection
For a speed run, you don't need 100% pixel-perfect edges on the background. The goal is to clear the cups. If a tiny bit of Magenta spills slightly into the White zone (and the game allows it without failing the level), it might be faster to leave it and cover it with White later. However, this is risky and only recommended for advanced players.
Tip 4: The "Beak" Snipe
The Red beak is the fastest part of the level if you are lucky. If a Mystery Cup reveals Red, don't wait. Snipe it immediately. If you miss the window and the cup cycles away, you lose valuable time waiting for the RNG to bring it back. Prioritize the Red beak above all else the moment it appears.