
Level 214
HARDHow to solve Sand Loop level 214? Get instant solution for Sand Loop 214 with our step by step solution & video walkthrough. Sand Loop 214 tips and guide.
Play Sand Loop Now
Experience the puzzle challenge firsthand
Game Screenshots
Sand Loop Level Guides
Level Overview: The Sunset Pier Challenge
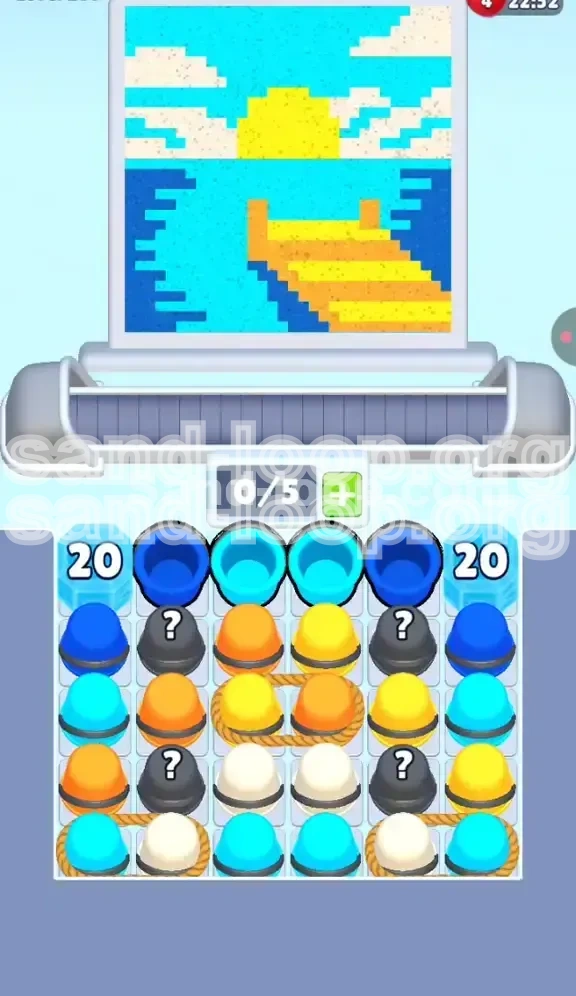
Welcome to the "Sunset Pier," one of the most intricate logic puzzles in Sand Loop. This level is not just about matching colors; it is a masterclass in resource management within a confined space. Visually, you are constructing a scene featuring a wooden pier stretching into a calm sea under a setting sun. However, the gameplay reality is a claustrophobic struggle against board geometry.
The Dual-Layer Constraint
Unlike previous levels where you had a wide tray to play with, Level 214 restricts your movement significantly. The board is divided into three distinct vertical zones. The left and right zones are locked behind massive "20-count" Ice Blocks. This forces you to operate within a narrow central channel for the first 60% of the level. Understanding this restriction is the first step to victory.
The Visual Palette
The target image is deceptive. It looks simple: Blue water, Cyan sky, Orange pier, and Yellow sun. However, the distribution is specific. The bottom 40% of the canvas is dominated by Deep Blue water. The middle section is a checkerboard nightmare of Orange and Yellow (the pier). The top is a mix of Cyan and White. If you treat this as a simple "bottom-up" painting, you will fail.
The "Slot" Economy
In this level, your 5 available slots are the most valuable currency. Because the side columns are frozen by ice, you cannot "store" unwanted cups on the sides. You must process what is on the belt immediately. If your slots are clogged with White clouds while you are trying to paint the Blue water, the game will deadlock.
The Bottleneck Effect
The central channel creates a funnel. New cups enter from the top, but if the conveyor belt is full, the mechanism jams. Since you cannot offload cups to the frozen side columns, you must be incredibly precise about the order in which you tap cups. This level requires a rhythm of "tap one, clear one" rather than "tap everything in sight."
Why Standard Speed Fails
Attempting to speed-run this level by tapping rapidly will result in an instant soft-lock. The specific arrangement of the "20" Ice Blocks means that premature expansion of your playable area is impossible. You must grind through the center column colors before the sides open up. Patience is more valuable than speed here.
Calculated Difficulty
Statistically, this level has a higher failure rate than average due to the "Mystery Cup" mechanic in the center. With a 50% chance of getting a color you don't need early on, Level 214 is as much about luck management as it is about strategy. We will discuss how to mitigate bad RNG in the walkthrough below.
Strategic Analysis: The Sunset Gradient
Before we make a move, we need to analyze the dependencies in the pixel art target. The "Sunset Gradient" is not painted randomly; it follows a specific layer order that dictates your gameplay.
Layer 1: The Deep Blue Foundation
Priority: Maximum. The canvas requires a solid base of Deep Blue to form the water. This color occupies the bottom corners and the lower center. Since sand flows from the bottom up in the nozzle logic (conceptually), you must secure these Blue cups first. If you run out of Blue while the nozzle is trying to paint the water, you will be forced to use other colors, causing errors.
Layer 2: The Pier Checkerboard
The pier is the most complex part of the image. It consists of Orange and Yellow planks arranged in a checkerboard pattern. This is the "Danger Zone." You cannot simply finish all Orange then move to Yellow; the game will demand you switch between them rapidly. Furthermore, these colors sit "visually" on top of the water, meaning you often need to pause the water progression to lay down a pier plank.
Layer 3: The Cyan Transition
Cyan serves two purposes: the sky and the water reflections. This is where players often get stuck. The Cyan cups are located deep in the level, initially blocked by ropes and ice. You must resist the urge to clear the top sky (White/Cyan) until the bottom is stable. Prematurely triggering the sky colors will clog your belt with colors that cannot be painted yet.
Layer 4: The Sun and Clouds (Yellow/White)
The Sun is pure Yellow, and the clouds are White. These are "end-game" colors. They are located at the top of the canvas and the bottom of the cup stack. Accessing them too early is a guaranteed loss. You must view the Yellow sun and White clouds as the finish line, not the starting point.
The Dependency Chain
Visualize the level as a chain. The Ice blocks (sides) hold the Cyan/Blue. The Ropes (center) hold the Orange/Yellow. The Mystery cups (top) hold the Wildcards. You cannot break the chain by pulling the wrong link. You must clear the initial Blue -> Solve the Ropes -> Break the Ice -> Paint the Sky.
Fill Prediction Logic
The nozzle's fill algorithm follows a "nearest neighbor" logic. It will try to paint the lowest available pixel first. If you have a cup of White (sky) and a cup of Blue (water) on the belt, the nozzle will prioritize the White if the pixel is closer to the nozzle's origin, or if the Blue is blocked. You must manage the queue so the correct color is at the front of the line when the nozzle is ready.
Step-by-Step Walkthrough: The Blue Opening
The opening moves of Level 214 are scripted. You have no choice but to play the hand you are dealt. Here is how to navigate the first 30 seconds of the level.
The Initial "U" Shape Maneuver
As the level starts, look at the top center. You will see a formation of four Blue Cups arranged in a "U" shape. Tap these four immediately. Do not wait. Do not look at the Mystery cups yet.
- Reasoning: These four cups correspond to the Deep Blue water foundation. Tapping them sends them to the nozzle.
- Outcome: This clears the top row of cups, allowing the heavy blockers (Ice and Ropes) to slide down into the active zone.
Managing the Initial Belt
After tapping the four blues, check your conveyor belt (your slots). You should have 4/5 slots filled with Blue. Watch the nozzle paint the bottom of the canvas. Do not tap anything else until one of these Blues clears. You must keep at least one slot open for emergency management.
Identifying the Blockers
Once the top row clears, you will see the layout of the board. You have the "20" Ice Blocks on the far left and right. You have a cluster of Mystery Cups in the top center. You have the Roped Cups (Orange/Yellow) in the middle. Take a mental pause. Identify which colors are currently missing. You likely need more Blue and the Pier colors (Orange/Yellow).
The First Mystery Cup Reveal
Now, look at the four Mystery Cups. Tap only one.
- If it reveals Blue: Great! Tap another one if you have slot space.
- If it reveals Orange/Yellow: Good. Tap another if you have slot space.
- If it reveals White (Cloud) or Cyan: STOP. Do not tap any more Mystery Cups. A White cup at this stage is a "Dead Card." It cannot be used until the very end. You must leave it sitting on the board rather than clogging your belt.
The "Slot Math" Check
Before you touch the Roped Cups in the center, do a quick count. Your belt should have a mix of Blue and maybe one Pier color. Ensure you have at least 2 empty slots. Why? Because the next step requires tapping a rope, which adds TWO cups to your belt instantly. If you are at 4/5 capacity, tapping a rope will overflow your belt and cause a Game Over.
Establishing the Rhythm
Your goal in this opening phase is to establish a painting rhythm. The nozzle should be continuously laying down Blue water. You are looking for opportunities to slip in Orange or Yellow to start the pier, but Blue is your primary food source. Do not let the Blue run dry.
Step-by-Step Walkthrough: Cutting the Orange/Yellow Ropes
The middle phase of Level 214 is defined by the "Roped Pair." This is the mechanic that claims the most unprepared lives. Here is how to cut the rope without hanging yourself.
Understanding the Rope Mechanic
In the center of the board, an Orange Cup and a Yellow Cup are tied together with a white rope. Tapping this cluster is not a single action. It is a double action. Tapping the rope consumes 2 slots of capacity instantly. You cannot separate them; they join the belt as a pair.
Pre-Condition for Tapping
Never tap the rope unless your slot counter reads "0/5", "1/5", or "2/5". If your counter reads "3/5" or higher, you are walking into a trap. You must wait for the nozzle to purge the current sand before cutting the rope. Patience here prevents a restart.
The Pier Painting Sequence
Once the Orange and Yellow cups hit the belt, the nozzle will start switching between them. Watch the pixel art preview closely. The pier planks are a checkerboard. The nozzle will paint an Orange plank, then a Yellow plank. You don't need to micro-manage the order, but you do need to ensure the belt doesn't run dry of these colors. If the nozzle tries to paint a Yellow plank but only has Blue available, it creates a defect.
Clearing the Center Channel
As you process the Orange and Yellow cups, you are effectively clearing the center channel of the board. This is critical. The center channel is the only active path for new cups to enter the bottom. You must keep this flow moving. Do not let the center clog up with Mystery Cup rejects (White/Cyan).
Handling the "Rope Rhythm"
There is a rhythm to the center phase. It goes: Tap Rope -> Wait for slots to clear (painting happens) -> Tap Blues/Refills -> Wait for slots -> Tap Rope. Do not rush. If you tap the second rope cluster (if there is a deeper layer) too soon, you will overload your capacity. Maintain the "0/5 to 2/5" rule strictly.
The Pier Completion Check
How do you know when this phase is done? Look at the canvas. The wooden pier should be fully formed across the center of the image. The water below it should be solid Deep Blue. Once these two elements are 100% complete, you are ready to trigger the next phase: Breaking the Ice.
Step-by-Step Walkthrough: Breaking the Ice & The Sky Finale
The endgame begins when the center is clear and the massive Ice Blocks start to crumble. This is where the board opens up, and the final challenge begins.
Triggering the Ice Break
The "20" Ice Blocks on the sides are linked to the clearing of the center board. As you process the center cups (Blues, Oranges, Yellows), the counter on the ice goes down. Once the center channel is empty or near-empty, the ice will shatter. You don't need to tap the ice; it breaks automatically as a reward for clearing the center.
The Side Column Reveal
When the ice breaks, two new columns of cups slide into view from the left and right. These are primarily Cyan and the remaining Deep Blue cups. Now, for the first time, you have access to the full width of the board. Your playable area has doubled.
The Cyan Shift
Immediately shift your focus from Blue/Orange to Cyan. The top half of the painting (the sky and reflections) requires Cyan. The game will now start feeding you Cyan cups from the sides. Tap these aggressively. The bottom of the canvas is done; the nozzle is now moving up the image.
The Final Rope Trap
At the very bottom of the board, there is one last trap: A White and Cyan pair tied together. This is the final boss.
- The Trap: If you tap this while the nozzle is still working on the mid-section Cyan, you will clog the belt.
- The Solution: Wait until the canvas is 90% filled. Only the top clouds and sun should remain. THEN, tap this final pair. The White is for the clouds, and the Cyan is for the final patches of sky.
The Sunset Finale
With the final rope tapped, the last colors will flow onto the canvas. The Yellow sun will glow against the Cyan sky. The White clouds will fluff up. As long as you managed your slots and didn't tap the White too early, the level will complete itself here. Watch the satisfying final fill animation. You have conquered the Sunset Pier.
Master Tips and Common Mistakes
To ensure a 100% success rate on Level 214, review these critical tips and the pitfalls that ensnare most players.
Key Tip: The "Mystery Cup" Rule of Thumb
Develop a strict policy for the "?" cups. If the board is already half-full of "Sky" colors (Cyan/White) and the "Water" (Blue) isn't done, do not tap Mystery Cups. It is statistically likely they will give you more Sky colors, causing a jam. Only tap Mystery Cups when the board is empty or when you desperately need a specific color to bridge a gap.
Key Tip: Watch the "0/5" Counter
Keep your eyes on the slot counter more than the canvas. If you see "3/5", stop tapping. The game is giving you a warning. Always keep 2 slots open as a buffer for unexpected color shifts or rope clusters. This single habit will prevent 90% of Game Overs.
Common Mistake: Pre-painting the Sky
Many players try to clear the top of the canvas (the sky) early because the cups are accessible via Mystery Cups. This is wrong. The nozzle paints from bottom to top. If you paint the sky first, the nozzle will have to "paint over" it later or get stuck trying to reach the bottom water behind the dry sky paint. Always respect the bottom-to-top layering.
Common Mistake: Ignoring the Checkerboard
Don't assume all the Pier colors are the same. The Orange and Yellow must be treated as equal partners. If you clear all your Yellow cups but leave a row of Orange cups on the belt, you will create a defect. Balance the intake of Pier colors. Don't let one color run dry while the other is flooding the belt.
Stuck Solution: The "Soft Lock" Fix
If you are stuck and the nozzle isn't painting anything, check the belt. You likely have a color queue that doesn't match the available pixels (e.g., you have White but only Blue pixels are left). To fix this, you may have to waste a cup. If absolutely necessary, drag a cup to the "trash" zone (if available) or just wait and see if the game auto-corrects. Usually, the issue is just a temporary jam where a color needs 2 more seconds to clear.
Speed Run Tips: The "Slot Shuffle"
For experienced players looking to 3-star this level, use the "Slot Shuffle." As soon as a cup enters the nozzle, immediately tap the next cup you need. Do not wait for the animation to finish. By the time the nozzle is free, your next cup will be arriving. This shaves seconds off your time. However, this requires you to have memorized the color order perfectly.