
Level 220
HARDHow to solve Sand Loop level 220? Get instant solution for Sand Loop 220 with our step by step solution & video walkthrough. Sand Loop 220 tips and guide.
Play Sand Loop Now
Experience the puzzle challenge firsthand
Game Screenshots
Sand Loop Level Guides
Level Overview: The Logic of the Potted Lavender
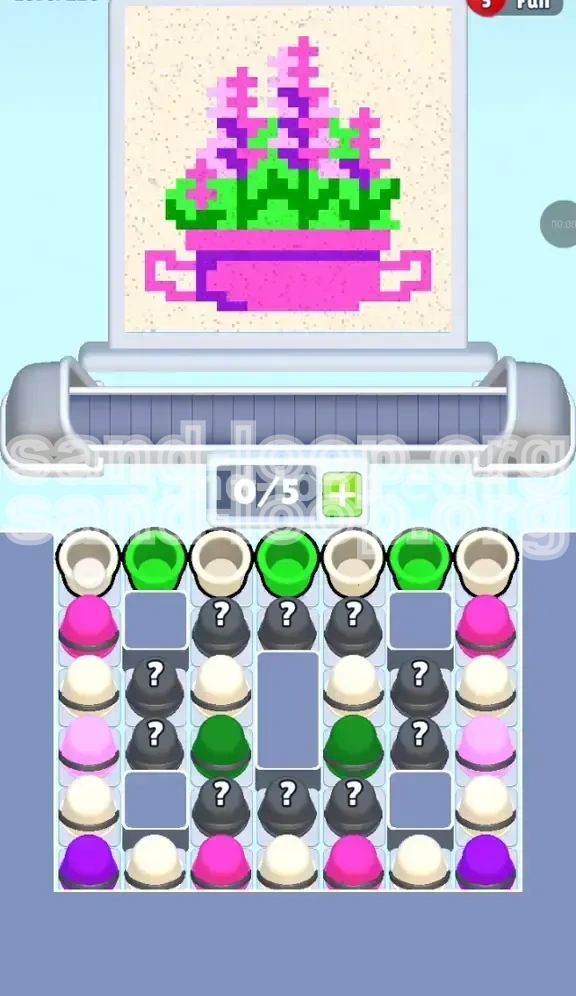
Sand Loop Level 220 is a deceptive puzzle that hides a complex logistical challenge behind a charming pixel art facade: a Potted Lavender plant. While the image appears simple—featuring a vibrant pink pot, lush green foliage, and delicate purple floral spikes resting on a cream-colored background—the gameplay mechanics are designed to test your patience and planning rather than your speed.
This level is classified as a "Mystery Block Logic" stage. Unlike standard levels where you can see every obstacle, the center of your supply tray is obscured by gray cups marked with question marks (?). This creates a "Fog of War" effect where you must make decisions based on probability and immediate necessity rather than a clear overview. The primary difficulty lies in managing your limited 5-slot conveyor belt while dealing with unknown variables. If you blindly tap cups, you will flood your belt with unusable colors, causing a deadlock that forces a restart. Success in this level depends entirely on disciplined resource management and the ability to isolate specific columns to control the flow of materials.
Core Objectives and Strategic Approach
To conquer Level 220, you must shift your mindset from "clearing rows" to "managing flow." Your goal is not just to paint the canvas, but to control the specific order in which colors are released from the tray. The Mystery Blocks in the center columns act as gates; opening them too early or in the wrong sequence will release colors you cannot use yet, clogging your workflow.
The 60/40 Background Rule
The canvas is dominated by the Cream (Beige) background, which accounts for approximately 60% of the total pixels. However, you cannot simply flood the canvas with Cream first. The Cream cups are interlocked with the Green cups at the very top of the tray. Your objective is to harvest these two colors in a specific rhythm to establish the "sky" without depriving yourself of the Green needed for the leaves.
The Column Isolation Strategy
The most critical objective is to avoid clearing the top row horizontally. Doing so will reveal five Mystery Blocks simultaneously. If even two of those are Dark Violet (a color used sparingly for shadows), they will sit on your conveyor belt taking up space while you wait for Pink or Green. You must aim to clear columns vertically—drilling down one path at a time—to reveal Mystery Blocks only when you have the capacity to deal with them.
The "Top-Down" Color Priority
Unlike most puzzles where you work background to foreground, Level 220 requires a hybrid approach. You must prioritize the Green Leaves and Pink Pot (mid-ground elements) before the final Lavender touches. This is because the Pink and Green cups are physically higher and more accessible in the tray than the buried Light Purple cups. Focusing on the flowers too early will drain your belt of slots needed for pot maintenance.
Managing the "Shadow" Variable
Dark Violet is the "danger color" of this level. It comprises less than 5% of the total canvas but causes 90% of failures. Your objective is to keep Dark Violet cups on the tray (or in the single slot on your belt) until the very specific moments they are needed—specifically for the pot's base shading and the depth of the flower centers. Do not treat them as a standard paint color; treat them as a "key" that must be used at the exact right lock.
Conveyor Belt Hygiene
Your final constant objective is to maintain "Belt Hygiene." You have 5 slots. A healthy run keeps 2 slots empty at all times. This "buffer zone" allows you to shuffle cups when a Mystery Block reveals an unwanted color. If you let your belt fill up completely (5/5 slots), you lose the ability to react to the Mystery Blocks, and the run is effectively over.
Complete Step-by-Step Walkthrough
This walkthrough divides the level into four distinct phases. Follow these steps in order to ensure a smooth completion.
Phase 1: The Green & Cream "Opener"
The game begins with a fully visible top row. You will see an alternating pattern: Cream, Green, Cream, Green, Mystery.
Step 1: Start by tapping the Green cups. Look at the canvas; the leaves form a clump at the bottom center. You need to establish this green base early.
Step 2: Immediately tap the adjacent Cream cups. As the Green fills the leaves, the Cream should start filling the background surrounding them.
Step 3: Stop Tapping. Once the visible top row (Cream and Green) is cleared, pause. Do not tap the visible Pink cups on the sides yet. Do not tap the Mystery block in the center yet.
Step 4: Allow your conveyor belt to empty. Pour the existing Green and Cream paint onto the canvas. You want your belt to be completely clear (0/5 slots used) before you initiate Phase 2. This reset is crucial for handling the unknowns of the mid-game.
Phase 2: The Side Drills for Pink
With the top row cleared, you now have access to the "Next" row of cups. However, the center columns are still blocked by Mystery Blocks. Your focus now shifts to the far left and far right columns.
Step 1: Locate the Neon Pink cups. They are located in the "Next" row on the extreme left and right edges of the tray. These are safe because they are visible.
Step 2: Tap the far-left column to free the Pink cup. Do not clear the whole column; just clear enough to drop the Pink onto your belt.
Step 3: Tap the far-right column to free the second Pink cup.
Step 4: Load these Pink cups onto your belt. The Neon Pink pot is the largest contiguous object in the puzzle. You need a constant stream of Pink. By drilling the sides, you bypass the Mystery Blocks entirely and secure the fuel for your pot.
Step 5: Pour the Pink. Focus on filling the main body of the flower pot. Avoid the small shadow pixels at the very bottom of the pot for now.
Phase 3: The "Mystery" Mid-Game Control
This is the most dangerous phase. You have likely exhausted the easily accessible Pink and Green. You must now interact with the center Mystery Blocks to progress.
Step 1: Tap only one Mystery Block cup at a time. Do not clear a whole row of them.
Step 2: Observe the revealed color immediately.
- If it's Pink: Add it to your current flow.
- If it's Green: Use it to finish the leaves.
- If it's Dark Violet: STOP. Check the canvas. Are the pot shadows ready? If not, keep this cup on your belt but do not pour it yet. Use it as a placeholder until you need it.
- If it's Light Purple: This is rare early, but if it appears, check if the leaves are done. If not, keep it on the belt.
Step 3: Maintain the "2-Slot Buffer." Never let more than 3 cups sit on your belt unless you are 100% sure of their usage order. This buffer allows you to grab a new Mystery Block, reveal it, and decide whether to use it or hold it without clogging the system.
Phase 4: The Lavender Finale
Once the Pink Pot and Green Leaves are 100% complete, the board state stabilizes.
Step 1: The Mystery Blocks will likely reveal a flood of Light Purple (Lavender) and Cream.
Step 2: Shift focus to the flower spikes. Use the Light Purple to paint the top clusters of the plant.
Step 3: Use the Dark Violet cups you "saved" from Phase 3 to add the final shading details to the pot base and the center of the flower clusters.
Step 4: Finish with the Cream background. By now, the tray is likely emptying out. Use the remaining Cream cups to fill the last pixels of the sky in the top corners of the canvas.
Essential Tips and Common Pitfalls
Even with a plan, Level 220 can go wrong in seconds. These tips are designed to prevent the most common causes of failure.
The "Fog of War" Trap
The biggest mistake players make is treating the gray Mystery Blocks like normal obstacles. They are not; they are randomizers. If you are feeling confident and start tapping faster, you will trigger multiple Mystery Blocks. If three of them turn out to be Dark Violet while you are trying to paint the main Pink pot, your belt will fill up with unusable paint. Tip: Always slow down your tapping speed to about 50% normal pace whenever you are interacting with the center columns.
The Dark Violet Bottleneck
Dark Violet is the bottleneck of this level. Because there are so few pixels requiring it (estimated 10-15 pixels total), the game's algorithm tends to generate these cups disproportionately. Tip: If you have a Dark Violet cup on your belt and the canvas isn't ready for it, pour a different color *first* to clear a slot, then bring the Violet back. Never hold two Dark Violet cups at once; you only need one to do the job.
Ignoring the Side Columns
Many players fixate on the center of the screen because that's where the plant is. Consequently, they ignore the far left and right edges of the tray. Tip: The side columns are your "safe zones." They contain the high-volume Pink and Green cups. If your belt is clogged, look to the sides. Tapping a side column is a guaranteed safe color that won't introduce a risky Mystery Block into your workflow.
Misidentifying Shadow Pixels
The pixel art for the Potted Lavender is high-detail. The Dark Violet shadows on the pot are small, sometimes just 1 or 2 pixels wide at the bottom curve. Players often mistake these for part of the background or the main Pink pot. Tip: Zoom in on the canvas (pinch out) to verify if a pixel is truly Pink or if it is a Dark Violet shadow. Pouring Dark Violet into a Pink area creates an error that is hard to fix without wasting a whole cup.
Over-Filling the Background
Since Cream is the background color, it's tempting to finish it first. However, the Cream cups are needed to "unlock" the Green cups in the early game. If you pour all your Cream immediately, you might be left with Green cups on the tray but no Cream to clear the row above them. Tip: Only pour Cream in the top 30% of the canvas until the Green leaves are fully established.
Speed Run and Optimization Guide
Once you have mastered the logic, you may want to improve your time. Achieving a 3-star rating requires optimizing your movements and minimizing "decision latency."
The "Rhythm Method" Tapping
In the opening phase, don't tap randomly. Establish a rhythm: Green-Cream, Green-Cream. By alternating your taps between the columns, you ensure that both colors arrive on the belt simultaneously. This prevents the "stop-start" waiting that occurs when you pour all your Green and then have to wait for the Cream to catch up.
Pre-Loading the Belt
Advanced players use the belt capacity to their advantage. During Phase 2, try to have 2 Pink cups and 1 Green cup sitting on the belt *before* you finish the previous color. This pre-loading means that the instant you finish pouring one cup, the next is ready to go. This eliminates the 1-2 second delay of waiting for a cup to slide from the tray to the belt.
The "Tap and Cancel" Tech
This is a high-level technique for Mystery Blocks. If you tap a Mystery Block and it reveals a Dark Violet (which you don't want), you can immediately tap a *different* column (like a side column) to push the Violet further down the belt queue. This effectively "cancels" the immediate problem of the Violet blocking your pouring slot, allowing you to deal with it later without it pausing your current action.
Shortcutting the Lavender Layer
You don't need to wait for the Green leaves to be 100% perfect to start the Lavender. Once the leaves are roughly 80% filled, you can start pouring Light Purple into the top spikes. Because the Lavender and the Green leaves rarely touch, you can have two colors (Purple and Green) on your belt simultaneously. Working on these two areas in parallel can shave 15-20 seconds off your total time.
Endgame Board Clearing
In the final 10 seconds, the tray often enters a "flood state" where it releases all remaining cups. Don't worry about order here. Just tap any column that has a cup. As long as you have your 2-slot buffer, the physics of the game will sort the cups onto your belt. Your only job is to pour as fast as you can. Trying to be precise here actually slows you down; brute force tapping is faster when the level is essentially won.