
Level 28
HARDHow to solve Sand Loop level 28? Get instant solution for Sand Loop 28 with our step by step solution & video walkthrough. Sand Loop 28 tips and guide.
Play Sand Loop Now
Experience the puzzle challenge firsthand
Game Screenshots
Sand Loop Level Guides
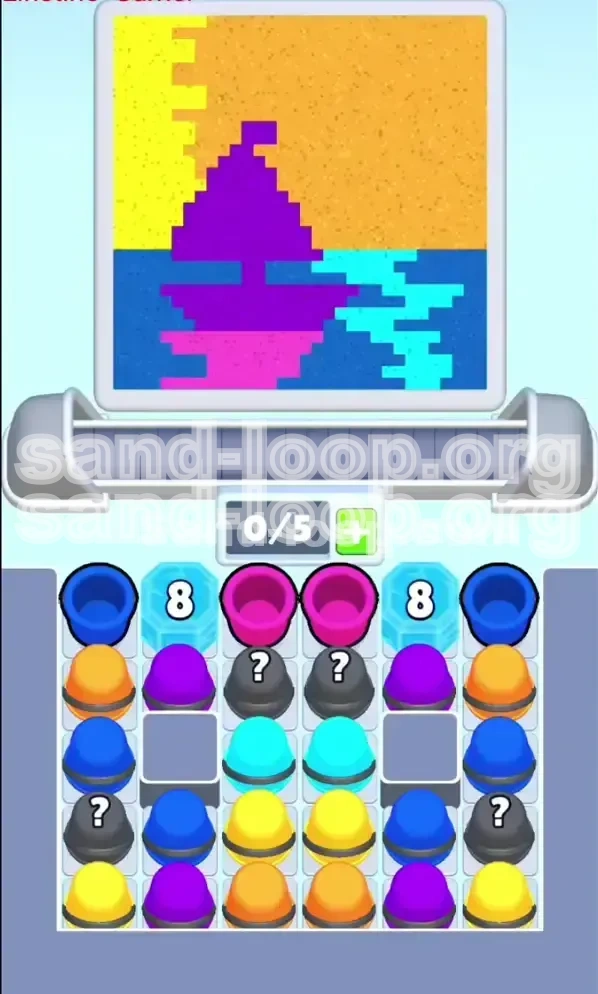
Level Overview: The Purple Sailboat Challenge
Welcome to Level 28, a stage that marks a significant jump in difficulty due to its structural bottlenecks. This level is visually defined by the Purple Sailboat artwork, featuring a vibrant split background of a yellow sun and orange sky against dark blue water. However, the aesthetic beauty hides a ruthless mechanic known as the "Ice Wall."
The primary challenge here is not color matching accuracy, but resource management. You are facing a scenario where your supply lines are physically choked by two massive Ice Blocks. Unlike standard levels where you can access any color immediately, this level forces a strict opening sequence. You are effectively playing with one hand tied behind your back until you can break these walls. The stage requires you to balance the immediate need to clear space with the long-term requirement of preserving specific colors for the sailboat and the complex water reflections below.
The "Ice Wall" Mechanic
The defining feature of Level 28 is the presence of two Blue Hexagon Ice Blocks stamped with the number "8." These are not merely obstacles; they are hard locks on the game board's geometry. These blocks sit directly on top of the 2nd and 5th columns of your cup dispenser. This means any Purple cups located underneath these blocks are completely inaccessible until the counter reaches zero. The counter only decreases by one for every successful cup poured. This forces a linear gameplay style where you must make exactly 8 specific moves before you can access the majority of your offensive colors.
Visual Analysis: The Four Zones
To succeed, you must deconstruct the artwork into four distinct processing zones. The top-left consists of a solid Yellow sun block, while the top-right is a large Orange sky section. The center features the Purple boat, which is complex but smaller in area than the sky. The bottom "Danger Zone" is the water, which utilizes a high-frequency dithering pattern mixing Dark Blue, Cyan, and Pink. Understanding these zones is critical because the game's painting algorithm usually targets the largest contiguous blocks of color first, meaning you will be dealing with Yellow and Orange demands before the Purple boat becomes relevant.
The Board Geometry Problem
Your playable grid is severely restricted. With two columns blocked by ice, you have limited conveyor belt space to queue cups. This creates a high risk of "deadlocks"—situations where you need to move a cup to the belt to pour it, but the belt is full of wrong colors. Because you cannot dig down the blocked columns to swap cups, you must be extremely selective about which cups you load into your queue. You cannot simply rely on clearing what is in front of you; you must actively manage the "corks" (top cups) in the unblocked columns to ensure the flow of new cups.
The Dithering Difficulty
The water section at the bottom of the canvas is where most players fail. The game engine renders water using a checkerboard "dithering" pattern rather than solid blocks. This means the dispenser nozzle will switch rapidly between Dark Blue, Cyan, and Pink in short bursts. If you queue two Dark Blue cups in a row, assuming the water is one solid color, you will inevitably miss the single-pixel Cyan or Pink reflections sandwiched between them. This requires you to interrupt your color flow constantly, preventing you from building a rhythm.
Why This Level is Tricky
Level 28 is tricky because it punishes hoarding. New players often try to save Purple cups for the boat, clogging their limited slots. However, since the boat is painted *after* the sky, holding Purple causes a jam that prevents you from clearing the Ice Blocks. The level forces you to ignore the main subject (the boat) for the first 25% of the game to focus entirely on the background (sky). This counter-intuitive strategy is the main reason for failure rates on this specific stage.
Clear Objectives: Your Mission Goals
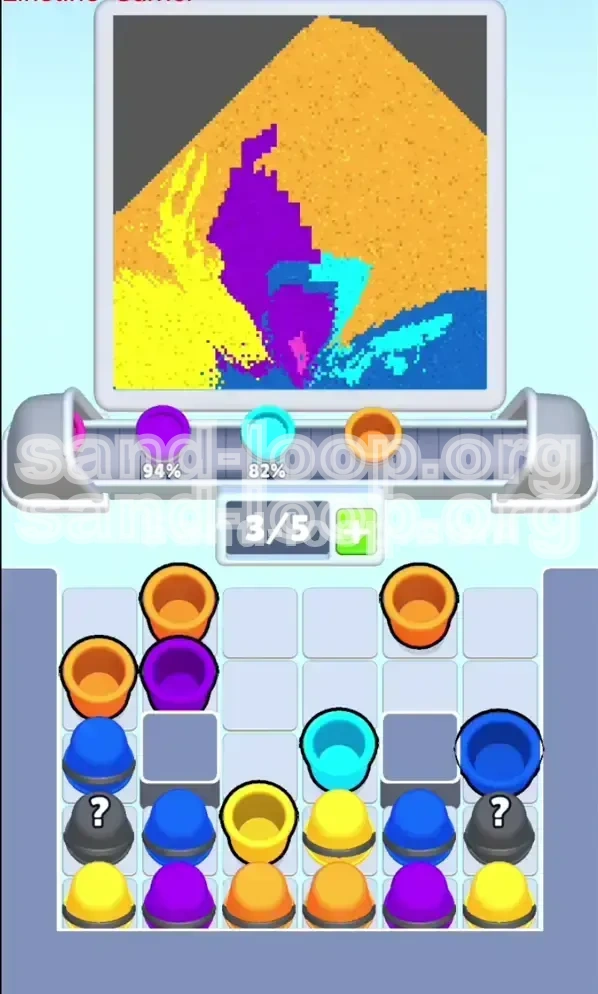
To clear Level 28 with a high score and minimal frustration, you need to shift your focus from "painting the picture" to "managing the board." Your objectives are divided into three distinct phases: The Breakout, The Sky Clear, and The Detail Work. Completing these phases in order is the only reliable path to victory.
Phase 1: The "Breakout" (First 8 Moves)
Your absolute first priority is math, not art. You need to generate 8 successful pours to shatter the Ice Walls. Do not worry about matching the artwork perfectly during this phase. In fact, it is acceptable to make small mistakes on the sky if it means getting a pour through. Every time you send a cup to the dispenser, the counter drops. You must treat this as a race against the clock. If the game asks for Orange and you only have Yellow, send the Yellow anyway just to keep the counter moving, provided it doesn't ruin the sky entirely. The goal is simply to reach move #8 as fast as possible.
Phase 2: Unlocking the Supply Lines
Once the Ice Blocks shatter, the board physics will shift. The columns will drop, revealing the Purple cups trapped underneath. Your immediate objective here is to clear the "debris"—the cups that were blocking the Purple ones. You must prevent the newly revealed Purple cups from clogging your active slots. If you dump all your Purples immediately, you will have no room for the other colors needed for the sky. The objective is to release the pressure by clearing side columns while keeping Purple as a reserve, not as an active dump target.
Phase 3: The Sky Saturation
The game algorithm prioritizes large background blocks. You will face a massive demand for Orange (top right) and Yellow (top left). Your objective is to clear these colors *before* the water details start appearing. If you still have Yellow/Orange cups clogging your belt when the game starts asking for water pixels, you will fail. You must aim to have the top 50% of the canvas 90% filled before you allow yourself to focus on the boat or water.
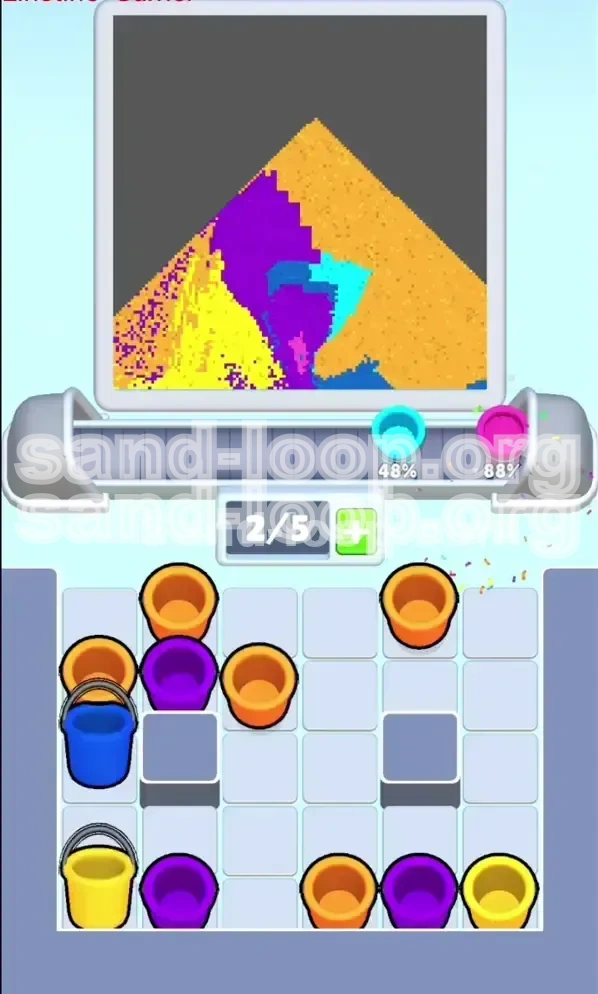
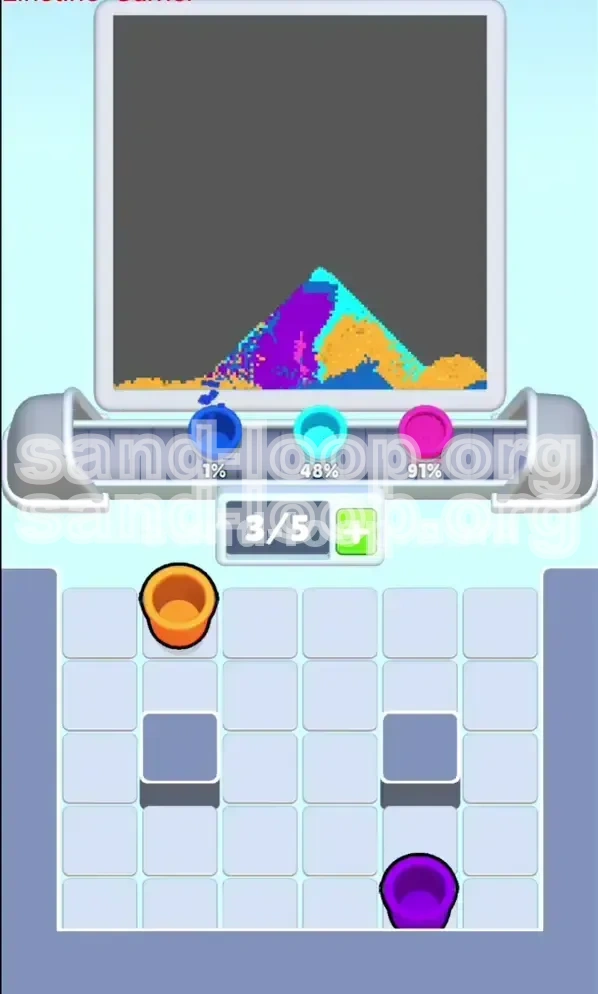
Phase 4: Managing the "Danger Zone"
The final objective is precision handling of the water section. You must clear your inventory of "Block Colors" (Yellow/Orange) to make room for "Detail Colors" (Cyan/Pink). The objective here is not speed, but rhythm. You need to alternate your belt queue to match the dithering pattern. Success is defined by how efficiently you can switch between Blue, Cyan, and Pink without causing a spill.
Score Maximization
Beyond just completing the level, aim for "Combos." Since you are forced to process colors in a specific order, try to queue cups so that you finish a color exactly as a new section of that color opens up. For example, if you finish the Yellow sun and the dispenser immediately moves to the Orange sky, having an Orange cup already on the belt maximizes your chain multiplier. Do not let the belt run empty; keep the pressure on the dispenser constantly.
Failure Prevention
Your final objective is to avoid the "Game Over" screen. This happens when your belt is full, and the next cup needed is buried under an Ice Block (in the first phase) or buried under other cups (in the second phase). To prevent this, never let more than 2 slots on your belt get filled with the same color. Always keep a "wildcard" slot open for a Mystery Cup or an unexpected color switch.
Step-by-Step Instructions: The Action Plan
Follow this precise sequence of actions to navigate the level. We will break this down into a turn-by-turn strategy for the opening game, followed by a tactical guide for the late game.
Step 1: Clear the "Corks" (Turns 1-3)
Look at the top center of your cup grid. You will see Pink cups acting as a plug. Even though the artwork is primarily Yellow/Orange at the start, you must tap these Pink cups first.
- Action: Tap the top-center Pink cups to load them onto the conveyor belt.
- Reasoning: These Pinks are not immediately useful, but they are blocking access to the Mystery Cups and lower rows. Removing them is the only way to see what you are working with.
- Note: If the dispenser is currently painting Yellow, these Pink cups will sit on your belt. This is fine. You are trading board space for future visibility.
Step 2: The Side Column Release (Turns 4-5)
With the center Pinks cleared, look at the far left (Column 1) and far right (Column 6) columns. You will see Dark Blue cups at the very top.
- Action: Tap the Dark Blue cups in the top corners.
- Reasoning: These Dark Blues are "corks" for the side columns. You need to remove them to access the high-volume Orange and Yellow cups sitting in the second row of these columns.
- Timing: Do this immediately after the Pinks. Do not wait for the dispenser to match Blue. Just get them off the grid.
Step 3: The Mystery Cup Gamble (Turns 6-8)
You should now see Black Mystery Cups (?) exposed in the center area. The Ice Wall is likely still up (or just about to break).
- Action: Tap the Mystery Cups immediately.
- Reasoning: You need the Ice Block counter to hit 8. Mystery cups act as free agents. Even if they turn into a color you don't need right now (like Cyan), getting them onto the belt counts towards your 8 pours.
- Outcome: Usually, these turn into Cyan or Yellow. Cyan is useful for the upcoming water phase; Yellow is useful for the sky. It is a low-risk move that accelerates the game state.
Step 4: The "Breakout" Moment (Turn 9)
At this point, the Ice Blocks should shatter. The board will shake, and columns 2 and 5 will drop.
- Action: Pause for 1 second. Do not tap anything immediately.
- Reasoning: The drop reveals the Purple cups. If you tap them instantly, they will clog your belt because the dispenser is likely still painting the Orange sky.
- Strategy: Look at the dispenser. Is it still on Orange? If yes, ignore the Purples and look for the Oranges you exposed in Step 2.
Step 5: The Sky Rush (Mid-Game)
Now you are in the main phase. The dispenser will bounce between the Yellow Sun (Left) and Orange Sky (Right).
- Action: Focus exclusively on columns 1 and 6 (the sides). Clear the Yellow and Orange cups there.
- Technique: Alternate taps between Left (Yellow) and Right (Orange). This keeps your belt balanced and prevents one color from monopolizing your slots.
- Warning: Do not dig deep into the center columns yet. The Purples there are a trap. Let them sit.
Step 6: The Water Transition (Late Game)
Once the sky is 80% full, the dispenser will move to the bottom (Water).
- Action: Scan the board for Cyan and Dark Blue.
- Technique: This is the hardest part. You must load your belt in a specific pattern: [Blue, Cyan, Blue, Pink]. Do not load [Blue, Blue, Blue].
- Reasoning: The water is dithered. Loading single Blues allows you to catch the tiny Pink/Cyan pixels that appear between the Blue strokes.
Color Order: Processing the Palette
The "Fill Order" in Level 28 is strictly dictated by the game's code, which prioritizes large contiguous areas of color before moving to detailed textures. Understanding this hierarchy allows you to predict what the game will ask for next, preventing you from loading the wrong color onto your belt.
The Primary Priority: Orange
Expect Orange to be the first major demand. The top-right sky is a massive block of solid color.
- Requirement: Approximately 35-40% of your total pours will be Orange.
- Strategy: Keep Column 6 (Right Side) open for business. This is your primary Orange source. Don't let it get clogged with mystery cups.
- Timing: You will need Orange from Turn 2 through Turn 15.
The Secondary Priority: Yellow
Simultaneously with Orange, the Yellow sun on the top left needs filling. It is slightly smaller than the Orange sky but still a large block.
- Requirement: Approximately 25-30% of your pours.
- Strategy: Column 1 (Left Side) is your friend here.
- Transition: Yellow demand usually drops off *slightly* before Orange, but both must be cleared before the Purple boat becomes the focus.
The Tertiary Priority: Purple
The Purple Sailboat is the focal point of the art, but it is actually the third priority in terms of fill order.
- Trap Alert: Do not pour Purple while the Sky is still 50% empty. The dispenser will switch back to Sky, and your Purple cups will sit on the belt, taking up space needed for Orange/Yellow.
- Strategy: Treat Purple as "filler" during the transition between Sky and Water. If you have an empty belt slot and the dispenser is between colors, tap a Purple.
The Quaternary Priority: Dark Blue
The Dark Blue water is the base layer of the bottom section.
- Requirement: About 15% of total pours.
- Strategy: Since it is the background of the water, it comes first in the water phase.
- Warning: Do not queue multiple Dark Blues. The water is not solid; it has gaps.
The Detail Priority: Cyan and Pink
These are the final touches. Cyan and Pink are used for the reflections and sparkles on the water surface.
- Frequency: Low (10-15%), but critical.
- Strategy: These are "interrupters." You must have them ready when the nozzle hits a dithered pixel.
- Placement: Keep these cups in the back of your queue (slots 4 or 5) until the very end.
The Fill Order Summary
To visualize the flow, the level runs on this timeline:
- Early Game: 80% Orange/Yellow (Sky). Ignore everything else.
- Mid Game: 60% Orange/Yellow finishing up, 20% Purple (Boat), 20% Blue (Water start).
- Late Game: 40% Blue, 40% Cyan/Pink (Water details), 20% Purple (Boat finishing touches).
Key Tips: Notes for Mastery
These tips are designed to give you an edge in edge-case scenarios. The difference between a 3-star score and a Game Over often comes down to managing these small details.
The "One-Color-Per-Slot" Rule
As mentioned, avoid putting two cups of the same color next to each other on your belt unless the canvas is a solid block of that color. In Level 28, the sky is solid, but the water is not. Once you hit the water phase, diversify your belt. If you have [Blue, Blue, Blue], you are guaranteed to miss the Pink pixel that appears at 40% completion on the water line. Force yourself to alternate: [Blue, Pink, Blue, Cyan]. This "staggered" queue is the secret to beating the dithering.
Don't Fear the Spill (Early Game)
In the first 10 turns, while the Ice Wall is up, do not be afraid to cause a small spill if it helps you break the wall faster. If you have a Pink cup and the dispenser is painting Yellow, you have a choice: wait for Pink (risky, slows you down) or pour Yellow on the Pink (spill). Pro Tip: Sometimes spilling a bit of Yellow on a Pink cup is worth it to get the pour count up and shatter the Ice Wall 2 turns earlier. The time saved by unlocking the full grid usually outweighs the penalty of one small spill.
Mystery Cup Management
The Mystery Cups (?) in this level are mostly beneficial. They tend to resolve to Cyan or Yellow. However, if they resolve to a color you don't need (like Purple early on), treat them as "Blockers." Move them to the very end of your conveyor belt (Slot 5). Do not pour them unless you have absolutely no other moves. Using them as placeholders keeps your belt count managed without wasting a useful color.
The "Tap-Focus" Technique
When the game enters the "Water Reflections" phase, stop looking at the artwork and start looking at the Nozzle. The nozzle movement predicts the color. If the nozzle jitters rapidly between Blue and Pink, a dithered section is coming. If the nozzle makes a long, smooth sweep, it is a solid block. Match your tapping speed to the nozzle speed. Fast taps for dithering, slow taps for solid blocks.
Mid-Board Assessment
Pause and look at your grid every 10 turns. Are your side columns (1 and 6) empty? They should be. Are your center columns (2 and 5) piling up? They shouldn't be. If you see a tower of cups building up in the center, you are digging too deep. Stop tapping the center and go back to tapping the sides. You need to keep the grid relatively flat to ensure cups fall into the correct positions.
Utilizing the "Pause" Feature
This is a frantic level. There is no shame in hitting the pause button to look at the artwork. Specifically, pause right before the Water phase starts. Look at the bottom row. Identify exactly where the Pink pixels are. Unpause and target those areas with your Pink cups. This 5-second pause can save you from 5 minutes of frustration.
Common Mistakes: What to Avoid
Learning what not to do is just as important as learning what to do. These are the specific pitfalls that catch players in Level 28.
Mistake 1: The "Purple Hoard"
This is the #1 killer. Players see the Purple Sailboat and instinctively start hoarding Purple cups on their conveyor belt from the very beginning.
- The Error: You fill 3 out of 5 belt slots with Purple.
- The Consequence: The dispenser starts painting the Orange Sky. You have no Orange cups on the belt because the slots are full of Purple. You can't dig for Orange because the board is locked by ice or full cups. You lose.
- The Fix: Only grab Purple when the dispenser is actually painting Purple. Do not stockpile it.
Mistake 2: Ignoring the "Corks"
Players often focus entirely on the bottom row of cups or the colors matching the current nozzle position.
- The Error: Leaving the Dark Blue cups in the top corners untouched.
- The Consequence: You run out of playable cups in the center. The Dark Blues are blocking the high-value Orange cups. You are forced to tap useless Mystery cups just to keep the game moving, which fills your belt with garbage.
- The Fix: Always clear the top "cork" cups first to refresh the column.
Mistake 3: Queueing Solid Blocks for Dithering
This mistake happens in the final 30% of the level.
- The Error: Seeing "Dark Blue Water" and loading [Blue, Blue, Blue] onto the belt.
- The Consequence: The nozzle hits a single Pink pixel. You miss it because you have a Blue cup active. You wait for the Pink to come back around, but it takes too long. Your Blue cup spills. By the time you recover, the nozzle has moved to a new section.
- The Fix: Remember the checkerboard pattern. Never queue two identical colors in a row during the water phase.
Mistake 4: Digging Too Deep Too Soon
Players tap the same column 3 or 4 times in a row.
- The Error: Tapping Column 2 repeatedly to get a specific cup.
- The Consequence: You create a "tower" where that column becomes empty and others are full. This unbalances the physics, making it harder for new cups to spawn in useful locations. It also creates a situation where a simple color switch takes 10 seconds because you have to wait for the belt to clear.
- The Fix: Rotate your taps. Left, Right, Center. Left, Right, Center. Keep the board level.
Mistake 5: Panicking at the Ice Wall
When the Ice Wall doesn't break immediately, players tap random cups frantically.
- The Error: Tapping a Purple cup that is under the ice (impossible to access) or tapping a cup that jams the belt.
- The Fix: Trust the math. You need 8 pours. Count them in your head. "1, 2, 3... 8." Once you hit 8, the wall will break. Patience is the key strategy for the opening moves.
Stuck Solutions: Troubleshooting Guide
If you find yourself in a situation where victory seems impossible, use these emergency protocols to get back on track.
Scenario: The Belt is Full of Wrong Colors
You have [Purple, Pink, Purple] but the dispenser is painting Orange.
- The Fix: You must sacrifice a cup. Look at the artwork. Is there a tiny pixel of Purple or Pink anywhere nearby? If yes, move the belt to that color and pour to free up a slot. If no, you must create a "controlled spill." Pour the wrong color on the canvas to clear the slot. It is better to spill one cup and clear your belt than to have a full belt and miss 10 pours.
Scenario: Ice Wall Won't Break
You are at move 15 and the Ice is still there.
- The Fix: You are likely being too perfectionist. Stop trying to match the art perfectly. Tap any cup that is accessible. Even if it's the wrong color, getting it onto the belt and poured (even if spilled) advances the counter. The priority is breaking the wall, not painting the sun. Switch to "Speed Mode" and just cycle cups until the wall shatters.
Scenario: No Blue Cups Available
The dispenser is painting the water, but you have no Blue/Cyan cups on the grid.
- The Fix: Look at your Mystery Cups. Now is the time to tap them. They have a high probability of turning into Cyan or Blue. If you have no Mystery Cups, look at the top corners. Sometimes a Dark Blue cup is hiding under a "cork" you missed. If you are truly out of Blue cups, you must wait for the dispenser to cycle back to the sky (Orange/Yellow). Use this time to clear the remaining sky colors.
Scenario: Purple Cups Clogging the Grid
The wall is broken, but now Purple cups are everywhere and blocking the Orange/Yellow you need.
- The Fix: You must "burn" the Purple cups. Check the sailboat. Is there any Purple left to paint? If the boat is 100% done, the Purple cups are now obstacles. You must pour them onto the boat (overfilling it slightly) just to get rid of them. Do not leave them on the grid. A full boat is better than a clogged grid.
Scenario: The "Invisible" Color
The game asks for a color (e.g., Cyan) that you swear isn't on the screen.
- The Fix: Zoom in on the water. The Cyan is there, but it is a single pixel line sandwiched between Blue pixels. The "dithering" makes it hard to see. Trust the nozzle. If the nozzle is Cyan, the pixel is there. Move your belt until you find a Cyan cup (or a Mystery cup) and pour it immediately.
Speed Run Tips: The Fast Track
For players looking to achieve a high score or complete the level in under 60 seconds, speed requires sacrificing perfection for momentum.
The "Fast and Loose" Start
Don't wait for the perfect color match in the first 8 moves. If the dispenser is Orange and you have Yellow, pour the Yellow. A 50% fill is better than a 0% wait. The goal is to shatter the Ice Wall by move 8, not move 12. The faster you open the full board, the faster your overall completion time will be.
Pre-Loading the Belt
While the nozzle is painting the top-left Yellow sun, use your eyes to scan the right side of the board. Identify the Orange cups you will need next. Start moving them toward the belt before the nozzle even reaches the Orange sky. This "buffering" technique ensures there is zero downtime between color switches.
Bulk Pouring
If you have 3 slots of Orange and the sky is 50% Orange, don't tap one by one. Swipe to pour them in rapid succession. The game allows for a brief animation overlap if you are fast enough. This clears your belt instantly, allowing you to refill with the next color set immediately.
The "Reset" Trick
If you make a mistake early on (e.g., a bad spill that messes up the sky) and you are going for a speed run, sometimes it is faster to hit "Retry" immediately than to try and fix the error. A clean start is often 20 seconds faster than a recovery effort in Level 28 due to the tight Ice Wall bottleneck.
Optimizing the Mystery Cups
Don't watch the animation of the Mystery Cup transforming. As soon as you tap it, look at the next cup in the column. By the time you look back at the belt, the Mystery Cup will have revealed its color. This saves microseconds per cup, which adds up over the 60+ cups needed for this level.
Ignoring the Perfectionist Goal
A speed run is about 85-90% completion, not 100%. If a small corner of the water is missing pixels but the main blocks are filled, keep moving. Chasing the last 5% of pixels usually takes longer than the first 95%. Focus on the large blocks (Sky, Boat) and let the minor details slide if time is running out.