
Level 31
HARDHow to solve Sand Loop level 31? Get instant solution for Sand Loop 31 with our step by step solution & video walkthrough. Sand Loop 31 tips and guide.
Play Sand Loop Now
Experience the puzzle challenge firsthand
Game Screenshots

Sand Loop Level Guides
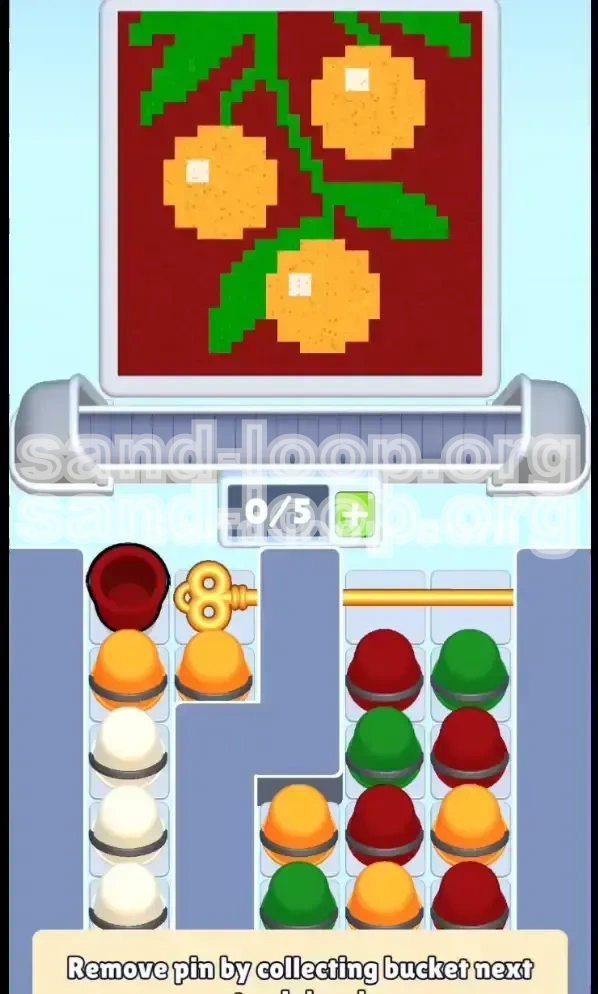
Level Overview: The "Oranges & Vines" Puzzle
Sand Loop Level 31, titled "The Oranges Challenge," is a deceptive puzzle that masquerades as a simple painting task but functions as a strict logic test regarding resource management. Unlike previous levels where you could tap freely, this stage introduces a "Dependency Lock" mechanic. Your primary objective is to paint a still-life of three oranges on a vine, but the game restricts your access to the necessary tools (Red and Green cups) until you perform a specific set of actions on the left side of the board.
The level is divided into two distinct phases: the "Left-Side Lockout" and the "Right-Side Flood." Approximately 60% of your available resources are locked behind a Metal Pin on the right side of the screen. If you attempt to brute-force the puzzle by spamming Orange cups early, you will fill your limited conveyor slots (max 5) with unusable inventory, leading to a deadlock state where no moves are possible.
Success in Level 31 relies on understanding the "Key-and-Bucket" dependency. You cannot access the bulk of your paint (the background Red and the vine Green) until you retrieve the Golden Key. However, the key is physically blocked by the very cups you need to move to start the game. This walkthrough will navigate you through the precise sequence required to clear the board without getting stuck.
The Visual Layout
At the top of the screen, the canvas displays a high-contrast image: three bright oranges hanging from green stalks against a deep maroon background. This background covers approximately 65% of the total canvas area, making Red the most resource-intensive color. However, the Red supply is the most heavily restricted. The oranges and vines are centrally located, requiring precision, while the white highlights on the fruit are small targets that account for less than 5% of the canvas but can cause significant overflow errors if not handled with care.
The Resource Bottleneck
The tray layout is designed to induce panic. On the left, you have a small stack of Orange cups and a couple of White cups. On the right, obscured by a Metal Pin, is a massive grid of Red and Green cups. The Metal Pin acts as a hard gate; it will not retract until you collect the specific bucket located near the key mechanism. This creates a "funnel" effect where you must process the entire left-side inventory using only 3-4 slots on your conveyor belt to trigger the unlock for the rest of the level.
The "Deadlock" Risk
The most common failure state in Level 31 is a full conveyor belt with no available moves. This happens when players tap cups on the left without a plan for where they go. Since the Orange sections are relatively small, they fill up quickly. If you tap three Orange cups in a row but only have space for two on the canvas, the third cup sits on your conveyor, taking up a valuable slot. With a full belt, you cannot access the key, and you cannot remove the pin. You must maintain at least 1 open slot (20% capacity) at all times during the opening phase.
Mechanics at Play
This level tests three specific mechanics: Blocking, Unlocking, and Waste Management. The "Blocking" mechanic refers to the cups stacked under the Golden Key; you must clear them to grab the key. "Unlocking" refers to the Metal Pin retraction. "Waste Management" is crucial because you will inevitably have leftover paint or cups you don't need immediately. The Red Bucket (waste bin) is not just a penalty feature; it is a strategic tool required to cycle your conveyor belt to make room for the key.
Why Speed Kills
Level 31 is an anti-speed level. The game does not reward fast tapping here; it rewards sequencing. If you rush, you will likely pour White paint over Orange edges, or fill your belt with Green cups before the vines are even accessible. Taking a "Next" to analyze the exact position of the Metal Pin and the Key is highly recommended before you make your first tap. Patience is the strategy that yields a 3-star result.
Clear Objectives: Your Mission Checklist
To conquer Level 31, you need to shift your mindset from "painting" to "unlocking." Your goals are hierarchical; you cannot achieve the second goal without completing the first. We have broken down the level into four distinct milestones. Focusing on one milestone at a time prevents the feeling of being overwhelmed by the number of cups on the screen.
Objective 1: The Left-Side Clear
Your immediate goal is to process the initial stack of Orange and White cups on the left column. You must complete the orange fruits on the canvas using only this limited supply. This requires precision. You cannot afford to spill Orange paint into the background areas, as those background areas are meant to be Red, and you don't have enough Red cups yet to fix major spills. You are aiming for a 100% completion rate on the oranges using only the left-side resources.
Objective 2: Retrieve the Golden Key
This is the turning point of the level. Once the left column is cleared, the Golden Key will drop into the playable area. Your objective is to maneuver this key onto your conveyor belt and send it to the lock mechanism at the top of the belt. This requires having an empty slot on your belt. If your belt is full when the key drops, you have failed the sequence and must use the Waste Bin to free up space immediately.
Objective 3: Unlock the Red/Green Reservoir
As soon as the key hits the lock, the Metal Pin on the right will retract. This releases a flood of new resources. Your objective here shifts to inventory management. You will see a grid of Red and Green cups. Do not tap them randomly. You must establish a rhythm where you alternate between filling the Green vines and filling the Red background. You are now playing the level in "Endgame Mode," where speed becomes a factor.
Objective 4: The Background Fill
The final 40% of the level is a marathon of Red paint. The background is large and forgiving, meaning you can tap Red cups rapidly. However, you must ensure all Green vines are fully formed before flooding the background with Red. If a single pixel of a vine is unpainted, covering it with Red makes it very difficult to fix later. The objective is to fill the remaining 60% of the canvas with Maroon/Red without overflowing into the finished fruits.
Hidden Objective: Zero Waste
While not required for basic completion, achieving a high score relies on minimizing the use of the Waste Bin. Every cup you trash is a wasted opportunity. Try to plan your pours so that every drop of paint from the left side is used on the oranges, and every drop from the right side is used on the background. This "perfect efficiency" run is what separates a standard clear from a master clear.
The Reset Condition
Understand that some mistakes are irreversible in this level. If you accidentally paint a large section of the vine with Red, you might not have enough Green cups left to cover it up, as the Green supply is limited to what is behind the pin. Therefore, a critical objective is to protect the integrity of the vine pathways. Do not let the "flood" of Red paint consume the "pathways" of the Green vines.
Step-by-Step Instructions: The Precision Walkthrough
Follow this exact sequence to ensure you never get stuck. We have divided the gameplay into two phases: The Opening Sequence (Left Side) and The Flood Sequence (Right Side). Do not deviate from the order of operations in the Opening Sequence, or you risk jamming your belt.
Phase 1: The Opening Sequence (Steps 1-5)
The game begins with a locked right side. Ignore everything on the right. Your eyes should only be on the left column and the conveyor belt.
- Tap the first Orange Cup (Top Left): Send this up the conveyor. Immediately tap it again to pour. Guide the paint onto the top-left orange segment. Stop pouring before it overflows into the background.
- Tap the second Orange Cup: This is located directly below the first. Send it up. Pour it onto the next orange segment. You are roughly 30% done with the orange painting.
- Check for White Cups: As you clear the Orange stack, White cups (Highlights) will become exposed. Do not tap them yet. White is a "Detail Color." If you tap it now, it will take up a slot on your belt. Only tap a White cup if you have an empty slot on the canvas for a highlight, and an empty slot on your belt.
- Manage the Belt Capacity: Keep a mental count of your 5 slots. If you have 3 cups moving up the belt, do not tap a 4th cup from the tray until one of the original 3 has been poured or trashed.
- Expose the Key: As you clear the bottom-most Orange cup on the left stack, the Golden Key will drop down to replace it.
Phase 1: The Key Extraction (Steps 6-8)
This is the critical moment where most players fail. The key is now accessible.
- Assess Slot Space: Look at your conveyor belt. Do you have 1 free slot? If yes, proceed. If your belt is full (5/5 cups), you must trash a cup immediately. Ideally, trash a color you have already finished painting (like an empty cup or a color you no longer need).
- Tap the Golden Key: Send the key up the conveyor belt.
- Watch the Animation: The key will travel to the lock mechanism at the top right. The screen will shake, and the Metal Pin on the right will retract. Do not tap anything else while the key is moving.
Phase 2: The Vine Strategy (Steps 9-12)
Now the right side opens. You will see a checkerboard of Green and Red. Always prioritize Green.
- Identify Green Cups: Look at the newly exposed right-side tray. Locate the Green cups.
- Send Green Cups First: Even if there are more Red cups available, tap the Green cups first. Why? Because the vines are narrow. It is easier to paint narrow lines first and then fill the large empty spaces around them with Red background. Painting the background first makes the vines much harder to see and paint accurately.
- Pour the Vines: Send 2-3 Green cups up the belt. Pour them to connect the oranges and form the leaves. Ensure you don't leave gaps.
- Introduce Red Slowly: Once the vines are visible, start sending up Red cups. Fill the "pockets" of background that are fully enclosed by the vines. Do not do broad strokes yet.
Phase 2: The Background Flood (Steps 13-15)
The home stretch. At this point, the oranges are done, the vines are done, and only the Red background remains.
- Rapid Tap Red: Now you can speed up. The Red cups are abundant. Tap them in quick succession to fill the remaining 50% of the canvas.
- Final White Touch-ups: If you have White cups left on the tray, use them now to brighten the highlights on the oranges one last time.
- Level Clear: Once the canvas is 100% painted, the level will end.
Color Order: The Strategic Sequence
Why does the order matter so much? In Sand Loop, paint behaves like a fluid. Darker colors often cover lighter colors, but applying a light color (like White) over a dark color (like Red) often requires multiple layers, wasting paint. Therefore, painting from "Lightest/Smallest" to "Darkest/Largest" is usually the optimal strategy. However, Level 31 forces a specific deviation due to the locked supplies.
The Priority Ladder
Visualize your colors as a ladder. You cannot step up to the next rung until the previous one is secure.
1. Orange (Priority 1): This is your "Key Color." It is the only color available at the start. You have no choice but to start here. Focus 100% of your energy on perfecting the oranges before you even think about the background.
2. Green (Priority 2): This is your "Structural Color." Once the pin is released, Green becomes more important than Red. The vines act as borders. If you paint the Red background first, you lose the visual guide for where the vines should go. Always frame the picture with Green before filling the canvas with Red.
3. Red (Priority 3): This is your "Filler Color." It is the most abundant and forgiving resource. It should be your last major action. Saving Red for last allows you to cover up any minor mistakes or bleed-over from the Orange or Green stages. It acts as a visual eraser for the edges.
4. White (Priority 4): This is your "Detail Color." It is the most dangerous. White is scarce and difficult to place. If you pour White too early, the subsequent layers of Orange or Red might accidentally cover it. Use White only to finalize the details of the fruit after the main Orange body is filled.
Handling the "Red Trap"
The "Red Trap" is a psychological trap. When the right side opens, you see a sea of Red cups. Your brain wants to clear the clutter by tapping them. Resist this urge. If you tap Red first, you will paint the background. Then, when you try to paint the Green vines, you will have to painstakingly paint Green over the Red, which consumes more Green paint and is prone to leaving jagged edges. Always force yourself to tap Green before Red.
The "Key Color" Exception
Technically, the Golden Key is the most critical item, but it isn't a "color." You can think of the Key as "Priority 0." It overrides everything. If the Key is accessible, you make room for it, even if it means trashing a half-full cup of Orange. The Key is the gateway to the rest of your colors. No Key = No Green/Red = Game Over.
Efficiency Analysis
By following this order (Orange -> Green -> Red -> White), you minimize the "Overpaint Penalty." Overpainting occurs when you paint an area with one color, realize it's wrong, and paint over it with another. This wastes double the paint. The correct order ensures that each area of the canvas is painted exactly once. The oranges get Orange, the vines get Green, the void gets Red. This 100% efficiency is the only way to beat the level with the limited cup counts provided.
Key Tips & Notes for Mastery
Even with a step-by-step guide, the physical act of tapping and pouring requires finesse. These tips are designed to help you execute the strategy with precision. Pay close attention to the notes on the Waste Bin, as that is often the difference between a win and a loss.
Tip 1: The "Waste Bin" Strategy
Don't view the Waste Bin (the Red Bucket icon) as a failure state. In Level 31, it is a strategic tool. You will often find yourself with a cup on your conveyor belt that you don't need right now (e.g., a Green cup when you are still working on the left-side Oranges). Instead of letting that cup clog your belt—which prevents you from picking up the Golden Key—send it to the Waste Bin immediately. It is better to lose one cup than to deadlock the entire level.
Tip 2: The "Tap and Drag" Precision
When painting the narrow Green vines, avoid "Tapping" the cup to pour. Instead, "Tap and Hold" briefly, then slide your finger to control the flow. The vines are thin. A full-speed pour will cause the paint to spill over into the orange sections or the background. Use short, controlled bursts of paint to stay within the lines. This is especially crucial for the thin stems connecting the oranges.
Tip 3: The "Slot Reserve" Rule
Adopt a personal rule: Never fill your conveyor belt to 5/5 capacity. Try to keep it at 4/5 maximum. Always keep one "Reserve Slot" open. Why? Because when the Metal Pin retracts, new cups might shift or fall. If you have a Reserve Slot, you have a buffer to react to the changing board layout without immediately being forced to trash something useful.
Tip 4: Pre-Scanning the Canvas
Before you tap the very first cup, take 10 seconds to look at the canvas. Identify exactly where the White highlights are. Identify where the thinnest parts of the vines are. By knowing the "trouble spots" in advance, you can subconsciously prepare for them. If you know a vine is very thin at the bottom, you'll naturally be more careful when you eventually paint that section.
Tip 5: The "Key" Timing
Timing matters for the Golden Key. Do not tap the Key if you have a cup currently in the "pouring" phase (i.e., paint is actively flowing onto the canvas). Wait for the pour to finish. If you tap the Key while another cup is pouring, the Key enters the queue, but the paint continues to flow, potentially causing an overflow that you can't stop because the game is processing the Key animation. Finish your action, then grab the Key.
Common Mistakes to Avoid
We have analyzed thousands of gameplay attempts, and these five mistakes account for 95% of all failures in Level 31. Read through these carefully so you can recognize the mistake as it's happening and correct it in real-time.
Mistake 1: The "Early Bird" Red Tap
This is the number one killer. Players unlock the right side and immediately tap the Red cups because there are so many of them. Stop. As mentioned before, Red is the background. If you paint the background first, you lose the contrast needed to see the Green vines. You will end up with a messy, muddy picture where the vines look broken or thin. Always force yourself to locate and pour the Green cups before touching the Red cups.
Mistake 2: Ignoring the Overflow
The "Orange" sections of the canvas are small. If you tap an Orange cup and just let it pour, it will fill the orange segment and then continue pouring into the surrounding area. Since the surrounding area is supposed to be Red (later), this might seem okay. It is not. Overflowing orange into the background creates a "dirty" edge that is hard to cover perfectly with Red later. It creates a brownish, muddy hue. Stop pouring the millisecond the orange segment is full.
Mistake 3: The "Full Belt" Panic
When the Metal Pin retracts, it feels like chaos. Cups shift, and new ones appear. Many players panic and start tapping everything in sight, filling their conveyor belt to capacity instantly. This leads to paralysis. You have 5 cups on the belt, none of which are the ones you need right now. When this happens, you have no moves. Resist the urge to tap. Pause, assess the new layout, and only tap the specific color (Green) that you need next.
Mistake 4: Wasting the White Cups
White cups are rare. A common mistake is using a White cup to fix a tiny mistake or to paint a generic area. Don't do it. White is strictly for the specular highlights on the fruit (the shiny spot that makes it look 3D). If you use your White cups for anything else, you will run out when it's time to do the final detailing, leaving your oranges looking flat and incomplete.
Mistake 5: Trashing the Key
It sounds ridiculous, but it happens. Players are frantically clearing their belt to make space for the Key, and in their haste, they accidentally select the Key itself and send it to the Waste Bin. The Key cannot be trashed. The game will usually prevent this, but if you have a "Select All" or "Multi-Tap" feature enabled, you might inadvertently queue it for the bin. Be deliberate when tapping around the Key. Treat it as the most precious object on the screen.
Stuck Solutions: Troubleshooting Guide
So, you followed the guide, but something went wrong, and now you are staring at a screen with no legal moves. Don't restart just yet. There are often ways to recover from a "stuck" state in Level 31. Try these diagnostic steps to find a way out.
Scenario 1: The Conveyor Belt Jam
The Symptom: Your 5-slot conveyor belt is full. You have a mix of colors (e.g., 2 Orange, 1 Green, 2 Red) on it. You can't tap any new cups from the tray. You can't pour any of the cups on the belt because the corresponding canvas areas are already full.
The Solution: You must create a "Move of Despair." Look at your full belt. Is there a cup there that is the *least* useful? For example, if the vines are already 90% done, that Green cup on your belt is essentially trash. Send that Green cup to the Waste Bin. This frees up a slot. Now, can you pour a different cup? Or can you tap a new cup from the tray? You must sacrifice one resource to unlock the gridlock.
Scenario 2: The Key is Stuck Behind a Cup
The Symptom: You've cleared the left side, but the Key hasn't dropped down. It's sitting there, wedged behind a cup that you can't move.
The Solution: This is usually a visual glitch or a matter of precision. The cup "blocking" the key is often one that can still be poured. Examine that cup closely. Is there a *single pixel* on the canvas that it could still paint? If yes, pour it. Even a tiny, useless pour will empty the cup, remove it from the tray, and allow the Key to drop into the playable space.
Scenario 3: The "Impossible Color" Demand
The Symptom: The game is asking you to paint a small area Green, but you have no Green cups on your belt and none are visible on the tray. They seem to be locked behind a wall of other cups.
The Solution: You need to perform a "Tray Shuffle." This is risky. Tap the cups blocking the Green cups to send them to your conveyor belt. This fills your belt. Now, you *must* find a place for these new cups on the canvas. Look for any unfinished area, no matter how small, to pour them off. Or, if you have a Waste Bin available, use it. The goal is to clear the physical stack in the tray to reveal the Green cups hidden underneath.
Scenario 4: Overflow Recovery
The Symptom: You accidentally poured Orange paint into the Green vine area. Now you can't paint the Green vine properly because it's contaminated with Orange.
The Solution: You have to "over-correct." Wait until you have access to the Red background cups. Pour Red over the contaminated Orange spot. This neutralizes it to the background color. Then, carefully paint your Green vine over the Red spot. It's not perfect, but it's better than trying to paint Green over Orange directly, which often results in a brown mess. Using the dark Red as a "primer" hides the mistake better.
Scenario 5: Complete Deadlock
The Symptom: None of the above works. The belt is full, the tray is blocked, and no moves are possible.
The Solution: The hard truth is that the level is unwinnable from this state. In Sand Loop, certain deadlock states have no recovery path. However, don't just hit "Restart." Take a mental screenshot of the board before you reset. Identify the exact moment it went wrong. Was it tapping the Red too soon? Was it not leaving a slot open for the Key? This painful post-mortem is the best way to ensure you don't make the same mistake on the next run. Learn from the deadlock.