
Level 38
HARDHow to solve Sand Loop level 38? Get instant solution for Sand Loop 38 with our step by step solution & video walkthrough. Sand Loop 38 tips and guide.
Play Sand Loop Now
Experience the puzzle challenge firsthand
Game Screenshots


Sand Loop Level Guides
Level 38 Strategy Guide: Conquering the Blue Penguin Wizard
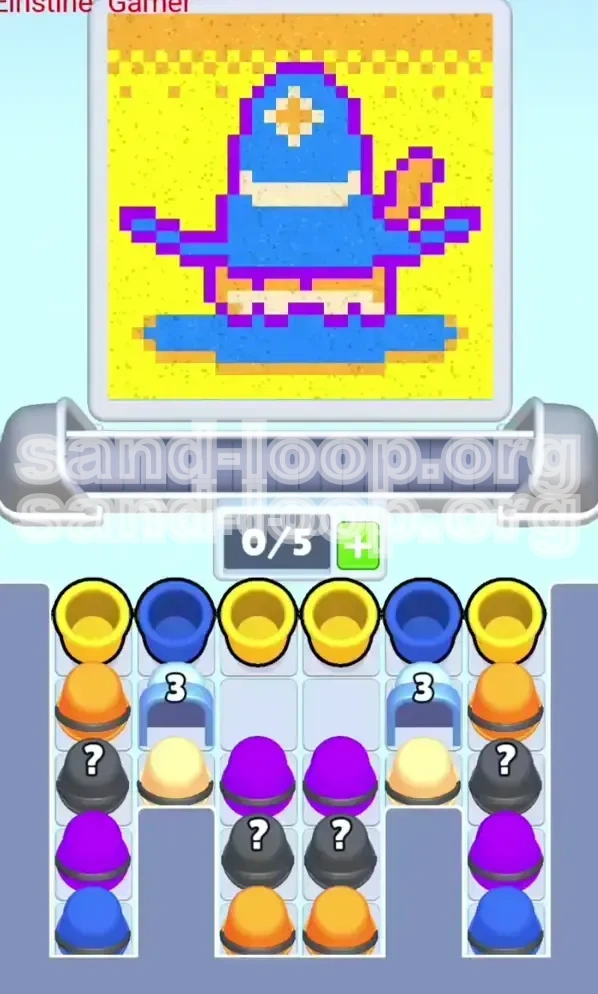
Welcome to the definitive walkthrough for Sand Loop Level 38. If you have been pulling your hair out trying to paint the cute Blue Penguin Wizard, you are not alone. This level represents a significant difficulty spike, shifting from pure speed runs to a claustrophobic logic puzzle. The stage is set with a vibrant yellow background, a checkered top border, and a blue creature standing on a puddle. However, the path to victory is narrow.
The core challenge here is not your reaction speed, but your inventory management. You are restricted to a mere 5-slot capacity on your conveyor belt while dealing with two high-health Ice Blockers that guard your essential paints. One wrong move in the first ten seconds can deadlock your board, forcing a restart. This guide will break down exactly how to clear the ice, manage your colors, and execute the perfect painting sequence.
Key Level Features
- Target Image: Blue Penguin Wizard with a star, standing on a blue puddle.
- Constraint: Extremely tight 5-slot belt limit.
- Obstacles: Two Ice Blockers (Health: 3) blocking the center columns.
- Difficulty Spike: High inventory management requirements.
Core Objectives and Victory Conditions
To achieve a three-star finish on this level, you need more than just completing the painting; you need to do so without clogging your system. The objectives can be broken down into three distinct phases: The Unlock, The Layering, and The Flood.
Phase 1: The Icebreaker Unlock
Your immediate goal is not to paint, but to clear the board state. The two Ice Blockers in the middle of the tray are locking away your Purple and Mystery cups. You cannot afford to waste slots on colors you don't need yet. Your primary objective here is to clear the top row to destabilize the ice blocks, allowing you to access the trapped inventory underneath. If you fail to clear the ice within the first 20% of the level, you will run out of maneuvering room.
Phase 2: Precision Layering
Once the ice is gone, you enter the most dangerous phase of the level. This stage requires you to alternate between Blue and Purple paints rapidly. The objective is to establish the Purple Outline without overpainting the Blue Body. This requires strict discipline—you must stop pouring Blue the moment the outline is needed, switch to Purple for the borders, and then switch back. This "pulsing" technique is essential for maintaining accuracy.
Phase 3: The Yellow Flood
The final objective is volume filling. The yellow background and the checkered top border require a massive amount of yellow pigment. You must reserve at least 30-40% of your total belt capacity for Yellow cups. The mistake most players make is using Yellow too early. Your goal is to save the Yellow flood until the Penguin is fully defined, ensuring you don't accidentally paint over the creature's details with the background color.
Accuracy Target Metrics
- Purple Accuracy: Keep overpour under 5%. Purple is scarce.
- Blue Consistency: Maintain 90% fill rate on the body.
- Belt Efficiency: Keep belt utilization between 60-80% to allow for new pickups.
Step-by-Step Walkthrough
Follow this exact sequence to navigate the level safely. Do not deviate from the opening moves, as they are calculated to prevent deadlock.
Step 1: The Top Row Purge (Seconds 0-10)
At the start, your tray is locked. Look at the top row. You will see a sequence of Yellow - Blue - Yellow - Yellow - Blue - Yellow. You cannot take all of these.
Action: Tap only the two Blue cups and two Yellow cups (alternating sides). Do not fill your belt to 5/5 immediately.
Why: You need to create vertical space in the tray. By removing the top cups, you allow the heavy Ice Blockers to slide upward or become adjacent to active cups. This is the only way to reach the inventory trapped beneath them.
Step 2: Breaking the Ice Blockers
With the top row cleared, the Ice Blockers (HP: 3) are now your focus. Do not try to match them directly; you must clear the cups around them.
Action: Look for the Orange cups on the far left and right edges of the second row. Pull these onto your belt immediately.
Result: Clearing the side Orange cups causes a vertical shift in the board. This shift usually triggers the breakage of the Ice Blockers or drops the valuable Mystery (?) and Purple cups into the accessible zone. Once the ice shatters, prioritize clearing the debris to free up your belt slots.
Step 3: Handling the Mystery Cups
Now that the middle is open, you will see Black Question Mark cups. These are wildcards.
Strategy: Only pull a Mystery Cup when you have 3 empty slots on your belt.
Reasoning: If a Mystery Cup turns into a color you don't currently need (e.g., it turns Yellow while you are painting the Blue body), it becomes a "dead cup" occupying valuable space. Having empty slots allows you to pour it off into the waste bin or use it on a secondary area without clogging your main flow.
Step 4: The Base Layer (Blue Puddle & Feet)
Start painting from the bottom up.
Action: Pour the Blue cups to fill the puddle at the very bottom of the canvas. Switch briefly to Orange (from Step 2) to paint the penguin's feet.
Note: Do not touch the body yet. Ensure the base is solid. This grounds your image and prevents you from accidentally lifting your finger too early during the complex body painting phase later.
Step 5: The Body and Outline (The Hard Part)
This is where most levels fail. You now have access to Blue and Purple.
Technique: Pour Blue until the body is about 60% full. Stop. Immediately switch to Purple. Run a thin line around the edge of the blue body. Switch back to Blue to fill the center.
Why: If you fill the body 100% with Blue first, you will inevitably spill over the outline when you try to add the Purple later. By alternating, you ensure the Purple sits "on top" or "inside" the edge of the Blue, creating that sharp contrast needed for the Wizard's look.
Step 6: The Star and Beak
You likely saved some Orange or have a specific detail cup left.
Action: Use a precise stream to paint the Orange Star on the forehead and the Beak.
Tip: These are small areas. Do not use a full cup if you can avoid it. A quick tap-and-release is often enough to deposit the required pigment without wasting the rest of the cup's volume.
Step 7: The Yellow Background Flood
The board should now be mostly empty of detail colors.
Action: Aggressively pull all remaining Yellow cups. Flood the background.
Focus: Pay special attention to the Checkered Top Border. This is the final hurdle. Ensure the yellow flows all the way to the top edge of the canvas to complete the pattern. Since this is the last step, don't worry about belt clogs anymore—just pour until the level ends.
Color Order and Processing Logic
Understanding the hierarchy of colors is vital for inventory rotation. You cannot process colors as they appear randomly; you must process them based on the image's geometry.
Priority Tier 1: The Unlockers (Orange & Mystery)
Even though Orange is a detail color, it acts as a key in this level. Because the Orange cups are located on the periphery of the Ice Blockers, they are your primary tool for breaking the ice. Process Orange immediately to gain access to the rest of the board. The Mystery cups fall into this tier as well—pull them early to clear the space, even if you just pour the result into a safe corner.
Priority Tier 2: The Structural Blue
Blue is the skeleton of the painting. It defines the shape and separates the foreground from the background. However, it is not the majority of the screen area. Treat Blue as a "structural" color. You need it to build the form, but you must stop pouring it before it invades the background space. It requires about 30% of your focus.
Priority Tier 3: The Precious Purple
Purple is your most scarce resource. It is likely trapped under the ice and appears in very few cups. This gives it the highest priority in terms of care. You cannot afford to waste a single drop of Purple. Do not pour Purple until you are 100% ready to draw the outline. If it sits on your belt, that's fine—if it spills on the canvas, that's a disaster.
Priority Tier 4: The Filler Yellow
Yellow is the "bulk" color, making up roughly 50-60% of the canvas. In inventory management terms, Yellow is low priority early on. You want to let Yellow cups stack up in the tray (or ignore them) while you deal with Ice and Details. Only when the tray is cleared of danger colors should you start pumping the Yellow. Trying to juggle Yellow while clearing Ice is the fastest way to a Game Over.
The "Z-Buffer" Strategy
Think of your painting in 3D layers. The Background (Yellow) is Layer 1 (Z-depth 0). The Body (Blue) is Layer 2 (Z-depth 1). The Outline (Purple) is Layer 3 (Z-depth 2).
You generally paint back-to-front (Yellow -> Blue -> Purple). However, due to the Ice Blockers, you are forced to paint somewhat out of order. The trick is to paint the "under-layer" (Yellow) only in the corners first, paint the "mid-layer" (Blue), and then finish the "under-layer" (Yellow) at the very end. This technique, known as underpainting, is crucial for levels with restrictive inventory locks.
Key Tips and Mistakes to Avoid
Even with a plan, small errors can compound. Here are the critical success factors and the common pitfalls that ruin runs.
Tip: The "3-Slot" Safety Rule
Never let your belt fill up past 3 cups if you are waiting for a specific color (like Purple). If you are at 4/5 or 5/5 capacity and the color you need becomes available, you cannot grab it without wasting a slot. Keeping 2 empty slots gives you the flexibility to grab a key color the moment it unlocks from the ice. This "buffer zone" is your best friend.
Tip: Pre-Planning for the Checkered Border
Remember that the top of the image has a texture. If you flood the whole background with Yellow early, you might find yourself with no Yellow left when you need to finish the top corners. Always keep 2 or 3 Yellow cups in reserve for the final 10 seconds of the level to clean up the top edge.
Mistake: The "Purple Spill"
The most common fail state is overusing Purple. Because the Purple lines are thin, players often pour too fast, causing the liquid to bleed into the Blue body or the Yellow background. Correction: Tap the Purple cup gently. Do not hold it down. A short tap creates a controlled circle; holding it down creates a flooding mess that you cannot undo.
Mistake: Ignoring the Ice Blocker Health
Some players try to brute-force the level by painting around the ice. This does not work. The Ice Blockers sit on top of essential colors. If you ignore them, you will run out of Blue and Purple cups, leaving you with a half-finished Penguin and a belt full of useless Yellow. Correction: Make breaking the ice your absolute first priority, even if it means pausing your painting for 5 seconds to clear the board.
Mistake: Mystery Cup Panic
When a Mystery Cup turns into a color you didn't want, players often freeze or try to pour it onto the canvas anyway. Correction: If you have space on your belt, just keep the bad cup there. It is better to have a full belt with a "bad" cup than to ruin your painting accuracy. Wait until the very end (Yellow Flood phase) to dump the bad cup into the background, or discard it if the game mechanics allow manual clearing.
Mistake: Starting the Yellow Background Too Early
The Yellow background is tempting because it covers a large area, but starting it early is a trap. It takes up belt space and time that should be spent clearing the Ice Blockers. Correction: Only paint the bottom-left and bottom-right corners of the background early. Leave the rest for the end.
Speed Run and Shortcuts
Once you have mastered the logic of the level, you can start optimizing for time. This section is for players looking to shave seconds off their run.
Shortcut: The "Top-Row Drop" Technique
Speedrunners don't wait for the Ice to break naturally; they force it. As soon as the level starts, identify the specific cups in the top row that correspond to the colors underneath the Ice Blockers. By tapping these specific cups in a rapid "Left-Right-Left" rhythm, you can maximize the vertical board shift speed. This can shave off 3-5 seconds from the initial phase.
Optimization: Pre-Loading the Belt
If you are confident in your memory, you can pull the Mystery Cups before the Ice breaks, provided you have the buffer space. If the Mystery Cup turns into Blue or Purple (the colors you need next), you have saved yourself the wait time of pulling it later. This is a high-risk, high-reward strategy that can save significant time if luck is on your side.
Speed Run: Combining the Flood
In a standard run, you switch between Blue and Purple carefully. In a speed run, you can try to "feather" the stream. As you are finishing the Blue body, start moving your cursor toward the outline while still holding Blue. Release Blue and instantly tap Purple. This fluid motion eliminates the 0.5-second pause between colors. It requires practice but creates a much smoother painting flow.
Shortcut: Ignoring Small Details
The game's accuracy percentage is forgiving. You do not need to fill 100% of the Orange beak or the White belly strip perfectly. You can fill these to about 80% completion and the game will still count them as "done." Skipping the perfectionism on these tiny details allows you to move to the Yellow Flood phase 2-3 seconds earlier, which is often the difference between 2 stars and 3 stars.
Macro Strategy: The "Rhythm Method"
Establish a rhythm of "Tap-Tap-Pour." Tap two cups onto the belt (checking them), pour the one you need, tap the next one. This constant rhythm prevents the belt from ever sitting idle. In Level 38, time is currency. A paused belt is a wasted opportunity to clear that Ice Blocker.
By following this comprehensive guide, you now have the knowledge to tackle the Blue Penguin Wizard with confidence. Remember: Clear the ice, respect the Purple, and save the Yellow for last. Good luck, and enjoy the satisfying splash of victory!