
Level 223
HARDHow to solve Sand Loop level 223? Get instant solution for Sand Loop 223 with our step by step solution & video walkthrough. Sand Loop 223 tips and guide.
Play Sand Loop Now
Experience the puzzle challenge firsthand
Game Screenshots
Sand Loop Level Guides
Level Overview: The Sunset Cat Challenge
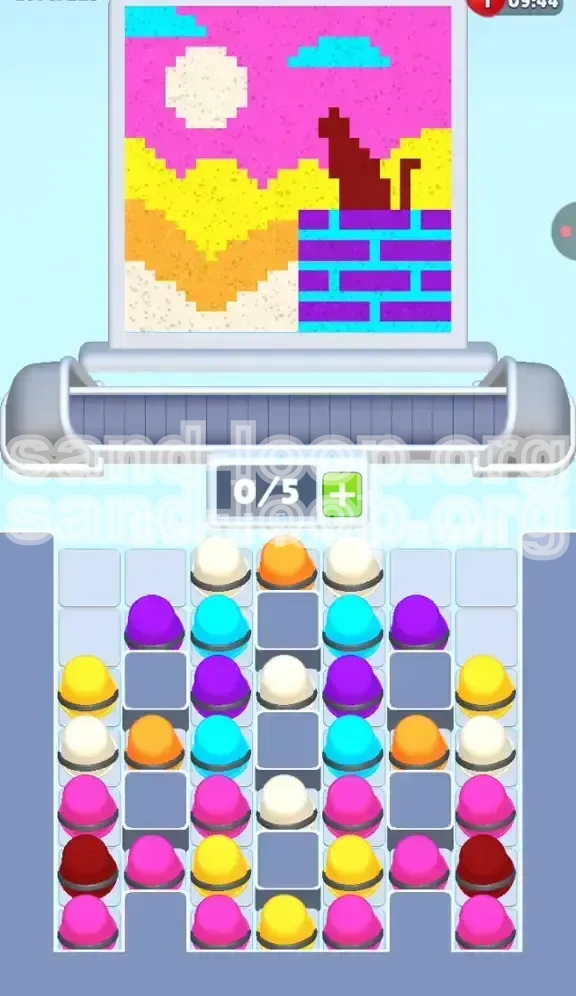
Welcome to Level 223, a stage that shifts the focus from reflexes to pure logistical management. In this level, you are tasked with assembling the "Sunset Cat," a complex pixel-art mosaic set against a vibrant desert evening. Unlike previous stages where you might rely on speed, this is a Logic Puzzle. The primary difficulty here is Color Overload; you are managing seven distinct colors (White, Cyan, Purple, Yellow, Orange, Pink, and Dark Red) within a very restricted tray space. The risk of "Deadlocking" your conveyor belt—filling it with cups you cannot use immediately—is extremely high. To succeed, you must suppress the urge to tap rapidly and instead treat the tray like a game of Chess, thinking three moves ahead.
The Canvas Composition
The image is divided into distinct geographical zones, each demanding specific color groups. Understanding these zones is the first step to victory. The top-left features a large, stark White Sun. The top-right and upper background are a vibrant Pink Sky, speckled with two Cyan clouds. The bottom-left consists of sandy Yellow and Orange dunes. The bottom-right is the complex area, featuring a brick wall pattern of Cyan and Purple. Finally, overlaid on the wall and sky is the silhouette of the Cat in Dark Red.
The Logic Mechanism
This stage forces you to practice "Vertical Segregation." The tray is not randomly mixed; it is sorted by columns. Columns 2 and 4 are dedicated almost entirely to the wall and sky colors (Cyan/Purple). Columns 1 and 5 hold the landscape colors (Pink/Yellow/Orange) and the crucial Dark Red for the cat. If you try to clear one section of the tray before starting the image, you will fail. You must alternate between these columns rhythmically.
The Seven-Color Obstacle
Most stages introduce 3 or 4 colors. Level 223 throws 7 at you. This creates a "Traffic Jam" risk. With only 5 to 7 slots on your conveyor belt, holding two colors that are meant for the end-game (like the Dark Red) too early will block the flow of colors you need right now (like the White or Cyan). You must prioritize space management over speed.
Why Speed Kills
Tapping cups as fast as possible will cause a soft lock. For example, if you tap all the Cyan cups early, you will overfill the conveyor belt with blue while you still have the Pink Sky and Yellow Dunes to clear. The conveyor belt will become clogged with the wrong pigment, forcing you to waste precious seconds dumping cups or restarting.
Clear Objectives: Managing the Palette
To complete the Sunset Cat, you must balance filling the background with detailed layering. Your primary goal is to keep the conveyor belt flowing while executing the specific color patterns required for the brick wall and the sky. You are not just filling a bucket; you are painting a structured mosaic.
Primary Goal: Establish the Background
Your first major objective is to clear the White Sun and the majority of the Pink Sky. These colors occupy the largest surface area. Clearing them first serves a dual purpose: it completes the bulk of the image and, more importantly, drains the top layers of the tray to expose the colors buried underneath (specifically the Dark Red for the cat).
Secondary Goal: The Brick Wall Pattern
The bottom-right corner requires a specific rhythm. You cannot simply pour all Blue/Cyan cups. You must alternate between Cyan and Purple to match the brick-and-mortar pattern. Failing to alternate will result in a messy blotch of color that requires correction, wasting time and space.
Hidden Objective: Expose the Cat
The Dark Red cups for the cat are located at the very bottom of the outer columns. You cannot reach them until you have cleared the Pink, Yellow, and Orange cups sitting above them. A common failure state is having the image ready for the cat, but the red cups are still buried under unused sky colors.
Maintenance Goal: Conveyor Hygiene
You must always keep at least one slot open on your conveyor belt. If the belt is full, you cannot tap new cups. If you have a belt full of Cyan but need to pour Yellow, you are stuck. You must occasionally "waste" a cup or strategically pour small sections to free up space.
Step-by-Step Instructions: The Execution Phase
Follow this sequence precisely. It is designed to minimize tray clogging and ensure you never get stuck with a full belt of unusable colors.
Phase 1: The Solar Flush (Start White)
As soon as the level loads, locate the center column. You will see a stack of White cups. Tap the White cups first. Pour them into the large sun in the top-left corner. Do not tap anything else until the Sun is about 50% complete. This clears the center column immediately, giving you a "buffer" zone in the tray.
Phase 2: The Sky-High Start (Top Layer)
Shift your eyes to the outer columns (1 and 5). Look for the Pink cups located in the top and middle rows. Tap these Pink cups to fill the top-right sky background. Do not tap the Pink cups at the very bottom yet. By clearing the top half of the outer columns, you prevent the "lid" from closing on the inner columns.
Phase 3: The Dune Foundation (Bottom Left)
Move to the bottom-left section of the image (the sand dunes). You will see a mix of Yellow and Orange. Tap the Yellow and Orange cups from the outer columns to fill this area. Focus on getting the Yellow down first, as it is often more abundant than the Orange. This action drains the mid-section of the tray.
Phase 4: The Wall Rhythm (Cyan/Purple Alternation)
Now look at the bottom-right (the brick wall). Look at your tray; you likely have exposed Cyan and Purple in the inner columns (2 and 4). Tap ONE Cyan cup, pour it into a blue brick. Then, tap ONE Purple cup, pour it into the mortar line. Repeat this: Cyan, Purple, Cyan, Purple. Do not spam tap. If you pour three Cyan in a row, you will block the next Purple pour required to finish the pattern.
Phase 5: Excavating the Cat (Digging Deep)
After pouring the sky and dunes, check the outer columns. You should see the top of the Dark Red stack emerging. Do not tap them yet! Finish the remaining Pink and Yellow/Yellow cups in the outer columns first. Only when the outer columns are stripped down to the bottom 20% should you aggressively tap the Dark Red cups to finish the cat silhouette.
Color Order: The Hierarchy of Pouring
Understanding the priority of colors is vital for queue management. Not all colors are created equal in Level 223. Some are "Blockers" (high volume) and some are "Detailers" (low volume). Here is the optimal processing order.
Tier 1: White (The Sun)
Priority: Highest. White is usually located in the center and easy to access. It is a large, solid shape with no intricate edges. Clearing White first reduces the cup count by roughly 15% instantly, freeing up significant mental bandwidth and conveyor space for the complex colors.
Tier 2: Pink (The Sky)
Priority: High. Pink makes up approximately 40% of the background. It is the most common color in the tray. You must process Pink steadily throughout the level, but never spam it. If you dump all Pink cups into the belt at once, you will have no room for the Purple or Dark Red.
Tier 3: Cyan & Purple (The Wall)
Priority: Medium. These are "Pulse" colors. You process them in short bursts. Pour 2-3 Cyan bricks, then switch to Purple for the lines. These are dangerous because if you process them too fast, they clutter the belt. Treat them as a pairing; always process them together.
Tier 4: Yellow & Orange (The Dunes)
Priority: Medium-Low. These are localized to the bottom left. They are generally abundant in the tray but only needed in one specific spot. Process these when the belt is relatively empty to avoid getting "Orange-locked."
Tier 5: Dark Red (The Cat)
Priority: Lowest (Initially). This is your end-game color. You physically cannot reach these cups until the end. If you find yourself tapping Red early, you are likely making a mistake, as they are buried under the Pink and Yellow you haven't used yet.
Key Tips: Mastering the Tray
These tips will help you navigate the specific idiosyncrasies of Level 223's tray generation. The tray is symmetrical, but your usage of it should not be.
The "Column Isolation" Strategy
Notice that the Brick Wall colors (Cyan/Purple) are strictly segregated into Columns 2 and 4. Use this knowledge to your advantage. If your conveyor belt is full of "Sky" colors (Pink/White), stop tapping Columns 1 and 5. Tap Column 2 or 4 instead to introduce a different color family to the belt, preventing a stall.
Visualizing the "Cheat Sheet"
The tray layout is a hint. The Gray stone spacers in the center column tell you that the White cups are isolated. The fact that Dark Red is at the bottom of the outer columns tells you it is a "final step" color. Never fight the tray's architecture; work with it. If the game gives you Cyan, pour Cyan. Do not hold onto Cyan waiting for a better time; the tray won't give you more until you pour what you have.
The 1-Slot Buffer Rule
This is the golden rule for this level. Never let your conveyor belt get 100% full. Always leave one slot empty. This empty slot acts as a "shifter," allowing you to rotate the cups in the belt to access the one you need buried behind others. If you fill the belt completely, you lose the ability to rotate and effectively lose control of the game.
Pre-emptive Color Swapping
Do not wait for a color to run out completely before switching. If you have 3 Cyan cups left but the wall is mostly done, switch to Purple to finish the mortar lines. Switching before total exhaustion prevents you from being stuck with single, orphaned cups that are hard to place later.
Common Mistakes: The Traps of Level 223
Most failures in this level happen in the first 30 seconds. Here is what to watch out for.
The "Wall Spam" Error
This is the most frequent cause of restarts. Players see the Cyan and Purple cups in the inner columns and tap them all immediately. This fills the conveyor belt with 50% Blue/Purple. Meanwhile, the background is still empty and needs Pink. You are now stuck with a belt full of Wall colors and no way to pour the Sky without wasting cups.
Ignoring the Sand Dunes
Because the Dunes are in the bottom left (a low-priority visual area), players often ignore them until the end. However, the Dunes use Yellow and Orange, which are blocking access to the Dark Red Cat cups. If you save the Dunes for last, you will have to pour them while the Cat is sitting there unfinished, leading to messy overlap.
Early Cat Attempts
Trying to pour the Dark Red Cat silhouette before the background is finished is tempting but disastrous. The Red cups are at the bottom of the stack. Trying to force them out early usually results in accidentally pouring a Pink cup into the Cat, ruining the silhouette. The Cat must be the finishing touch.
The "Full Belt" Panic
When players see the belt getting full, they panic and start randomly pouring colors into wrong spots just to clear space. This creates "polluted" pixels (e.g., a splash of White in the Pink sky). It is better to wait and let the current colors pour slowly than to misplace a color to create space.
Stuck Solutions: Troubleshooting Guide
If you find yourself in a deadlock situation where no moves seem possible, use these diagnostics to fix it.
Problem: Conveyor Belt Full of Wrong Colors
Symptom: You have a full belt of Cyan, but you need to pour Pink.
Solution: You must "burn" a cup. Look for a spot in the image where you can squeeze in a drop of Cyan, even if it's not perfect (like a corner of the sky). Alternatively, if you have a full belt, stop tapping new cups immediately. Wait for the current cups to pour, even if it takes 5 seconds of waiting. Do not tap anything until the belt has 2-3 empty slots.
Problem: Can't Find the Dark Red Cups
Symptom: The cat is outlined but not filled, and you can't find Red in the tray.
Solution: Look at the very bottom of Columns 1 and 5. They are likely covered by a "cap" of Pink or Yellow cups. You must clear the remaining Pink Sky and Yellow Dune sections first. The Red is there; it is just buried under the priority colors you haven't finished yet.
Problem: The Brick Wall Looks Messy
Symptom: You poured too much Cyan in one spot.
Solution: You cannot undo a pour, so you must fix it by surrounding it. Pour the Purple mortar lines *around* the blob of Cyan to make it look like a wider brick. Do not try to correct it with more Cyan; embrace the wider brick shape and adjust the mortar accordingly.
Problem: Timer is Running Out
Symptom: You have 10 seconds left and the image is only 60% done.
Solution: Switch to "Macro Mode." Stop worrying about the small details like the cloud shape or the brick lines. Tap the largest remaining color groups (usually Pink or Yellow) and flood the general areas of the canvas. It is better to have a completed image with slight errors than an unfinished image.
Speed Run Tips: Beating the Clock
Once you understand the logic, you can optimize your movement to shave seconds off your time. A perfect run takes about 25-30 seconds.
The "Top-Down" Tray Scan
Don't look at the whole tray. Train your eyes to scan only the top row of cups available in each column. As soon as a White cup appears in the center, tap it. As soon as a Pink cup appears on the edge, tap it. This "Top-Down" scanning prevents you from planning and allows you to react instantly to available colors.
Pre-Loading the Conveyor
As you are pouring the last 10% of the Sun (White), start tapping the Pink cups in the outer columns. Do not wait for the Sun to finish to start looking for the next color. The "downtime" while the current cup is pouring is the perfect time to queue up the next color in the belt.
Batch Processing the Wall
Instead of alternating Cyan-Purple one by one, try tapping TWO Cyan cups quickly, then ONE Purple. The game's physics often allow the two Cyan cups to pour simultaneously if timed right, effectively painting a double-width brick. This cuts the number of taps needed for the wall by 30%.
The End-Game Spam
When the image is 90% complete (only the Cat and small background patches remain), ignore the specific patterns. Spam the remaining Dark Red and Pink cups as fast as you can. At this stage, precision matters less than volume. Flooding the canvas with the final dominant colors will trigger the level completion even if the edges are slightly rough.