
Level 252
HARDHow to solve Sand Loop level 252? Get instant solution for Sand Loop 252 with our step by step solution & video walkthrough. Sand Loop 252 tips and guide.
Play Sand Loop Now
Experience the puzzle challenge firsthand
Game Screenshots
Sand Loop Level Guides
Level 252 Comprehensive Guide: The Yellow Bear Challenge
Introduction to the "Yellow Bear" Mechanics
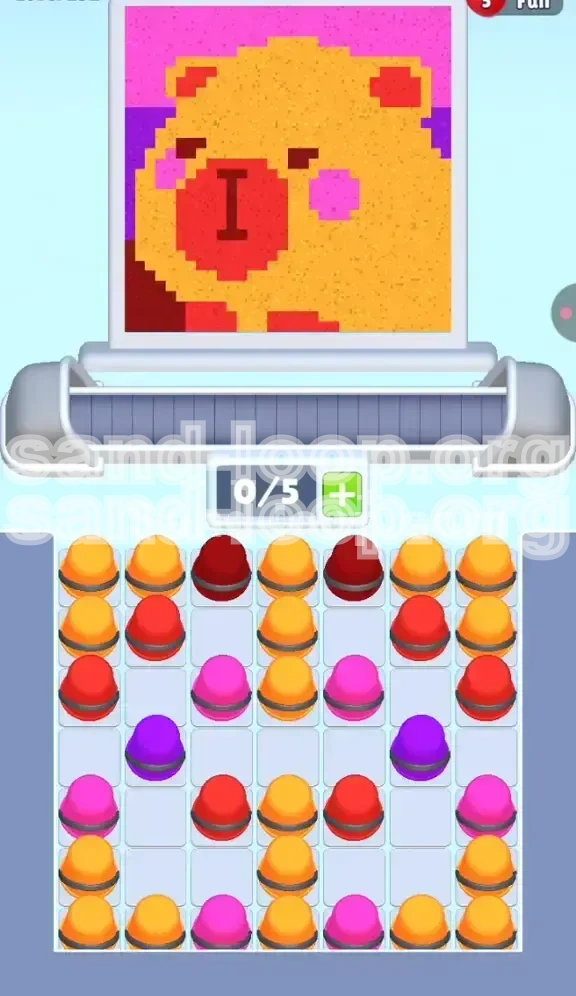
Welcome to Level 252, a stage that shifts the focus from reflex-based speed runs to pure logistical strategy. At first glance, this level appears deceptively simple: you are presented with a pixelated animal face resembling a bear or hamster, composed largely of yellow sand. However, the deceptive simplicity of the "Yellow Bear" lies in its slot management requirements. You are limited to a 5-slot capacity on your conveyor belt, but the volume of yellow sand required to fill the main face is massive. The primary difficulty arises not from the speed of the conveyor, but from the risk of color contamination. The red snout and pink cheeks are embedded directly within the massive yellow field. If you prioritize the dominant yellow color too early, you will bury the necessary red and pink slots, making it impossible to finish the details without restarting.
Core Challenges and Obstacles
The specific challenge of Level 252 is the "Checkerboard" Tray Layout. Unlike previous levels where colors might be neatly organized or blocked by ice, here the colors are interwoven in a chaotic mix. The top row is dominated by the colors you need least urgently (Dark Red and Yellow), while the crucial background colors (Purple and Pink) are buried in the middle rows. Furthermore, the "Danger Zones" of this level—the eyes and the snout—require absolute precision. The eyes are tiny horizontal slits; missing them means a failed level. The red snout is a large block surrounded by yellow; if you fill the yellow first, you will struggle to "punch through" the existing yellow sand to place the red snout cleanly without overflowing the canvas.
Victory Conditions
To successfully complete Level 252, you must achieve a 100% fill rate without exceeding the 5-slot limit. The image is layered: the deepest layer consists of the purple background and dark eyes, followed by the pink background and cheeks, then the red snout, and finally, the massive overlay of yellow fur. The victory condition is not just filling the space, but filling it in the correct dependency order. You must clear the tray in a way that brings the background colors to the conveyor belt *before* the bulk of the yellow sand arrives, or you will face a bottleneck that forces a reset.
Strategic Analysis of the Canvas and Tray
Decoding the Color Hierarchy
Before you tap a single cup, you must understand the volume and priority of each color. The Golden Yellow, which constitutes the bear's fur, accounts for approximately 60% of the total sand volume. It is the dominant color. The Bright Red, used for the snout, is a secondary color but critical for the character's definition. The Hot Pink serves a dual purpose: it forms the top background and the cheeks, accounting for about 15% of the canvas. The Deep Purple, used for the middle background, is less volume-heavy but crucial for depth. Finally, the Dark Brown/Maroon is the lowest volume (less than 5%) but highest priority for detail, as it forms the eyes and nose line.
The "Checkerboard" Trap Explained
The most significant strategic hurdle is the arrangement of the tray. The game presents you with a "Dependency Hell." The colors you need immediately (Purple and Pink) are buried under the colors you want to save for later (Yellow and Red). If you recklessly clear the top row of Yellow cups just to clean up the tray, you will flood your conveyor belt with Yellow. Since you only have 5 slots, filling them with Yellow leaves no room for the Purple and Pink cups that are revealed underneath. This results in a jam where you are forced to use Purple cups while Yellow is occupying the belt, leading to mixed pours and a ruined canvas.
The 5-Slot Management Principle
Your conveyor belt is your most valuable resource. In Level 252, you cannot treat the belt as a holding area; you must treat it as a precision tool. The strategy involves "Thinning the Herd." You must carefully tap specific cups to expose the lower layers without accidentally triggering a cascade of unwanted colors. For example, tapping a single Yellow cup might be necessary to reach a Purple cup behind it, but tapping two adjacent Yellow cups will flood your belt. The goal is to maintain 2 or 3 empty slots on your belt at all times, allowing you to instantly grab the high-priority background colors as soon as they are uncovered.
Visualizing the Fill Order
The optimal fill order follows the "Background to Foreground" rule. You must paint the background elements (Purple and Pink strips) first to get them out of the way. Next, you must place the detailed elements (Dark Red eyes and nose line) while the canvas is still relatively empty. Then, you move to the mid-ground feature (Bright Red Snout). You save the massive Yellow block for last. This order ensures that the large volume of Yellow sand acts as a "clean-up" crew, washing over any minor gaps or pixelated edges left by the previous colors, rather than acting as a barrier that prevents you from placing the details.
Timing the Conveyor Belt
The conveyor belt moves continuously, which acts as both a timer and a mixer. When you are ready to pour the "Snout Sequence" (a burst of Bright Red), you must ensure the belt is clear. If the belt is carrying stray Yellow or Purple cups, your Red pour will be interrupted. An interrupted Red pour leads to a pixelated, messy snout. Therefore, part of your strategy is waiting for the "0/5" or "1/5" moment—when the belt is nearly empty—before launching a burst of a specific color. This requires patience and the discipline to stop tapping, even when cups are available, to wait for the optimal timing window.
Step-by-Step Execution Guide
Phase 1: The Initial Dig (Top Row)
Begin the level by focusing exclusively on the top row of the tray. Your immediate goal is to expose the second row without clogging your belt. Start by tapping the Dark Red cups first. These are for the eyes and nose details, which are the hardest to place later. Get 1 or 2 Dark Red cups onto the belt. Next, tap a very limited number of Yellow cups—just enough to lower the top row and reveal the colors underneath. Crucial Step: Do not fill the belt with Yellow. If you have more than 2 Yellow cups waiting, stop tapping and let the belt drain. The yellow sand will start forming the top of the head, which is fine, but you must leave room for the next phase.
Phase 2: The Background Extraction (Rows 2 & 3)
Once the top layer is thinned, you will see the "Prize" colors: Pink and Purple. Immediately stop tapping Yellow entirely. Your priority is now to extract these Purple and Pink cups. Tap the Purple cups as soon as they are accessible. The purple band is located in the middle-left background, and it needs to be filled before the main yellow face covers it. Follow up by tapping the Pink cups. It does not matter if they are for the background or the cheeks yet; just get the pink sand flowing. By prioritizing these, you ensure the background layers are established while the canvas is still mostly blank, avoiding contamination.
Phase 3: The "Snout" Precision Strike
With the background colors handled, your tray is now likely a mix of remaining Yellow and the cluster of Bright Red cups in the middle-right. This is the most dangerous moment. You need to create a solid, continuous pour of Red to form the snout. Action: Wait for your conveyor belt to clear (aim for 0/5 or 1/5 usage). Locate the Bright Red cluster. Tap 3 to 4 Red cups in rapid succession. This "burst" ensures that the Red sand hits the canvas back-to-back, creating a clean circle. If you alternate Red and Yellow here, the snout will look jagged and the colors will bleed into each other, ruining the contrast.
Phase 4: The Final Yellow Flood
At this stage, the eyes, snout, cheeks, and background should be correctly placed. The tray is now mostly populated with the remaining Yellow cups, likely at the bottom. This is the "Cleanup Phase." You can now aggressively tap every remaining Yellow cup on the screen. Since Yellow is the dominant color, it will wash over the remaining empty pixels (the ears, chin, and fur texture). Any slight imperfections or gaps left by the Red or Pink pours will be seamlessly filled by this final flood of Yellow. The logic here is that Yellow is the "safe" color that fills the negative space around the details you have already locked in.
Phase 5: The Final Inspection
After the Yellow flood, the level should complete automatically. However, if the game does not end, you have likely missed a single pixel. Use the "Zoom" strategy: visually inspect the eyes. If one eye looks lighter than the other, you missed a Dark Brown cup. Check the tray for one last hiding cup. If you find it, clear a slot on your belt (wait for a pour to finish) and send that final cup home. Once that last pixel lands, the level is yours.
Advanced Tips and Speed Run Strategies
The "Eye-First" Technique
While the background is important, the eyes are the "Fail Condition" of this level. A pro-tip for Level 252 is to prioritize the Dark Red cups above all else in the first 5 seconds. Even if you haven't touched the background, getting the Dark Red sand on the belt and poured immediately is vital. Because the eyes are small horizontal slits, they are hardest to hit when the canvas is crowded with other colors. Pouring the Dark Red when the canvas is white/empty ensures 100% accuracy on the eyes. You can always fix the background later, but the eyes must be placed early.
Chain Reaction Management
In Level 252, tapping one cup often causes others to shift or fall into place. Use the physics of the tray to your advantage. Instead of tapping cups randomly, tap the cups that are supporting others to cause a collapse that reveals the buried Pink/Purple row. This "Digging" tactic is faster than tapping individual Yellow cups out of the way. Look for the "Keystone" cup—the one cup that, if removed, will drop a whole column of colors down to reveal what you need.
Color Bleeding Prevention
One of the most common reasons for failure is "Color Bleeding," where the Pink background mixes with the Pink cheeks, or the Red Snout bleeds into the Yellow Fur. To prevent this, never pour a color when the previous color on the canvas is still "wet" or settling if you are switching between high-contrast colors (like Red next to Yellow). Wait for the pour animation to fully finish before tapping the next cup of a different color. This pause adds milliseconds to your time but saves you from having to restart the entire level.
Slot Buffering for Speed
If you are attempting a Speed Run, you cannot afford to wait for the belt to clear to 0/5 every time. Instead, use "Slot Buffering." If you know you need to pour Red next, but you have 2 Purple cups currently pouring, tap the Red cup *while* the Purple is pouring. As long as the Purple cups finish pouring before the Red cup reaches the dispenser head, you have successfully buffered the input. This keeps the flow of sand continuous and maximizes your score efficiency without causing jams.
Mental Mapping of the Tray
Before you start, take a mental screenshot of the tray. Notice that the top right is usually heavy on Yellow, while the bottom left often hides the straggling Dark Red cups. Knowing the "geography" of the tray helps you plan your tapping route. Don't zigzag your taps; instead, clear in quadrants. Clear the top-left quadrant, then the top-right, then move down. This systematic approach prevents you from getting "lost" in the tray and accidentally tapping a Yellow cup when you meant to tap a Red one.
Troubleshooting and Common Mistakes
Mistake: The Yellow Trap
The Error: Tapping all available Yellow cups in the first 10 seconds because they are abundant.
The Consequence: Your 5-slot belt fills with Yellow. When you finally uncover the Pink and Purple cups, you have no room to pick them up. You are forced to watch them slide by while you pour Yellow, effectively burying the background areas and making the level impossible to finish.
The Fix: Exercise restraint. Treat Yellow as the "trash" color of the early game. Only tap it when you need to clear a path or when you have completely secured the background colors.
Mistake: The Mixed Snout
The Error: Alternating taps between Red and Yellow cups while trying to fill the snout area.
The Consequence: The snout becomes a muddy orange-brown mess rather than a bright, distinct red circle. The pixelation looks terrible, and you may not have enough Red volume left to fix it.
The Fix: Isolate your colors. When it is time for the Snout, the belt should be clear (or only have other Red cups on it). Pour Red *exclusively* until that feature is done.
Mistake: Ignoring the Dark Details
The Error: Focusing on the big blocks of color (Yellow, Red, Pink) and leaving the Dark Brown/Maroon cups for the very end.
The Consequence: The Dark Brown cups are often buried at the very bottom of the tray or hidden in corners. If you wait until the end to find them, your belt might be jammed with other colors, or you might not have enough moves left to dig them out. Furthermore, pouring dark details on top of wet, multi-colored sand can look messy.
The Fix: Secure the Dark Brown cups in Phase 1 or Phase 2. Treat them as a high-value collectible that must be acquired early.
Mistake: Panic Tapping
The Error: Getting frustrated with the slow pace of the "Checkerboard" reveal and tapping frantically to speed it up.
The Consequence: This leads to accidental mis-taps. You tap a Yellow cup thinking it was Red, or you tap a Pink cup when you meant to tap Purple. In a level with strict slot limits, one wrong tap can cost you the game.
The Fix: Slow down to speed up. Deliberate, calculated taps are faster than frantic tapping that leads to a restart. Watch the belt, watch the colors, and tap with intent.