
Level 257
HARDHow to solve Sand Loop level 257? Get instant solution for Sand Loop 257 with our step by step solution & video walkthrough. Sand Loop 257 tips and guide.
Play Sand Loop Now
Experience the puzzle challenge firsthand
Game Screenshots
Sand Loop Level Guides
Level Overview: The Purple Mountains Challenge
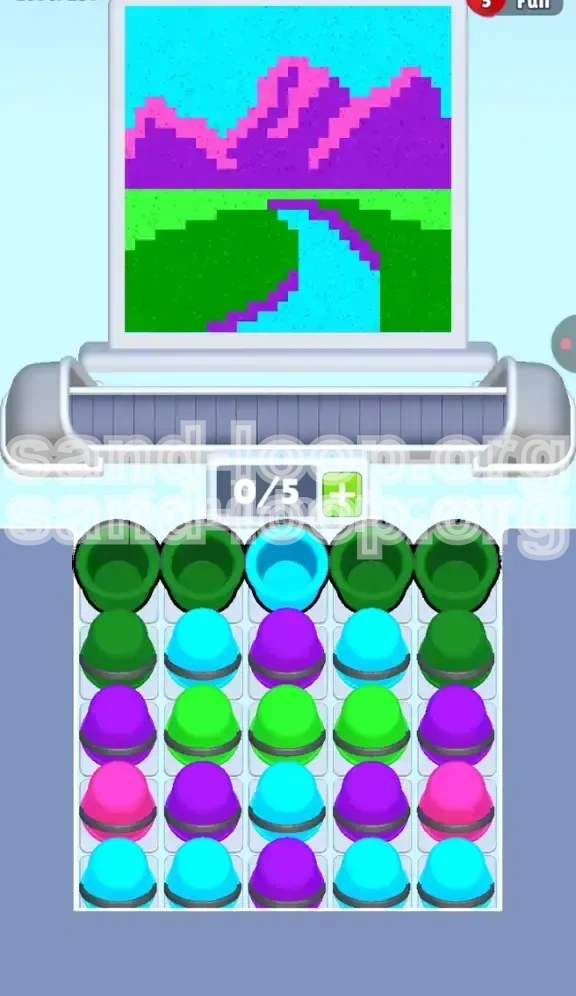
Welcome to the comprehensive walkthrough for Level 257, famously known as the "Purple Mountains" challenge. This stage marks a significant shift in gameplay mechanics, moving away from the rapid-fire reflex tests of previous levels and settling into a pure logic puzzle environment. You are presented with a serene landscape scene: rolling green hills, a winding cyan river, and majestic purple mountains capped with hot pink snow.
The core difficulty here lies in bottle-neck management. Unlike earlier stages where you could simply click fast, Level 257 requires you to act as a traffic controller for your 5-slot conveyor belt. The level is designed with a specific "Green Wall" obstacle at the very start, intended to trap players who clog their belt too early. If you have been struggling with the conveyor jamming or colors bleeding into the wrong sections (like green sand contaminating the river), this guide will teach you the precise rhythm needed to clear the board efficiently.
The Visual Layout
The target image is a landscape composed of three distinct horizontal layers. Understanding this geography is crucial because it dictates the order in which you must extract colors. The top 40% of the canvas is the sky, which requires a massive volume of Cyan. The middle section is dominated by Deep Purple mountains, requiring medium density. The bottom 30% consists of Neon Green hills and a thin, winding Cyan river. This structure means you cannot simply finish one color at a time; you must balance them to prevent the belt from stalling.
The Conveyor Constraint
Your biggest enemy in this level is the 5-slot limit on the conveyor belt. With a tightly packed grid of colors, you will frequently find yourself with full hands. If you load five cups of Green onto the belt, you cannot access the Purple or Pink cups sitting behind them until those Green cups finish pouring. Since Green takes up the most surface area, it pours the longest. This timing mismatch is the primary cause of failure.
The "Green Wall" Mechanic
The level starts with a deceptive arrangement: Green, Green, Cyan, Green, Green. We call this the "Green Wall." It tempts you to clear the top row immediately. However, doing so without a plan will lead to a jammed belt where you are waiting 30+ seconds for Green to finish, unable to feed the machine the required Purple for the mountains. Identifying how to break this wall efficiently is the key to a 100% completion.
Color Distribution Analysis
Based on pixel density analysis of the target image, here is the color volume breakdown:
- Cyan (Sky & River): ~45% of total sand. This is the heaviest color load.
- Neon Green (Hills): ~30% of total sand. It is the foreground obstacle.
- Deep Purple (Mountains): ~20% of total sand. It creates the middle depth.
- Hot Pink (Highlights): ~5% of total sand. These are small, precision fills.
Strategic Color Order
Before we dive into the step-by-step clicks, we must establish the logic behind the processing order. Attempting to paint this canvas from top to bottom (Sky first) will fail because the Green cups in the front row block the Purple cups in the back rows needed for the mountains. Conversely, painting bottom to top leaves you with no belt space for the massive amount of Cyan needed at the end.
Priority 1: Clearing the Access Path (Green)
The Neon Green cups are essentially "gatekeepers." They are positioned primarily in the top rows and the sides of the tray. Your first strategic goal is not necessarily to finish the green hills, but to move these Green cups off the tray to free up the slots behind them. You want to expose the Purple and Pink cups hidden in rows 3 and 4. Think of Green as a logistical obstacle that must be cleared in small batches.
Priority 2: Establishing the Base (Purple)
Once the initial Green blockage is cleared, your focus shifts immediately to Deep Purple. Why? Because the Purple mountains sit directly behind the Green hills in the image layering. If you wait until the end to do Purple, you risk having the Green "overflow" mechanics interfere with the mountain edges. Furthermore, Purple cups are clustered in the middle rows; extracting them early prevents the belt from getting clogged with slow-pouring Green later on.
Priority 3: The Interim Fills (Cyan)
Cyan is tricky because it appears in two disparate places: the Sky (top) and the River (bottom). You cannot do all the Cyan at once. You must perform "interim fills." This means grabbing a Cyan cup whenever the belt is empty (usually after a Purple or Pink pair) to top up the river and the sky, but stopping before the belt fills up completely. This keeps the flow moving.
Priority 4: The Precision Finish (Pink)
Hot Pink is the "cherry on top." These cups are rare and buried deep. Because the Pink areas on the mountains are so small (just the peaks), these cups pour very quickly. You should save these for moments when you need a "palette cleanser"—a fast action to break up the slow, heavy pours of Green and Cyan. Do not leave them for the very end, or you might find yourself searching for them in a cluttered tray.
The Rhythm Method
The ideal rhythm for Level 257 is: 2 Greens (Slow) -> 1 Cyan (Medium) -> 2 Purples (Slow). By cycling through these patterns, you ensure that the belt is always moving, but never overflowing. You are essentially juggling three slow-moving tasks (Green Hills, Purple Mtns, Cyan Sky) by alternating them.
Step-by-Step Walkthrough
This section provides the exact button sequence to clear Level 257. Follow these stages in order. Do not rush ahead; let the sand pour before clicking the next batch if your belt is full (5/5 slots).
Phase 1: Breaching the Wall (Moves 1-4)
The level starts with the top row: Green, Green, Cyan, Green, Green. Do not click all five. Your belt will jam.
- Click the Top-Left Green. Start the left hill.
- Click the Top-Right Green. Start the right hill.
- Wait. Let these pour until you have 3 free slots on your belt (or until they finish).
- Click the Top-Center Cyan. This begins the sky/river base and clears the center column.
Phase 2: The Purple Reveal (Moves 5-8)
With the top row gone, you now have access to the second and third rows, which contain the Purple mountains.
- Locate the Purple cups. They are now exposed in the middle rows.
- Click 2 Purple cups. Ideally, the ones closest to the center.
- Observe the Belt. You likely have 2 Greens, 1 Cyan, and 2 Purples on the belt.
- Do NOT add more yet. Wait for the first batch of Greens or Cyans to clear off the belt.
Phase 3: The Great Green Clear-Out
Now that Purple is flowing, we need to finish the massive Green task. Look at the remaining tray. You will see more Green cups on the sides of the lower rows.
- Click 2 more Green cups. These are likely the ones revealed from the second row sides.
- Monitor the River. If the river path looks empty, grab a Cyan cup now instead of Green.
- Alternate. If you grab Green, wait for it to finish. If you grab Cyan, wait for it to finish.
- Target: You want the Green Hills to be about 80% complete by the end of this phase.
Phase 4: The Pink Search (Mid-Game)
As you clear Green and Purple, look for the Hot Pink cups. They are usually hiding in the corners of the 3rd or 4th row.
- Pause your Green filling. Even if the hills aren't 100% done, stop.
- Click the Pink cups. Usually, there are only 2 or 3 of them.
- Let them pour. They pour fast (approx 5-8 seconds).
- Benefit: This clears the tray of the rarest color, ensuring you don't get stuck with a single Pink cup blocking a slot at the very end.
Phase 5: The Cyan Flood (End-Game)
By now, Green is 95% done, Purple is 95% done, and Pink is 100% done. The tray should look like a sea of Cyan.
- Check your progress. Is the sky blue? Is the river blue?
- Spam Click Cyan. You can now safely click 3, 4, or even 5 Cyan cups at once.
- Why? There are no other colors left to compete for belt space. The only job left is filling the large empty blue voids.
- Completion: Watch the percentage counter climb from 80% to 100% rapidly.
Key Tips for Success
Even with the correct order, small optimizations can mean the difference between a smooth clear and a frustrating restart. These tips focus on the mechanics of the sand physics in this specific level.
The "Finger Hover" Technique
Keep your cursor hovered over the "Next Cup" area while the current sand is pouring. As soon as a cup empties and disappears from the belt, immediately click the next cup. In Level 257, the pouring times for Green are long (approx 20 seconds). Utilizing every second of that time to plan your next click is essential. A 1-second delay between every pour adds up to minutes lost over the course of the level.
Visualizing the River Path
The Cyan river is the narrowest part of the level (only 2-3 pixels wide in some places). When you are pouring Green for the hills, stop pouring if the Green starts to mound up near the river bank. If you pour Green too high, it will spill over into the river channel. While the game logic technically handles color separation, overflowing sand can sometimes "bleed" pixels into the wrong channel, causing you to waste time fixing it later. Keep the Green low and flat.
Understanding Color Stacking
In the cup tray, colors stack on top of each other. Just because you can't see a Purple cup doesn't mean it's not there. Often, a Cyan cup will be hiding a Purple cup underneath it. You must clear the Cyan cup (pour it out) to reveal the Purple cup beneath. Do not assume a color is missing; you just haven't unlocked the layer yet. Always work on clearing the top layer of the tray pyramid first.
Managing the "Full Belt" Panic
It is common to look down and see 5/5 slots full with slow-pouring Green. New players panic and try to click faster. Instead, relax. You cannot speed up the sand. Take that 20 seconds of waiting to look closely at the canvas. Identify exactly which parts of the hills are still brown (unpainted). When the belt finally frees up, you will know exactly where to point the next stream of sand to maximize efficiency.
The 80% Rule
Do not aim for 100% completion on a color before moving to the next. Aim for 80%. If you try to squeeze the last few pixels of Green out of the level before touching Purple, you will likely run out of belt space or accessible cups. Leave the last 20% of "touch-up" work for the very end of the level, during the "Cyan Flood" phase. It is much faster to fix a few stray brown pixels at the end when you have zero other distractions.
Common Mistakes to Avoid
Level 257 is designed to punish specific types of player behavior. By learning what not to do, you can save yourself from unnecessary restarts.
The "Top-Row Dump" Error
This is the #1 cause of failure. Players see the top row (Green, Green, Cyan, Green, Green) and click all five in rapid succession. This fills the belt immediately. Because Green takes so long to pour, you are stuck watching the sand fall for a full minute while unable to access the Purple cups in the lower rows. This stalls your momentum completely. Always click in pairs of two or three.
Ignoring the Pink Cups
Because Pink is such a small part of the image, players often ignore it until the very end. However, Pink cups are often placed in inconvenient corners of the tray. If you wait until the end to grab them, you might find you need to clear 3 other cups just to get to one Pink cup. By that time, the belt is full of other colors. Grab Pink early (Phase 4) when you have a spare slot, just to get them out of the way.
Overfilling the Conveyor
The belt has a limit of 5 for a reason. If you have 4 cups pouring and you add a 5th, you have zero wiggle room. If a new color becomes available that you need urgently (like a Pink reveal), you are stuck. Keep your belt at 3 or 4 cups whenever possible. This gives you the flexibility to react to the changing board state.
Mixing "Wet" and "Dry" Colors
While less of an issue in modern versions, in some physics iterations, pouring two different colors into the exact same pixel spot simultaneously can cause graphical glitches or "flickering" where the game can't decide which color to display. This is most common when pouring Green and Purple at the border between the hills and mountains. Ensure your pours are aimed at distinct areas to prevent the engine from struggling to render the overlap.
Skipping the Tutorial Logic
Players who skipped earlier levels might try to brute-force this. Level 257 is a logic grid, not an action game. Attempting to "click faster" than the logic will fail. If you are stuck, the solution is not speed, but waiting. Wait for the belt to clear, then make a deliberate, calculated click on the correct color. Patience is the strategy here.
Stuck Solutions & Troubleshooting
If you followed the guide but still find yourself at a standstill with a 92% completion screen and no obvious moves left, use this troubleshooting checklist.
The "Last 5 Pixels" Problem
Symptom: You are at 98% or 99%, and the game says "Incomplete," but the canvas looks full. Solution: You likely missed a single pixel in the corners of the canvas or a tiny gap in the winding river. Look specifically at the "source" of the river (usually top center or middle edge). Also, check the very bottom corners of the hills; often a single Green pixel is hidden behind the UI overlay. Zoom in if possible or just sweep Cyan and Green slowly across the bottom edge.
Belt Jammed with No Moves
Symptom: Your belt has 5 cups (e.g., all Green), and there are no clickable cups left in the tray. Solution: You are in a "wait out" scenario. The game requires you to simply wait for the sand to pour. There is no magic button. However, if the game seems bugged and the sand has stopped falling, check your internet connection (if online) or try restarting the app. If you are physically stuck, it means you filled the belt with colors you didn't need yet. Next time, keep a slot open.
Cannot Find the Pink Cup
Symptom: You need Pink to finish the mountains, but you don't see any Pink cups. Solution: It is buried. Look at the grid. Is there a column of cups that hasn't been cleared yet? There is likely a Green or Cyan cup sitting on top of the Pink. You must clear that upper cup (even if you don't need that color right now) to reveal the Pink underneath. This is why clearing the "Green Wall" in Phase 1 is so critical—it unlocks the bottom layers.
River Looks Green/Cloudy
Symptom: The Cyan river looks muddy or has green spots. Solution: You accidentally contaminated the river with Green overflow. Unfortunately, you cannot "erase" sand in this game. You must fix it by pouring more Cyan into that specific spot to dilute the color. In some color mixing logic, adding enough Blue (Cyan) can override the Green tint. Focus your remaining Cyan pours directly on the discolored spots.
Reaching the Time Limit
Symptom: You are running out of time on the clock. Solution: You are spending too much time waiting for the belt. In future runs, be more aggressive in Phase 1. Don't be afraid to have 4 or 5 cups on the belt if they are the correct colors. The time loss comes from having the wrong cups on the belt (e.g., 5 Greens) and having to wait for them to finish before you can start the Purple mountains. Prioritize the "unlock" colors (Purple/Pink) over the "bulk" colors (Green/Cyan) early on.