
Level 304
HARDHow to solve Sand Loop level 304? Get instant solution for Sand Loop 304 with our step by step solution & video walkthrough. Sand Loop 304 tips and guide.
Play Sand Loop Now
Experience the puzzle challenge firsthand
Game Screenshots
Sand Loop Level Guides
Level 304 Overview: The "Sliced Apple" Strategy Breakdown
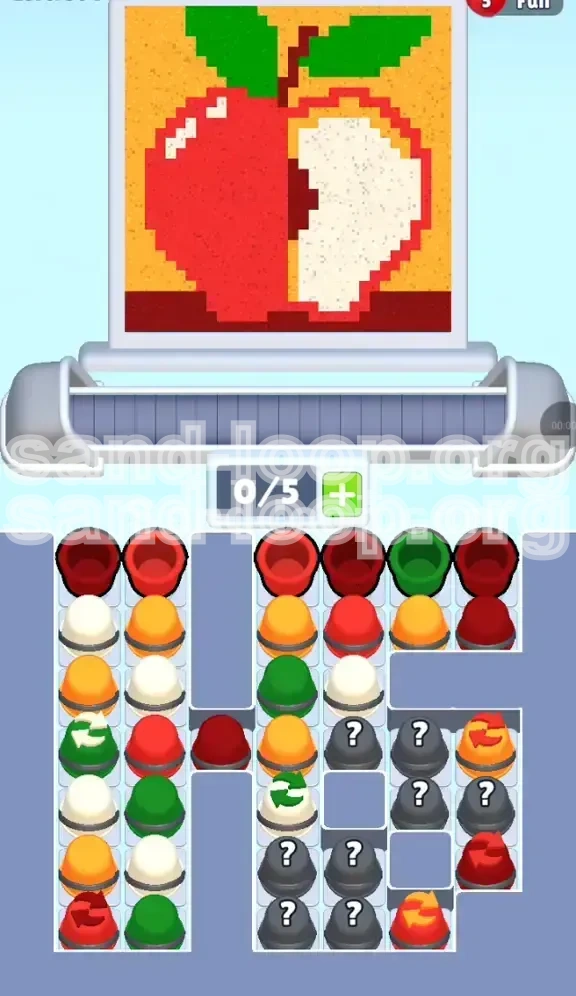
Welcome to the Sand Loop guide for Level 304, famously known as the "Sliced Apple" challenge. This level is a significant shift in difficulty, moving away from pure speed and into the realm of resource management and logic. The visual target is deceptively simple: a pixelated apple sliced down the middle, revealing red skin on the left, white flesh on the right, sitting on a table with a background of leaves and sky.
However, the level layout is designed to induce panic. You are presented with a dual-conveyor belt system and a supply tray that is split into two distinct personalities. On the left, you have a towering, narrow stack of intermingled paints. On the right, you have a dense, blocked cluster of "Mystery Cups" (the grey question mark cups). The primary challenge here is not the painting itself, but the uncertainty of your supply chain. If you treat this like a normal level and fill your belt early, you will fail. This guide will break down the mathematical approach to clearing the Mystery Cluster and painting the Apple without getting soft-locked.
Visual Breakdown of the Canvas
To succeed, you must understand the geometry of the target image. The canvas is roughly divided into 60% Apple (foreground) and 40% Background (leaves and sky). The Apple is split vertically; the left 30% of the canvas is Red, and the right 30% is White. The bottom 10% is a Dark Red strip (the table/shadow), and the top remaining area is Yellow background with two small Green leaves.
This strict vertical separation means you cannot just "paint everywhere." You have to be surgical. A spill of Red into the White zone, or White into the Yellow zone, creates a cleanup job that wastes precious conveyor belt space.
The Mystery Cup Mechanic
The defining feature of Level 304 is the heavy reliance on Mystery Cups. In the bottom right quadrant of your supply tray, you will notice a dense block of grey cups with question marks. You cannot see the color inside these cups until the cup directly on top of them is removed.
Statistically, these cups contain the colors you need (Yellow, Green, Dark Red), but they are buried under decoys. The danger lies in the "Reveal Cost." Every time you clear a cup to reveal a Mystery Cup, you use up a belt slot. If you reveal a color you don't need (e.g., getting Green when you are painting the Red skin), you are forced to either waste the paint or clog your belt.
The Inventory Management Crisis
Your conveyor belt has a limited capacity (typically 5 slots). In standard levels, keeping 4/5 slots full is safe. In Level 304, keeping 4/5 slots full is a death sentence. When you are digging into the Mystery Block, you need "Reveal Space."
If your belt is full (5/5) and you clear a cup that reveals a new color, you have nowhere to put that new cup. The game will not let you proceed. Therefore, your operational strategy must change: maintain at least 2 empty slots at all times when interacting with the right-side supply stack.
The Probability Trap
The right-side stack is designed to trick you. It often places Cycle Cups (cups with arrows that change color or content) on top of valuable colors. Many players waste taps trying to cycle colors perfectly before painting. In Level 304, efficiency is king. Do not try to cycle a cup to the perfect shade if a "good enough" shade is available. The probability of getting the exact color you want via cycling is often lower than just digging deeper into the stack for a fresh cup. Focus on revealing the static Mystery Cups rather than gambling on the Cyclers.
Why This Level Isn't a Speed Run
While you *can* speed run this level, attempting to do so on your first try will likely result in a "Game Over" due to a full conveyor belt. The "Sliced Apple" requires a stop-and-go rhythm. You will paint a section, then stop to analyze the stack, then dig, then paint again. Trying to maintain a constant flow of clicks will cause you to miss the visual cues that a Mystery Cup is about to turn into a blocker.
Strategic Objectives and Goals
Before you tap a single cup, establish your mindset. You are not painting a picture; you are managing a logistics pipeline. Your goals are ordered by priority to prevent soft-locks.
Objective 1: The Dark Red Foundation (Priority: High)
The bottom strip of the canvas is Dark Red. This is your first priority. Why? Because Dark Red is the rarest color in the supply tray for this level. It is not buried in the Mystery Block; it is exposed at the very top of the left and right stacks.
If you ignore this and start painting the Red skin or White flesh, you risk burying the Dark Red cups under other debris. Get the Dark Red cups onto your belt and pour them immediately. This secures the bottom of the canvas and prevents you from having to hunt for this specific color later when your belt is full.
Objective 2: Belt Hygiene (Priority: Critical)
Your secondary, continuous objective is to keep the conveyor belt clean. "Clean" does not mean empty; it means organized.
- Slot 1-2: Active paints (what you are using right now).
- Slot 3: "Next up" paint.
- Slot 4-5: EMPTY.
If Slots 4 and 5 are occupied, you stop digging. Period. You must paint until those slots are clear. This creates a rhythm: Dig -> Load -> Paint -> Repeat. Do not fall into the trap of loading 5 cups and then trying to figure out where they go. Paint first, load second.
Objective 3: Simultaneous Dual-Column Construction
The Apple consists of Red Skin (Left) and White Flesh (Right). You might be tempted to finish all the Red first, then do all the White. Do not do this.
The supply tray alternates colors. If you only take Red, you will fill your belt with Red, leaving the White cups buried in the stack. You must build the apple row-by-row. Paint a row of Red, then a row of White. This keeps the supply stack balanced and ensures you always have access to both primary colors.
Objective 4: Managing the "Leaf" Delay
The Green leaves are at the very top of the canvas. You will likely uncover Green cups very early in the level. Your instinct will be to paint them. Resist.
The leaves sit on top of the Yellow background. If you paint the Green leaves now, and later pour a large bucket of Yellow for the background, you risk overlapping the Green (depending on the pour mechanics) or simply wasting belt space holding Green cups for 20 minutes. Stash the Green cups in your belt (if you have space) or ignore them until the very end. They are your "End Game" objective.
Objective 5: Cracking the Mystery Cluster
The right side of the tray is a fortress. Your goal here is not to get every color, but to reveal every cup. You need to know what is under the Mystery Cups. Once revealed, you can decide whether to use it or dump it. The goal is visibility. Until you can see the bottom of the tray, you aren't truly in control of the board.
Step-by-Step Walkthrough Guide
Follow this sequence to navigate the level with the highest probability of success.
Phase 1: The "Floor is Lava" (Dark Red Start)
As soon as the level starts, ignore the apple body. Look at the top of the stacks. You will see Dark Red cups on the far left and far right peaks.
Action: Tap the Dark Red cups immediately.
Execution: Load them onto the belt. Pour them directly into the bottom strip of the canvas. Do not worry about being neat; just get the color down.
Result: You have secured the rarest color and cleared the top of the "towers," allowing access to the layers beneath.
Phase 2: The "Twin Towers" Ascension (Red & White)
Now you are staring at the left stack (mostly Red/White) and the right stack (Green/White/Yellow).
Action: Tap a Red cup from the left stack. Tap a White cup from the right stack.
Execution: Pour the Red into the leftmost 3-4 columns of the Apple area. Pour the White into the rightmost 3-4 columns. Do not fill them to the top. Fill them about 20% of the way up.
Logic: By alternating, you keep the stacks level. If you dig too deep on one side, you might hit a block of Mystery Cups that you aren't ready for yet. Ascend slowly.
Phase 3: The Mystery Block Breach
Eventually, clearing the right side will expose the grey Mystery Cups. This is the danger zone.
Action: Ensure your belt has 2 empty slots.
Execution: Tap the Mystery Cup.
- Scenario A: It reveals Yellow. Great! Pour it into the top background immediately (above the apple).
- Scenario B: It reveals Green. Okay. If you have a free slot, keep it for the end. If not, you might have to temporarily "waste" it by pouring it into the leaf area prematurely, or hold it if you are confident.
- Scenario C: It reveals a useless color (like extra Red when you have plenty). This is the worst case. You must pour it onto the canvas somewhere (even if it's slightly messy) just to get it off your belt.
Phase 4: The Background Push
You will reach a point where the Apple body (Red/White) is half-done, but you are running out of space because the background is empty. A full canvas looks intimidating, but you need to clear the Yellow background cups to clear the tray.
Action: Shift focus to the Yellow cups.
Execution: Aggressively target Yellow cups in the supply tray. Pour the Yellow to fill the top 30% of the canvas. Don't worry about the leaves yet—just paint over where the leaves *will* be. You can paint Green over Yellow later, but painting Yellow over Green is a waste of Green paint.
Phase 5: The Clean-Up Sweep
At this stage, the Mystery Block is gone, the background is Yellow, and the bottom is Dark Red. You are left with a messy middle section of the Apple.
Action: Systematically clear the remaining Red and White cups.
Execution: Fill in the rest of the Apple body. Since you already did the bottom (Dark Red) and the top (Background), the middle is just a matter of connecting the dots. Use the "Single Tap" method here: tap one cup, pour it, tap the next. Don't hoard cups.
Phase 6: The Leaf Finale
The canvas is almost full. The only unpainted pixels are the Green leaves at the top.
Action: Retrieve those Green cups you stashed earlier (or ignored) in the tray.
Execution: Carefully pour the Green into the leaf shapes. Since the background is already Yellow, you have a clear guide. If you have extra Green, check if there are any stray pixels you missed, or simply congratulate yourself on a level clear.
Color Processing and Order
Understanding the hierarchy of colors is vital for inventory management. Not all colors are equal in this level.
1. Dark Red (The "Floor" Color)
Processing Order: First.
Reasoning: Dark Red is isolated from the other colors in the supply tray. It appears only at the very top and very bottom of stacks. It is not mixed in the Mystery Cluster. If you don't take it when you see it, you might have to unload 10 other cups to get back to it. It is the foundation of the level. Get it done immediately.
2. Yellow (The "Background" Color)
Processing Order: Middle (but keep collecting early).
Reasoning: Yellow is the "Space Filler." It takes up the most area on the canvas but is often blocked by Cycle cups or Green cups. You should process Yellow as soon as you have a block of 3-4 Yellow cups on your belt. Pouring Yellow clears massive amounts of canvas real estate, giving you room to breathe if you make a mistake with the Red/White boundary.
3. Red and White (The "Body" Colors)
Processing Order: Continuous / Alternating.
Reasoning: These are your "Bread and Butter." You will process these more than any other color. The trick is the ratio. For every 2 Red cups you process, try to process 2 White cups. Do not let the ratio get unbalanced (e.g., 5 Red on the belt, 0 White). An unbalanced belt leads to panic-pouring.
4. Green (The "Detail" Color)
Processing Order: Last.
Reasoning: Green has the smallest surface area (the two leaves). It is also the most dangerous to hold because it doesn't fit into the "Red/White" rhythm. Treat Green as a "special object." If you get a Green cup, visualize where it goes (the leaves). If the leaves aren't ready (background isn't done), the Green cup is just a passenger taking up a seat on the bus. Keep it on the belt, but don't pour it until the end.
Dealing with Color Contamination
What happens if you pour Red into the White area? You have a "Color Contamination" event.
Immediate Action: Stop. Do not try to fix it by pouring White over it immediately (unless you have White in hand). Usually, it is better to leave the mistake and finish the level with one pixel error than to scramble your entire inventory trying to fix a minor aesthetic flaw. However, if you have plenty of White, pour a single tap of White to correct the center of the spill.
Key Tips and Strategic Advice
These tips are gathered from high-level play strategies to optimize your clear rate.
Tip 1: The "2-Slot Safety Buffer" Rule
We mentioned this before, but it deserves its own section. When approaching the right-side Mystery Cluster, count your empty slots.
If you have 0 or 1 empty slot: Do not tap the Mystery Cup. Paint something first.
If you have 2+ empty slots: Safe to tap.
Why? Because a Mystery Cup might reveal a color that forces you to dig deeper to find the *next* color you actually need. Having that extra buffer prevents the dreaded "Belt Full" stalemate.
Tip 2: The "Dummy Pour" Technique
Sometimes, you *must* tap a Mystery Cup to progress, but your belt is full. You have a "bad" cup on your belt that you don't need right now (e.g., a Green cup when you are painting the floor).
Technique: Pour the "bad" cup into a "dummy" spot. A dummy spot is an area of the canvas that is *already the correct color*. Pouring Green onto an already Green leaf doesn't change the canvas, but it gets the cup off your belt. This frees up a slot for the Mystery Cup reveal.
Tip 3: Identifying the "Stack Lock"
Look at the columns in the supply tray. If a column has 5 cups and you need the one at the bottom, that column is "Locked."
Do not tap the top cup of that column until you are ready to deal with the *entire* chain. For example, if a stack is [Green -> Mystery -> Yellow], and you want the Yellow, tapping the Green commits you to adding Green to your belt. If your belt is full, you can't get the Yellow. Always check the depth of the stack before breaking the seal.
Tip 4: Utilizing the Cycle Cups
The cups with circular arrows are "Cycle Cups." They rotate through a set of colors every time you tap them.
Pro Tip: Don't tap them randomly. Watch the canvas. If you need Red, and the Cycle Cup is currently Green, check your belt. Do you have Green? If yes, tap it. If no, wait. A Cycle Cup is a "flexible" resource. It is better to use a flexible resource to match a hard constraint than to use a hard resource (like a fixed Red cup) when you don't need to. Save the fixed Red cups for when you are desperate.
Tip 5: The "Top-Down" Visual Verification
Every 30 seconds, zoom out (visually) and look at the whole canvas.
Are your Red and White sections vertical? Or are they drifting diagonally? A diagonal drift means you are pouring more of one color than the other. Correct this by intentionally ignoring the overflowing color for a few taps and forcing the other color onto the belt.
Solutions for Common Stuck Scenarios
Even with a plan, things go wrong. Here is how to recover from specific failure states.
Scenario 1: The "Full Belt" Freeze
Situation: Your conveyor belt is full (5/5). The supply tray has no useful colors exposed. You are stuck.
Diagnosis: You have been collecting more than painting.
Solution: You must "burn" a cup. Look at your belt. Is there a cup that is *least* useful? Maybe you have 2 Red cups, but you only need 1 more stroke of Red. Pour the 2nd Red cup into the Red area anyway. This consumes the cup, clears a slot, and lets you continue. It is better to waste a little paint than to restart the level.
Scenario 2: The "Missing Color" Search
Situation: You need Dark Red for the floor, but you can't see any Dark Red cups.
Diagnosis: It is buried under a Mystery Cup or a Cycle Cup.
Solution: Stop painting the canvas. Look for the "heaviest" column on the right side. Start clearing that column methodically. It is highly likely the Dark Red is hiding under the grey blocks. You must sacrifice your current belt composition to dig it out. Use the "2-Slot Safety Buffer" method while digging.
Scenario 3: The "Boundary Bleed"
Situation: You accidentally poured Red over the White boundary. Now the Apple looks like it's bleeding.
Solution: Do not panic. Do not try to scrape it off. Wait until you find a White cup. When you do, pour the White *larger* than the mistake. You are effectively "outlining" the mistake in White to make it disappear. If you don't have White, you may have to leave it as a "battle scar" and focus on finishing the level to get your score up.
Scenario 4: The Mystery Loop
Situation: You keep tapping Mystery Cups and they keep giving you Green, but you don't want Green.
Solution: The game is forcing you to hold Green. Put the Green cups on your belt. Now you have 2 fewer slots. This forces you to play more slowly and deliberately. Accept the slower pace. Treat the Green cups as "blockers" occupying slots so you don't accidentally fill up with other junk. Once the leaves are ready, you will appreciate the stockpile.
Speed Run and Optimization Tips
Once you have beaten the level normally, here is how to optimize your time for the Speed Run leaderboards.
Shortcut 1: The "Bulk Pour" Method
Instead of tapping individual cups, look for "Chains." If the top three cups in a stack are Red, and you need Red, load all three.
Technique: Tap-Tap-Tap (load 3 Reds). Then Pour-Pour-Pour.
This minimizes the animation time of the conveyor belt moving back and forth. The belt moves slower than your fingers. Maximize the belt's movement by filling it in one direction.
Shortcut 2: Pre-Loading the Background
Speed runners often prioritize the Yellow background much earlier than normal players.
Why? Clearing the background clears the top of the supply tray. It removes the "ceiling" of the level, allowing you to access the deeper Mystery Cups faster. By doing Yellow early, you speed up the rate at which you can reveal the rest of the board.
Shortcut 3: Ignoring Perfection
A 100% perfect fill is slower than a 95% fill.
If a pixel is 90% filled, leave it. The game's collision detection is lenient. You don't need to scrub every corner. If the Red looks "Red enough," move to the next cup. Saving those 2-3 seconds per color section adds up to a massive time save over the whole level.
Shortcut 4: The "Tap and Swipe" Rhythm
Develop a rhythm for the standard Red/White sections.
Tap (Load) -> Swipe (Pour) -> Tap (Load) -> Swipe (Pour).
Do not wait for the paint to settle before tapping the next cup. As soon as the pour starts, tap the next cup on the tray. This "queues up" the next action, making your character move fluidly without the pauses that occur when you wait for visual confirmation.