
Level 311
HARDHow to solve Sand Loop level 311? Get instant solution for Sand Loop 311 with our step by step solution & video walkthrough. Sand Loop 311 tips and guide.
Play Sand Loop Now
Experience the puzzle challenge firsthand
Game Screenshots
Sand Loop Level Guides
Level Overview: The Pixel Chicken Challenge
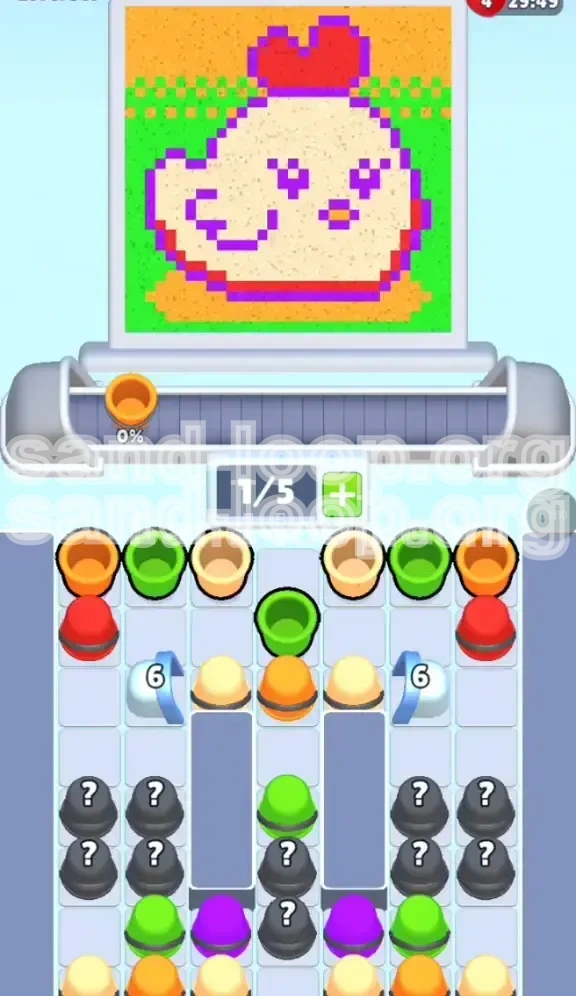
Welcome to Level 311, commonly known as the "Pixel Chicken" stage. This level is a deceptive puzzle that masquerades as a simple art restoration task but functions as a rigorous inventory management simulation. Unlike previous speed-based stages, Level 311 requires patience and spatial awareness.
The core challenge lies in the "Sand Loop" mechanic—a limited 5-slot conveyor system that recycles unused cups. You are presented with a cute, pixelated White Chicken against a checkered background. The difficulty spike here comes from the vertical depth of the cup tray; essential colors for the final details are buried deep beneath layers of filler colors and hazardous Mystery Cups. One wrong move in the early game can clog your inventory, making the late game impossible to finish without a restart.
The 5-Slot Constraint
The most critical mechanic in this level is the conveyor belt limit. You only have five active slots available at any given time. Once a slot is occupied, it cannot be freed until the cup is poured or merged. This means you cannot simply hoard colors. You must constantly balance between pulling new cups from the tray and clearing existing ones from your belt.
Visual Analysis of the Target
Before you tap a single cup, analyze the pixel art. The chicken consists of three main color masses: the Cream body (approx. 60% of the image), the Green background (approx. 30%), and the Red/Orange accents (approx. 5%). The final 5% is the Purple outline and eyes. Understanding this ratio is crucial; the largest color masses are your safest dumping grounds for inventory management.
The Vertical Tray Problem
The cup tray is deep and narrow. Colors are not arranged conveniently. The Cream cups you need immediately are often blocked by Green or Orange cups. Worse, the Purple cups required for the final outline are located at the very bottom row of the tray, physically inaccessible until the upper layers are cleared. You must dig down to reach them.
The Ice Block Obstacles
Flanking the main tray are two "Ice Block 6" obstacles. These frozen barriers block access to auxiliary Mystery Cups. The number 6 indicates that you must clear 6 cups of a specific color chain to shatter them. Ignoring these is fine initially, but eventually, you must clear them to prevent your tray from overflowing with un-pourable junk.
Mystery Cup Risks
Scattered throughout the tray are Black Mystery Cups marked with a "?". In Level 311, these are not freebies; they are traps. They can spawn Purple cups too early (clogging your belt) or redundant Green cups when you need Red. Approaching these without a plan is the fastest way to fail.
Strategic Objectives: How to Win
To achieve a 100% completion rating in Level 311, you need to move beyond random clicking and adopt a phase-based strategy. Your goal is not just to paint the picture, but to control the flow of inventory from the tray to the belt.
Objective 1: Clear the "Filler" Colors
Your immediate goal is to reduce the tray's vertical height. The top layer consists of Green, Orange, and Cream. You must clear these to create physical space in the tray for lower cups to rise up. Do not focus on details yet; focus on bulk pouring to free up inventory slots.
Objective 2: Unlock the Purple Outline
The Purple cups are the bottleneck of this level. They are buried at the bottom. You cannot finish the level until you dig them out. However, you also cannot paint the Purple outline until the Cream body is finished, or you will paint over the lines and lose precision.
Objective 3: Break the Ice Blocks
You need to shatter the Ice Blocks to access the rear Mystery Cups. This usually happens passively as you clear the top layer colors. However, keep an eye on the counter; if you stop pouring a specific color too early, the blocks will remain intact, trapping useful cups you might need later.
Objective 4: Maintain Inventory Flow
At no point should your 5-slot belt be full of "useless" colors. A useless color is one that you cannot currently pour (e.g., having a Purple cup when the body isn't painted). Your objective is to keep 2 slots open at all times to handle the random nature of the loop.
Objective 5: Avoid Contamination
100% completion requires no color bleeding. This means you cannot pour Green into the Orange background pixels, or Cream into the Green background. The final checkered pattern near the horizon is the danger zone. You must achieve a "clean" separation of colors.
Step-by-Step Walkthrough: Phase 1 - The Bulk Clear
The first phase of the level is purely mechanical. You are reducing the pile. Do not worry about the chicken's face or the outline yet. We are strictly managing volume.
Step 1: Target the Cream Body Mass
Locate the Cream (White) cups in the tray. Tap them first. The chicken's body is the largest area in the game. It is a "safe zone" because it is surrounded by a thick outline that makes accidental spills harder to mess up. Filling this area consumes a large number of cups, which is exactly what you want to do immediately to clear the tray's top layer.
Step 2: Alternate Green and Orange
While the Cream cups are pouring (or cycling), pull Green and Orange cups. Pour Green into the sky. Pour Orange into the ground. The key here is to keep the flow moving. Do not let one color sit on the belt while you hunt for another. Keep the belt rotating.
Step 3: The Checkerboard Warning
As you paint the Green background (sky), you will notice the horizon line has pixels of Orange mixed in. Do not spam the Green cup. Stop pouring just before you hit the horizon line. Leaving 2-3 pixels unpainted is better than having to restart the whole level because you contaminated the Orange ground with Green paint.
Step 4: Digging Down
As you pour the top layer colors (Cream, Green, Orange), you will see the tray shifting. The cups above vanish, and the cups below rise up. This is "digging." You are intentionally digging to reach the row containing the Red cups and the Ice Blocks.
Step 5: Monitor the Mystery Cup (?)
Eventually, a Black Mystery Cup will rise to the top row. Do not tap it yet. Look at your belt. If you have 4 or 5 cups, let it sit in the tray. If you tap it now, and it turns out to be a Purple cup, your belt will jam because you can't use the Purple yet. Only tap the Mystery Cup when you have exactly 3 or fewer cups on your belt.
Step-by-Step Walkthrough: Phase 2 - The Detail Work
Now that the massive blocks of color are done, the tray looks different. The "filler" is gone. We are now dealing with the dangerous colors: Red and Purple.
Step 6: Tackling the Red Comb
The Red cups are likely now accessible. The Chicken's comb (the red thing on its head) and the wing details are small targets. This requires timing. You cannot just hold the cup down. Tap, release, and check. Spilling Red on the Cream body is ugly. Spilling Red on the Green background is fatal to your score.
Step 7: Breaking Ice Block 6
By pouring the Red cups, you should notice the Ice Blocks on the sides cracking. The game mechanic usually ties these blocks to clearing the adjacent color chain. If the blocks haven't shattered after you clear the visible Red cups, you may need to pull a specific Mystery Cup that was hiding behind the ice to finish the count.
Step 8: Managing the Mystery Reveal
When the Ice shatters, new Mystery Cups are released. Tap one. Ideally, this reveals the first Purple cup. If it reveals a color you already finished (like Green), do not panic. You can merge it with an existing Green cup on the belt to delete it, or just let it loop until it disappears off the screen (if the game allows non-merging recycling). Merging is safer.
Step 9: The Wait for Purple
This is the hardest part. The tray is now mostly empty. You are waiting for the final Purple cups to rise from the bottom. You might have 1 or 2 Purple cups on your belt, but the body isn't 100% White yet. Do not pour the Purple. You must wait for the remaining Cream cups to rise and be poured. This "wait" is where many players panic and make mistakes.
Step 10: Final Inventory Check
Before starting the final phase, ensure your belt is clean. You should have: 1 or 2 Purple cups, and maybe 1 random other cup. If your belt is full of junk (e.g., 3 Green cups and 2 Orange cups), pour them immediately into the background to clear space. You need empty slots for the final maneuver.
Key Tips and Tricks for Success
These tips are distilled from hundreds of test runs on Level 311. Use them to avoid common pitfalls.
Tip 1: The "Two Empty Slots" Rule
Never let your belt fill up with 5 cups unless you are about to pour all of them immediately. Ideally, keep 2 slots empty. Why? Because if you pull a cup from the tray and it's a "dud" (a color you don't need), you need a slot to put it in while you wait for it to cycle off the belt. If you are full, that dud blocks you from pulling the cup you actually need.
Tip 2: Pre-Painting Strategy
You can "pre-paint" difficult areas. If you have 90% of the Cream body done, but you are missing the final few pixels, you can stop. Switch to Red, do the comb, then switch back to Cream. You don't have to finish one color 100% before starting another, provided the areas don't touch. The body and the comb don't touch, so the order doesn't matter for those specific parts.
Tip 3: Mystery Cup Math
There is a 40% chance a Mystery Cup contains a color you strictly need *now*, and a 60% chance it contains a color for *later* or a duplicate. Do not gamble on a full belt. Treat the Mystery Cup as a wild card that costs 2 inventory slots to use (1 to pull, 1 to hold). If you can't afford the tax, don't pull the lever.
Tip 4: The Outline Layering
The Purple outline is drawn *over* the Cream body and the Green background. This means the Cream body must be perfect before you touch the Purple. If you try to Purple first, you will inevitably paint over the pixels that are supposed to be Cream. Since Cream is a "thick" color and Purple is "thin," painting Cream over Purple is much harder and messier than doing it the correct way (Base Coat -> Outline).
Tip 5: Handling the Loop Speed
The loop (conveyor) speed in Level 311 is moderate. It's fast enough that you can't daydream, but slow enough that you can plan your next tap while the current cup is pouring. Use the pouring time to scan the tray. Don't watch the paint fall; watch the tray shift. Look for where the next Purple cup is located.
Tip 6: The Restart Threshold
If you mess up the checkerboard pattern (Green into Orange), and you are only 20% into the level... restart. Trying to fix a background error by over-painting is nearly impossible in this art style because the pixels are small. You will just make the mud darker. A restart costs 30 seconds; fixing a mistake costs 3 minutes of frustration.
Common Mistakes to Avoid
Learning what *not* to do is as important as learning what to do. Here are the most common reasons players fail Level 311.
Mistake 1: The Premature Purple Pull
This is the #1 killer. You see a Purple cup deep in the tray or in a Mystery block, and you pull it to your belt immediately. Now it's taking up space. You can't pour it because the body isn't white. You can't get rid of it. It sits on slot #4 or #5, preventing you from pulling the Cream cups you actually need. Result: Gridlock.
Mistake 2: Ignoring the "Beak" Spill
The chicken's beak is Orange. It is right next to the Red Comb. It is also right above the Green background. If you pour the Orange beak too aggressively, the paint will bleed into the Red comb (turning it muddy brown) or down into the Green background. The beak is tiny. Use a short tap, not a long pour.
Mistake 3: Hoarding Colors
Some players try to collect all the Reds on the belt before pouring any. "I'll wait until I have 5 Reds, then pour them all." This is bad strategy. It blocks your slots. Pour as soon as you have a valid target. The only exception to this is if you are saving a color for a specific merging strategy, but in Level 311, pouring immediately is usually safer than hoarding.
Mistake 4: Forgetting the Background Details
The background isn't just Green. It has that checkered horizon. If you treat the background as a single solid Green block, you will fail the 100% check. Always zoom in (mentally) on the horizon line before pouring Green. Stop 2 millimeters short.
Mistake 5: Panic-Merging
When the belt gets full, players start tapping randomly to merge cups. They might merge a Red with a Green just to get it off the belt. This destroys a valuable cup. Only merge identical colors. If you have a non-merging clutter, you must pour them to clear the slots, even if it means filling a 95% complete area just to free up space.
Troubleshooting: When You Are Stuck
Feeling frustrated? If you are stuck at 90% completion with a full belt and no moves, here is how to diagnose the situation.
Problem: The "Last Pixel" Jam
You have one tiny pixel of Cream left to paint, but your belt is full of Purple and Green. You cannot pull the last Cream cup because the belt is full.
Solution: You must sacrifice a cup. Look at your Purple/Green cups. Is there any safe place to dump them? If the background is 100% done, you can't dump Green. If the outline is 100% done, you can't dump Purple. If you are truly stuck, you likely made a measurement error earlier (e.g., left a pixel unpainted). In this case, look for a "Merge" opportunity to delete a cup, or restart.
Problem: Ice Block Won't Break
You've cleared the top layer, but the Ice Block remains at 1/6 or 0/6.
Solution: You missed a hidden cup. Look behind the Ice Block in the tray visualization. Is there a cup tucked in the corner? Sometimes the tray logic requires you to clear the *specific* color associated with the block. If the block is Red, ensure you haven't missed any Red pouring opportunities, even small ones.
Problem: Mystery Cup Loop
You keep pulling Mystery Cups, and they keep giving you colors you don't need.
Solution: Stop pulling them. Let the Mystery Cups cycle in the tray. Focus on pouring what you have on the belt. Often, the game forces "bad luck" streaks until you clear your current inventory buffer. Pour 2-3 cups, create space, and *then* try the Mystery Cup again.
Problem: Color Bleed on the Comb
You accidentally turned the Chicken's comb pinkish-purple because you spilled Purple on it too early.
Solution: You cannot easily fix this with Red over Purple. The digital blend will make it dark brown. You have to restart. Level 311 is unforgiving on the small details. The restart is faster than trying to correct a layering error.
Problem: Tray Stopped Moving
You feel like you've poured everything, but no new cups are rising.
Solution: The tray only shifts when you pull cups. If you are staring at a static tray, it means you haven't tapped the bottom row in a while. The game is waiting for you to pull the "blocking" cup to trigger the physics shift. Pull that cup you were avoiding!
Speed Run Strategies
Once you have beaten the level normally, you might want to improve your time. Here is how the pros do it.
Speed Tip 1: Bulk Pouring
Don't tap-tap-tap. Hold the pour. As long as you are 100% sure of the area boundaries, hold the cup down. The Cream body can be filled in 2 seconds if you hold the cup rather than tapping. This saves precious seconds on the clock.
Speed Tip 2: Pre-Loading the Belt
While the first cup is pouring, you should already be tapping the next cup you need. Don't wait for the animation to finish. The "Sand Loop" allows you to queue actions. As soon as you tap "Pour," tap the next cup in the tray. If you time it right, the next cup will arrive on the belt exactly when the previous one is empty.
Speed Tip 3: Ignoring Small Mistakes
If you are going for a time record and not a 100% score, you can ignore the checkerboard background details. Just paint the whole background Green. You lose points, but you gain 20 seconds of speed. This is a valid strategy for 2-star or 3-star runs where 100% accuracy isn't required.
Speed Tip 4: The Mystery Skip
If you get a Mystery Cup that spawns a Purple cup early, don't wait for the perfect moment. Speed runners will often pour the Purple outline *before* the body is fully done. It's riskier, but if your aim is good, you can shave off the "wait" time at the end. This requires knowing exactly where every pixel is.
Speed Tip 5: Ice Block Prioritization
Don't wait for the Ice Blocks to break naturally. If you see a color chain that is close to breaking them (e.g., you need 1 more Red), prioritize that immediately. Breaking the ice early releases more cups into the pool, preventing the "waiting for new cups" lag that happens at the end of the level.