
Level 326
HARDHow to solve Sand Loop level 326? Get instant solution for Sand Loop 326 with our step by step solution & video walkthrough. Sand Loop 326 tips and guide.
Play Sand Loop Now
Experience the puzzle challenge firsthand
Game Screenshots
Sand Loop Level Guides
Sand Loop Level 326: The Ultimate "Lakeside Sunset" Strategy Guide
Welcome to the most comprehensive strategy guide for Sand Loop Level 326. This stage is a significant difficulty spike, categorized internally as a "Volume Drain" scenario. Unlike previous levels where you could rely on color matching alone, Level 326 demands resource management and mathematical precision. You are painting a "Lakeside Sunset," a composition that involves a heavy foreground, a complex mid-ground, and a vast background. The primary constraint is the "Number Walls"—barriers that require a specific volume of sand to be destroyed, not specific colors. Below is the definitive breakdown to conquer this stage efficiently.
1. The Mechanics of Volume vs. Color
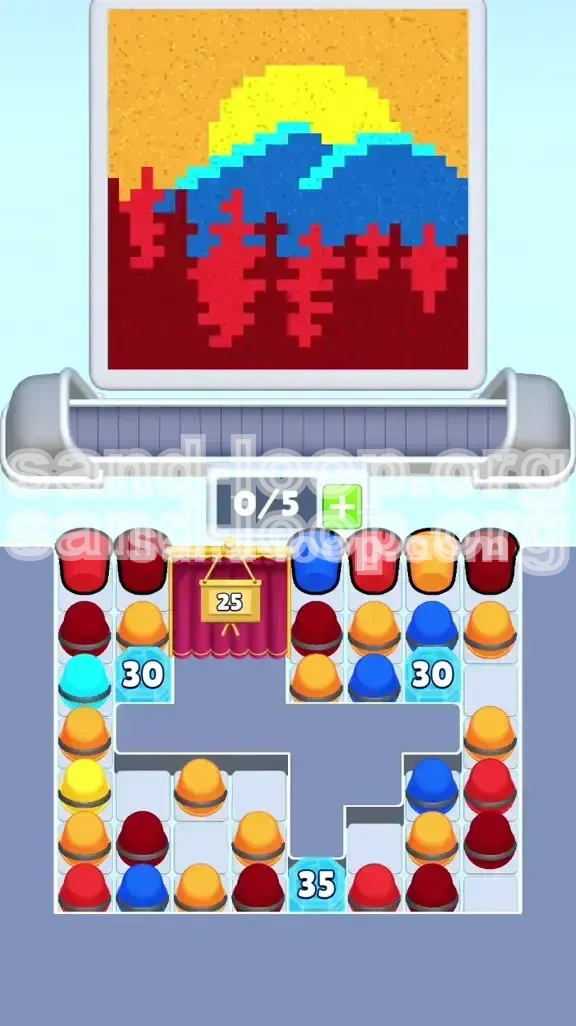
The most critical misunderstanding players face in Level 326 is assuming the color counters are sensitive. They are not. The "25", "30", and "35" blockers function purely on volume. Every single cup you successfully dispense reduces these counters by 1, regardless of whether it is Red, Blue, or Yellow. This mechanic transforms the level from a puzzle game into a resource management simulation. You must output a total of 90 cups (25 + 30 + 35) to clear the board physically, independent of the painting requirements.
2. Analyzing the Canvas Composition
The "Lakeside Sunset" image is deceptive. It features three distinct horizontal layers. The bottom 20% is Dark Red (the reflection/water), the middle 50% is a mix of Dark Blue (mountains) and Cyan (highlights), and the top 30% is Yellow (sky). The visual weight is bottom-heavy, meaning your conveyor belt will naturally be clogged with Red and Blue cups early on. If you hoard Yellow for the end without leaving buffer space, you will create a deadlock that forces a restart.
3. The Conveyor Belt Constraints
You are limited to a 5-slot capacity on your loading tray. In this level, the "Ice Block" obstacles trap cups behind them, meaning your active pool of available sand shrinks as the level progresses. You cannot rely on a constant flow of new cups; you must rely on the cups exposed by breaking the Ice Blocks. Efficient rotation of your 5 slots is the difference between a clear and a fail.
4. The Critical "Deadlock" Risk
The "Deadlock" occurs when your 5 slots are full of colors you do not currently need (e.g., holding 5 Red cups while trying to paint the Yellow sky), and you cannot discard them because the conveyor is blocked. Level 326 is designed to induce this state. You must always maintain at least one empty slot (or a "wildcard" slot) to absorb incoming cups from the newly opened columns.
Strategic Objectives: How to Approach the Level
Before you tap "Start," you need a clear plan of attack. This level is won or lost in the first 20 moves. Do not play reactively; play proactively.
1. Primary Goal: Triggering the 25-Count Curtain
Your immediate priority is to generate 25 units of volume. This does not mean painting perfectly. It means rapidly dispensing any valid color to lift the Red Curtain blocking the center column. Treat the first 15 seconds as a race against volume, not art. The faster this curtain lifts, the faster you unlock the Blue and Cyan reserves needed for the mountain section.
2. Secondary Goal: Managing the "30" Ice Blocks
The two "30" Ice Blocks flank the playing field. These are deceptive because they trap the "transition" colors—specifically the Cyan needed for the mountain peaks. You must chip away at these evenly. If you focus only on the left side, you will deplete your Red/Blue supply and have no access to the Cyan trapped on the right, stalling your progress at the 60% mark.
3. Tertiary Goal: The "35" Final Block
The "35" block at the bottom center is the final gate. It usually guards the bulk of the Yellow cups required for the sky. A common mistake is breaking this too early. If you flood your tray with Yellow cups before you have finished the Dark Blue mountains, you will have no space to process the necessary Blue sand. You must time the breaking of this block to coincide with your transition to the top section of the painting.
4. Volume Efficiency Analysis
To maximize efficiency, aim for a "Pour Rate" of 2 cups per 3 seconds. Any slower, and you risk running out of timer (if timed) or simply making inefficient moves. Since the counters are high (30 and 35), every misclick—where you pick up a cup and fail to dispense it—costs you valuable progress toward breaking the barriers. Precision is just as important as speed here.
The Detailed Walkthrough: Step-by-Step Execution
Follow this exact sequence to navigate the Lakeside Sunset without getting stuck. This walkthrough assumes a standard starting configuration.
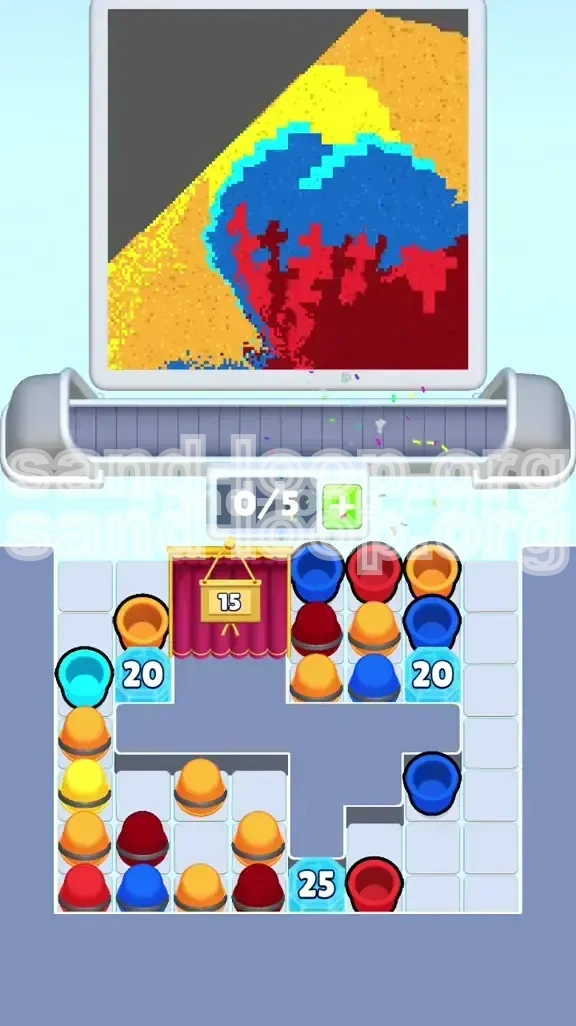
Phase 1: The "Red Rush" (Moves 1-25)
The board opens with the bottom section exposed and the center blocked. The dominant color available is Dark Red.
- Action: Immediately pull Dark Red cups from the far left column.
- Action: Ignore the Yellow cups at the bottom left completely. If you pick one up, place it in an inactive slot or discard it if the mechanic allows, but do not let it occupy a primary active slot.
- Targeting: Focus entirely on filling the bottom "reflection" area of the canvas.
- Milestone: Continue dispensing Red until the "25" counter hits zero and the Red Curtain lifts.
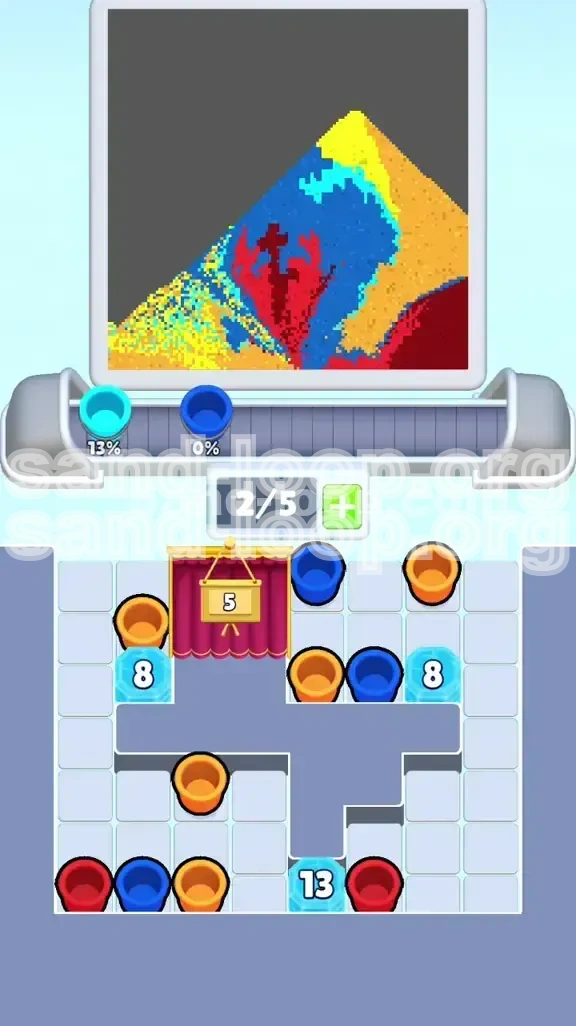
Phase 2: The "Cyan Reveal" (Moves 26-55)
Once the center curtain lifts, you expose the "30" Ice Blocks and a new cache of cups, primarily Blue and Cyan.
- Action: As soon as the curtain lifts, swap your focus from Red to Cyan (Light Blue).
- Warning: The Cyan zones are jagged and thin. Do not pour aggressively. Tap lightly to ensure the sand lands within the thin mountain ridges.
- Slot Management: Keep 1 slot open. As the curtain rises, new cups will slide onto the belt. If you are holding 5 Reds, you will miss the incoming Cyans.
- Milestone: You should be chipping away at the "30" counters while filling the mid-section mountain ranges.
Phase 3: The "Blue Grind" and Ice Breaking (Moves 56-80)
This is the most dangerous part of the level. The "30" Ice Blocks are cracking, and the "35" block is becoming the focus.
- Action: Alternate between Dark Blue and Cyan. Fill the main body of the mountains.
- Strategy: You are trying to reduce the combined total of the remaining counters.
- Observation: Look for the "35" block to crack. As it gets close (5-10 counts remaining), stop picking up new Red cups.
- Preparation: Clear your conveyor belt of Dark Red. You want empty slots ready for the final phase.
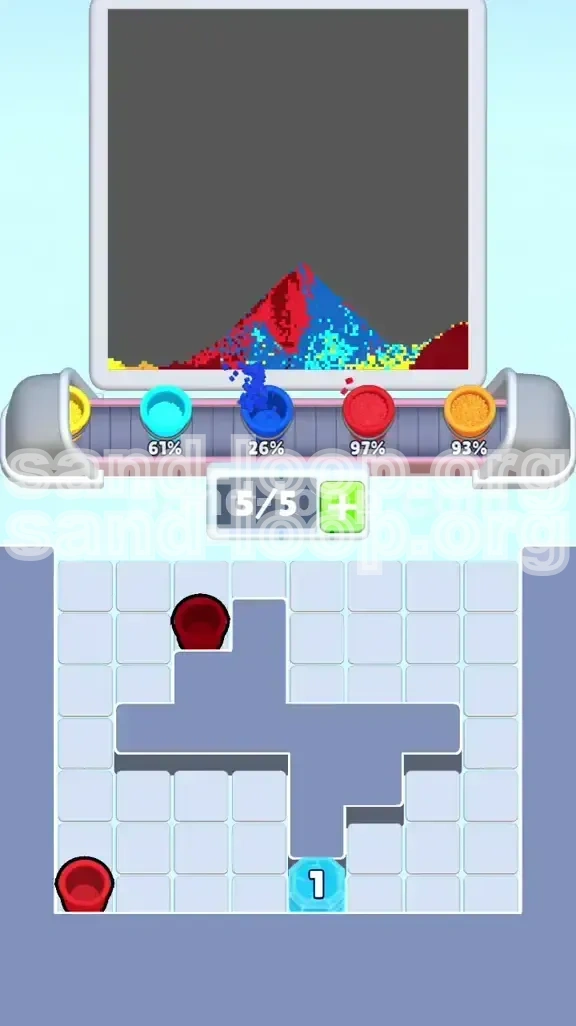
Phase 4: The "Yellow Sky" Finale (Moves 81+)
The "35" block shatters, revealing the Yellow sky reserves.
- Action: Mass-pickup the Yellow cups.
- Targeting: Fill the top sky section. Since this is a large open area with no complex borders, you can pour aggressively here.
- Cleanup: Use any remaining Blue or Red sand in your tray to fix pixel errors on the mountain or water lines.
- Win Condition: The level completes when the sky is full and the canvas reaches 100% completion.
The Color Order: Processing Priority
Knowing what to do is different from knowing when to do it. The order in which you process colors determines your success rate.
1. Priority 1: Dark Red (The Foundation)
Dark Red is the "currency" of the early game. You must process it first, even if it feels tedious. The bottom of the screen is the largest single color block by area density. Failing to clear Red early guarantees a bottleneck later when your tray is small. Process 100% of the available Red before touching Yellow.
2. Priority 2: Cyan (The Bridge)
Cyan is your "Bridge" color. It connects the Red bottom to the Yellow top. Because Cyan areas are often small, thin lines on the mountain ridges, they are hard to fill later when the board is cluttered. Fill Cyan while the board is relatively clear and your focus is sharp. Missing a Cyan pixel is the most common cause of "99% completion" fails.
3. Priority 3: Dark Blue (The Bulk)
Dark Blue serves as the bulk filler for the middle section. Unlike Cyan, Blue areas are large and forgiving. You can fill Blue mountains in between other tasks. It is the "flex" color in your inventory.
4. Priority 4: Yellow (The Finisher)
Yellow is strictly a late-game color. There is absolutely no benefit to picking up Yellow in the first 50% of the level. It wastes a slot. Wait until the "35" Ice Block is gone before introducing Yellow into your active rotation. Treating Yellow as a "Phase 4" exclusive item prevents 90% of traffic jams on the conveyor belt.
Key Tips for Mastery
To achieve a high score or a flawless clear in Sand Loop Level 326, keep these professional insights in mind.
1. The "1-Slot Open" Rule
Never fill your 5-slot tray to capacity (5/5) unless you are 100% certain of the next 5 moves. Keeping 1 slot open (4/5) allows you to absorb random cups that slide out from cracked Ice Blocks. This single slot acts as a "shock absorber" for the game's randomness, preventing the game from locking you out of new colors.
2. Pre-visualization of the Sky
Before you even start painting, look at the sky area. Notice that it is a solid block with no internal obstacles. This tells you that you can dump sand rapidly there without fear. Use this knowledge to your advantage: save your "dumping" speed for the end, and use your "precision" speed for the start.
3. Understanding the Counter Math
25 + 30 + 30 + 35 = 120 total volume actions required minimum. If the level has a move limit (e.g., 150 moves), you only have 30 moves of "fat" for mistakes. This highlights why you cannot afford to make accidental pickups or pour into the wrong color zones. Every wasted pour is a percentage of your total safety margin gone.
4. The "Ice Trap" Awareness
Remember that cups trapped under Ice Blocks cannot be accessed until the count hits zero. If you are waiting for a specific Blue cup and it's under the "35" block, you must grind volume with other colors first. Do not wait for specific colors; keep the flow moving.
Common Mistakes to Avoid
Even experienced players fail Level 326 due to these specific errors. Learn them so you don't repeat them.
1. The Early Bird Yellow Mistake
This is the #1 cause of failure. Players see Yellow cups available at the start and pick them up "to save for later." This is fatal. Those Yellow cups will occupy 20% of your tray capacity for the entire level, effectively reducing you to a 4-slot capacity for the hard parts. Leave them on the belt.
2. Ignoring the "Thin Cyan" Lines
Players often pour Dark Blue over the Cyan mountain ridges, thinking "close enough." The game's color matching logic is strict. If you cover a Cyan pixel with Dark Blue, you will have to clear that Blue later (costing you moves) and re-pour it. This is a massive time sink. Be precise with the Cyan ridges.
3. Tunnel Vision on the Center
Because the "25" curtain is in the center, players tend to hyper-focus on the middle column. However, the "30" Ice Blocks on the sides are equally important. If you only clear the center, the side columns won't refresh, and you'll run out of sand volume to break the bottom "35" block. Always play the full width of the board.
4. Panic-Pouring at the End
When the timer is low or moves are running out, players start panic-pouring into any open slot. This leads to cross-contamination of colors. If you are in trouble, slow down. A panicked mistake usually costs more moves than taking a second to find the right target pixel.
Troubleshooting: What to Do When Stuck
Hit a wall? Here is how to recover from specific scenarios in Level 326.
1. Scenario: "I have no matching colors on my belt."
You are in a "Color Drought." This usually happens when you've burned through your Red and Blue, but the Yellow is still locked behind the Ice Block.
- Solution: Check the corners of the canvas for tiny, unfilled pixels of Red or Blue you missed. Filling these gives you +1 volume.
- Solution: Look for the "Cyan" zig-zags. These are often missed and can provide the volume needed to crack the next Ice Block.
2. Scenario: "My tray is full of useless colors (e.g., full of Yellow while painting Mountains)."
This is the "Deadlock."
- Solution: You must sacrifice. If the game allows dragging cups to a "discard" or "trash" zone, do it immediately.
- Solution: If there is no trash, look for the absolute smallest pixel of that color on the screen to dump the sand, even if it's already full. You need to free up the slot.
3. Scenario: "The '35' Ice Block just won't break."
You are 1 or 2 pours short, and have no colors left.
- Solution: Zoom in (if possible) and scrutinize the border between the Mountain and the Lake. There is often a 1-pixel wide line of Dark Blue or Red that is easy to miss.
- Solution: Re-check the "Reflection" area. Sometimes the reflection needs to be darker (more Red sand) than visually apparent.
Speed Run Tips and Shortcuts
For players aiming to 3-star this level or set a time record, here are the advanced shortcuts.
1. The "Slide and Tap" Technique
Don't tap individual cups one by one. Place two fingers on the screen (if supported) or use a rapid sliding motion to pull multiple Red cups from the left column in a single sweeping motion. This shaves seconds off the initial "Red Rush" phase.
2. Pre-Loading the Next Color
While your current cup is pouring, use your other hand (or your thumb) to immediately drag the next required color cup closer to the nozzle. This eliminates the "travel time" for the next cup. You should achieve a rhythm where sand is flowing 90% of the time.
3. Ignoring Perfection
For a speed run, 95% coverage is often enough to trigger the "Win" state if the remaining pixels are scattered. Do not obsess over filling the corners of the Yellow sky perfectly if the counter is already moving to the win screen. Stop pouring the moment the "Level Complete" trigger hits.
4. Memorizing the Ice Break Points
The Ice Blocks in Level 326 are static. They always break at specific counts. Memorize that the "25" breaks exactly when you finish the first Red lake section. Use this muscle memory to transition to Blue without looking at the counter, keeping your eyes on the canvas.