
Level 366
HARDHow to solve Sand Loop level 366? Get instant solution for Sand Loop 366 with our step by step solution & video walkthrough. Sand Loop 366 tips and guide.
Play Sand Loop Now
Experience the puzzle challenge firsthand
Game Screenshots


Sand Loop Level Guides
Level Overview: The Sleeping Bear Challenge
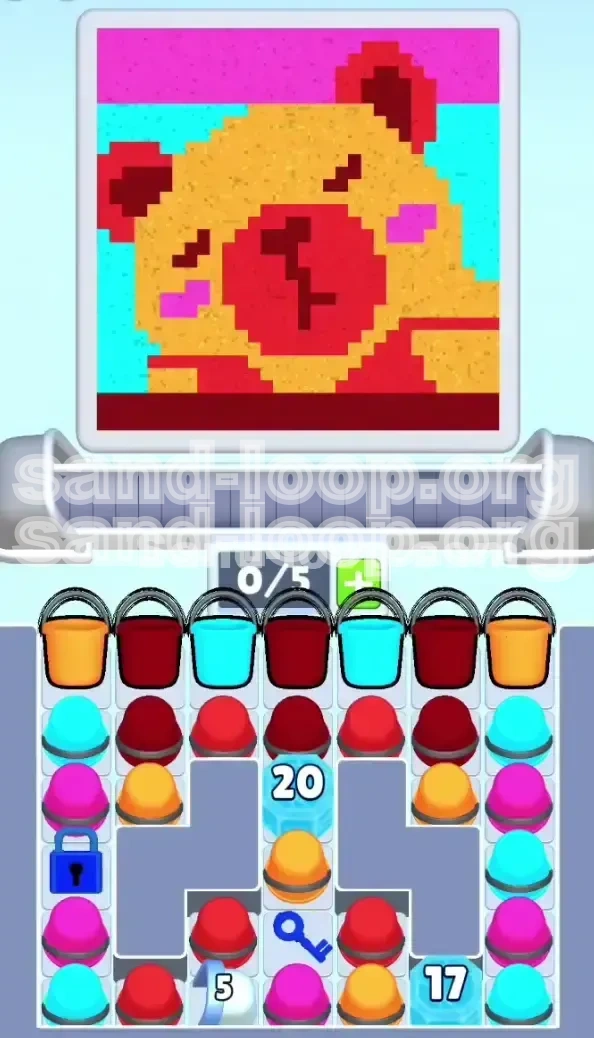
Welcome to Level 366, infamously dubbed "The Sleeping Bear" within the Sand Loop community. This stage represents a massive difficulty spike, transitioning the game from a simple color-matching puzzle into a hardcore resource management simulation. Unlike previous levels where you could leisurely fill the canvas, this stage is defined by a restrictive 5-slot inventory system and a layout designed to choke your supply chain if you prioritize the wrong objectives.
The visual goal is to paint a pixel-art bear sleeping against a night sky. However, the structural reality is a logistical nightmare. A massive Ice Block (20 HP) sits directly in the center of the board, acting as a gatekeeper for the Blue Key. Furthermore, the essential Pink/Magenta colors required for the bear's details are locked behind a padlock on the left side. To succeed, you must stop thinking like an artist and start thinking like an engineer: clear the obstructions first, paint the picture second.
Core Level Mechanics
- The Inventory Bottleneck: You are limited to 5 active slots. In this level, the conveyor belt moves faster than your consumption rate. If your slots are full of "useless" colors (like Cyan) while you need "critical" colors (like Red) to break ice, you will soft-lock and fail.
- Ice Block Physics: The central Ice Block requires 20 hits to shatter. It alternates requirements between Dark Red and Orange. While it stands, it blocks the most direct path to your collection cups and hides the essential Blue Key.
- The Lock-and-Key System: The Pink reserves are not on the main belt initially. They are gated behind the Left Padlock. You cannot access them until you retrieve the Blue Key from under the Central Ice Block.
- Pixel Layering: The level uses "bottom-up" filling logic. If you fill the large Yellow areas of the bear's face before unlocking the Pink, you may physically block the smaller Cheek pixels, making them impossible to fill later without wasting moves.
Difficulty Analysis
- Logistical Strain: High. The demand for Dark Red in the first 20 moves often exceeds the supply spawn rate.
- Precision Requirement: Very High. A single misplaced Magenta pour into the Sky strip can waste 3-4 seconds.
- Restart Probability: Estimated 60% for first-time players due to early-game inventory clogging.
Clear Objectives and Strategic Goals
To beat Level 366, you must abandon the instinct to "fill the empty space." Your primary objective is Deconstruction, not Construction. Every move you make in the first half of the level should be dedicated to removing physical barriers.
Primary Mission: The Extraction Phase
Your immediate goal is not to paint the bear, but to shatter the Central Ice Block (20). This block is the lungs of the level; as long as it exists, it suffocates your ability to access the bottom center cups and the Blue Key. You must channel 80% of your Red and Orange resources into this block within the first 15-20 moves. If you reach move 25 and the Ice Block is still standing, the probability of clearing the level drops below 20%.
Secondary Mission: The Key Protocol
Once the Central Ice Block shatters, a Blue Key is revealed in the bottom center column. This key is the trigger for the second half of the level. You must retrieve the cup sitting directly on top of this key. Do not worry about the color of this cup; even if it is a color you don't need, you must pour it out to activate the key mechanism. This action unlocks the Left Padlock, which immediately begins flooding your conveyor belt with the critical Pink/Magenta cups.
Tertiary Mission: The Cyan Reserve
Located in the bottom right corner is the "Ice Block 17." This is a trap for inexperienced players. While it guards the Cyan reserves needed for the sky, focusing on it early is a fatal error. The background sky is the easiest part of the level to fill and requires zero logistics. Treat the Cyan block as a passive objective—clear it only when you have spare moves or accidentally matched Cyan cups while waiting for other colors.
Winning Condition
The level is only complete when the bear's face (Yellow), nose (Dark Red), cheeks (Magenta), and the background sky (Cyan) are 100% filled. However, the win condition is mathematically impossible to reach if you do not clear the Central Ice Block (Moves 1-20) and Unlock the Pink Reserves (Moves 21-30) efficiently.
Step-by-Step Walkthrough Guide
This section provides a turn-by-turn logic flow for the level. Follow these phases to manage the chaos of the conveyor belt.
Phase 1: The Ice Breaker (Moves 1-20)
The start of the level is a race. The conveyor belt will immediately present you with a mix of Yellow, Red, and Cyan.
- Priority 1: Dark Red. Scan the top row for Dark Red cups. Tap them immediately. Do not save them. The Central Ice Block usually demands Red first.
- Priority 2: Orange. If the Ice Block shifts to Orange, tap Orange cups. Treat these as fuel.
- Sacrificial Moves: If your 5 slots are full and none match the Ice Block's current color, you must create space. Pour a "useless" color (like Cyan or extra Yellow) into a safe, non-critical area of the canvas (like the very top corner of the sky) just to free up a slot. Do not let the belt clog.
- Ignore the Sky: Resist the urge to fill the Cyan background. It is a trap. An empty background does not kill your run; a full inventory does.
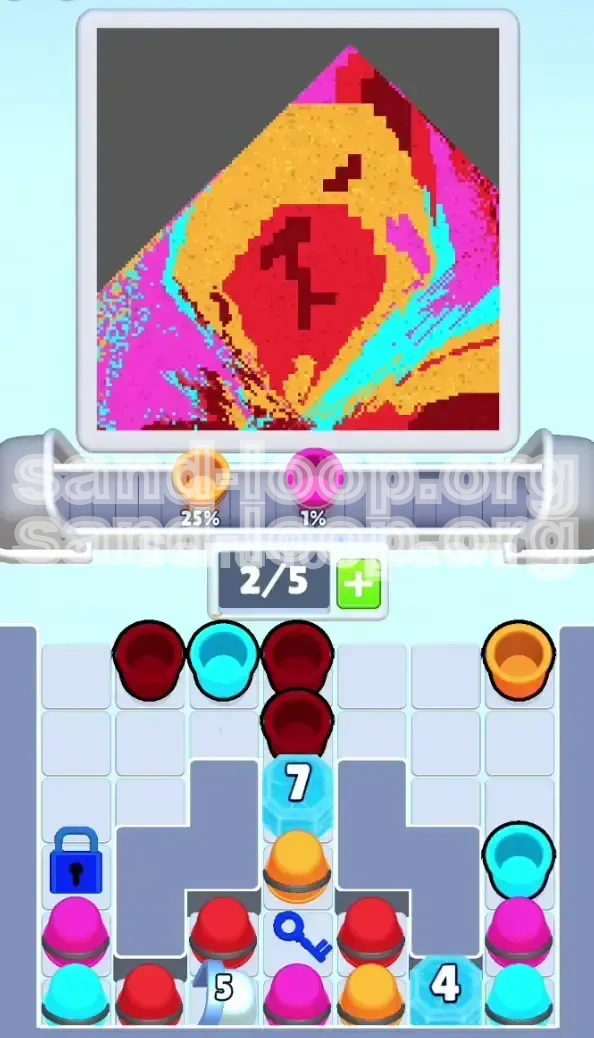
Phase 2: The Key Retrieval (Moves 21-30)
The moment the "20" block shatters, the board state shifts.
- Identify the Key Cup: Look at the bottom center. A cup is now resting on the Blue Key.
- Force the Pour: Immediately tap this cup to pour it out. This triggers the key to rise and unlocks the Left Padlock.
- Prepare for the Flood: Unlocking the Left Padlock adds a new cup type (Magenta) to the spawn pool. Ensure you have at least 2 empty slots before the unlock animation finishes, or you will miss the incoming Pink cups.
Phase 3: The Bear's Face (Moves 31-50)
With the path clear and Pink available, you can finally start painting.
- Nose First: Quickly deposit the remaining Dark Red into the bear's nose to get it out of your inventory.
- Cheeks Next (Critical): Before you flood the face with Yellow, fill the Cheeks with Magenta. These pixels are small and located low on the bear's face. If you fill the Yellow fur first, the physics engine might block the Cheek pixels.
- Bulk Yellow Fur: Once the nose and cheeks are done, dump all your Yellow reserves into the main face area. This is the "safe" part of the level.
Phase 4: The Endgame (Moves 50+)
At this stage, the bear is likely finished, and the Ice Block 17 in the bottom right is the only thing remaining.
- Clear the Right Block: Use any remaining Cyan or Blue cups to shatter the Ice Block 17.
- Sky Fill: With the block gone, flood the top background with Cyan.
- Detail Check: Verify that the top "Sky Strip" (which requires Magenta) is filled. This is often missed. If you are out of Magenta, check if any remains on the belt.
Color Processing Order and Logic
Understanding the hierarchy of colors is the difference between a win and a loss. Do not treat all colors equally.
Tier 1: Dark Red (The Critical Resource)
Function: Ice Breaking & Nose.
Strategy: This is your gold. In the first 20 moves, if a Red cup appears, tap it. Do not think. Do not check your inventory. Just tap it. If you miss a Red cup early, you cannot recover the time lost on the Ice Block. The bear's nose is a secondary priority; the Red is strictly for the Ice Block first.
Tier 2: Golden Yellow (The Bulk Filler)
Function: Bear's Fur.
Strategy: Yellow is abundant but dangerous. Because there is so much of it, it will occupy 3 of your 5 slots if you aren't careful. Only tap Yellow when you have made significant progress on the Ice Block, or if you need to perform a "sacrificial pour" to free up inventory space. Do not let Yellow clog your belt during the critical Red phase.
Tier 3: Magenta/Pink (The Locked Resource)
Function: Cheeks & Sky Strip.
Strategy: This color is non-existent until Phase 2. Once the Left Padlock opens, Magenta jumps to Tier 1 priority. You must secure it immediately to detail the face before the Yellow flood buries the cheek pixels.
Tier 4: Cyan (The Trap Resource)
Function: Sky Background.
Strategy: Cyan is the enemy of speed. It spawns frequently but serves no purpose until the very end. Treat Cyan cups as "inventory trash." Only pick them up if you have absolutely zero other options (e.g., your belt is full of Cyan and you must move it). Pouring Cyan early is the number one reason players fail to break the Central Ice Block in time.
Tier 5: Orange (The Utility)
Function: Ice Breaking Support.
Strategy: Orange acts as a backup battery for the Ice Block. If the block asks for Orange, feed it. If the block asks for Red, hold Orange for a moment to see if Red spawns next. Do not waste Orange on the bear's highlights until the Ice Block is gone.
Common Mistakes to Avoid
Players consistently fail due to three specific errors. Analyze these to adjust your gameplay.
Mistake 1: The "Background First" Trap
It is instinctively satisfying to fill the large empty blue spaces at the top of the screen. Stop doing this. The background requires no strategy and can be filled in 4 seconds at the end. If you spend your first 10 moves filling the sky, you will enter the mid-game with a full inventory of Cyan while the Ice Block sits at 15/20 HP, demanding Red. You will then be forced to dump Cyan, wasting the time you spent pouring it. Always prioritize the Center (Ice) over the Top (Sky).
Mistake 2: The "Key Cup" Negligence
When the Central Ice Block shatters, the cup revealed on the Blue Key is often a color you don't need, like Cyan or Yellow. Many players ignore this cup, waiting for a "better" color to come along so they can pour it elsewhere. This is a fatal logic error. You cannot retrieve the Key until the cup is moved. If you ignore the Key Cup, you effectively stall the entire level. You must tap that cup immediately, regardless of its color, to trigger the unlock mechanism.
Mistake 3: The "Yellow Overfill" Error
This is a physics-based mistake. The Cheek pixels (Pink) are located "inside" the Bear's Face pixels (Yellow). If you fill the main face with Yellow 100% before applying the Pink, the Pink sand will often slide off the sides or get blocked because the "container" for the cheeks is already full. Always apply the "inside" colors (Nose, Cheeks) before the "outside" colors (Fur).
Stuck Solutions and Troubleshooting
If you find yourself unable to progress, use these diagnostics to fix your run.
Issue: The "Red Drought" (Early Game Stuck)
Symptom: The Ice Block is at 10/20 HP, but the conveyor belt has only given you Cyan and Yellow for 10 consecutive turns. Your inventory is full.
The Fix: You must perform "Emergency Dumping." Take a non-essential cup (Cyan) and pour it into the very top-most pixel of the sky, or any other "safe" zone that doesn't interfere with the bear's face. Do not worry about wasting the color; you need to cycle the belt. New colors won't spawn until the old ones are taken. Force the spawn by creating empty slots.
Issue: The "Missing Pink" (Mid Game Stuck)
Symptom: You have the Blue Key, the lock is open, but no Pink cups are appearing.
The Fix: Check your inventory. You likely have 5 slots full. The game cannot spawn new Pink cups onto the belt if there is no physical space for them to drop into. Pour one cup immediately. Alternatively, you might be experiencing a visual lag—wait 3 seconds for the unlock animation to fully finish before the new cup types enter the rotation.
Issue: The "Last Pixel" Glitch (End Game Stuck)
Symptom: The bear looks 100% done, the sky is full, but the level isn't ending.
The Fix: Zoom in on the Top Center Sky Strip. There is a 1-pixel high line that often blends in with the background but requires Magenta. If that is full, check the very bottom edge of the bear's chin. Sometimes a "ghost pixel" remains unfilled due to collision boxes. Pour a drop of the matching color directly onto that coordinate.
Speed Run and Efficiency Tips
For players aiming for the leaderboard, here is how to optimize your time.
The "Slot Buffer" Technique
Never let your inventory sit at 5/5. A speed runner keeps the inventory at 4/5 or 3/5. Why? Because when you break the Central Ice Block, the game spawns a new wave of cups instantly. If you are at 5/5, that new wave gets stuck at the top of the belt. Keeping one slot open allows you to grab the "Post-Break" cups instantly, saving 2-3 seconds of belt animation time.
Pre-Positioning for the Key
Before the final hit on the Ice Block (20), try to ensure that the cup in your hand is not the color currently needed for the Ice Block. This sounds counter-intuitive, but if you are holding the last Red needed to break the block, you have to pour it, wait for it to travel, then wait for the key to rise. If you break the block using a cup already on the board (not in hand), your hand is free to instantly grab the Key Cup the millisecond it unlocks.
Bulk Pouring Macro-Management
Once Phase 3 (The Bear's Face) begins, stop tapping individual cups one by one. Wait for the belt to group 2 or 3 Yellow cups together. Grab them all (filling slots 1, 2, and 3), and then pour them in rapid succession into the face. Grouping your taps reduces the "travel time" of the sand and increases your effective actions per minute (APM) significantly.