
Level 371
HARDHow to solve Sand Loop level 371? Get instant solution for Sand Loop 371 with our step by step solution & video walkthrough. Sand Loop 371 tips and guide.
Play Sand Loop Now
Experience the puzzle challenge firsthand
Game Screenshots
Sand Loop Level Guides
Level 371 Comprehensive Walkthrough: The Golden Mailbox Logic Puzzle
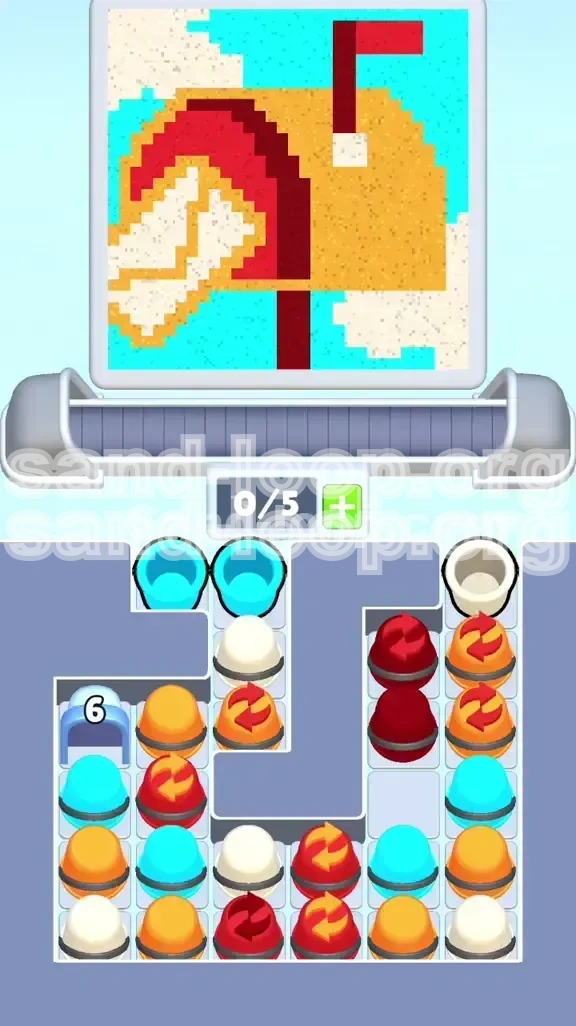
Welcome to the ultimate guide for conquering Sand Loop Level 371. This stage represents a significant shift in gameplay dynamics, pivoting from simple color matching to a complex exercise in inventory management and reverse-engineering. Your objective is to construct a detailed Golden Mailbox standing against a Cyan sky, complete with a Deep Red post and White envelopes peeking from inside. However, the "Ice Block 6" mechanic serves as a hard gate on your supplies, freezing your most critical colors until you have executed a specific number of moves. Success in this level relies not on speed, but on the precise order of operations.
The Core Challenge
Level 371 is classified as a Logic/Inventory stage. The primary difficulty stems from a restricted supply tray. While you have a -slot conveyor belt capacity, the left third of your inventory—including the essential Cyan and White cups—is encased in a block of ice. This forces a linear progression: you must build the foundation with available colors before you can access the frozen supplies needed for the details.
Visual Breakdown
The target image is high-contrast and consists of four distinct elements:
- The Sky (Background): A Cyan blue fill that occupies the top corners and wraps around the sides.
- The Mailbox (Foreground): A large Golden Orange rectangle that dominates the center.
- The Post (Base): A Deep Red vertical line anchored at the bottom center.
- The Flag (Accent): A Deep Red block positioned at the top right of the mailbox structure.
- The Detail (Envelope): Diagonal White strips that must appear "inside" the Orange box.
Victory Conditions
To secure 100% completion and the three-star rating, you must adhere to strict color layering rules. The Red post must be the first element to touch the bottom floor. The White envelopes must be visually sandwiched between layers of Orange—never buried completely at the bottom or floating loosely on top. Finally, the Cyan sky must fill the negative space without displacing the heavier foreground elements.
The Inventory Setup
Your supply tray is effectively divided into two zones. The Center and Right stacks are immediately accessible, containing mostly Red and Orange cups, alongside "Loop" (Arrow) power-ups. The Left stack, containing the vital Cyan and White cups, is locked behind an "Ice Block 6" counter. This means you must execute exactly 6 moves using the free colors to shatter the ice block and unlock the rest of your palette.
The "Sandwich" Logic
Understanding the layering is crucial. Because sand piles up, the first colors you pour will sink to the bottom, and later colors will sit on top. To make the White envelopes look like they are inside the box, you cannot simply pour them last. They must be inserted *between* layers of Orange. The correct sequence is: Orange Base -> White -> Orange Top. Pouring White last results in "snow" on top of the box; pouring it first buries it in the dark depths.
Strategic Objectives and Color Order
The difference between a failed attempt and a clear board in Level 371 comes down to the order in which you pour your colors. Gravity dictates that the first colors you pour will sink to the bottom, while later colors will sit on top. You must visualize the final stack in reverse.
The "Base-First" Rule
Why Red goes first: The mailbox post is a vertical red line at the bottom. If you pour Orange or White first, they will pool at the bottom of the canvas. When you eventually pour Red, it will sit on top of these colors, creating a "floating" mailbox rather than one anchored to the ground. Action: Your very first tap must be a Red cup.
The "Sandwich" Technique
Why White is in the middle: The white envelopes are inside the box. This means they must visually appear "behind" the front face of the box but "in front of" the back. In 2D sand physics, this requires a specific sandwich: Orange (Back) -> White (Envelope) -> Orange (Front). If you pour all Orange first, the White will just sit on top of the yellow box, looking like snow, not mail.
The "Sky-Last" Strategy
Why Cyan goes last: While backgrounds are usually painted first, in Sand Loop, you paint the "negative space" last. The Cyan sky fills the gaps around the mailbox. If you paint the sky first, the heavy Orange and Red sands will displace the Blue, pushing it aside and ruining the clean edges of the mailbox shape.
The "Flag" Timing
Why Red Flag is late-game: You have a second Red requirement: the flag at the top right. You must save one Red cup for the final 20% of the level. If you use all your Red cups on the post at the start, you will have no way to complete the flag detail later.
Prioritizing the Unlock
The 6-Move Burn: Before you can worry about the sky or envelopes, you have 6 "forced" moves to break the Ice Block. During these 6 moves, you are purely setting the stage. You are building the foundation (Red Post) and the bulk of the box (Orange), but you cannot finish the details until the counter hits zero.
Conveyor Belt Management
Since the Ice Block locks half your supplies, your available 5-slot belt will fill up quickly with "burnable" items like extra Red or Loop cups. Do not hoard items. If a cup enters the tray that you don't need immediately, check if using it helps break the ice faster. Efficient cycling of the belt is just as important as accurate pouring.
Step-by-Step Walkthrough Guide
Follow this sequence exactly to navigate the Ice Block bottleneck and layer your colors correctly. This guide assumes a standard run without lucky RNG (Random Number Generation) drops.
Phase 1: The Unlock Sequence (Moves 1-6)
The goal here is to break the Ice Block while establishing the foundation of the image. Do not worry about perfect details yet; focus on efficient belt management.
- Move 1: Scan the Right and Center stacks. Locate a Red Cup. Tap it immediately. This forms the base of the post.
- Move 2-3: Look for Orange Cups or Loop/Arrow Cups. Drop them into the center. This creates the "floor" for your white envelopes to land on later.
- Move 4-5: Continue dropping Orange/Loop cups. If you see a White cup, check the Ice Block counter. If it's not broken yet, you generally want to wait, but if the conveyor belt clogs, tap the White cup to keep the flow moving (it will sit on top of your initial Orange layer).
- Move 6: Drop the final available cup from the free stacks. Result: The Ice Block shatters, unlocking the Left stack.
Phase 2: The Envelope Insert
Now that the Left stack is open, you have access to White and Cyan. Do not switch to Cyan yet. The window for the Envelope detail is now.
- Assess the Canvas: You should have a mound of Orange with a Red base.
- The Weave: Locate a White Cup in the Left stack. Tap it.
- The Cover: Immediately follow up with an Orange Cup. This pours orange *over* the white you just dropped, creating the illusion that the white paper is inside the box.
- Repeat: If you have multiple White cups, alternate White -> Orange -> White to create distinct envelope layers.
Phase 3: The Flag Placement
As the mailbox body rises to cover about 70% of the screen, you must address the flag.
- Check Inventory: Do you have any Red cups left on the belt?
- Placement: Pour the Red cup when the center of the canvas is nearly full. The Red sand will settle on the peak of the orange mound, specifically flowing to the right side due to the physics of the pile.
- Adjustment: If the pile isn't high enough, the flag will look like a blob on the floor. Ensure the orange mound is substantial before dropping the final Red cup.
Phase 4: The Sky Cleanup
With the structure (Post, Box, Flag) complete, only the background remains.
- Switch Colors: Ignore any remaining Orange or Red cups. Your focus is now entirely on the Cyan Cups from the Left stack.
- Corner Filling: Rapidly tap Cyan cups. The blue sand will flow around the mailbox, filling the bottom corners and rising up the sides.
- The Top Gap: The hardest part is the very top corners of the sky. If a standard cup leaves a gap, look for a Splitter Cup (a cup with two spouts). This will send sand to both top corners simultaneously, securing the 100% clear.
Phase 5: Final Polish
This is the margin for error phase.
- Inspect the Gaps: Look closely at the edges where the Orange box meets the Cyan sky. Are there any red pixels showing?
- Fixing Leaks: If you see a color "leaking" where it shouldn't, pour a small amount of the correct color on top to seal the edge.
- The 100% Check: Before the time runs out or the level auto-finishes, ensure no white is buried under red, and no red is buried under the floor.
Advanced Mechanics and Key Tips
Mastering these specific mechanics will turn a frustrating retry-loop into a smooth victory. This section analyzes the "hidden" physics of the game engine.
Understanding "Loop" (Arrow) Cups
You will notice cups with a circular arrow symbol. These are not just decorative. In Sand Loop, "Loop" cups act as Textured Fillers. They pour the same color as the standard cup (Orange), but they often have a slightly wider pour arc or different particle physics. Use these for the "bulk" filling of the mailbox body to save standard cups for detailed edges. They are excellent for Phase 1 when you just need to burn moves.
The "Floor" Physics
The Red post is the most critical element because it interacts with the "floor" of the level. In this game engine, the first color to touch the absolute bottom pixel determines the color of the ground. If White touches the bottom first, you cannot fix the Red post later. Rule of Thumb: Red is always the #1 priority in any level that has a fence, post, or stem.
Handling Conveyor Belt Jams
Because you are locked out of the Left stack for the first 6 moves, your 5-slot belt will fill up fast.
- Don't Hoard: If you have a Red cup and an Orange cup, use them. Do not wait for a "better" combination that isn't there.
- The Cycle: If the belt is full of useless colors (e.g., you have 3 Red cups but only need 1), you must "burn" the extras by pouring them in a safe spot (like the corner of the sky) to get them off the belt and make room for new cups.
Ice Block Anxiety
Seeing half your inventory frozen can cause panic. Tip: Don't watch the block; watch the counter. Every move brings you closer to your goal. Use the "locked" time to focus purely on the center of the canvas. Treat the first 6 moves as a mini-game of "How fast can I build the base?"
Splitter Cup Strategy
The Splitter Cup (usually appearing late in the level) is your "Get Out of Jail Free" card for the top corners. Standard cups pour in a single stream, often favoring the left or right side. If you have one tiny pixel of blue missing in the top right corner, a Splitter Cup is the only reliable way to hit it without burying the flag in excess sand.
Visualizing the "Sandwich"
Think of the canvas as a layer cake. Layer 1 (Bottom): Red and Dark Orange. Layer 2 (Middle): White Envelopes. Layer 3 (Top): Light Orange. Layer 4 (Sides): Cyan. If you add a layer from the top list too early, it covers up the layers below it. Always ask: "Does this color need to be visible at the end?" If yes, don't bury it yet.
Troubleshooting and Speed Run Tips
This section covers what to do when things go wrong and how to optimize for the fastest possible clear time. Even with perfect strategy, RNG can mess up a run. Here is how to adapt.
Mistake #1: Burying the Envelopes
Symptom: You can't see the white envelopes anymore.
Cause: You poured too much Orange after the White. The sand layers have mixed.
Fix: You can't "dig" in this game. You must restart. On your next run, pour less Orange after the White. Just a thin layer is needed to cover the envelopes.
Mistake #2: The "Floating" Post
Symptom: The red post looks like it's sitting on top of the grass, not coming out of the ground.
Cause: You poured Orange or Cyan before the Red.
Fix: Restart. Make the Red cup your absolute first tap, before the Ice Block even breaks. If the first available cup isn't Red, tap the next available color only to move the belt, but try to get Red down as soon as physically possible.
Mistake #3: Running Out of Space
Symptom: The conveyor belt is full, the Ice Block is active, and you have no moves.
Cause: You were holding onto cups for too long.
Fix: In future runs, pour "dud" cups into the corner if you have to. A messy corner is better than a full belt. Better yet, plan your burns. If you have an extra Red cup you don't need, pour it into the center of the mailbox immediately—it just adds volume to the box, which isn't a waste.
Speed Run Shortcut: The "Pre-Load"
While the level is loading, visually scan the Right stack. If the first cup is Red, you are golden. If the first cup is Orange, tap it instantly to move the belt. Speed running Level 371 is entirely about how fast you can cycle through those first 6 cups to unlock the Whites and Cyans. Don't admire the animation; tap, tap, tap.
Speed Run Shortcut: Bulk Color
Don't alternate Orange and White one cup at a time for the whole middle section. Once the envelopes are defined (maybe 2-3 White cups), dump 4-5 Orange cups in rapid succession to build the height. You don't need to weave for the whole body of the box, just the front face. The back of the box can be solid Orange.
Speed Run Shortcut: Ignoring the Sky
Until the mailbox is 95% finished, ignore the Cyan cups completely. Even if the belt has 3 Cyan cups sitting there, let them clog the slot. If you pour them early, you'll just have to pour more Orange later to cover the bottom edges, which wastes time. Treat Cyan as "End Game Only" fuel.