
Level 389
HARDHow to solve Sand Loop level 389? Get instant solution for Sand Loop 389 with our step by step solution & video walkthrough. Sand Loop 389 tips and guide.
Play Sand Loop Now
Experience the puzzle challenge firsthand
Game Screenshots
Sand Loop Level Guides
Level Overview: The Shark Tank Resource Crisis
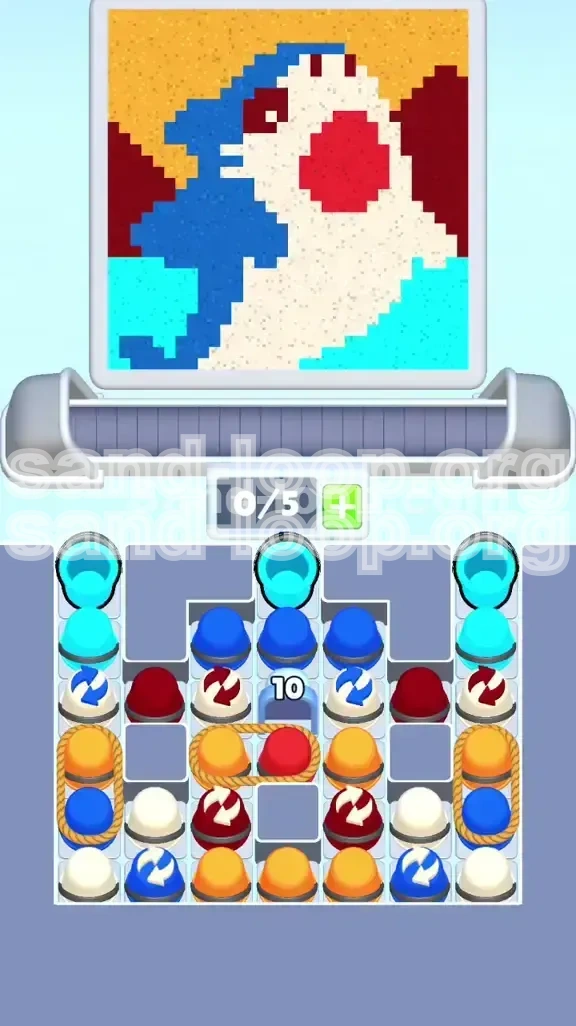
Welcome to Level 389, commonly known as "The Pixel Shark." While the pixel art aesthetic of a Great White Shark breaching the water looks nostalgic and simple, this level is actually a severe test of your inventory management skills. This is not a level where you can mindlessly tap cups; it is a logic puzzle disguised as an action game. The primary difficulty here is the "Slot Economy"—you have very limited inventory space, and the game is designed to flood your tray with items you cannot use yet. If you treat this like a standard level, you will fill your conveyor belt with useless colors and face a deadlock within seconds. Success requires you to ignore the obvious targets and focus entirely on specific order of operations.
The Slot Economy Problem
In this level, your biggest enemy is not the timer, but your own inventory bar. You have a limited number of slots (usually 5 or 6 depending on your character upgrades). The level is engineered to force you to pick up "future" colors (Sky colors) while you are still trying to paint "past" layers (Water colors). If you pick up a Sky color too early, it becomes "dead weight" in your tray, preventing you from picking up the colors you actually need right now. You must learn to treat empty slots as a valuable resource, more valuable than the paint itself.
The "Tax" of Roped Pairs
The defining feature of this level is the rope mechanic connecting specific paint cups. About 60% of the available paint comes in pairs connected by a rope. This means that for every useful color you want (like Blue for the shark), you are forced to also pick up a useless color (like Orange for the sky) that you cannot use until the very end. This "tax" fills your slots rapidly. You need to calculate if you have enough room to pay the tax before you pull a rope.
Layering Logic
The image is built in three distinct vertical layers: the foreground water (Cyan), the mid-ground shark (Blue, White, Red), and the background sky (Yellow, Orange). The physics of the game means sand settles from bottom to top. If you try to paint the Sky (Yellow) before the Shark (Blue) is finished, the Yellow sand will simply fall behind the Shark layer and be wasted. You must strictly follow the bottom-up painting order.
The Difficulty Spike
Level 389 is considered a difficulty spike in the Sand Loop chapter. Previous levels likely allowed you to clear your tray periodically. Here, you will be carrying "passenger" cups for 80% of the level. It requires a mental shift from "clear and pour" to "hold and manage." Expect to feel frustrated by the cluttered screen; this is normal. The key is keeping that clutter organized so it doesn't stop you from making moves.
Visualizing the Pixel Art
Take a moment to admire the target image at the top of the screen. It’s a Great White Shark jumping out of dark blue water against a sunset. Why does this matter? Because it tells you exactly what you need. You need a lot of Blue (the biggest chunk), a medium amount of Cyan and White, and very little Red and Yellow. This volume analysis tells you that you should prioritize clearing the Blue and Cyan ropes first, as they constitute the bulk of the work.
Clear Objectives: The Three-Phase Strategy
To beat Level 389, you cannot simply react to what appears on the conveyor belt. You must follow a rigid three-phase plan. Your goal is to process the colors in an order that contradicts the natural availability of the cups. You will often see Orange cups immediately, but you must ignore them until the end.
Phase 1: The Foundation (Cyan & White)
Your immediate goal is to establish the bottom layer of the image. This involves the Cyan water and the White belly of the shark. You need to clear these specific cups first to clear the physical space in the supply tray. If you do not clear the bottom rows of the supply tray, you cannot access the critical Blue cups buried underneath. Phase 1 ends when the water layer is 100% complete and the shark's belly is outlined.
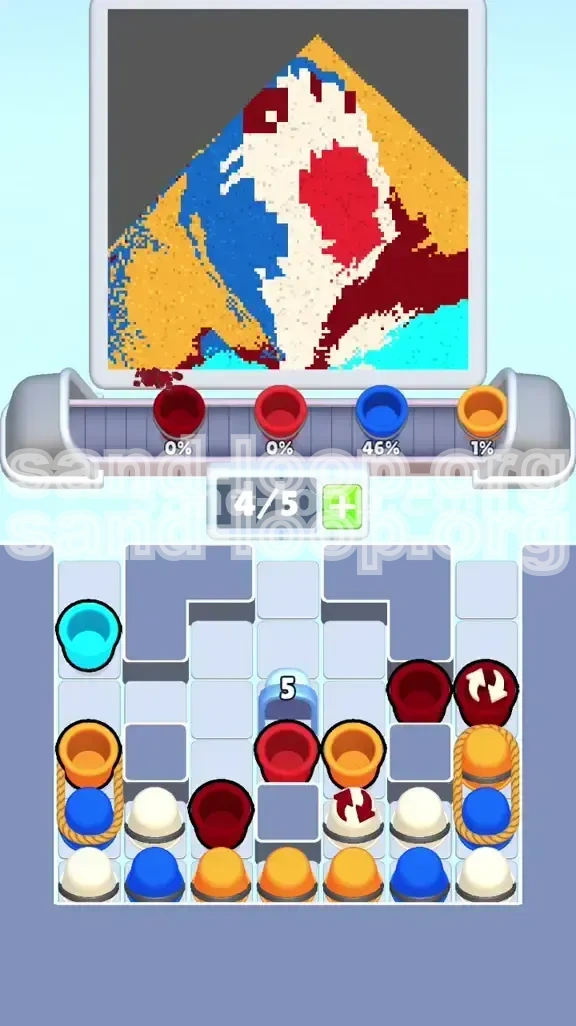
Phase 2: The Main Body (Blue & Red)
This is the longest phase, consuming about 60% of your time. You will be working exclusively on the shark's body and the background mountains/mouth. This phase requires the most discipline because you will be forced to carry "useless" Yellow and Orange cups in your tray while you work. You cannot empty your tray during this phase; you must operate with 1 or 2 empty slots at all times to accommodate the rope mechanics.
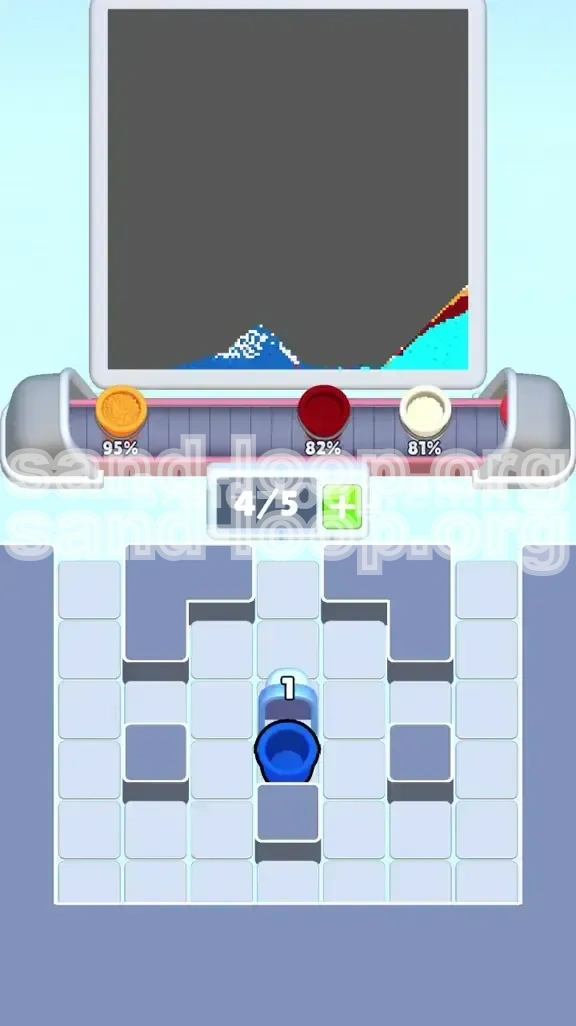
Phase 3: The Sunset (Yellow & Orange)
Only when the shark is completely solid and distinct from the background can you start Phase 3. This is the cleanup phase. By now, your tray is likely overflowing with the Yellow and Orange cups you've been forced to pick up. Now, you finally get to pour them. This phase is fast and satisfying, as you simply dump the accumulated inventory to top off the sky.
Inventory Management Goals
Your objective throughout the level is to maintain at least one empty slot in your tray. If you have 5 slots and 5 cups, you cannot pick up a rope pair (which requires 2 slots). Being full means you are stuck. Therefore, a secondary objective is to pour off small amounts of paint constantly—even if it's just a little bit—to keep your slots flowing.
The "10" Block Objective
Mid-level, you will encounter a number block marked "10" guarding the central supply of sand. Your objective here is to clear cups adjacent to this block. Don't try to clear it in one go. Just focus on clearing the cups that are near it as part of your normal painting process. It will break naturally as you work on the shark's mouth and belly area.
Step-by-Step Instructions: The Shark Attack Walkthrough
Follow these steps in order. Do not skip ahead. The timing of when you pull the ropes is the difference between a win and a stuck screen.
Step 1: The Cyan Corner Sweep
When the level starts, ignore the center. Look at the top corners of the supply tray (the area where new cups spawn). You will see single Cyan cups. They are not roped. Tap these immediately. Pour them into the water section at the bottom of the canvas. This is a safe move. It clears the top row of the supply tray, causing new items to slide forward. It also guarantees that the bottom layer is started without risking your inventory slots.
Step 2: The First Rope Pull (Left Side)
Now, look at the roped pairs. You will see pairs connecting Orange and Blue. Only pull the rope on the far left. Do not pull the right side yet. When you pull the left rope, both the Blue cup and the Orange cup will move to your tray. Pour the Blue cup immediately onto the shark's body. Take the Orange cup and leave it in your tray. It is now "dead weight" that you must carry for the rest of the level.
Step 3: Uncovering the Whites
With the top row cleared in Step 1 and the left side pulled in Step 2, you should now see White cups sliding into view. These are critical for the shark's belly and teeth. Use your free slots to grab these Whites. Pour them onto the white areas of the shark. Be careful not to pour them into the blue water, or you will have to fix it later (which wastes time).
Step 4: The Center Block Strategy
As you are pouring Blue and White, you will notice the "10" number block in the center of the supply tray. Don't panic about it. Just focus on clearing the cups directly touching it. These are usually White or Red mix cups. As you clear these specific cups for the shark's detail work, the counter on the block will decrease. Once it hits zero, the block shatters, giving you access to a fresh stash of sand underneath.
Step 5: The Red Mouth and Mountains
Once the center block is gone, you will find Red cups (often roped with Yellow). Pull the Red/Yellow rope pair. Pour the Red cup into the shark's mouth and the dark mountain shapes in the background. Again, the Yellow cup attached to it is just a passenger. Park it in your tray. You should now have 1 Blue (being poured), 1 Orange (held), and 1 Yellow (held) in your possession.
Step 6: The Body Polish
At this point, the main structure of the shark is done, but it might look patchy. Use any remaining Blue and White cups to smooth out the edges. Make sure the shark is distinct from the water. The boundary between the Blue shark and Cyan water must be sharp. If it's blurry, pour a little more Blue or Cyan to sharpen the line. This is your last chance to use these colors before the sky sand falls on top.
Step 7: The Sky Unleash
Now for the fun part. Your tray is probably full of Orange and Yellow cups that you've been saving. Since the bottom layers (Shark and Water) are full and solid, any sand you pour now will settle on top. Pour all your Orange and Yellow cups aggressively. Fill the top section of the canvas. If there are any remaining roped pairs in the tray, pull them now and pour them immediately.
Color Order: The Logic of the Layers
Understanding the correct color sequence is vital. If you pour color "B" before color "A", color "B" is wasted because it falls behind the unpainted area of "A". Here is the specific processing order for Level 389.
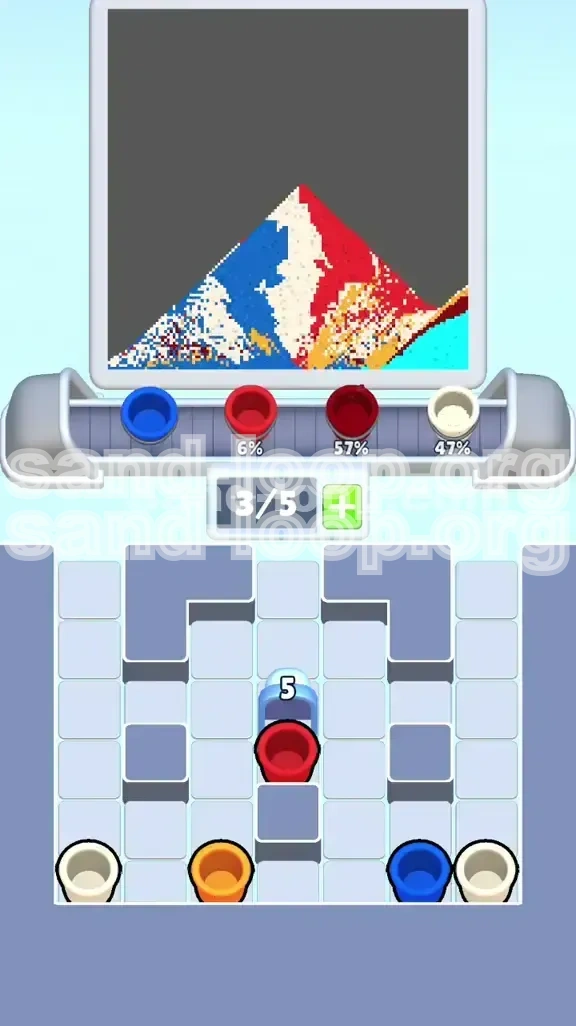
Priority 1: Cyan (The Base)
Cyan is the bedrock. It represents the deep ocean water. It is located at the very bottom of the pixel art. Because physics applies, the Cyan sand will fall to the lowest point. If you pour Yellow or Orange first, they will get stuck "behind" where the water is supposed to be, making the water look muddy or dark. Cyan must be 100% finished before any other color touches the canvas.
Priority 2: White (The Belly)
Why White before Blue? Because the shark's belly is slightly lower or forward compared to the dark blue back. Also, White is often used to separate the shark from the water. If you paint the shark Blue first, you might accidentally cover the belly area. Painting White first defines the shape, and then Blue can be painted around it or on top to define the back.
Priority 3: Blue (The Shark)
This is the bulk of the level. Blue covers the shark's back, fins, and head. It is the most prominent color. However, you must be careful when pouring Blue near the top of the shark's head; if you go too high, you risk painting over the sky area (which should be Yellow/Orange). Keep the Blue contained within the shark's outline.
Priority 4: Red (The Details)
Red is used for the gills, the mouth, and the distant mountains. These are mid-to-high contrast details. Since Red is darker than the sunset sky but lighter than the deep water, it sits in the middle layer visually. You pour this after the main shark body is formed so you don't accidentally paint the mouth over the shark's teeth or belly.
Priority 5: Yellow and Orange (The Sky)
These are strictly "Last Layer" colors. They fill the negative space above the shark and the mountains. If you pour these while the shark is still transparent or unfinished, they will fall into the shark's body, turning your shark into a muddy brown color. You must wait until the shark looks like a solid sticker on the canvas before dropping these colors.
Key Tips: Managing the Chaos
Even with the right order, the level can get messy. These tips will help you manage the physical chaos of the roped cups and the conveyor belt.
Tip 1: The "One Empty Slot" Rule
Make a golden rule for yourself: never let your tray get completely full. Always try to keep at least one slot empty. Why? Because if a new set of roped cups arrives, or if you need to swap a cup, you need that buffer space. If you are full, you are forced to pour paint somewhere it might not belong, just to free up a slot. Keeping a slot open gives you flexibility.
Tip 2: Isolate the "Passengers"
You will pick up Orange and Yellow cups early on. Once you pick them up, move them to the side of your tray and mentally mark them as "Do Not Touch." Treat them like hazardous waste. If you accidentally pour them, you ruin the level. Organize your tray so that the "Active" cups (Blue/White) are near your pouring thumb, and the "Passenger" cups (Orange/Yellow) are tucked away in the corners.
Tip 3: Micro-Pouring
Don't feel like you have to empty a whole cup in one go. If you are holding a Blue cup and need to pick up a White cup, but your tray is full, pour just a tiny bit of Blue into the shark to make room. This "Micro-Pouring" keeps the flow moving without overfilling a specific section of the art. It's better to do three small pours than one big messy one.
Tip 4: Watch the Supply Tray Flow
The supply tray (where cups sit before you pick them up) operates like a grid. Cups slide to fill empty spaces. Sometimes, picking up a single Cyan cup can cause a whole row to slide, revealing a roped pair that was hidden. Always scan the top row of the supply tray. If you see a rope end poking out, plan your next move around it, because pulling that rope will consume two slots instantly.
Tip 5: The "10" Gate is Not a Rush
Many players panic when they see the "10" block and try to clear cups rapidly to break it. Don't rush it. The block breaks when you clear adjacent cups. Just focus on painting the shark normally. The cups near the block are usually the ones you need for the shark's belly anyway. If you just play normally, the block will break on its own. Trying to force it will only jam your tray with colors you don't need yet.
Common Mistakes: What to Avoid
Level 389 has several specific traps that cause 90% of failed runs. Learn what these are so you don't fall into them.
Mistake 1: The "Rope Happy" Player
This is the most common error. Players see a roped pair and pull it immediately. This fills two slots. Then they see another pair and pull that. Now they have 4 slots occupied by colors they can't use (Orange/Yellow) and only 1 slot for the color they need (Blue). This effectively ends the run. Only pull one rope pair at a time, and only when you have the slots to spare.
Mistake 2: Pouring "Future" Colors Too Early
It is very tempting to pour the Yellow or Orange cups just to get them out of your tray. But if you pour them before the shark is done, the sand falls into the shark's body. This creates a "polluted" look where the shark is greenish-brown instead of crisp Blue and White. You cannot fix this easily. You have to wait, no matter how full your tray feels.
Mistake 3: Ignoring the Cyan Base
Some players jump straight for the Blue Shark because it looks cool. But if you skip the Cyan water at the bottom, the shark looks like it's floating in a void. Also, without the Cyan base, the bottom pixels of the shark might not register correctly if the game's logic checks for background contrast. Always do the background first.
Mistake 4: Misjudging the "10" Block
Players often think the "10" block requires 10 specific "key" cups to open. They might hoard specific colors thinking they are keys. In reality, the block just needs 10 units of *any* adjacent clearing. Don't save specific cups for the block. Just clear whatever is touching it. The game doesn't care which colors you use to clear the space, only that the space is cleared.
Mistake 5: Panic Pouring
When the conveyor belt starts moving fast and the screen fills up, players tend to panic and start pouring randomly. This is when you pour Blue into the Sky or White into the Water. If the screen gets too chaotic, stop. Take your hand off the screen for one second. Look at your tray. Identify one color you can pour safely. Pour it. Take a breath. Then make the next move. Speed comes from smoothness, not frantic tapping.
Stuck Solutions: Debugging the Level
If you are in the middle of Level 389 and feel completely stuck—meaning you can't pick anything up and you can't pour anything—use these diagnostic steps to get moving again.
Solution 1: The "Full Tray" Lock
The Problem: Your tray is full. Every cup in your tray is either a "Passenger" (Yellow/Orange) that you can't use, or a color (Blue) that you are currently pouring but can't finish because the area is full.
The Fix: You must create a slot. Find a color in your tray that has *some* area left on the canvas, even if it's not the perfect color. For example, if you have a White cup and the shark's belly is 95% done, pour the White into the last 5% to empty the cup. This frees up the slot. If the area is truly 100% full, you might be stuck and need to restart, but usually, there is a tiny pixel gap somewhere.
Solution 2: The "Hidden Rope" Jam
The Problem: You can't pick up the Blue cup you need because it's roped to a Yellow cup, and you don't have space for the Yellow cup. But you also can't empty your tray because you're holding essential Reds.
The Fix: Check if the Red cup can be poured into the mountains/mouth area. Usually, Red is a low-volume color. If you can finish the Red section, you drop that cup. Now you have a slot. Now you can pull the Blue/Yellow rope. The rule is: finish your current low-volume tasks before taking on a high-volume roped pair.
Solution 3: Supply Tray Gridlock
The Problem: The supply tray is full of cups, but none of them are the ones you need (e.g., you need Blue, but the tray is full of White).
The Fix: You have to clear the "junk" to make the good stuff slide forward. Pick up the White cups even if you don't need them immediately. Pour them into a safe corner or overlap them slightly onto existing White areas to dispose of them. Clearing the tray causes the rows to slide down, revealing the Blue cups hidden in the upper rows.
Solution 4: The Number Block Won't Break
The Problem: You've cleared 8 cups near the "10" block, but you can't find the last 2.
The Fix: Look closely at the corners of the supply tray. Sometimes a cup is half-hidden under the block's graphic. Also, check if you have any cups in your *hand* (on the conveyor) that were originally adjacent to the block. Picking them up counts toward the total. If you are truly stuck, pour paint onto any area that touches the block's boundaries to clear the pixels.
Speed Run Tips: For the Time Attackers
Once you understand the level, you might want to achieve a three-star score or complete it quickly for a daily challenge. Here is how to optimize your time.
Tip 1: Pre-Loading the Tray
Advanced players know that you can pick up cups while the "Level Complete" or "Phase Complete" animation is happening (sometimes). Even without glitches, you can pick up the next roped pair *while* your previous cup is still pouring. You don't need to wait for the pour to finish 100% to tap the next item. As long as the cup has left your hand, your slot is free. This "queueing" of actions saves seconds.
Tip 2: Bulk Pulling
In the standard guide, we said "Pull one rope at a time" for safety. For a speed run, once the Shark Body (Blue) is about 50% done, you can aggressively pull *both* side ropes at once. This instantly fills your tray with 2 Oranges and 2 Blues. You then pour the Blues rapidly. It's a risk management strategy: you sacrifice inventory safety for raw speed of acquisition.
Tip 3: Ignoring Perfection
Perfectionists try to fill every pixel to 100% before moving on. Speed runners aim for about 90-95%. The game is forgiving; if the shark's belly is 95% white, the remaining 5% can often be covered by the Blue background or the Sky without looking terrible. Don't waste time trying to get the last few pixels of Cyan perfect if the Blue shark is going to cover 90% of it anyway.
Tip 4: The "Swipe" Technique
Instead of tapping individual cups, get comfortable with swiping. If you have a roped pair, you can swipe across both cups to pick them up slightly faster than tapping twice. Similarly, when pouring, swipe across the canvas area to pour in a continuous stream, which is often faster than tapping multiple times. This requires muscle memory to avoid spilling, but it is much faster.
Tip 5: Mental Map Reset
Don't watch the sand fall. Watching the animation is wasted time. As soon as you tip a cup, move your eyes back to the supply tray to locate the next cup you need. Trust that the sand will land where it should. By constantly scanning the tray while the previous pour is happening, you eliminate the "search time" between actions. This is the biggest secret to fast times.