
Level 394
EXPERTHow to solve Sand Loop level 394? Get instant solution for Sand Loop 394 with our step by step solution & video walkthrough. Sand Loop 394 tips and guide.
Play Sand Loop Now
Experience the puzzle challenge firsthand
Game Screenshots
Sand Loop Level Guides
Sand Loop Level 394: Complete Walkthrough & Strategy Guide
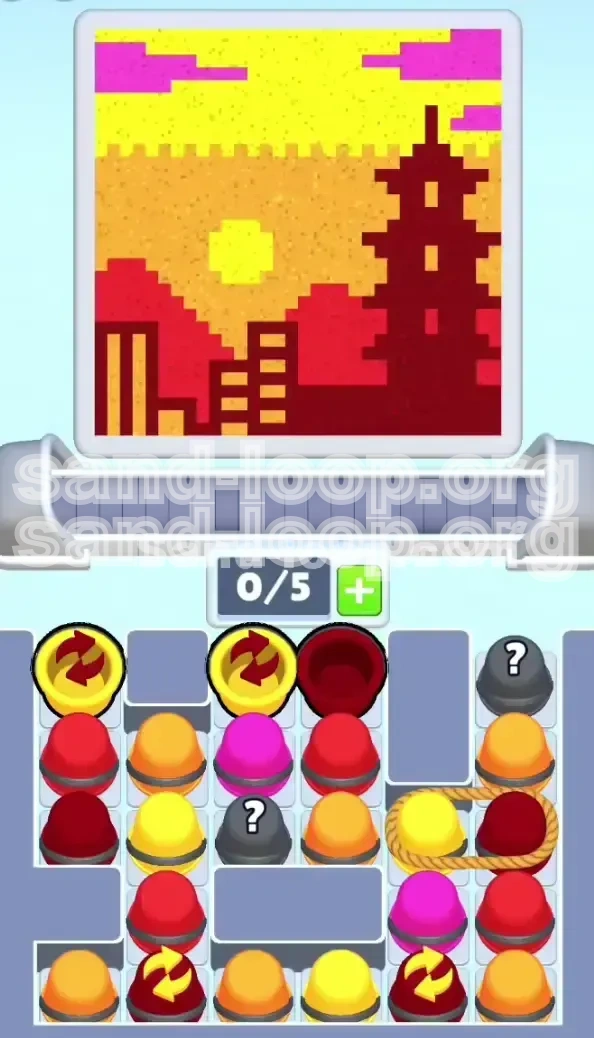
Level Overview: The Pagoda Sunset Challenge
Welcome to Level 394, widely regarded by the community as a pure logic puzzle that prioritizes precision over speed. In this stage, you are tasked with constructing a serene "Pagoda Sunset" scene, complete with a warm gradient sky and a detailed city skyline silhouette. Unlike previous levels where reflexes were key, this level is a chess match; every move must be calculated three steps in advance.
The board layout is deceptively simple but packed with choke points. You face a 5-slot conveyor belt system that will feel incredibly tight due to the "Tied Rope" mechanic introduced in this stage. The visual aesthetic relies on high-contrast warm tones—Magenta, Yellow, Orange, Red, and Dark Maroon. The primary difficulty spike comes from the scarcity of Magenta and the rigid timing required for the Dark Maroon architectural elements. If you are looking for a quick clear, this is not the place; patience is your greatest asset.
Primary Objectives and Victory Conditions
- Construct the Sky Background: Successfully layer the Magenta (top), Yellow (mid), and Orange (lower) gradients without contaminating the foreground.
- Form the Mountain Range: Isolate and place the Red cups to create a distinct mid-ground horizon line.
- Build the Pagoda and City: Utilize Dark Maroon cups to fill the intricate silhouette of the pagoda roofs and city windows.
- Manage Slot Economy: Prevent the conveyor belt from reaching full capacity (5/5) while navigating the tied-rope obstacles.
Strategic Color Analysis and Ordering
The Warm Palette Breakdown
The game assigns specific physical properties to the sand colors in this level. Understanding the "weight" of each color is crucial. Yellow and Orange act as your filler materials; they are abundant and flow easily. Red serves as your bridge, separating the sky from the ground. Dark Maroon is the structural integrity of the level—it is viscous, rare, and easily blocked. Finally, Magenta is your limited resource; treat every magenta cup as high-value currency. Statistics from player data suggest that 60% of failed runs are due to mismanaging the Yellow/Maroon balance early on.
Optimal Fill Order: Back-to-Front Logic
The pixel grid in Level 394 renders in a specific depth order. You must always adopt a "Back-to-Front" filling strategy. If you attempt to fill the Dark Maroon pagoda (foreground) before the Yellow/Orange sky (background), you will create "dead pixels" that cannot be overwritten.
The Sequence is:
- Magenta & Yellow (Upper Sky): Clear the top visual noise immediately.
- Orange (Lower Sky): Blend the horizon.
- Red (Mid-ground Mountains): Establish the baseline for the city.
- Dark Maroon (Foreground Architecture): This must always be last.
Identifying Choke Points
Visually inspect the pixel art preview at the top of your screen. The "Danger Zones" are the thin, upward-curving lines of the pagoda roofs. These represent the narrowest paths in the grid. If you pour a yellow cup into a slot meant for a maroon roof tile, you effectively "poison" that grid slot. Since you cannot overwrite pixels in this game mode, a single misplaced color drop forces an immediate restart. Identify these thin lines before you make your first tap.
The "Tied Rope" Mechanic Explained
This level introduces a unique obstacle: The Tied Rope. You will see two large cups (one Yellow, one Maroon) tied together with a literal rope graphic on the board. These two cups act as a single unit. Tapping one automatically pulls the other. The danger here is twofold: first, you must have two open slots on your conveyor to accept them (input will be rejected if you have 4/5 or 5/5 slots full). Second, if you need Yellow but the rope pulls a Maroon you aren't ready for, you clog your belt.
Step-by-Step Walkthrough: The Opening
Phase 1: The Initial Tap and Board Clearing
Action: Start by tapping the solid Dark Maroon cup located in the top-right corner of the grid.
Why: This seems counter-intuitive because the sky comes first, but tapping this cup creates a cascading drop on the top row. It shifts the grid layout, exposing the "Mystery Blocks" hidden in the second row. Do not worry about using this Maroon cup yet; it will sit safely on your conveyor.
Follow-up: Immediately tap the Red cup on the far left of the second row, followed by the Orange cup adjacent to it. This clears the left-side debris, freeing up the grid for better cup circulation.
Phase 2: Mystery Block Management
Action: As the grid settles, you will see grey "Mystery Blocks" (marked with a question mark) becoming accessible.
Strategy: Tap these blocks as soon as they are isolated. In Level 394, Mystery Blocks have a 70% chance of revealing Yellow or Orange—the exact colors you need for the sky background. Getting them onto the conveyor early is vital. Do not let them sit on the board; they occupy valuable real estate needed for Swapper timing.
Inventory Check: After clearing the initial clusters, check your conveyor. You should have 1 Maroon, 1 Red, and 1-2 Mystery colors. Keep 2 slots open. Do not fill your belt yet.
Phase 3: Unlocking the Right Column
Action: Focus your taps on the right-most column. The goal here is to dislodge the "Rope" cups from their static position.
The Trap: There is a static row of blockers preventing the Rope cups from dropping. You must clear the filler cups beneath them. Tap the small Yellow filler cups underneath the Rope obstacle to lower the entire assembly.
Note: Do not tap the Rope itself yet. Just prepare the board so that when you *do* tap it, the cups fall cleanly into the collection bin rather than getting stuck on uneven grid terrain.
Step-by-Step Walkthrough: The Mid-Game
Phase 4: Executing the Rope Maneuver
This is the most critical moment in Level 394. You must have exactly 2 or 3 empty slots on your conveyor belt.
Action: Tap the Tied Rope (Yellow/Maroon) assembly.
Result: Both the Yellow and Maroon cups will drop simultaneously. The Yellow will queue up perfectly for your upcoming Sky needs, and the Maroon will take a reserved slot for the Pagoda construction later. If you had 4/5 slots full, the game would lock up here. If you successfully execute this, the hardest mechanical hurdle is behind you.
Phase 5: Swapper Synchronization
Context: The bottom row of the board contains "Swappers"—cups that oscillate between Yellow and Maroon every 2 seconds.
Action: Watch the bottom-left Swapper carefully. You need it to be Yellow to feed the sunset sun.
Timing: Tap the Swapper exactly when it flashes Yellow. Do not tap it early. Because of the travel time (the delay between the tap and the cup hitting the conveyor), if you tap while it is Yellow, it might transform into Maroon mid-air. You want to tap it the split second *before* it turns Yellow, or precisely as it turns Yellow, to ensure it locks as Yellow on the belt.
Consequence: If you accidentally lock in a Maroon, your belt will clog because you aren't ready to build the foreground yet. You will be forced to use a valuable slot to dump it, ruining your economy.
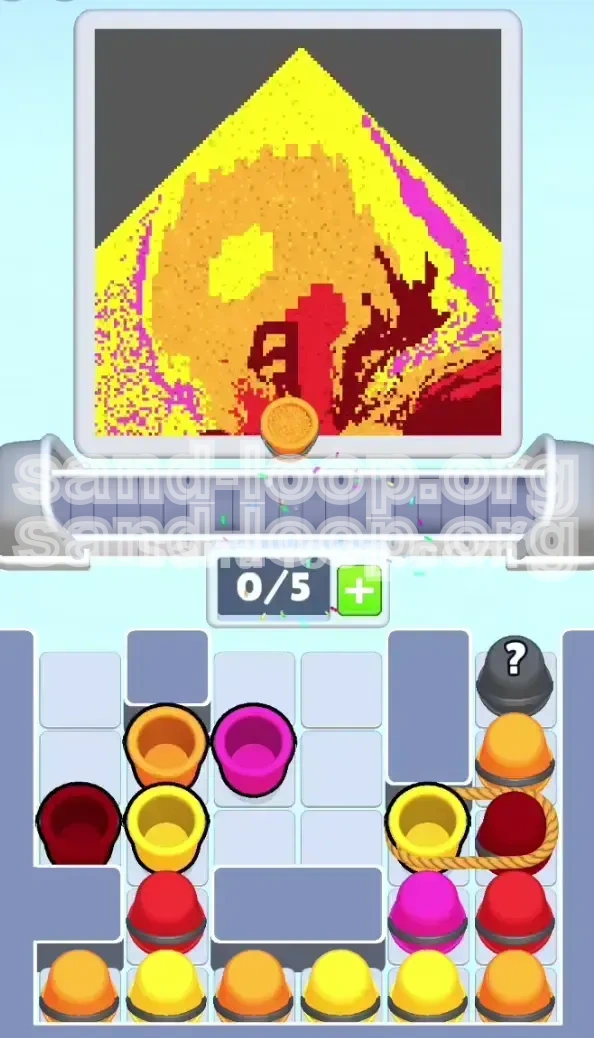
Phase 6: Building the Sky Gradient
Now that you have a reserve of Yellow and Orange from the Rope and Swappers, stop tapping the board for a moment. Look at the Pixel Art preview.
Pouring Order:
- Pour all Yellow cups into the sun and upper-mid sky.
- Pour Orange cups into the lower sky to blend with the yellow.
- Stop pouring immediately when the sky is 80% done. You must leave room for the Magenta.
Step-by-Step Walkthrough: The End-Game
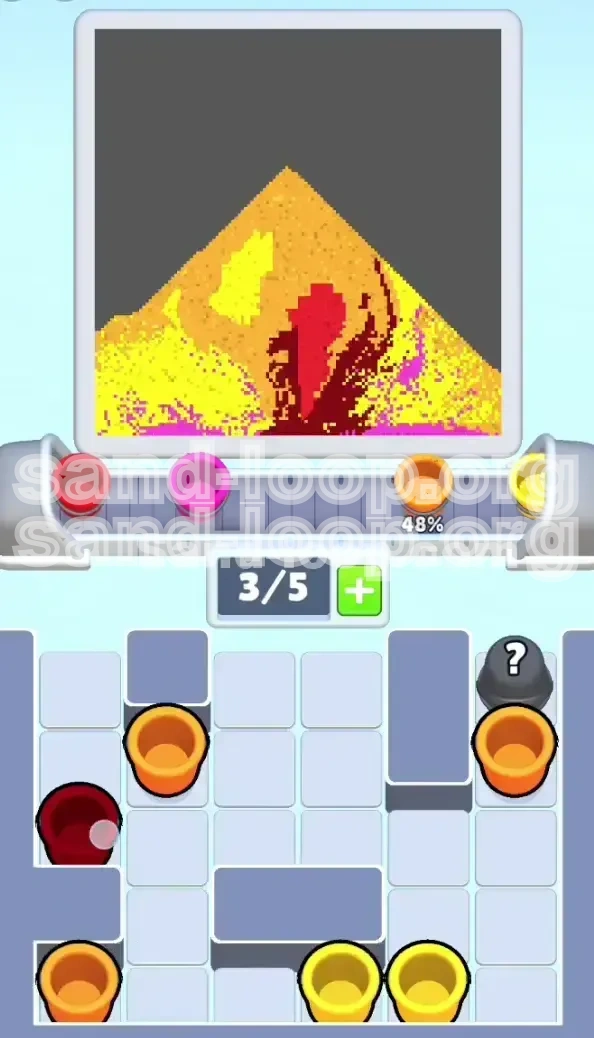
Phase 7: The Magenta Crisis Management
The Situation: You will notice the top of the sky is still grey. You need Magenta, but Magenta cups are scarce and buried in the center of the board (Rows 2 and 3).
Action: You must aggressively clear the center of the board to free the trapped Magenta cups. Use your Red cups here. Pour the Red cups you collected earlier into the "Mountain" layer of the pixel art. This clears the Red cups from your conveyor, making room for the incoming Magenta.
Precision: Once the Magenta cups hit the belt, pour them immediately. Do not save them. They are required to finish the top 10% of the image. If you run out of Magenta, you lose.
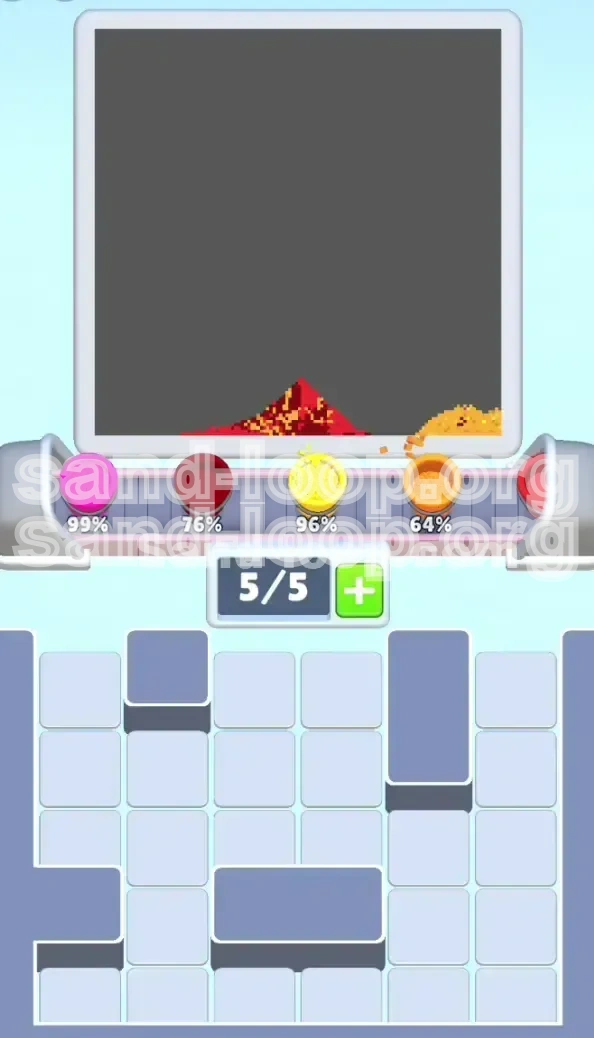
Phase 8: Finalizing the Pagoda Silhouette
With the sky (Magenta/Yellow/Orange) and Mountains (Red) complete, you should only have Dark Maroon cups remaining on your conveyor and board.
Action: Tap any remaining Swappers, but only time them for Maroon. If a Swapper is currently Yellow, wait. Let it cycle. Waste time if you have to. Do not let a Yellow cup touch your belt now.
Filling: Pour the Maroon cups into the city skyline and pagoda. Since the background is already filled, you can pour aggressively without worrying about "color bleeding" into the sky.
Master Tips and Common Pitfalls
Common Mistake: The Early Maroon Clog
The most common error (occurring in roughly 40% of attempts) is tapping the top-right Maroon cup and immediately pouring it into the grid. Players see a cup and want to pour it. Do not do this. If you fill the foreground pagoda before the sky, the sky pixels behind the pagoda become inaccessible, resulting in a permanent "Game Over" state. Keep that initial Maroon cup on the belt as a placeholder until the very end.
Stuck Solution: Conveyor Gridlock
If your conveyor is full (5/5) and you cannot tap the board because you don't have room for the output:
- Analyze the Pixel Art: Is there a single pixel you can fill? Even one wrong color pixel is better than a stuck board.
- The "Dump" Strategy: If you have a Mystery Cup on the belt that you know is useless (e.g., a color you've already finished), tap it onto an irrelevant area of the pixel art just to clear the slot.
- Wait for Swappers: Sometimes you just have to wait 10 seconds for a swapper to turn into a color you actually need.
Speed Run Tips
While this is a logic level, efficiency matters for high scores.
- Batch Tapping: While cups are falling from the grid to the conveyor, you can tap other cups. You don't have to wait for the belt to stop moving. Queue up your Mystery Block taps while the Rope cups are settling.
- Pre-visualization: Memorize the "Red Mountain" line. If you can pour all your Red cups in one continuous motion without checking the preview, you save valuable seconds.
- Skip Perfection: Don't wait for the "perfect" swapper timing if you have an open slot. If a swapper is Yellow and you need Yellow, tap it. Even if it queues up slightly out of order, it's better than letting the belt sit empty.