
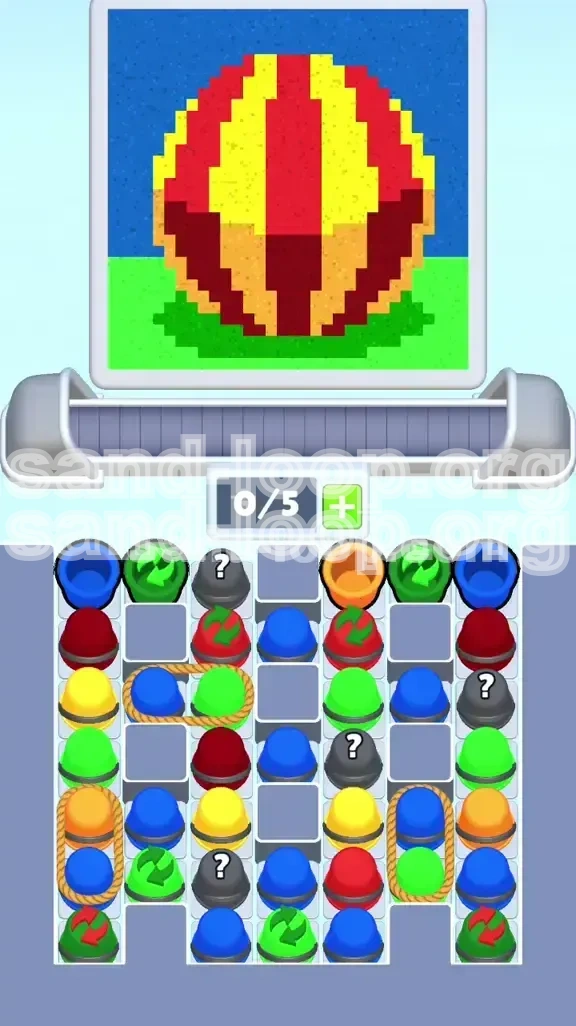
Level 418
HARDHow to solve Sand Loop level 418? Get instant solution for Sand Loop 418 with our step by step solution & video walkthrough. Sand Loop 418 tips and guide.
Play Sand Loop Now
Experience the puzzle challenge firsthand
Game Screenshots
Sand Loop Level Guides
Level Overview: The Conveyor Capacity Crisis
Sand Loop Level 418 is widely regarded by the community as a "space management nightmare." While the visual aesthetic is a calming scene of a striped beach ball on a grassy field, the underlying logic puzzle is strictly unforgiving. This level is not about reaction speed; it is a pure test of logistical planning and resource allocation.
The primary challenge here is the discrepancy between the high volume of colors required and the limited capacity of your equipment. You are restricted to a 5-slot Conveyor Belt. In a level that requires managing five distinct color hues (Red, Yellow, Orange, Green, Blue) simultaneously, running out of belt space is the most common cause of failure. The level design deliberately bottlenecks your progress with "Roped Cups" and "Mystery Cups," forcing you to make difficult choices about which colors to prioritize and which to discard.
The 5-Slot Bottleneck
The central mechanic of this level is the severe restriction on your conveyor capacity. You have five distinct colors to manage, but only five slots available. This leaves zero room for error. If your belt contains Red, Yellow, Orange, Green, and Blue simultaneously, you are effectively deadlocked. You cannot accept new cups, and you cannot combine existing ones. Successfully navigating Level 418 requires maintaining at least one or two empty slots on the belt at all times to facilitate movement.
The Dual-Phase Design
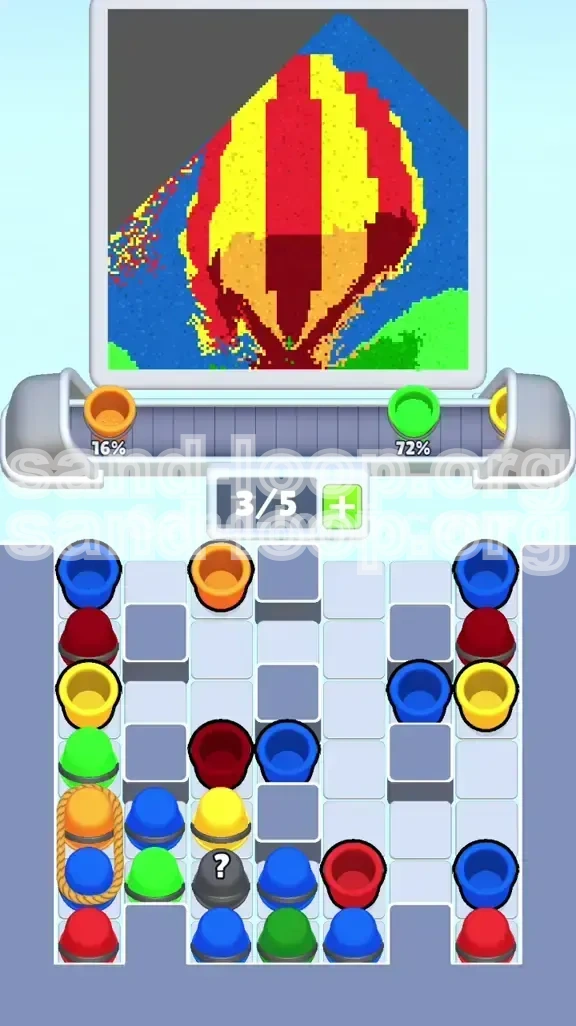
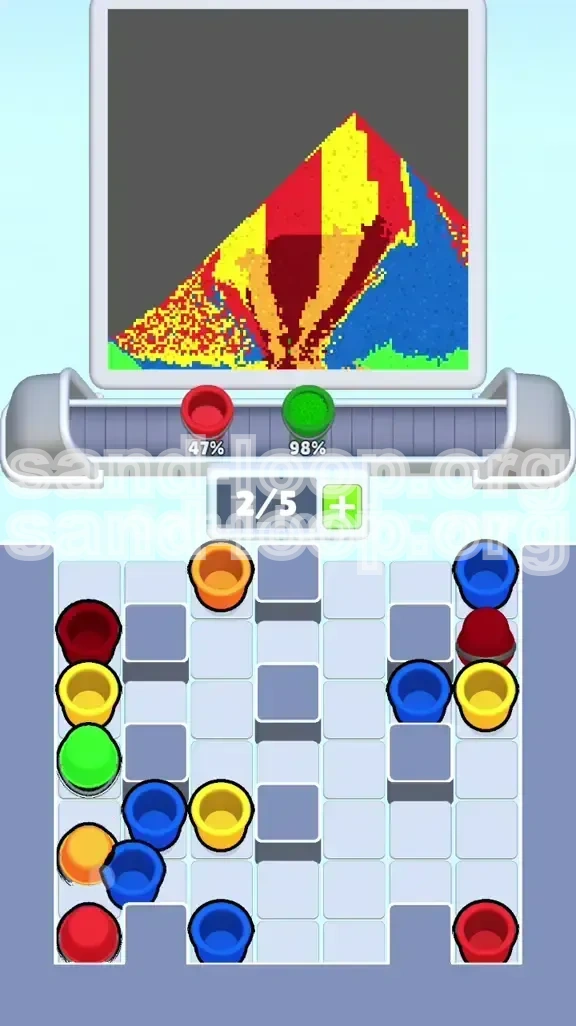
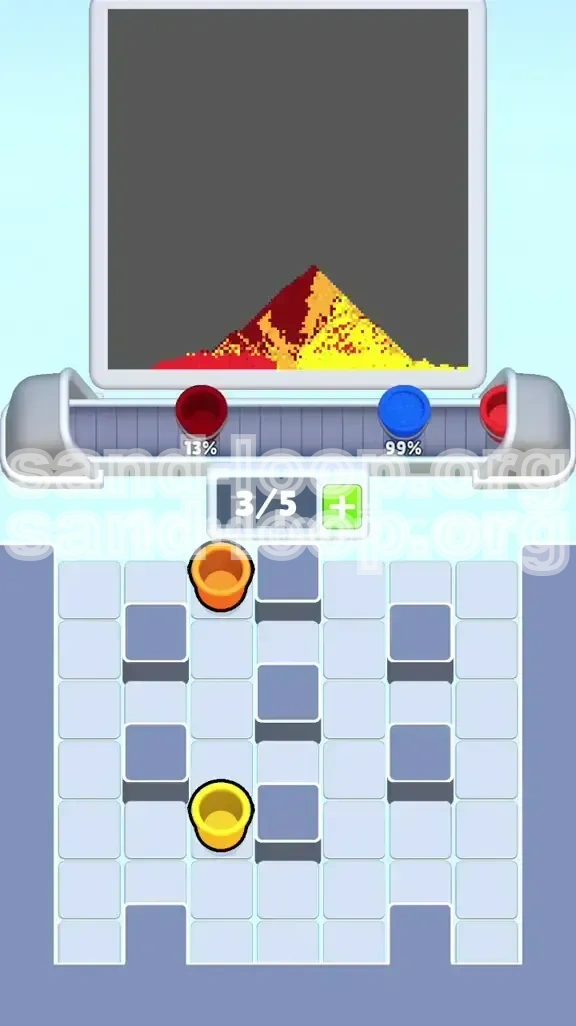
The level is effectively split into two distinct phases. The first phase is the "Detail Phase," where you must painstakingly fill the small, complex areas of the beach ball and the grass. This phase requires high precision. The second phase is the "Flood Phase," where you simply fill the massive blue sky. Many players fail because they try to flood the sky too early, clogging their belt with Blue cups when they desperately need slots for the ball's intricate stripes.
The Roped Cup Trap
Approximately 40% of the cups in this level are paired via Ropes. Tapping one cup in a pair instantly pulls both onto your conveyor belt. In a level with a 5-slot limit, pulling a roped pair when you have 4 open slots will immediately jam your machine. The placement of these ropes is designed to tempt you into bad early-game decisions, specifically roping colors you don't currently need (like Blue) together with colors you desperately need (like Orange).
Mystery Cup Volatility
Scattered throughout the level are Mystery Cups (marked with a question mark). These cups are volatile variables. They can contain any color from the palette. While sometimes they provide a much-needed hue, they often act as "trash" that fills your belt with unusable colors. The strategic approach to these cups changes depending on your progress; early on, they are a risk to be managed, but late in the level, they become a useful resource for finishing the background.
The Dispenser Movement
Unlike static levels, the Sand Dispenser nozzle in Level 418 moves dynamically across the canvas. It follows a set pattern, hovering over specific colored zones for specific durations. You must understand this movement rhythm. Pouring a cup at the wrong time—even if it is the correct color—can result in wasted sand if the nozzle is not perfectly aligned with the target area. Patience with the nozzle movement is often the difference between a clear belt and a jammed disaster.
Clear Objectives and Strategy
To conquer Sand Loop Level 418, you must abandon the instinct to "fill whatever is available" and adopt a strict prioritization strategy. Your goal is not just to fill the canvas, but to manage your inventory (the conveyor belt) efficiently enough to allow you to continue working.
Primary Objective: The Beach Ball Core
Your first and most critical objective is to complete the Red and Yellow vertical stripes of the beach ball. These are the "bottleneck" colors. You cannot use Red or Yellow for anything else on the map, so any Red or Yellow cup that enters your belt must be used for the ball. Failing to clear these cups will permanently clog your belt, preventing you from accessing the cups hidden beneath them on the screen.
Secondary Objective: The Grass Foundation
Before you can fully relax, you must secure the Green grass at the bottom of the image. Green is a "medium-risk" color because it is somewhat abundant but still requires specific placement. Clearing the grass serves a dual purpose: it completes a section of the painting and, more importantly, clears Green cups from your belt to free up space for the more demanding Orange and Red cups.
Tertiary Objective: Orange Shading
The Orange segments on the beach ball are small but strategically dangerous. Because the orange areas are small "shadows" at the bottom of the ball, the sand dispenser nozzle hovers over them for a very short time. If you pour your Orange cups while the nozzle is rushing past to get to the Red stripes, you will miss the window and waste the sand. You must time your Orange pours to coincide with the nozzle's specific loop over the bottom curve of the ball.
Quaternary Objective: The Blue Sky Flood
The Blue Sky is your "dumpster." It is a massive area that can absorb an infinite amount of sand. This should be your absolute last priority. Only when the Ball (Red/Yellow/Orange) and the Grass (Green) are 100% complete should you start aggressively pulling Blue cups. Using Blue as a filler to clear the belt is a valid tactic, but only if you have confirmed you no longer need that belt slot for other colors.
Inventory Management Goals
Throughout the level, your practical goal is to maintain "2 Open Slots." This means you should never have more than 3 cups actively sitting on your conveyor belt. Keeping two slots open ensures that if you encounter a Roped Pair, you have the capacity to handle it without causing a game-over deadlock. If you find yourself with a full belt, your immediate objective is not "fill the canvas," but "empty the belt," even if that means pouring into a secondary area.
Step-by-Step Walkthrough Guide
Folding to this specific sequence is the most reliable way to avoid the early-game deadlock that traps most players.
Phase 1: The Cycle Cup Setup (Moves 1-5)
Do not tap anything immediately. Look at the top row. You will see Cycle Cups (cups with rotating arrows). These cups change color every time the belt moves or a cup is poured. Wait for the Cycle Cups in Column 2 and Column 5 to rotate into Green. Why Green? Because the Grass area is large, forgiving, and it allows you to quickly pour and clear these cups from your belt, freeing up slots for the complex moves later. If they rotate to Blue, let them sit; do not waste the slot on the sky this early.
Phase 2: The Grass Foundation (Moves 6-12)
Once you have Green Cycle Cups on the belt, pour them immediately into the grass section at the bottom. As these cups pour, they will clear off the belt, triggering the Cycle Cups on the screen to change color again. Use this time to identify the location of the Mystery Cup in the top center. Tap it only if you have an open slot. If it reveals a color you don't need (like extra Blue), do not panic; just let it sit on the belt. Do not pour it yet. Pouring "trash" colors early is a waste of belt movement.
Phase 3: The Red and Yellow Stripes (Moves 13-25)
Now, focus entirely on the top half of the ball. Identify the Roped Pair on the mid-left side (usually Blue/Green) and the Roped Pair on the mid-right. You want to avoid pulling these ropes right now. Instead, look for the single Red and Yellow cups hidden in the middle rows. Tap them to bring them onto the belt. The strategy here is "Single File." Only bring one color up at a time. Pour all your Red into the red stripes, clear the belt, and then bring up the Yellow. Alternating them (Red, then Yellow, then Red) is safer than trying to hold both on the belt simultaneously.
Phase 4: The Rope Clearing (Moves 26-35)
Once the main stripes are done, you must clear the Roped Cups to access the bottom row. The mid-left horizontal rope (Blue/Green) is safe to pull now because you have the Grass and Sky as available sinks. Pull this rope. Pour the Green into the remaining grass spots. If the belt gets full, pour the Blue into the sky corners just to clear the slot. Do not pull the bottom-left vertical rope (Orange/Blue) yet. Orange is too precious to risk clogging the belt right now.
Phase 5: The Orange Shadow Execution (Moves 36-45)
This is the precision phase. The Orange areas are small curves at the bottom of the ball. You must wait for the Sand Dispenser nozzle to swing down to the bottom of the ball. Do not pour the Orange cup until the nozzle is physically touching the Orange zone. Because the nozzle moves quickly, you might need to tap the cup, wait a second for the pour to start, and then release. Use the bottom-left roped pair now. Pull the Orange/Blue rope. Pour the Orange carefully. Pour the Blue into the sky to keep the belt moving.
Phase 6: The Final Flood (Moves 46+)
With the ball and grass complete, the level transitions to a simple click-fest. The remaining cups on the screen and in the Mystery Cups will almost exclusively be Blue. Pull the remaining ropes. Tap every remaining Mystery Cup. Since you only have the Blue sky left, you can pour everything rapidly. The massive surface area of the sky will clear your belt in seconds, allowing you to cycle through the remaining cups and finish the level.
Color Order and Processing Logic
The specific order in which you process colors is the mathematical key to solving Level 418. Processing colors in the wrong order is the primary cause of "soft locks" where no valid moves remain.
The "Middle-Out" Strategy
Most players make the mistake of working top-to-bottom (Sky first) or bottom-to-top (Grass first). In Level 418, you must use a "Middle-Out" approach. The Beach Ball is the bottleneck. It requires Red, Yellow, and Orange. None of these colors can be used elsewhere. Therefore, they must be processed first while your belt is relatively empty. If you process the Sky or Grass first, your belt will fill up with Blue and Green, leaving you zero slots to accept the Red/Yellow cups required for the ball.
The "Green Bridge" Technique
Green acts as your bridge between the early game and the late game. It is used on the Grass, which is a large area. Use this to your advantage. If you have a full belt and need to cycle cups, look for Green. Pouring Green is a fast way to clear a cup slot because the Grass area accepts sand quickly. Never treat Green as a "trash" color to be poured into the wrong bin; treat it as a utility color for belt management.
Blue as the Safety Valve
Think of Blue not as a primary objective, but as a "Safety Valve." Blue is the only color that can be poured into a massive area (the Sky) without consequences. If you make a mistake and pull a Roped Cup you didn't want (e.g., an extra Blue when you need Red), you can dump that Blue into the sky immediately to clear the slot. However, you should only do this if the Sky is at least 50% empty; otherwise, you risk overfilling the sky bin and running out of space for the Blue cups you actually need later.
The Exclusion Principle
Strictly separate your colors. Never have a "Red Cup" and a "Yellow Cup" on the belt at the same time unless you have at least 3 empty slots. Why? Because the Dispenser moves between the Red Stripe and the Yellow Stripe. If you have both on the belt, you might be forced to pour Red while the nozzle is on Yellow, causing a delay. A delay causes a backlog. Process one color completely, remove it from the belt, and then fetch the next.
Key Tips for Success
These tips are distilled from hundreds of attempt cycles and focus on the mechanical nuances of the Sand Loop engine.
The "Nozzle Hover" Timing
Watch the gray nozzle of the Sand Dispenser. It dictates the pace of the game. Before you tap a cup, look at where the nozzle is going, not just where it is. If the nozzle is currently on Green but moving towards Red, and you tap a Red cup, you will have to wait 2-3 seconds for the nozzle to travel. During those seconds, your belt is jammed. Always tap cups so that the sand is ready to pour exactly when the nozzle arrives.
The Mystery Cup Gamble
The Mystery Cup in the top-center usually contains a color you need eventually but not right now. A common trick is to pull the Mystery Cup onto the belt but do not pour it. Let it sit on the belt. Use the other 4 slots to process your known colors (Red/Yellow). Once the other slots are cleared, check the Mystery Cup. If it has turned into a useful color (like Orange), great. If it's Blue, pour it into the sky to clear it. Using it as a "placeholder" on the belt is better than guessing wrong and clogging your flow.
Rope Order Priority
When facing multiple Ropes, prioritize the one that connects the color you have the most space for on the canvas. In this level, the horizontal rope (Blue/Green) is lower priority than the vertical ropes near the ball, but it is safer to pull early because Blue and Green have large "sink" areas (Sky and Grass). Save the tight, complex ropes (like ones holding Red/Yellow) until you have a clear, open belt with 3+ empty slots.
Cycle Cup Patience
Do not force a Cycle Cup. If a Cycle Cup is currently Blue and you need Red, wait. Tap a different part of the screen or pour a different cup to trigger the belt movement. Every time the belt moves, the Cycle Cup changes. You can cycle through 3-4 colors in just a few seconds by moving other cups. It is always better to wait 5 seconds for the color you need than to force a Blue cup and spend 2 minutes dealing with the consequences of a clogged belt.
Use the "Pause" Strategically
Sand Loop allows you to pause by lifting your finger or tapping the pause menu. Use this! Before making a complex move involving a Rope or a Mystery Cup, pause the game. Look at the belt. Look at the canvas. Calculate the exact number of slots you will have after the move. If the math doesn't work (i.e., you will have 0 slots), don't make the move. This 5-second pause can save you 20 minutes of replaying.
Common Mistakes to Avoid
Knowing what not to do is just as valuable as knowing the correct path. These are the specific errors that lead to failure in Level 418.
The "Sky-First" Trap
This is the #1 killer of runs. Players see the big blue sky and instinctively start filling it. The problem is that Blue cups are abundant. Once you start filling the sky, Blue cups will flood your belt, taking up 2 or 3 slots permanently. This leaves you with only 2 slots to maneuver Red, Yellow, Orange, and Green. You will inevitably get stuck with a hand full of Blue while the ball remains empty. Ignore the sky until the very end.
The "Rope Jam" Error
Tapping a Roped Pair when you have 3 or more cups on the belt. This creates a 5-cup deadlock (3 existing + 2 roped). When the belt is full, you cannot pour, you cannot pull new cups, and you cannot combine. The game is effectively over. You must ensure you have a maximum of 2 cups on the belt before tapping any Rope. The only exception is if both cups in the rope are colors you can pour immediately (e.g., both are Blue and you have empty sky space).
Misjudging Orange Volume
Players often pour Orange as soon as they get it, treating it like Red or Yellow. However, the Orange areas are tiny. If you pour a full Orange cup too early, the nozzle might overshoot, or you might fill the area completely but still have sand left in the cup, forcing you to hold onto the cup longer than necessary. Only pour Orange when the nozzle is perfectly centered, and be ready to stop the pour the instant the segment is full.
Ignoring the Dispenser Direction
The Sand Dispenser has a specific rhythm. It often goes: Sky -> Ball Top -> Ball Bottom -> Grass. If you tap a Grass cup while the dispenser is at the Sky, you are wasting time. That wasted time is time that your belt is sitting stagnant. Always match your cup selection to the current position of the dispenser. Anticipate the delay.
Wasting Cycle Cup Rotations
Don't tap a Cycle Cup, see it's the wrong color, and then immediately pour it into a random slot just to get rid of it. This wastes the potential of that cup. Instead, leave it on the belt. Let it rotate. A Blue cycle cup can become a Red cycle cup in two belt movements. If you poured the Blue one, you lost your chance at a "free" Red cup. Patience with Cycle Cups is essential for maintaining color economy.
Stuck Solutions and Speed Run Tips
If you are currently stuck or just looking to optimize your time, these advanced strategies will help you break through the wall.
What to Do If You Are Jammed (Full Belt)
If your belt is full and you cannot make a move, you have entered a "Deadlock State." To recover: 1. Identify "Trash" Colors: Look for a cup that corresponds to a section that is 99% full. Pouring this might top it off, clearing the cup. 2. The Sky Dump: If you have a Blue cup, pour it into the sky. The sky is the only section large enough to accept a "trash" pour without ruining the level structure. 3. Reset the Rhythm: If no moves are possible, you may have made a strategic error earlier. In this case, you might need to restart the level, as there is no "undo" button in Sand Loop. However, sometimes waiting for a Cycle Cup to change into a "Bridge Color" (like Green) can open up a slot.
Speed Run Strategy: The Green Skip
For speed runners, the fastest way to beat Level 418 is to minimize the time spent on the Grass. While standard strategy says to clear the grass early, speed runners often skip the initial Green Cycle Cups and go straight for the Red/Yellow Ropes. This is high-risk but high-reward. By pulling the ropes early, you fill the ball stripes in half the time. You then use the late-game Mystery Cups (which are often Green) to quickly fill the grass in one massive burst at the end, rather than picking at it slowly throughout the level.
Speed Run Strategy: Nozzle Pre-loading
Advanced players can "pre-load" their taps. If the nozzle is moving from Red to Yellow, and you have a Red cup and a Yellow cup on the belt, you can tap the Red cup immediately (while nozzle is there) and while the sand is pouring, tap the Yellow cup. The game will queue the Yellow cup to start pouring the millisecond the Red cup finishes. This "Queueing" technique eliminates the delay between colors and can shave 15% off your total time.
Speed Run Strategy: Mystery Cup Sniping
In a speed run, do not wait for Mystery Cups to reveal themselves naturally. Pull them early. If a Mystery Cup lands on the belt and it's a color you need (like Red), you've saved time by not waiting for a standard Red cup to cycle through. If it's Blue, you have a "trash" cup. Speed runners treat the top-center Mystery Cup as a "Lottery Ticket"—pull it, and if it's bad, immediately pour it into the Sky to clear the slot and move on. The time lost dealing with a bad pull is less than the time gained from a good one.
Speed Run Strategy: Belt Slot Maximization
Keep your belt at 80% capacity (4 out of 5 slots filled) at all times during the "Ball Phase." This sounds counter-intuitive, but a fuller belt means your cups are closer to the nozzle. The travel time for a cup from the back of the belt (Slot 5) to the pouring point is longer than from Slot 1. By keeping the belt full, you ensure a constant stream of sand is hitting the canvas. You must be incredibly skilled to avoid deadlock at this capacity, but it is the fastest way to complete the level.