
Level 420
HARDHow to solve Sand Loop level 420? Get instant solution for Sand Loop 420 with our step by step solution & video walkthrough. Sand Loop 420 tips and guide.
Play Sand Loop Now
Experience the puzzle challenge firsthand
Game Screenshots
Sand Loop Level Guides
Level Overview: The Logistics of the Breakfast Pan
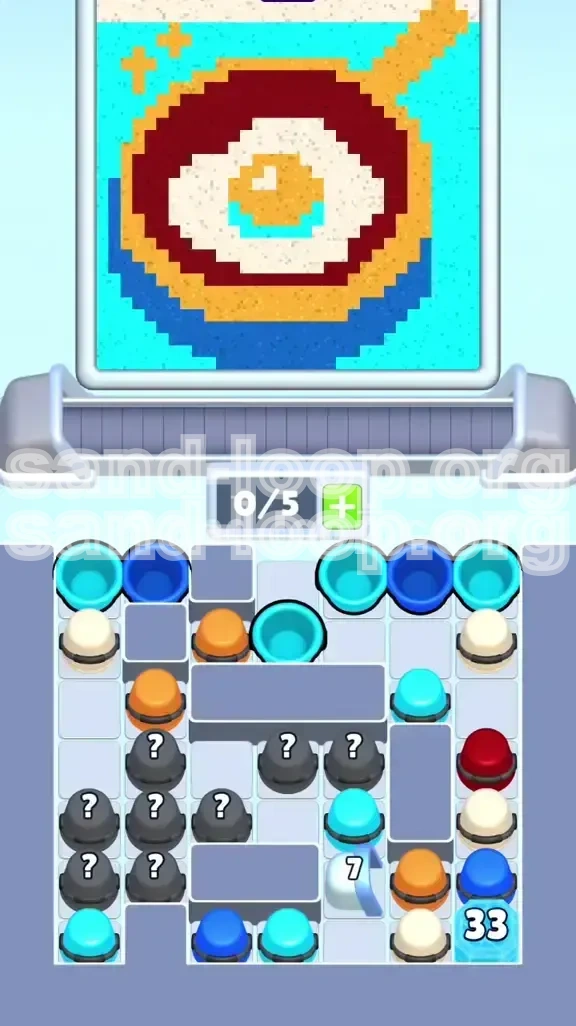
Level 420 in Sand Loop is a deceptive challenge that disguises a logistical nightmare as a simple pixel art puzzle. While the objective appears to be painting a fried egg, the reality is a battle against severe resource scarcity and inventory management. The level is governed by a brutal "Slot Economy" where you are limited to holding only 5 cups at a time. The primary antagonist is not the complexity of the image, but the "Gatekeeper" mechanic—specifically, the 33-count Ice Block that locks away your most critical resource.
The White Sand, which covers approximately 50% of the canvas (the egg white), is inaccessible at the start. It is buried under layers of ice and static grey blocks. Furthermore, the level features a "Fragile Highlight" system where a tiny Cyan pixel sits inside the Orange Yolk. If you pour carelessly, this highlight is buried, forcing an expensive correction operation. Statistically, the level requires 30-40 precise actions, with less than a 2% margin for error regarding the yolk's internal highlight.
The Resource Scarcity Crisis
Unlike standard levels where colors are plentiful, Level 420 restricts White Sand to a finite number of cups buried in the bottom right. If you waste your early moves filling the background Cyan or Dark Blue areas to 100% perfection, you will hit a "No More Moves" deadlock. The White Sand supply line must be established first, or the level is mathematically impossible to complete.
The Slot Management Bottleneck
Your inventory capacity is capped at 5 slots (0/5). Because breaking the Ice Blocks takes time (requiring 6-8 pours of other colors), your conveyor belt will inevitably back up. The most common failure point is filling all 5 slots with non-essential colors (like Cyan) just as the Ice breaks, revealing a White Cup that you cannot pick up. This "Slot Lock" is the primary cause of retries.
The Precision Trap
Visual clutter is a major enemy. The tray is filled with Static Grey Blocks that act as walls, forcing a specific "Snake Pattern" for clearing cups. You cannot simply tap any cup you see; you must tap cups in the order they are physically exposed. Additionally, the Yolk contains a single-pixel Cyan highlight that serves as a "trap." Pouring Orange sand continuously will overwrite this pixel, requiring a "Surgical Tap" later to fix it without wasting the precious White sand.
Clear Objectives: The Supply Line Protocol
To achieve a 100% completion rate on Level 420, you must abandon the artist's mindset and adopt a logistician's approach. Your goal is not to paint; it is to unlock the supply chain.
Primary Objective: Liberate the White Gatekeepers
The absolute priority is the destruction of the Ice Blocks. Specifically, the 33-count block in the bottom right corner acts as the main bottleneck. You must channel all "waste" actions (pouring unneeded colors) into breaking this block. Until the White Cups are flowing, the rest of the canvas is irrelevant.
Secondary Objective: Slot Hygiene
You must maintain at least one empty slot (or a slot occupied by a "waste" cup you are about to dump) at all times. This ensures that the moment the Ice shatters and a White Cup appears, you have the inventory space to retrieve it. Filling your slots with Mystery Cups before identifying their contents is a prohibited action.
Tertiary Objective: The Background Buffer
Use the Cyan and Dark Blue cups as "reset buttons" for your inventory. Pour them not to perfect the image, but to clear them from your tray and generate movement on the conveyor belt. Only when the White flow is stabilized should you return to polish the background to 100%.
Final Objective: The Yolk Surgery
The Orange Yolk must be filled last. Filling it early risks bleeding Orange into the White egg white or covering the internal highlight. You must use the "Tap-Tap-Stop" method to fill the Yolk aggressively but halt exactly at the boundary of the Cyan highlight.
Color Order and Processing Logic
The order of operations is critical. Do not process colors based on their visual position on the canvas; process them based on their availability and the risk they pose to your inventory.
Phase 1: The Icebreakers (Cyan & Dark Blue)
Priority Level: Immediate. At the start, only Cyan and Dark Blue cups are accessible. You must tap these immediately. Do not aim for 100% accuracy. Pour them into the general vicinity of their targets (top for Cyan, bottom for Blue). The goal here is purely mechanical: to clear space on the conveyor belt and apply "damage" to the Ice Blocks.
Phase 2: The Core Supply (White)
Priority Level: Critical. Once the 33-count Ice Block shatters, White becomes your currency. Immediately pivot your entire operation to filling the egg white. Ignore all other colors. If you have a Cyan cup in your slot, pour it out (even if it wastes a bit) to make room for the White stream. The White area is too large to leave for the endgame.
Phase 3: The Boundary Setter (Dark Red)
Priority Level: High. The Dark Red Pan Rim acts as a container. Fill this before touching the Orange Yolk. Having a solid Red border provides a visual guide for the Orange sand later, preventing it from spilling into the White area. It also clears Red cups from your tray, preventing slot clogs.
Phase 4: The Centerpiece (Orange)
Priority Level: Tactical. Save Orange for the end. The Yolk is a small area, and the Orange cups are fewer than the White ones. By filling it last, you ensure that your hand isn't steady when filling the large White areas. Crucially, stop pouring when you see the small Cyan gap in the center of the Yolk.
Step-by-Step Walkthrough
Follow this actionable sequence to navigate the gridlock and achieve the perfect loop.
Step 1: The Conveyor Flush
As the level loads, immediately tap the top-left Cyan and Dark Blue cups. Do not wait.
- Action: Tap 2 Cyan and 2 Dark Blue cups immediately.
- Targeting: Pour Cyan into the top 15% of the canvas. Pour Dark Blue into the bottom 10%.
- Result: This clears the physical path in the tray, allowing the buried cups (including the Ice Blocks) to slide up into the "tappable" zone.
Step 2: The 33-Count Assault
With the top rows cleared, you will see the massive Ice Block in the bottom right.
- Monitoring: Watch the "HP" of the block. It starts at 33.
- Technique: Continue tapping Cyan and Dark Blue cups. Every pour deducts 1 from the counter. Do not tap Mystery Cups yet; they are unpredictable.
- Timing: It will take roughly 8-10 seconds of continuous pouring to break this block.
Step 3: The White Rush
The moment the Ice Block breaks, a White Cup is revealed.
- Inventory Check: Ensure you have an empty slot. If you are full, waste a cup immediately.
- The Switch: Tap the White Cup. Immediately stop pouring Blue/Cyan.
- Filling: Pour White sand into the large central oval. Use broad strokes. Do not worry about hitting the edges perfectly yet; just get the volume down.
Step 4: The Yolk Highlight Surgery
Once White and Red are done, you will handle the Orange.
- Visual Scan: Look for a tiny 2x2 pixel Cyan dot in the center of the Yolk area.
- Execution: Tap the Orange cup. Use "Micro-bursts"—tap the screen for 0.5 seconds, release, and repeat.
- Correction: If you accidentally cover the Cyan dot, tap a Cyan cup (from your inventory or tray) and use a single, quick "peck" tap to drop a few grains of sand onto the highlight.
Step 5: The Endgame Polish
With the main shapes filled, the level often ends with 1-2% remaining.
- Scan the Perimeter: Check the absolute top edge and bottom corners for missing pixels.
- Mystery Cup Resolution: If you have a Mystery Cup left, tap it. If it's a needed color, fill the gap. If it's not, pour it into a finished area to clear the level.
Key Tips for Mastery
Advanced techniques to minimize frustration and maximize efficiency.
The "Lead the Target" Rule
Sand physics in Sand Loop have travel time. When the conveyor belt is moving, the cup takes a moment to reach the spout.
- The Tip: Tap the cup roughly 0.5 seconds *before* the target area on the canvas aligns with the pouring spout.
- Why: This ensures a continuous stream of sand. If you tap when the area is already under the spout, you lose precious seconds waiting for the sand to fall.
Inventory Banking Strategy
Never hold onto a cup "for later" in this level.
- The Rule: If you tap a cup, you are committed to pouring it immediately.
- Reason: The tray layout is too tight. Holding a cup blocks the slot needed for the next color the tray reveals. Tap, Pour, Clear.
Mystery Cup Discipline
Mystery Cups are slot blockers.
- Protocol: Never tap a Mystery Cup unless you have at least 2 empty slots.
- Reason: If a Mystery Cup turns out to be a color you don't need (like Red when the Pan is already full), it becomes "trash" that clogs your machine. You need the flexibility to move it to the conveyor or dump it without freezing your other operations.
The "Tap-Tap-Stop" Rhythm
For the Yolk and the Pan Rim, precision beats volume.
- Technique: Instead of holding your finger down, use a rhythmic tapping: Tap... Tap... Tap...
- Benefit: This gives the sand physics engine a moment to settle the grains. This prevents the "avalanche" effect where sand spills over boundaries because you poured too fast.
Common Mistakes to Avoid
90% of failures on Level 420 are caused by these specific errors.
Mistake #1: The Aesthetic Trap
The Error: Trying to make the Blue base or Cyan background look perfect before breaking the ice.
Consequence: You waste your limited "Waste Color" cups. When the Ice finally breaks, you have no Blue/Cyan left to clear your slots, forcing you to pick up the White Cup inefficiently.
Correction: Treat the background as a trash can. It only needs to be 60% full until the White supply is secured.
Mistake #2: The Slot Deadlock
The Error: Tapping 5 cups in a row without pouring.
Consequence: You are frozen. You cannot pick up the White Cup when the ice breaks. The tray keeps moving, and the White Cup slides back into the "unreachable" zone.
Correction: Adopt a "Tap One, Pour One" rhythm. Never let your slots stay full for more than 3 seconds.
Mistake #3: Premature Yolk Filling
The Error: Filling the Orange Yolk before the White Egg White is mostly done.
Consequence: When you pour White later, you will inevitably spill it into the Orange Yolk because the boundaries aren't established yet. This creates "muddy" mixed pixels that are hard to clean.
Correction: Always fill light colors (White, Cyan) before dark/saturated colors (Red, Orange).
Stuck? Here is the Solution
Emergency procedures for when the level goes sideways.
Scenario 1: The "Soft Lock"
Symptoms: Your slots are full of junk colors (e.g., 3 Cyan, 2 Blue), but you need White. The tray isn't moving.
The Fix: You must "waste" a cup. Take one of your full cups and pour it into a section of the canvas that is already 100% that color. This effectively "deletes" the cup, freeing up a slot so you can tap the tray and shuffle the grid to find the next usable color.
Scenario 2: The Invisible Pixel
Symptoms: You are at 99% completion, but the game won't end.
The Fix: Zoom in on the Yolk. It is almost always the Cyan highlight inside the Orange that is missing a single grain of sand. Alternatively, check the absolute bottom edge of the canvas—sometimes the physics engine leaves a 1-pixel gap at the very edge of the screen.
Speed Run Tips
Strategies for players aiming for the leaderboard.
The "Zero-Second" Start
Don't analyze the board. As soon as "Level 420" fades out, tap the top-left cup. Muscle memory should dictate your first 3 taps. This saves 2 seconds off your time immediately.
The "Blind Fill" Technique
For the White Egg White, don't aim. Once the White stream starts, move your cursor to the center of the egg and hold. The spread is wide enough that it will fill 90% of the area without you needing to adjust the position. Look away at your tray to plan your next tap while the sand pours.
Skip the Perfection
In Speed Run mode, 98% is often sufficient. If the main shapes are filled and you are missing one pixel in the corner of the Cyan sky, let it go. Hunting for that last pixel takes longer than restarting the level. Focus on flow, not perfection.