
Level 432
HARDHow to solve Sand Loop level 432? Get instant solution for Sand Loop 432 with our step by step solution & video walkthrough. Sand Loop 432 tips and guide.
Play Sand Loop Now
Experience the puzzle challenge firsthand
Game Screenshots

Sand Loop Level Guides
Sand Loop Level 432: The Ultimate "Hippo Pond" Strategy Guide
Level Overview: Why This Level is Hard
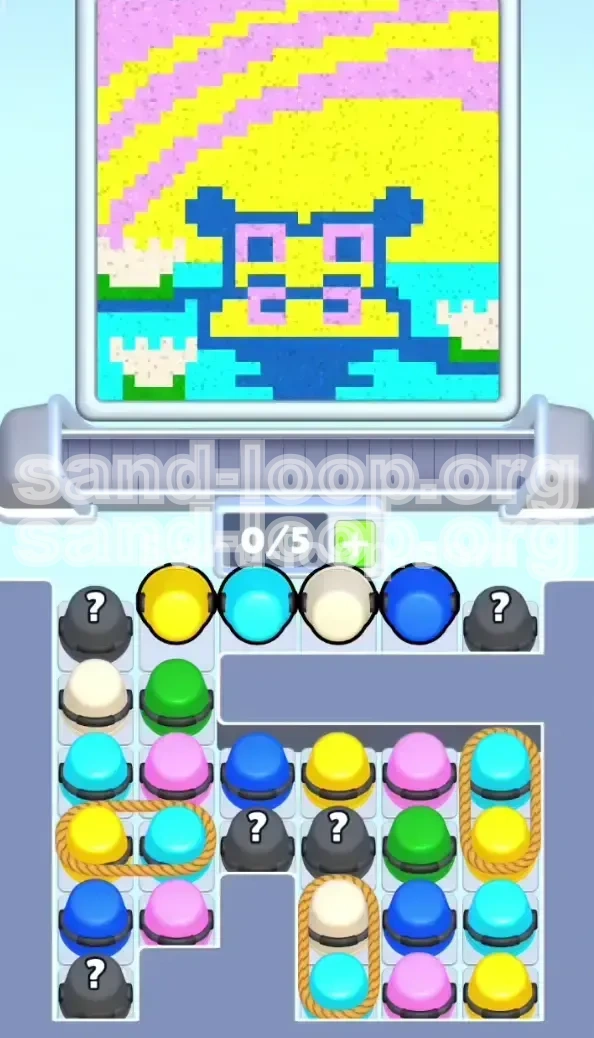
Sand Loop Level 432, known as the "Hippo Pond," is a deceptively tricky puzzle stage that appears simple at first glance but requires strict inventory discipline. Unlike earlier levels where you can rapidly tap cups to clear the board, Level 432 is defined by a severe inventory bottleneck: your conveyor belt only holds 5 slots. The difficulty arises from the "Rope Cluster" mechanic, where two cups are tied together. Triggering a cluster when your belt is full causes an immediate "No Space" error, which is the primary cause of failed runs. This guide breaks down exactly how to manage your inventory to achieve a 3-star finish without getting stuck.
The 5-Slot Inventory Constraint
The core mechanic of this level is the conveyor belt limit. You cannot simply tap every cup you see. If you have 4 cups on the belt and tap a Rope Cluster (which adds 2 cups), the game will block you. This often happens at the worst possible time, leaving you with a full belt of unusable colors while the target zones remain unfilled.
Understanding the Rope Clusters
There are three specific Rope Clusters in this level that tie two cups together. Tapping one pulls both onto the belt instantly. The clusters are fixed as follows: Left Cluster (Yellow + Cyan), Right Cluster (Teal + Yellow), and Bottom Vertical (White + Cyan). Since these take up 40% of your belt space immediately, they must be triggered only when you have exactly 3 open slots.
Target Zone Breakdown
The image is divided into four main zones: The Sky (Yellow, ~30% coverage), The Pond (Cyan/Teal, ~40% coverage), The Hippo (Blue/Yellow/Pink, ~20% coverage), and Details (Green/White, ~10% coverage). The key to victory is prioritizing the bulk zones (Sky and Pond) first. Do not waste time on the tiny details like the Hippo's nostrils or the lily pads until the endgame.
The "Deadlock" Risk
The most dangerous state in Level 432 is the "Deadlock." This occurs when your conveyor belt is full of cups that don't match the currently open zones, and the only available cups in the selection tray are Rope Clusters that you can't pull. To avoid this, you must always keep 2 slots open on your belt to allow for emergency cluster pulls.
Primary Objectives for Victory
Clear Bulk Colors First
Your main priority is to remove the massive volume of Yellow and Cyan cups from the selection tray. These colors form the background and occupy the largest area of the canvas. If you focus on small details like the Green lily pads early, you will clog your belt with minor colors while the screen is still flooded with background colors, leading to a deadlock.
Coordinate Rope Cluster Timing
Do not randomly tap Rope Clusters. You must coordinate them with your belt's empty slots. Only trigger a Rope Cluster when you have exactly 3 cups or fewer on the belt. This ensures the two new cups fit, leaving you with a manageable 5 cups that you can empty systematically before looking for the next cluster.
Mastering the "Endgame" Colors
Pink and Green are your "Endgame" colors. They are used for tiny, high-precision areas like the Hippo's nostrils and the Lily pads. If you pour these too early, you risk "bleeding" them into the large Yellow or Cyan zones, ruining your 100% completion chance. Save these cups for the final phase of the level.
Avoid the "Mixed Belt" Trap
Avoid having a mix of "Bulk" colors (Yellow/Cyan) and "Detail" colors (Pink/Green) on the belt at the same time. If you have a Pink cup on the belt while you are still trying to fill the Yellow Sky, you are wasting a valuable slot. Keep your belt focused on one task at a time: fill the background, then worry about the details.
Color Processing Order and Strategy
Phase 1: The Base Layers (Yellow & Cyan)
Start the level by ignoring everything except loose Yellow and Cyan cups. These are your "Safe" colors. Look for single, untied cups in the top row of the tray. Tap the Yellow cup first to fill the sky, followed by Cyan for the water. These colors have the largest margin for error, meaning you can pour them quickly without needing pixel-perfect accuracy.
Phase 2: Structural Definition (Blue & Teal)
Once the background is roughly 60% full, switch your focus to the Blue and Teal cups. Blue is used for the Hippo's structural features like the snout and ears. Teal is used to add depth to the water. These colors often appear in the Right Rope Cluster (Teal + Yellow). Process these now, but be careful not to spill Blue into the Yellow face zone.
Phase 3: The Precision Zone (Pink & Green)
Pink and Green are volatile. Pink is used for zig-zag sky streaks and tiny nostrils. Green is for lily pads. Treat these as "Danger" colors. Do not tap them until the very end. If you tap a Mystery Cup (Gray/Question Mark) and it turns out to be Green, and your belt is full of Yellow, you are forced to waste the Green or wait, clogging your progress.
Handling Mystery Cups
There are Mystery Cups in this level that hide their color until tapped. A good rule of thumb is to never tap a Mystery Cup while your belt is chaotic. Only tap a Mystery Cup when your conveyor belt is completely empty (0/5 slots). This gives you maximum control over where the hidden color goes, preventing you from getting stuck with a color you didn't want.
Step-by-Step Walkthrough Guide
Step 1: The Top Row Clearing
As the level loads, immediately scan the top row of the selection tray. You will likely see a configuration of loose cups. Identify the loose Yellow cup and the loose Cyan cup. Tap the Yellow cup first. Let it pour into the sky. Next, tap the Cyan cup. Direct it to the bottom pond zone. Check your belt count. If you have space, grab the White cup for the lily pads later. Crucially, do not touch the Rope Clusters yet.
Step 2: Triggering the Right Rope Cluster
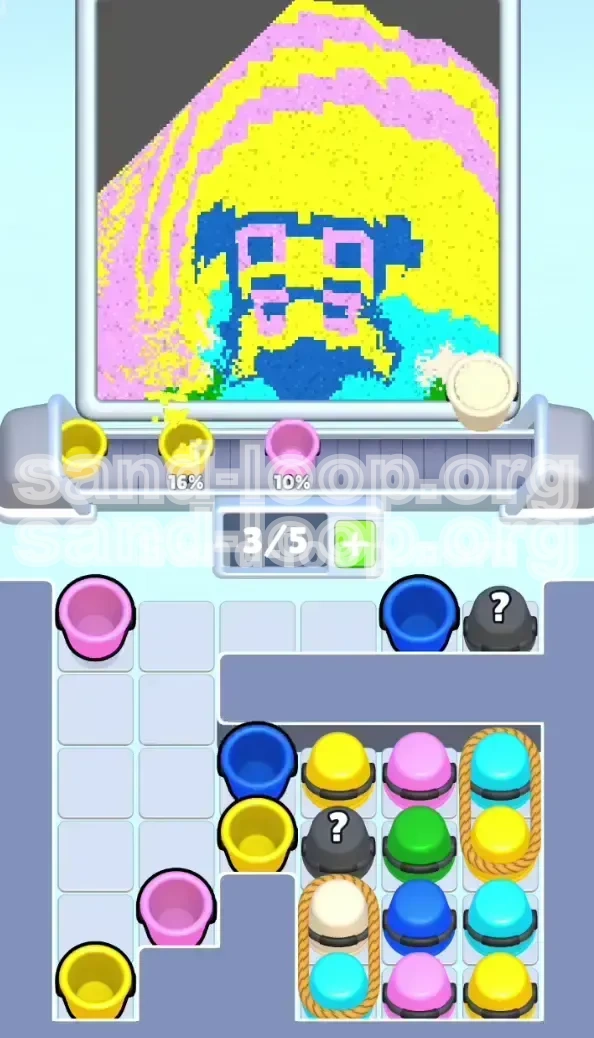
After clearing the loose top row cups, check your belt status. Ensure you have at least 3 empty slots. Now, look for the Right Rope Cluster. This cluster pulls a Teal and a Yellow cup onto the belt. Use the Teal to deepen the water color and the Yellow to patch any missed spots in the sky. Triggering this cluster early frees up space in the tray for other moves.
Step 3: Triggering the Left and Bottom Clusters
Next, locate the Left Rope Cluster (Yellow + Cyan) and the Bottom Vertical Rope (White + Cyan). Trigger the Left Cluster to finish the sky and water base. Then, when you are ready for micro-management, tap the Bottom Vertical Rope. This gives you the White cup needed for the Lily pads. Be sure to pour the White sand precisely into the center of the pad zones.
Step 4: The Hippo's Face (The Danger Zone)
This is the hardest part. You need to place Blue ears and a Pink nose onto the Yellow face. Retrieve the Blue cups from the middle-right of the tray. Position the cup so the sand stream lands exactly in the center of the ear outline. Retrieve the Pink cups (likely from Mystery Cups at this stage). Wait for the conveyor to center over the hippo's snout. Tap the pour button and release immediately. Do not hold it, or you will spill Pink into the Yellow face.
Step 5: Final Cleanup and Overflow
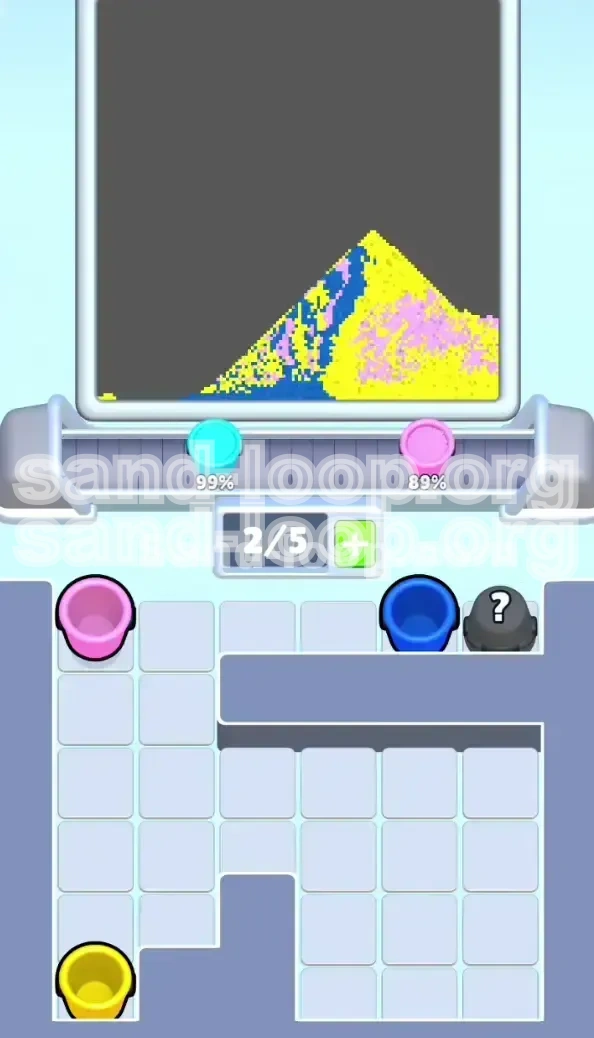
You should now be at 80-90% completion. Scan the tray for any remaining Yellow cups. Use these to fix the sky percentage. If you have excess Cyan, pour it into the deepest part of the water where it won't touch the Green pads. If you are stuck at 98%, look for tiny unfilled pixels in the Hippo's ears or the corners of the sky zig-zags.
Key Tips and Common Mistakes
The "Full Belt" Mistake
The most common error is treating the conveyor belt like a queue. Players tap cups as fast as possible, filling the belt with 5 items. When a Rope Cluster is tapped, the game forces a "No Space" penalty. The fix is to adopt a "Tap-Wait-Pour" rhythm. Never tap a new cup unless you are sure where the current cups are going. Keep 2 slots empty at all times until the very end.
The Mystery Cup Gamble
Players often tap Mystery Cups early to "see what they get." This is bad strategy. If the Mystery Cup contains Green (for lily pads) and you tap it while the belt is full of Sky Yellow, you are forced to either pour Green into the Sky (wasting it) or wait, clogging your belt. Assume Mystery Cups contain the color you need least at that moment.
Color Bleeding on the Hippo
The Hippo's face is a "bullseye" trap. The nostrils are Pink. The face is Yellow. The ears are Blue. These zones touch each other. Do not use "Wide" pours (holding down the button). Use "Tap" pours (tapping the button rapidly) to drop small amounts of sand. This gives you pixel-perfect control and prevents the colors from mixing.
Ignoring the Rope Pairs
Sometimes players try to play around the Rope Clusters, picking loose cups until no moves are left. You end up with a tray full of nothing but Rope Clusters, requiring you to clear 3 pairs at once. Since you can only handle 1 pair at a time (due to slot limits), you create a deadlock. The fix is to break the Rope Clusters early. Do not let them pile up.
Solutions for When You Are Stuck
Stuck at 95% Completion?
If you have filled all obvious zones but the percentage meter reads 95-98%, you are missing "anchor" pixels. Look at the Hippo's ears. The base of the ear often blends into the head. Use a single drop of Blue to connect the ear to the head. Also, check the corners of the "Sky Zig-Zags." The Pink streaks in the sky often have tiny start/end pixels that are easy to miss. Zoom in if possible to find these gaps.
Deadlocked by Rope Clusters
Scenario: Your belt is full (5/5). The only cups left in the tray are 3 Rope Clusters. You cannot tap any of them. The fix is to sacrifice a cup. If you have a cup on the belt that matches a zone that is mostly full, pour it anyway to clear the slot. Even if you overflow slightly, clearing the slot allows you to grab a Rope Cluster and finish the level. An overflow is better than a restart.
Mystery Cup is the Wrong Color
Scenario: You tapped a Mystery Cup hoping for Green, but you got Pink. You have no Pink zones left to fill. The fix is to look for the "deepest" part of the existing Pink zones (like the nostrils or sky streaks). Pour the excess Pink into the center of an already filled Pink area. The game generally tolerates 100-110% fill in a zone. It is better to overflow a zone than to leave a useless cup on the belt blocking your progress.
Speed Run and Advanced Tips
Optimized Tap Queueing
For experienced players looking to optimize time, you can "Queue" taps while the sand is pouring. While a cup is pouring into the Sky (Yellow), immediately look at the tray and identify the next cup you need (e.g., Cyan for water). Tap the Cyan cup while the Yellow cup is still pouring. Warning: Only do this if you are 100% sure the incoming cup fits the belt capacity.
Pre-Calculating Rope Clusters
Memorize the Rope Cluster pairs (Yellow+Cyan, Teal+Yellow). You don't need to read the labels on the ropes every time. When the level starts, immediately scan the tray for the "Teal+Yellow" cluster. Since Teal is rare and specific to the water edges, prioritize finding and processing this cluster first to get it out of the way.
The "One-Handed" Pour
Keep your finger hovering over the "Stop Pour" or "Tap" button. For the Hippo's nostrils and the Lily pads, do not watch the sand fall. Watch the percentage meter for that specific zone. As soon as the meter hits 100%, release the button. This is faster and more accurate than relying on visual confirmation of the pixel fill.
Zone Chunking Strategy
Instead of filling the Yellow Sky 100% in one go, fill it to 90%, then switch to the Cyan Water. This keeps your color options open. If you accidentally fill a zone to 100% and still have that color cup on the belt, you are forced to waste it or find a tiny hole to fill. Leaving zones at 90% until the final 10 seconds of the level gives you a "dumping ground" for excess cups.