
Level 445
HARDHow to solve Sand Loop level 445? Get instant solution for Sand Loop 445 with our step by step solution & video walkthrough. Sand Loop 445 tips and guide.
Play Sand Loop Now
Experience the puzzle challenge firsthand
Game Screenshots
Sand Loop Level Guides
Level Overview: The Mount Fuji Precision Challenge
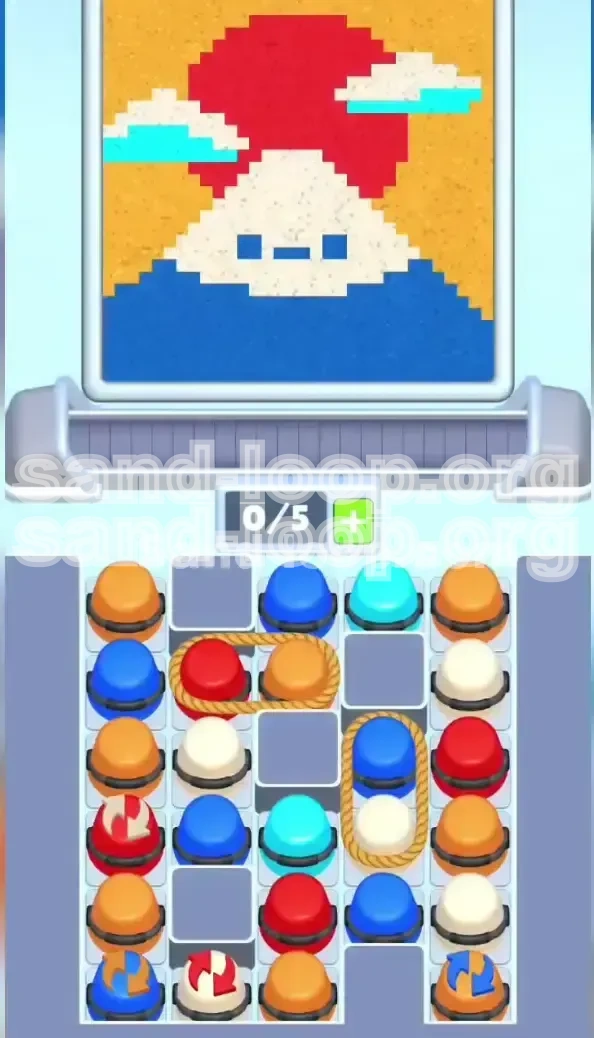
Level 445, often referred to by the community as the "Mount Fuji Sunset," marks a significant difficulty spike in Sand Loop. While the pixel art aesthetic of a serene Mount Fuji might calm you, the gameplay mechanics are designed to induce panic through extreme resource management. Unlike previous levels where you could rely on a steady flow, this stage introduces a severe "Slot Economy" constraint. You are restricted to a maximum of 5 active slots on your conveyor belt, which changes the game from a casual puzzler to a tight logistical test.
The visual composition is divided into three distinct horizontal zones that must be filled with pixel-perfect accuracy. The background consumes 40% of the volume (Orange/Gold), the mid-ground Sun is a sensitive 25% (Red), and the foreground Mountain contains multiple colors (Blue, White, Cyan) packed into a tight space. The primary difficulty comes from the "Lasso" mechanics—pairs of cups tethered together that consume double the inventory space in a single instant. This walkthrough focuses on managing these constraints to achieve a 3-star victory without hitting a deadlock.
Constrained Inventory Mechanics
The defining feature of this level is the hard cap on your inventory. In previous levels, having 6 or 7 cups queued was manageable. Here, if you tap a new cup when the belt displays 5/5, the game enters a "Deadlock" state, forcing you to watch potential mistakes pour out. This constraint forces you to prioritize clearing slots over speed, making every tap decision critical.
The Lasso System Explained
This level introduces tethered cup pairs. Tapping one cup immediately pulls its partner onto the belt. This effectively doubles the inventory cost of a single tap. For example, if you have 3 cups on the belt and tap a lasso pair, you instantly hit the 5/5 limit. You cannot trigger these ropes without careful planning, or you will block your ability to maneuver the cups you already have.
Visual Topography and Zones
The level is strictly divided into three layers. Layer A is the Sky (Orange), Layer B is the Sun (Red), and Layer C is the Mountain (Blue/White/Cyan). The danger lies in the proximity of these layers. The White snow cap is surrounded by Orange sky, making it highly susceptible to color bleeding. Understanding these boundaries is essential for planning your pour order.
The "Slot Economy" Strategy
Because space is limited, your strategy must shift from "fastest fingers" to "inventory flow." You must treat every slot as a valuable currency. The goal is to maintain a cycle where you never have more than 4 cups active at once, reserving that precious 5th slot for emergency maneuvers or lasso drops. Keeping the belt moving is just as important as filling the zones correctly.
Difficulty Spike Analysis
Statistically, players fail this level not because they lack the skill to aim, but because they mismanage the queue. The "Lasso" pairs spawn unpredictably, and if your belt is full when they appear, you are often forced to waste sand or restart. This walkthrough teaches you how to control the queue rhythm to prevent these deadlock scenarios.
Clear Objectives for 3-Star Success
To secure a perfect score and clear the board without running out of space, you need a structured set of goals. Randomly tapping cups will lead to a bottleneck within seconds. Follow these primary objectives to maintain control of the board state from start to finish.
Objective 1: Establish the Blue Foundation
Your immediate first goal is to clear the solo Blue cups blocking the top tray. These cups are obstructing access to the critical Lasso pairs below. Furthermore, the Blue zone defines the base of the mountain. Filling this first creates a visual anchor and clears the necessary vertical space in your inventory to handle more complex moves later.
Objective 2: Isolate the Red Sun Zone
The Red Sun is the most volatile zone on the board. It acts as a " contamination hazard"—if even a single grain of Orange or Blue sand enters the Red zone, your precision multiplier drops. Your objective is to fill the Red Sun to 100% completion as early as possible (Phase 2), effectively "closing" the zone so you can aggressively fill the surrounding Orange sky later without fear of bleeding into the Sun.
Objective 3: Execute Safe Lasso Maneuvers
You must successfully trigger both the Blue/White and Red/Orange Lassos without causing a slot overflow. The objective here is preparation: ensure you never have more than 3 cups on the belt before tapping a rope. You must aim to merge these pairs into your workflow seamlessly, treating them as a single "2-slot" unit rather than two separate cups.
Objective 4: Precise Snow Cap Placement
The White snow cap requires the least volume but the highest precision. It is surrounded by danger on all sides. Your objective is to pour the White sand only when the conveyor alignment is perfect. Rushing this step usually results in White sand spilling into the Orange sky, which ruins the contrast and lowers your score.
Objective 5: The 80% "Fill and Spam" Push
Once the detailed areas (Sun, Mountain, Snow) are filled, the board state changes. Your final objective is to reach 80% completion with a relatively empty belt. From 80% to 100%, the strategy shifts to spamming the filler color (Orange/Gold) into the remaining negative space without overthinking it, provided the sensitive zones are already sealed.
Objective 6: Multiplier Preservation
Do not settle for a messy finish. The game awards bonus points for "Perfect Fills." This means avoiding any cross-contamination between the Red Sun and Orange Sky. If you finish the level at 98% but with contaminated colors, you may miss the 3-star threshold. Aim for a "Clean Sweep" to maximize your end-of-level score.
Step-by-Step Walkthrough Guide
This guide breaks the level down into four distinct phases. Follow this sequence exactly to navigate the "Lasso" traps and manage your 5-slot limit effectively. We will move from the most constrained moves to the final flood fill.
Phase 1: The Opening (Clearing Blockers)
The start of the level is deceptive. Do not tap rapidly. You must wait for the conveyor belt to align the first column of cups. The upper tray contains solo Blue and Cyan cups that act as blockers.
- Step 1: Pause for 2 seconds at the start. Let the belt settle and identify the solo Blue cup at the top.
- Step 2: Tap the solo Blue cup. Immediately drag it to the Mountain Base zone (bottom center).
- Step 3: While the Blue sand is pouring, identify the solo Cyan cup in the top tray. Tap it to bring it onto the belt.
- Step 4: Pour the Cyan cup into the small cloud shadow details. This clears the right column of the tray.
- Step 5: Verify your belt count. You should have 2 or 3 slots open. This is the safe zone for triggering the first Lasso.
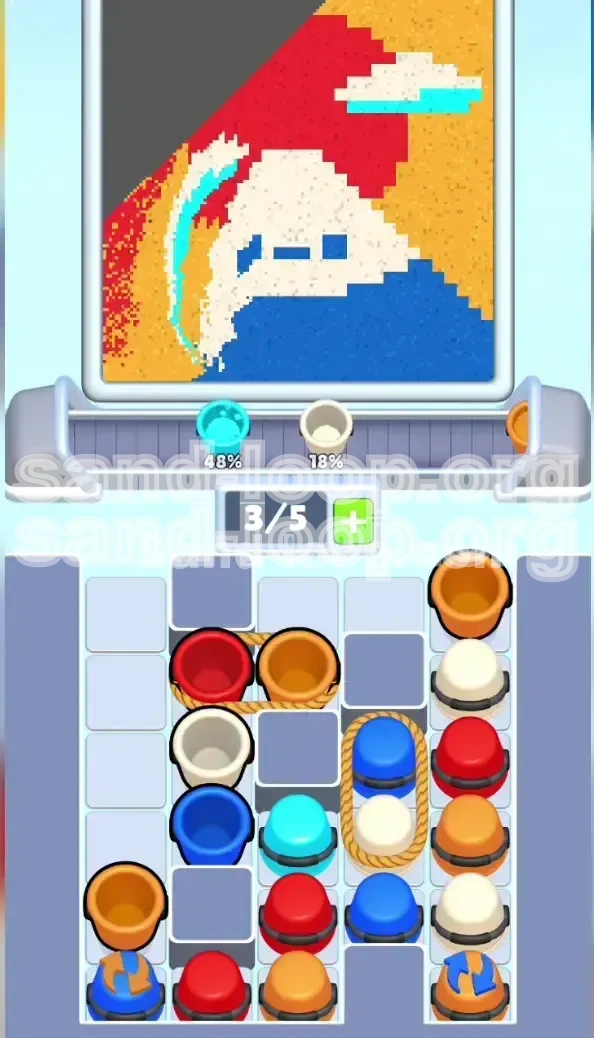
Phase 2: The Sun Construction (Red/Orange Lasso)
This is the highest-risk phase. The Red/Orange Lasso is tied to a rope. Tapping it adds two cups instantly. We do this now while the belt is relatively empty to secure the Sun.
- Step 1: Wait until your belt count drops to 1 or 0 cups.
- Step 2: Tap the Red/Orange Lasso rope. Both the Red and Orange cups will fly onto the belt.
- Step 3: Immediately grab the Red cup. Drag it to the Sun zone (top right circle). Aim for the center.
- Step 4: Take the Orange cup and drag it to the far right edge of the Sky zone. Keep it away from the Sun to avoid bleeding.
- Step 5: Watch the fill level. Once the Sun is 100% Red, it is "closed." You no longer need to worry about Orange sand bleeding into it.
Phase 3: The Mountain Base (Blue/White Lasso)
With the Sun sealed, we focus on the foreground details. This phase requires the most mechanical precision.
- Step 1: Check your slot count again. Ensure you have 2 empty slots before proceeding.
- Step 2: Tap the Blue/White Lasso rope located in the bottom tray.
- Step 3: Direct the Blue cup to the remaining parts of the Mountain Base. This should complete the dark foundation.
- Step 4: The White cup is next. Wait for the mountain peak (the dispenser) to align perfectly with the cup.
- Step 5: Pour the White sand slowly. If you miss and it hits the Orange background, the purity of the snow cap is compromised. If you have the "Swap" cup, save it for patching errors here.
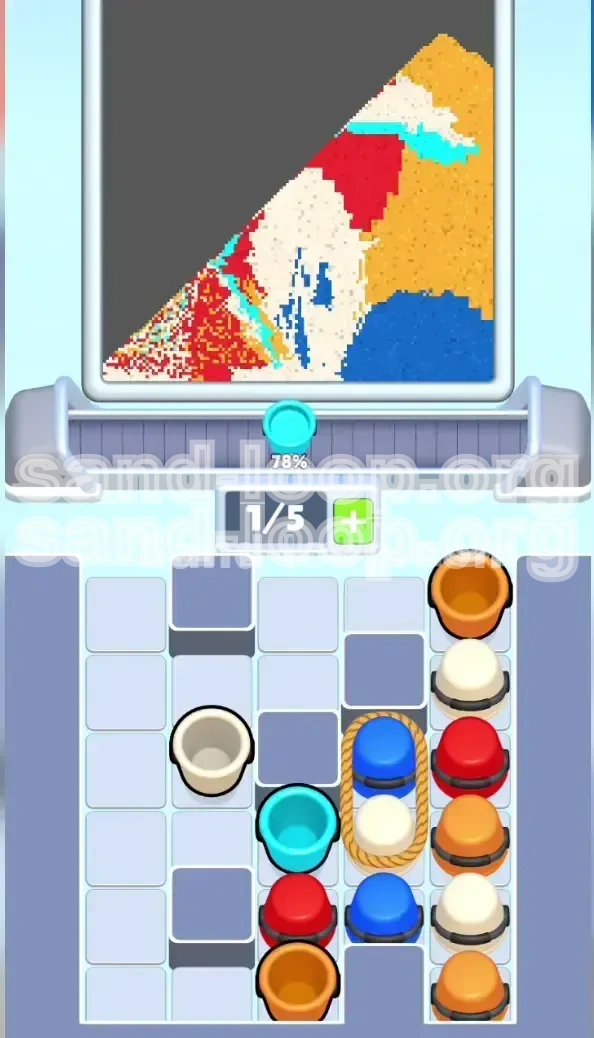
Phase 4: The Sky Fill (The Final Grind)
At this stage (approx 70% completion), the board should be clear of complex colors. Only the vast Orange sky remains.
- Step 1: Check the "Swap" cup in the tray. If it turned White, use it to fix any snow cap errors.
- Step 2: If the Swap cup is a color you don't need (like Blue), ignore it.
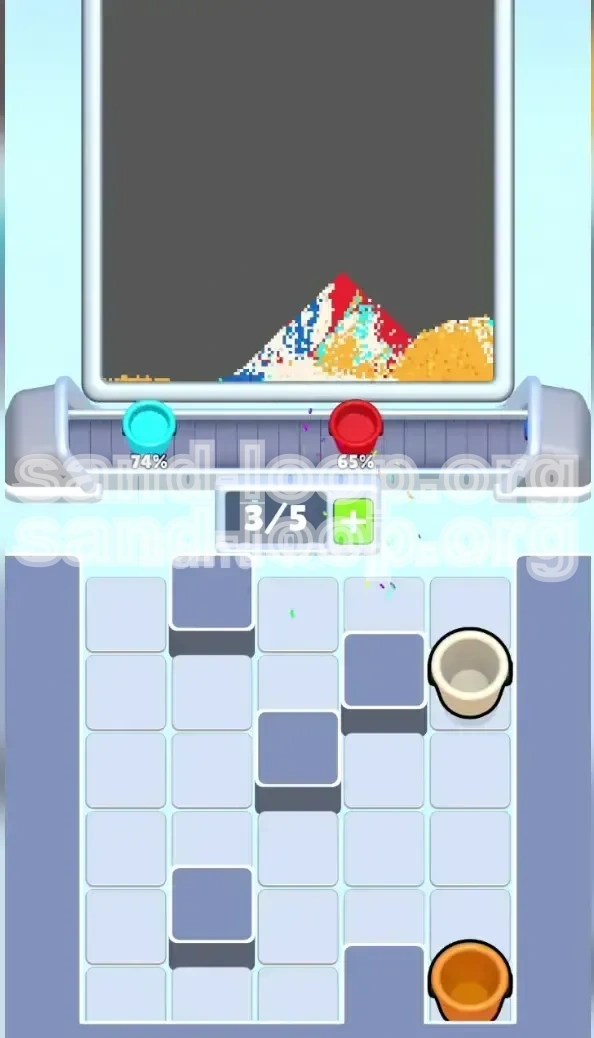
- Step 3: Begin rapidly tapping all remaining Orange/Gold cups.
- Step 4: Use the "Rapid Tap" method: Tap 3 cups, let them pour into the sky, clear them, then tap 3 more.
- Step 5: Do not aim carefully. The Sky zone is huge. Dump the sand anywhere in the negative space.
- Step 6: The level should complete automatically as the sky reaches 100% saturation.
Optimal Color Processing Order
Processing colors in the wrong order accounts for 90% of failed attempts on Level 445. The game tempts you to fill the large background first, but this is a trap. If you fill the Orange sky first, you will inevitably pour Orange sand into the Red Sun or White Snow zones later, causing contamination that cannot be fixed. You must follow the "Detail First, Background Last" rule.
Priority 1: Blue (The Foundation)
Blue is always first. It serves as the bottom layer of the mountain. By filling this first, you establish the boundary lines for the rest of the level. Furthermore, the Blue cups are positioned at the top of the tray, physically blocking access to other cups. You have to move them anyway, so you might as well use them to build the foundation immediately.
Priority 2: Red (The Hazard)
Red is second because it is the most sensitive color. The Red Sun has a strict circular hitbox. If you fill the Orange sky first, and then try to fill the Red Sun, a slight slip of the finger will pour Orange into the Red, turning it pink and ruining the score. By filling Red early (around 20-30% progress), you "close" the zone. Once the Sun is full, you can aggressively splash Orange around it without fear.
Priority 3: White (The Accent)
White comes third. It requires high precision but low volume. The White sand for the snow cap is visually distinct. If you do this after the Orange background is full, you risk "diluting" the whiteness with orange pixels. Do it while the surrounding area is still empty (black/grey). The contrast helps you see exactly where the White sand is landing.
Priority 4: Cyan (The Detail)
Cyan is used for tiny shadow details. It is the lowest volume color, often requiring just one cup. Save this for when you need a mental break from the high-stakes Red and White fills. It's usually safe to pour Cyan anytime, as long as the Blue base is already there to catch it.
Priority 5: Orange/Gold (The Filler)
Orange is dead last. Think of Orange as the "junk" color—it takes up the most space (40%) but requires the least thought. You fill everything else first, then use the Orange sand to flood the remaining empty space. This strategy ensures that your Orange sand never bleeds into critical areas like the Red Sun or White Snow.
The Logic Behind the Order
Imagine you are painting a canvas. You always paint the small, detailed objects first because you need to stay inside the lines. You paint the background last because it doesn't matter if you go over the lines into the empty space. Following this "Detail to Background" order minimizes the "Bleed Risk" and ensures a clean, high-score finish.
Pro Tips, Common Mistakes, and Speed Runs
Mastery of Level 445 comes down to avoiding specific psychological traps and optimizing your physical movements. Even with the right color order, small execution errors can derail a run. Here are the specific pitfalls to watch out for and advanced techniques to handle them.
Mistake 1: The Rope Snap Panic
When you tap a Lasso, both cups fly onto the belt instantly. Many players panic and try to pour one immediately to clear space. Don't. If the dispenser isn't aligned, you waste the sand. Instead, pause for a split second, check the alignment of the target cup, and only then drag it. Let the other cup sit on the belt until you need it. Patience wins here.
Mistake 2: Ignoring the Swap Cup Cycle
The Swap Cup (marked with circular arrows) changes color every time you tap a different cup. A common mistake is tapping it and then ignoring it, only to realize it turned into a color you needed 10 seconds ago. Tip: Tap the Swap Cup only when you have exactly 3 empty slots. If it turns into a bad color (like Blue when you need Red), you still have room to maneuver. If it turns into White or Red, you win.
Mistake 3: The "Mound Effect" on the Sun
When filling the Red Sun, do not just hold the cup in the center. The hitbox for the sun is a perfect circle. If you hold it too long in one spot, the sand piles up in the center (the "mound effect") and the physics engine might not register the edges as filled. Technique: Move the cup in a small, tight circular motion while pouring to ensure the Red sand hits the perimeter of the sun zone evenly.
Speed Run Tip: Pre-Loading the Belt
For speedrunners, you can shave off seconds by "pre-loading." As the level starts, you can tap the solo Blue cup before the mountain zone even aligns with the dispenser. The cup will sit on the conveyor. As soon as the mountain base passes under, the sand starts flowing instantly. This saves the 2-3 seconds of waiting for alignment.
Speed Run Tip: The "Dump and Drag"
For the Orange sky fill, don't be precise. The hitbox for the sky is massive. Drag the Orange cup to the far right corner of the screen and dump it there. The physics engine will spread the sand leftward into the sky naturally. This is significantly faster than carefully aiming for the center of the screen.
Advanced Technique: Lasso Chaining
If you are confident, you can "chain" the Lassos. Tap the Red/Orange rope. As the Red cup is pouring, immediately tap the Blue/White rope (if slots allow). This requires you to have 1 slot free (3 total cups on belt). It creates a chaotic board but clears the top tray in record time, allowing you to start the final Sky Fill phase much earlier.