
Level 448
HARDHow to solve Sand Loop level 448? Get instant solution for Sand Loop 448 with our step by step solution & video walkthrough. Sand Loop 448 tips and guide.
Play Sand Loop Now
Experience the puzzle challenge firsthand
Game Screenshots
Sand Loop Level Guides
Level Overview: The Pixel Art Snail Challenge
Level 448 stands out as a unique logic puzzle within the game, shifting the focus away from reflex-based tapping and toward strict resource management. The level presents you with a "Pixel Art Snail" design, but achieving a 100% completion rating requires navigating a fractured board and a severely limited inventory system. You are not just painting pixels; you are solving a logistical crisis where a single ill-timed tap can clog your tray and end your run immediately.
The core difficulty lies in the "Slot Economy Trap." Unlike earlier stages where you could rapidly clear cups, this level demands a rhythmic, almost surgical approach to tapping. You are forced to manage a bottleneck involving a Golden Key and a 7-Chest while simultaneously preventing color contamination between the snail's foreground and the sky's background. The bright Cyan background acts as a hostile force against the delicate Cream/White body of the snail, creating a high-stakes environment where execution order is everything.
Visual Layout Analysis
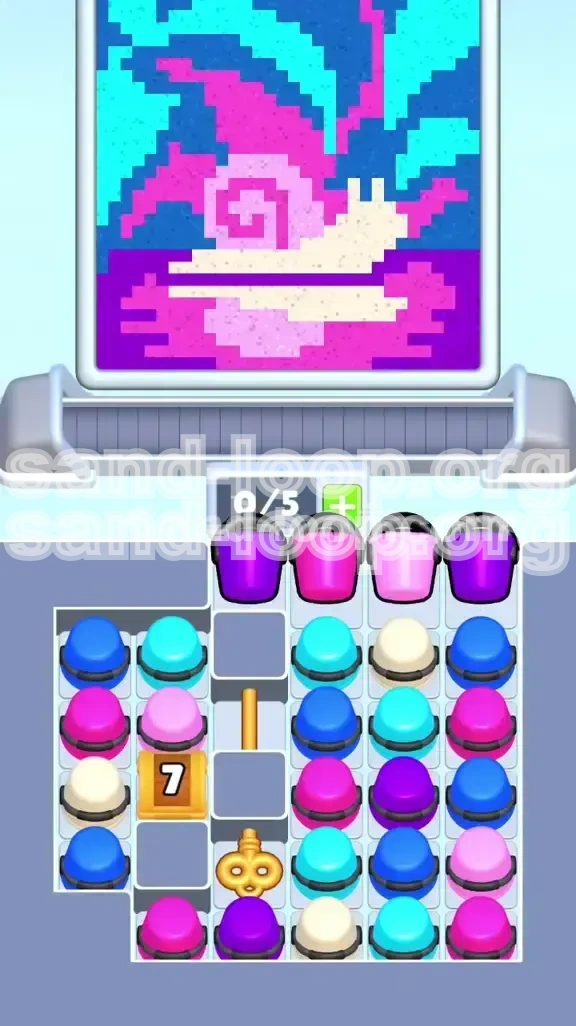
Understanding the canvas is the first step to victory. The image is split into two distinct horizontal zones. The bottom half consists of a heavy, dark blue ground layer. The top half is a bright, cyan sky. Intersecting these two zones is the Snail, which features a shell of spiraling Magenta and Light Pink, bordered by Deep Purple. The most critical visual element is the Snail's body and antennae, which are rendered in a fragile Cream/White. These white pixels are the "glass cannon" of this level—essential for victory, yet incredibly vulnerable to being overrun by the Cyan background sand.
The Board Divisions
The supply grid is intentionally fractured to induce panic. You start with a 0/5 Slot limit. The board is split into a main right-hand cluster and a completely isolated left-hand column. The left column is inaccessible at the start, blocked by a solid wall and a wooden 7-Chest. This means you effectively have less board space to maneuver with, forcing you to be efficient with every tap in the main grid. You cannot rely on having extra room to store cups; space is a luxury you do not have.
The Bottleneck Dynamics
This level introduces a brutal dependency chain. You need the cups in the isolated left column to finish the sky, but you cannot reach them. You need the Golden Key buried deep in the main grid to clear the board, but it is buried under three layers of unrelated colors. This creates a "funnel" where you must ignore 60% of the visible board to focus on a single specific column. If you get distracted by the easy matches on the right, you will run out of tray space and trigger a deadlock.
The Slot Limit Constraint
With a starting slot limit of 0/5, you have zero margin for error. Since the conveyor belt moves at a glacial pace, your tray acts as a volatile storage buffer. If you fill your 5 slots with colors that are not currently being processed by the sand dispensers, you have effectively blocked your own input pipeline. Every tap must be calculated to ensure that the cup entering the tray matches a cup currently pouring or about to pour.
Winning Conditions
To complete Level 448, you must achieve 100% fill accuracy across all color zones. This involves a sequential completion of the Dark Blue ground, the Magenta/Pink shell, the White body, and finally the Cyan sky. The level is won only when the final Cyan cup is tapped without having previously flooded the delicate White antennae. It is a test of patience, requiring you to resist the urge to "speed run" the early game.
Primary Objectives and Strategic Goals
Your goal in Level 448 is to excavate the Golden Key to unlock the left side of the board, execute a color-perfect filling of the Snail's body to prevent color bleeding, and manage the 7-Chest timer to release the necessary background colors. You must prioritize the Key over everything else, treating the first 60 seconds of the level as an excavation mission rather than a painting mission.
Excavate the Golden Key
This is your "Phase One" objective. The Golden Key is buried in the "Next" column of the main grid, covered by Cyan and Dark Blue cups. Your primary focus until that key is tapped is to drill down using the specific cups that block the key. Ignoring the White and Magenta cups on the right side of the board is essential. You must clear the path to the key to open up the board state and allow for the flow of required colors.
Execute the Color Fill Order
You must adhere to a strict color processing order. The game's physics engine will try to force Cyan down your throat early, but you must resist. The correct order is: Dark Blue (Ground) -> Magenta/Light Pink (Shell) -> Cream/White (Body) -> Cyan (Sky). Deviating from this order causes the light sand to sink beneath the heavy sand or get overwritten entirely. You are the gatekeeper of the conveyor belt.
Unlock the 7-Chest
Once the Key is retrieved and utilized, the 7-Chest on the bottom left becomes your next major hurdle. This chest holds the remaining Dark Blue cups required to ground the image. You must feed the conveyor with enough matches to trigger the chest's countdown. This requires a steady stream of correct colors; you cannot spam random cups to fill the chest, or you will clog your tray.
Protect the Antennae
The Snail's antennae are the failure point of this level. These are thin vertical columns of white pixels. If you process the Cyan background before the White body is 100% complete, the heavy Cyan sand will bury the antennae, making it impossible to finish the level. You must ensure the White sand has settled and the dispenser has cleared before you introduce the first drop of Cyan.
Manage Slot Efficiency
You must maintain a "flow state" with your tray. This means tapping cups in batches of three or four matching colors, letting them fill the tray (3/5 or 4/5), allowing the conveyor to process them, and then tapping the next batch. You should never have 5 single different colors in your tray. If your tray looks like a rainbow, you are about to lose. Group your inputs to match the outputs.
Step-by-Step Walkthrough Instructions
This section breaks down the level into actionable, minute-by-minute instructions. Follow this sequence to navigate the board from the opening tap to the final 100% completion.
Phase 1: The Golden Key Excavation (0% - 25%)
Ignore the right side of the board. Do not be tempted by the White or Magenta cups on the far right. Your eyes must lock onto the "Next" and "After" columns in the center grid. Tap the two top Purple cups first. This drops them into the tray. Immediately tap the Magenta cup sitting directly above the 7-Chest to start digging down. The next layer will expose Cyan and Dark Blue cups blocking the key. Match these Cyan cups together and drop them into the tray. Wait for the conveyor to carry them away. Once the path is clear, tap the Golden Key immediately. This is the turning point of the level.
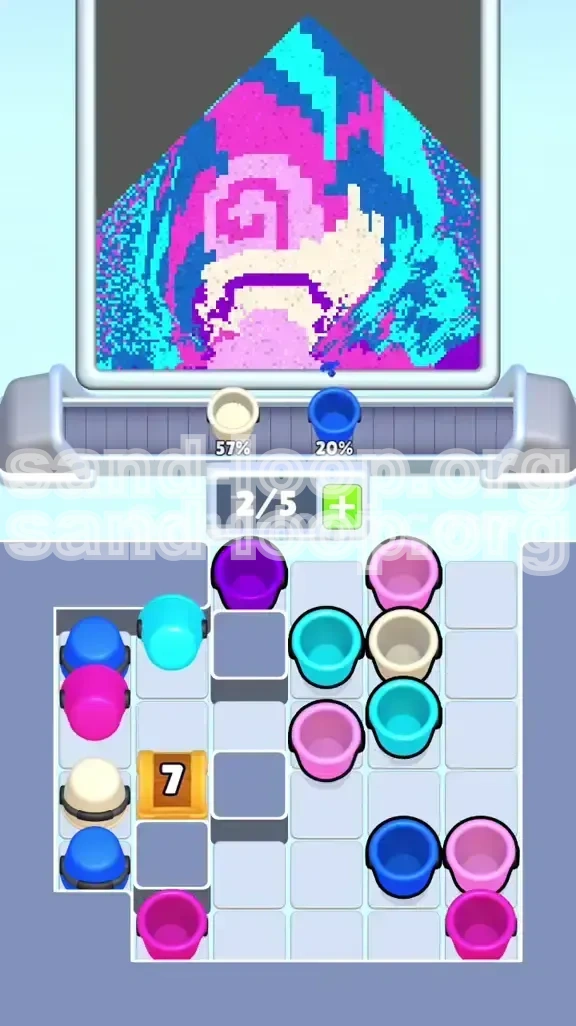
Phase 2: Tray Management and Mid-Game Traffic (25% - 50%)
Once the key is active, the board will shift. You are now in the "Slot Economy Trap." Group your colors aggressively. Look for clusters of Magenta or Light Pink. Tap three of them in a row. Let them fill your tray to 3/5 or 4/5 capacity. Watch the pour percentage on the top screen. Do not tap a new color until the current batch has poured at least 40% of its content. If you tap a White cup while Pink is still pouring, you risk creating a permanent blockage. Control the feed; force the game to play at your pace.
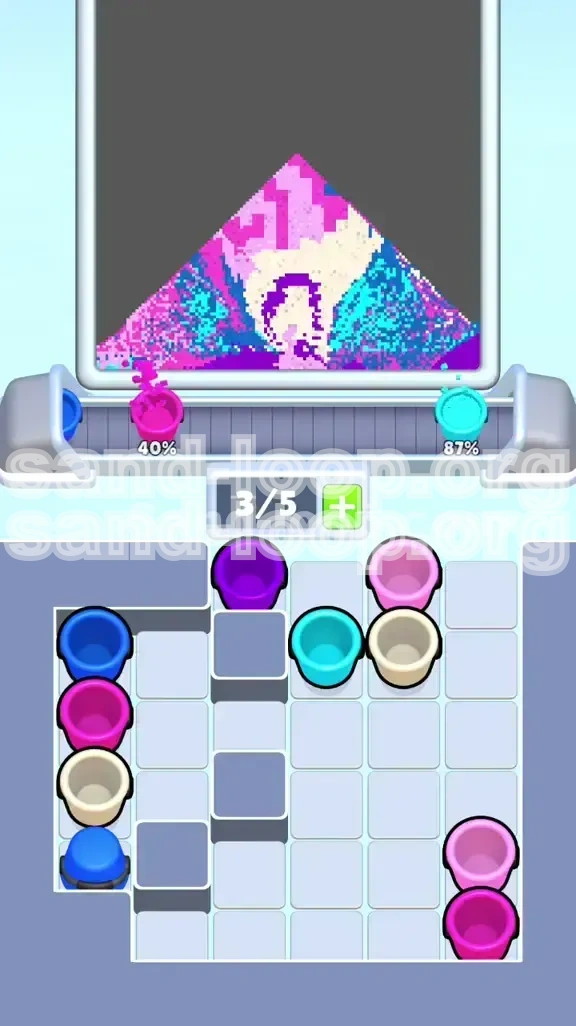
Phase 3: The Snail Body Construction (50% - 75%)
After the shell colors (Magenta/Pink) are established, shift your focus to the White/Cream cups. This is the most dangerous phase. You must build the snail's body and its delicate antennae. Ensure the conveyor belt is relatively empty before you start tapping White cups. Tap the White cups in a rapid sequence to flood the tray with white sand. You want a continuous stream of white to ensure the body forms solidly without gaps. Do not stop until the snail looks complete. The white sand must settle before you introduce the background colors.
Phase 4: The 7-Chest and Left Column Unlock (75% - 90%)
By now, the 7-Chest countdown should be nearing completion or already finished. The isolated left column is now free. Access the Dark Blue cups in this column to finalize the ground layer of the image. Send these Dark Blue cups up the conveyor. This cleans up the bottom of the canvas and stabilizes the image. Your board should now be mostly cleared of obstacles, leaving only the background colors remaining.
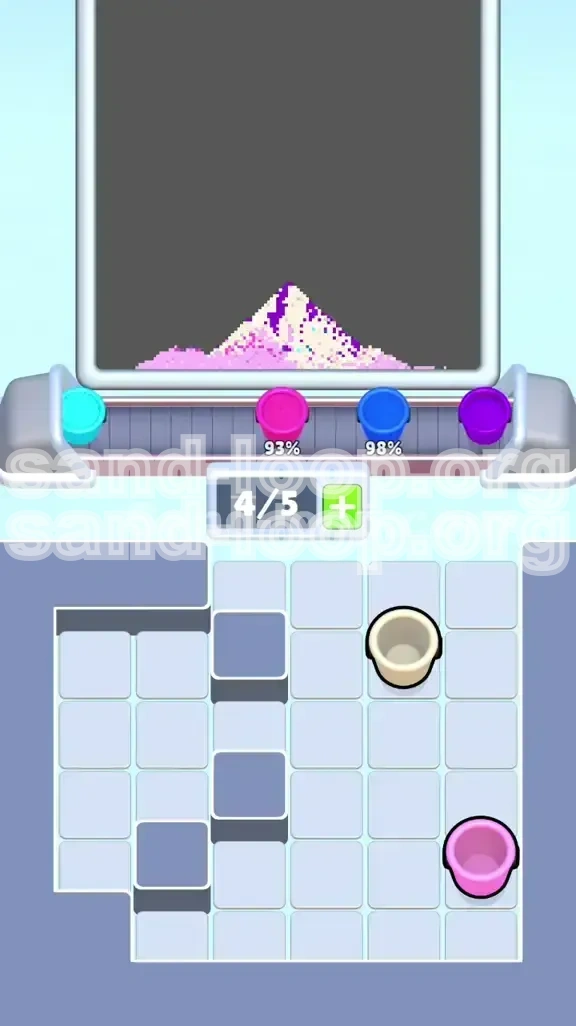
Phase 5: The Cyan Sky Cleanup (90% - 100%)
The final phase is the "Cleanup." The snail shell and body are entirely painted. The physics are locked. Now you can unleash the Cyan cups. The remaining cups on your board will be predominantly Cyan. Tap them systematically. Feed them onto the belt. The right-side dispenser will activate. Watch the percentage climb from 87% to 100%. The sky will fill in around the antennae perfectly because the white sand is already set in stone. The loop closes, and the level is complete.
Color Order and Logic Explanation
Why does the order matter so much? In Sand Loop, sand physics follow a "weight and displacement" logic. Heavier, darker sands tend to displace lighter sands if poured simultaneously or in the wrong order. Furthermore, the game renders pixels layer by layer. If the background layer (Cyan) is processed before the foreground object (White Snail), the object pixels have nothing to adhere to and get overwritten.
The Dark Blue Foundation
Dark Blue represents the earth and ground. It is the heaviest color. We process this first (or immediately after unlocking the Key) to create a solid base at the bottom of the canvas. This prevents the Snail's body from "floating" or looking detached. Establishing the ground anchor defines the perspective of the pixel art.
The Spiral Shell (Magenta and Pink)
The shell is the core visual feature. By processing Magenta and Light Pink next, we define the central mass of the image. These colors are distinct from the background. Pouring them early ensures they occupy the correct coordinates in the center of the screen. If you wait too long to pour the shell, you might run out of tray space when the board gets cluttered with late-game Cyan cups.
The White Body (Critical Path)
The White/Cream sand is the most critical variable. It is light and easily overwritten. It must be poured after the ground but before the sky. This creates a "sandwich" effect where the snail is protected. Specifically, the antennae require a 100% focused White pour. Any Cyan contamination here ruins the level immediately.
The Cyan Background (Final Flood)
Cyan is the "filler" color for this level. It covers the largest area but holds the least structural importance. We save it for last because once the Cyan is poured, the level is effectively over. There is no recovery room if you make a mistake after the sky is filled. It is the final cap that seals the artwork.
Dispenser Timing
Understanding the dispenser timing is crucial. The dispenser at the top of the screen does not release sand instantly; it waits for a full cup or a sequence trigger. By grouping your colors (e.g., tapping 3 Magentas in a row), you force the dispenser into a continuous "Magenta Mode." This is more efficient than alternating between Magenta and Blue, which causes the dispenser to reset and waste time.
Key Tips for Success
Mastering Level 448 requires a shift in mindset from "tapping fast" to "tapping smart." Here are the key strategies used by top players to conquer this logic-heavy stage.
The "Ignore the Noise" Strategy
The biggest mistake players make is looking at the whole board. Train your eyes to have "tunnel vision." When the level starts, the right side of the board has tempting White cups. Pretend they don't exist. If you tap them, you fill your tray with White, but the dispenser is still blocked by the Key. You now have 5/5 slots full of White, and you cannot dig the Key. You are stuck. Ignore the right side until the Key is yours.
The 3-Tap Rhythm
Develop a rhythm of "Tap, Tap, Tap, Wait." Find a color cluster. Tap three matching cups. Watch the tray. Watch the belt. Wait for the first cup to empty slightly. Only then tap the next set. This prevents the tray from becoming a parking lot for unmatched colors. This rhythm keeps the flow moving and prevents the "Deadlock" scenario where you have 5 different colors and 0 matches possible.
The Chest Timer Awareness
Keep a peripheral eye on the 7-Chest. While your main focus is the Key, you need to ensure you are feeding the beast enough matches to keep its countdown ticking. If you neglect the chest entirely, you hit a wall later when you need the Dark Blue cups. A steady stream of random matches is usually enough to keep the chest happy, but don't let it run dry for too long.
Antennae Preservation Tactics
The antennae are your win condition. Visually confirm they are fully formed before you tap a single Cyan cup. Zoom in (mentally) on the top of the snail's head. Do you see two distinct white lines? Good. Do you see a jagged mess? Then you aren't ready for the Cyan yet. Only when the White body is pristine should you move to the final phase.
Tray Space Buffering
Try to keep your tray at 3/5 capacity rather than 5/5. Keeping two empty slots gives you flexibility. If a surprise cup becomes available or a bomb appears, you have room to maneuver. A full tray is a death sentence. A 3/5 tray is a tactical tool.
Common Mistakes to Avoid
Level 448 is designed to punish specific behaviors. By recognizing these common pitfalls, you can adjust your strategy before you even make your first tap.
The Early Cyan Spam
This is the number one killer. Players see the Cyan background and assume they need to clear the Cyan cups immediately. They tap all the Cyan in the grid. The tray fills with Cyan. The dispenser pours Cyan all over the unfinished snail. The white body is buried. The level is failed. You must hold the Cyan back. It is the final boss, not the first minion.
The "Rainbow Tray" Error
Avoid the temptation to just clear whatever is available. Tapping a Purple, then a Blue, then a Pink, then a White results in a "Rainbow Tray." None of these colors match. The dispenser doesn't know what to pour. The belt moves slowly. You are stuck waiting 30 seconds for the first cup to clear so you can match the next one. Always tap in color batches.
Neglecting the Key for White Cups
The White cups on the far right are bait. They are easy to tap, and they look important because the snail is white. But they are traps. If you tap them before you get the Key, you have wasted your most precious resource: Tray Space. You will clear the White, have nowhere to put the excavated debris from the Key, and lose.
Pre-mature Chest Opening
Don't hyper-focus on the 7-Chest to the point of stupidity. If the chest is at 1/7 and you need to tap 10 cups to clear it, but those 10 cups clog your tray and prevent you from building the shell, it's not worth it. Let the chest fill naturally as you clear the path to the Key. Prioritize the Key over the Chest.
Panic Tapping
When the board gets full in the mid-game, panic sets in. Players start tapping randomly, hoping for a miracle. This never works. If you are stuck, stop. Look at the tray. Wait for a cup to pour. Then make one calculated tap. Patience is the only way to unravel a traffic jam.
Speed Run and Advanced Optimization
Once you have mastered the logic and can consistently beat the level, you may want to optimize your time. Here is how the pros shave seconds off their clock.
The "Quick-Key" Sequence
Memorize the exact location of the cups covering the Key. In the opening seconds, you don't need to "think" about which cup to tap. You should be able to tap the two Purples and the Magenta covering the key in under 1.5 seconds. This muscle memory saves valuable time that can be used later for the complex shell construction.
Pre-loading the Conveyor
While the sand is pouring from one cup, you can already be tapping the next set of cups. You don't need to wait for the cup to disappear from the tray. As soon as the sand starts flowing, that slot is "virtually" free. You can safely tap the next matching color. This "pre-loading" keeps the conveyor belt at 100% efficiency, never idling.
Bulk Color Sorting
Instead of tapping cups individually, look for "shifts" you can make. Can you tap one cup that causes three others to align into a match? Can you clear a row that frees up the Key in one move? Look for multi-tap opportunities that clear 20% of the board in a single interaction rather than 20 individual taps.
Ignoring the 100% Perfect Score
For a pure speed run, efficiency beats aesthetics. If the antennae are 90% formed but the Cyan is ready to flood, sometimes it's faster to just dump the Cyan and accept a slightly imperfect snail rather than waiting for the perfect pixel alignment. This is a risk/reward calculation for advanced players only.
Tray Overflow Manipulation
Advanced players know the exact millisecond a cup leaves the tray. By timing your taps to the exact beat of the conveyor, you can run a "Hot Tray" where you constantly have 5/5 slots but are tapping and pouring so fast that the game never registers a "clog." This requires extreme rhythm and is not recommended for casual players, but it is the ultimate speed tech.