
Level 466
HARDHow to solve Sand Loop level 466? Get instant solution for Sand Loop 466 with our step by step solution & video walkthrough. Sand Loop 466 tips and guide.
Play Sand Loop Now
Experience the puzzle challenge firsthand
Game Screenshots
Sand Loop Level Guides
Sand Loop Level 466: The Corgi Portrait Walkthrough
Level Overview & Analysis
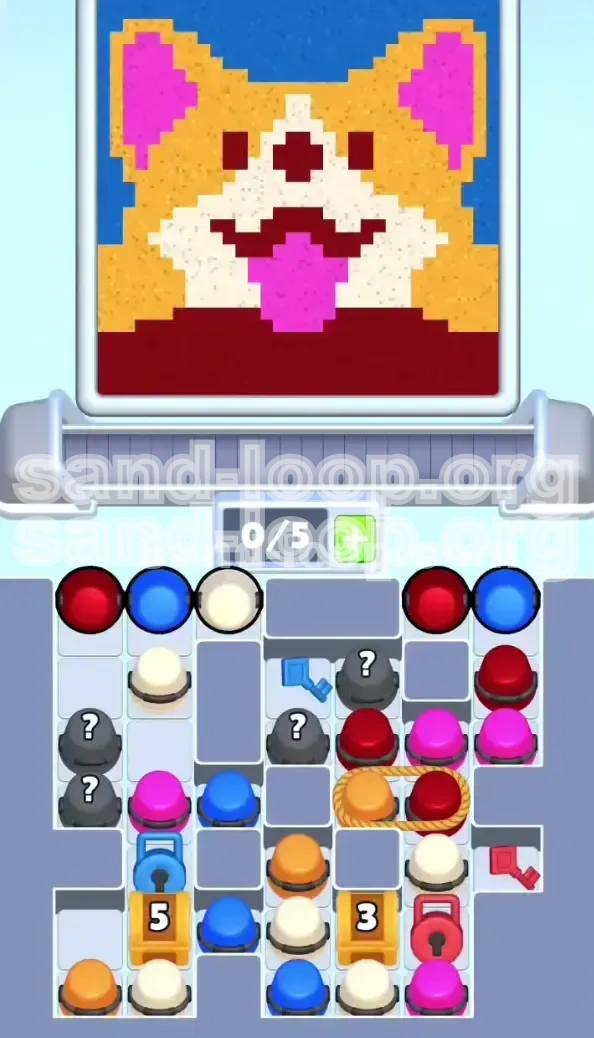
Welcome to the ultimate guide for Sand Loop Level 466. This stage is widely considered a "logic gate" for intermediate players, featuring a deceptively simple image of a Corgi dog that hides a complex web of Counter Blocks, Keys, and Mystery Cups. The board is tight, resources are scarce, and margin for error is slim. In this walkthrough, we will break down the logic required to clear the stage without hitting a deadlock.
Primary Objectives
Your goal is not just to "fill the picture," but to manage the Conveyor Belt logistics. You must complete three main tasks to succeed:
- Unlock the Blue Zone: Locate and move the Blue Key to its lock to trigger the 5-Counter mechanism, freeing up the bottom-left Cream and Orange reserves.
- Sever the Rope: Manage the tied Orange and Dark Red cups to clear the right-side barrier without jamming your belt.
- Execute Precision Pours: Complete the detailed facial features (Eyes, Nose, Tongue) using Dark Red and Pink without contaminating the surrounding Cream fur.
Why Players Fail
The most common failure point in Level 466 is the "Deadlock Scenario." This occurs when players fill their 5-slot Conveyor Belt with cups that cannot be poured immediately (e.g., holding a Pink cup while the alignment is off, or holding a Key that can't move yet). When the belt is full, you cannot tap new cups in the tray to shift them, bringing the game to a halt.
Strategic Color Palette & Priority
Understanding the hierarchy of colors is crucial for inventory management. Not all sand is created equal in this level. Some colors are "Logistics Blockers" while others are "Fillers."
Priority Tier 1: The Core Fur (Orange & Cream)
Orange: This is your volume filler. It covers the top of the head, the ears, and the sides of the face. It is abundant but often buried at the bottom of the tray.
Cream: This is the most critical color for the image structure. It forms the muzzle, the eyebrows, the chest, and the sides of the face. Because Cream defines the shape of the dog, running out of Cream early is a guaranteed fail. You must prioritize unlocking the section of the tray holding the bulk of the Cream sand.
Priority Tier 2: The Details (Dark Red & Pink)
Dark Red: High risk, high reward. This color is used sparingly for the nose, eyes, and collar outline. Since the areas are small (pixel-perfect), you often only need 2-3 specific pours of Dark Red. Having more than one Dark Red cup on the belt at a time is a waste of space.
Pink: The "Wild Card." Used for the inner ears and the large tongue. The tongue is a large area sitting right in the middle of the Cream muzzle. Timing the Pink pour is essential to avoid bleeding color into the white fur.
Priority Tier 3: The Background (Blue)
Blue: The "Space Saver." The background is vast but forgiving. You can pour Blue almost anywhere there is a gap. However, Blue cups are often trapped behind locks or used as fuel for the 5-Counter block. Do not hoard Blue cups; pour them off immediately to free up slots for the valuable Orange and Cream.
The Mystery Cup Warning
The tray contains several gray Mystery Cups. These are dangerous because their contents are random. However, logic dictates they usually contain colors you currently have the least of. In Level 466, they often hide the keys or additional Cream. Never tap a Mystery Cup unless you have at least one empty slot on your belt.
Mechanic Mastery: Keys and Counters
The tray in Level 466 is divided into three zones, locked by mechanics. Understanding the physics of these locks is the difference between a 3-star win and a stuck screen.
The Blue Key & 5-Counter Lock
Located in the upper-middle tray, the Blue Key is trapped behind two layers of standard cups. Once freed, it must travel to the bottom-left corner. Here lies a Blue Lock with a "5" symbol. This is a 5-Counter Block.
How it works: You cannot unlock this immediately. You must pour five cups of sand (any color) while the sensor is active. This means you need to cycle five "trash" or "filler" pours to break the seal. Pro tip: Do not waste your precious Cream or Pink here. Use Orange or Blue cups to charge the counter, as you have more of them and they are easier to replenish.
The Red Key & The Rope Trap
In the bottom-right, the Red Key sits behind a cluster of Mystery Cups. The real challenge here is the "Rope" mechanic connecting an Orange Cup and a Dark Red Cup.
The Trap: These two cups are tied together. If you tap one, BOTH jump onto the Conveyor Belt simultaneously. If you have 4/5 slots filled, tapping this pair will cause an overflow or jam.
The Rule: Never touch the Roped pair until you have 2 or more empty slots. Ideally, tap them when the Orange is ready to pour (fur alignment) and the Dark Red is ready for details (nose alignment).
Mystery Cup Logic
The Mystery Cups in this level are not purely random; they are seeded to provide necessary resources. Often, they hide the Keys themselves or the Cream needed for the face. If you are stuck waiting for a color to shift in the tray, look at the Mystery Cups. Tapping them might be the only way to shift the row above them.
Conveyor Belt Management
Think of your 5-slot belt as currency. Spending it wisely is key. Keep a mental counter of how many "active" cups you have. An active cup is one that is ready to be poured immediately. If you have 3 active cups, you have room to maneuver. If you have 5 cups that are "waiting for alignment," you are in trouble.
Step-by-Step Walkthrough Guide
Follow this exact sequence to navigate the early and mid-game without getting stuck.
Phase 1: Opening the Board (Start)
Step 1: Ignore the picture for a moment. Look at the top row of the tray. Tap the Red Cup (far left) and the adjacent Blue Cup. This clears the initial blockage.
Step 2: Assess the Mystery Cups that are now accessible. Tap one. If it reveals a Blue cup, pour it immediately into the background corners to clear belt space.
Step 3: Your immediate goal is to expose the Blue Key. Keep tapping the top row cups, pouring Blues and Oranges into the background/ears, until the Blue Key is free to move.
Phase 2: Triggering the Blue Lock
Step 4: Once the Blue Key is free, it will shift towards the bottom-left lock. Do not pour it yet. It needs to sit on the sensor.
Step 5: You now need to feed the 5-Counter. Look for "junk" cups—colors you have in abundance or areas of the picture that are already mostly filled (like the top corners).
Step 6: Pour 5 cups to trigger the lock. A good strategy is to pour 3 Blue cups (background) and 2 Orange cups (top of head). Once the counter hits 5, the lock shatters, opening the path to the hidden Cream reserve in the bottom-left.
Phase 3: The Right Side & Rope Strategy
Step 7: With the left side open, shift your focus to the right. You need to reach the Red Key. Tap the Mystery Cups on the right side carefully.
Step 8: Identify the Roped Pair (Orange + Dark Red). CRITICAL: Ensure you have 2 empty slots on your belt.
Step 9: Tap the Roped Pair. Pour the Orange into the side of the face/ear. Pour the Dark Red ONLY if the nose or eye is perfectly aligned. If not, hold the Dark Red cup (it takes up 1 slot) and clear other cups first.
Phase 4: The Final Countdown
Step 10: By now, the Red Key should have unlocked the bottom-right, revealing the final Pink cups.
Step 11: Pour the Pink into the inner ears and the tongue. The tongue requires a steady stream; don't stop until it's solid pink.
Step 12: With the face done, you will likely have a mix of Blue and leftover Orange. Pour these aggressively to finish the sky and fill any gaps in the fur.
Speed Run & Pro Tips
For players looking to optimize their time or achieve a high score, these advanced techniques will help you shave seconds off your run.
Combination Pours
Look for opportunities where two colors can be poured in quick succession without lifting your finger. For example, when filling the top of the head (Orange) which transitions into the ears (Orange/White), you can often drag your pour slightly to catch both zones if the alignment permits. This saves the milliseconds lost in lifting and tapping.
The "Pre-Load" Technique
While the 5-Counter is processing (shaking), you can be preparing your next move. Don't watch the animation. Immediately look at the tray to see which cup is next in line. By the time the lock opens, you should already know which cup to tap next. This keeps your rhythm flowing and prevents the belt from stalling.
Background Banking
Don't fill the Blue background 100% at the start. Fill it to about 80% (just enough to clear the edges of the dog). Leave the remaining 20% (the corners and tricky spots near the ears) for the end. This ensures you have a place to dump "junk" Blue cups if your belt gets full in the late game.
Key Prediction
The game's logic allows for slight prediction. If you know the Blue Key is about to unlock the bottom-left, start pouring any cups in your current stack that match the colors inside that locked zone (usually Cream). This clears space so that when the zone opens, you can immediately pull the new cups out without waiting.
Troubleshooting & Common Mistakes
Even with a guide, things can go wrong. Here is how to recover from specific error states.
"My belt is full and I can't tap anything!"
The Solution: You are in a deadlock state. Look at the cups on your belt. Is there a Blue cup? Pour it into the background immediately. Is there a Mystery Cup? Pour it into a safe, non-critical area (like the bottom corner). You must free up a slot to tap the next cup in the tray. If you have no "safe" colors, you may be forced to pour a color you aren't ready for (e.g., spilling Dark Red on the floor) just to clear the slot. This is better than restarting the whole level.
"I ran out of Cream for the face."
The Cause: You likely used Cream cups to feed the 5-Counter or poured them inaccurately.
The Fix: In future runs, be stingy with Cream. Only pour it when the white muzzle alignment is perfect. If you run out in the current run, you might have to restart, as the game usually provides exactly enough Cream to finish the face with zero waste.
"The Pink spilled into the White fur."
The Fix: Damage control. If the spill is small, you can sometimes cover it with a subsequent pour of Dark Red (to make a mouth marking) or Cream (if you have any left). If the spill is massive, it's usually a level fail. To prevent this, always pour Pink when the conveyor is moving slowly or stopped, and release your touch the millisecond the zone fills up.