
Level 474
HARDHow to solve Sand Loop level 474? Get instant solution for Sand Loop 474 with our step by step solution & video walkthrough. Sand Loop 474 tips and guide.
Play Sand Loop Now
Experience the puzzle challenge firsthand
Game Screenshots
Sand Loop Level Guides
Level Overview: The Logistics Puzzle
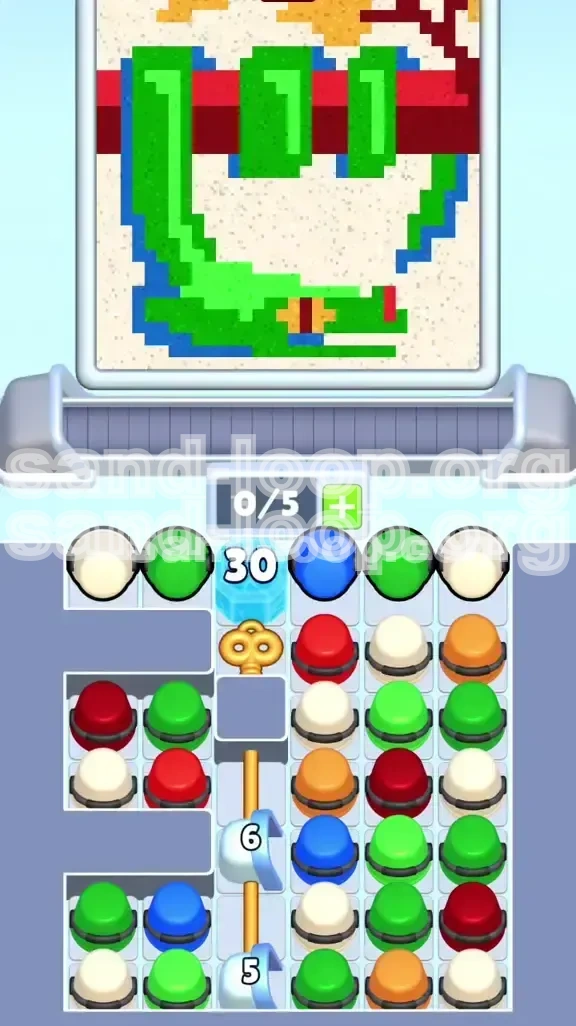
Sand Loop Level 474 is deceptive. At first glance, it appears to be a standard art restoration level featuring a pixel-art green snake coiled around a red branch. However, you will quickly realize that this level is actually a rigorous resource management simulation. The difficulty spike here comes from a combination of restricted board access and a massive health pool obstacle. Unlike previous levels where you could clear the board organically, Level 474 enforces a strict linear progression. You are effectively blocked from the necessary paint cups until you solve a specific sequence of mechanical puzzles.
The central crisis of this level is the "30 Ice Block" blockade located in the top center of the map. This single structure dictates your entire early game strategy. It sits atop a solid gray block that hides the Gold Key, which in turn is required to unlock the vertical rod trapping your essential painting tools. If you approach this level by trying to paint first and break obstacles later, you will run out of moves or jam your conveyor belt irreversibly. Success in Level 474 requires you to act like an engineer first, clearing the logistics blockage, and an artist second.
The Split Board Design
The map is geometrically divided into two distinct functional zones. The left side is the "Painting Zone," featuring staggered floating gray walls that shield your most valuable assets: the Red, Green, and Yellow cups needed for the snake. The right side serves as the "Resource Zone," a massive 3x6 grid of filler cups. A vertical rod in the center column acts as a gatekeeper, buried under the ice. This layout means you have zero access to the colors on the left until you execute the center sequence perfectly. You cannot rely on luck here; the board layout forces a specific path.
The Linear Dependency Chain
This level introduces a strict dependency chain that must be respected. You cannot access the Key without breaking the Ice. You cannot move the Rod without the Key. You cannot release the Blue cups without moving the Rod. And finally, you cannot paint the outline without the Blue cups. This linearity means that every move in the first 30% of the game is dedicated solely to the Ice Block. Any deviation from this—such as trying to paint the background early—will result in a move shortage later.
The Slot Management Crisis
Level 474 restricts your slot capacity to a maximum of 5 units (0/5). This creates a bottleneck pressure. In a chaotic level, it is common to spam taps to generate power, but doing so here is fatal. If you fill your slots with random colors while chipping away at the ice, you will block the input mechanism when the crucial Key drops. The game forces you to maintain an "Empty Slot Buffer" at all times, treating your inventory management with the same precision as your aiming.
Visual Precision Requirements
The target image—the Green Snake and Red Branch—is deceptively complex. The snake's eye is not a single dot but a compound structure requiring a Yellow base with a precise Red vertical slit. The branch must be a solid, unbroken bar. The background requires a specific "Sandy" color that is distinct from pure White. Furthermore, there is a pixel-thin Blue Outline on the far left edge. The hitboxes for these details are strict; missing the eye or the outline by even one pixel can deny you the 100% completion score, even if you feel you have painted the rest perfectly.
Clear Objectives: The Three-Phase Strategy
To conquer Level 474, you must abandon the instinct to paint immediately. Instead, adopt a three-phase strategic mindset. Your primary objective is not to create art; it is to execute a logistical protocol to clear the board. You are essentially a miner clearing a tunnel before you can start decorating the room. Completing this level requires roughly 85-90% paint coverage, but you should aim for 95% to ensure the strict hitboxes of the snake's eye and blue outline are satisfied.
Phase 1: The Ice Breaker (Turns 1-15)
Your sole objective during the first third of the match is the destruction of the "30 Ice Block" located in the top center row. This block sits on top of the Gold Key. Every tap, every cup generated, and every shot fired must be directed at this block. Do not worry about your paint percentage during this phase. If you finish Phase 1 with 0% paint coverage but the ice is gone and your slots are managed, you are in a perfect position to win. Conversely, if you have 20% paint but the ice is intact, you have likely already lost.
Phase 2: The Key Retrieval (Turns 16-20)
The moment the ice shatters, the game enters a critical transition state. A Gold Key will fall onto the gray block. Your objective here is mechanical precision: catch the key, clear the conveyor belt to prevent jamming, and unlock the center rod. This phase releases the Blue 6 and Blue 5 cups, which are essential for the outline and the snake's eye details. This phase usually lasts less than 10 seconds, but a mistake here (like letting the key get stuck behind a jam) is unrecoverable.
Phase 3: The Paint Sweep (Turns 21+)
Only after the rod is removed and the Blue cups are free do you switch to "Artist Mode." Your objective here is to extract the trapped Red and Green cups from the left alcoves and fill the large color zones. This phase requires careful color ordering to ensure you don't cross-contaminate the sandy background or the snake's eye. You must balance the need for speed (to clear the remaining cups) with the need for precision (to hit the small targets).
Resource Efficiency Metrics
Victory requires strict resource budgeting. You have a limited number of excess cups. A successful run typically ends with 0-3 cups remaining on the board. If you find yourself with more than 5 cups remaining when the paint hits 90%, you have managed your resources perfectly. If you run out of cups while the paint is only at 80%, it means you wasted too many high-value colors (like Green or Red) on the Ice Block during Phase 1, instead of using the filler White or Blue cups.
Step-by-Step Instructions: The Linear Walkthrough
Follow these steps in exact order. Deviating from this script usually leads to a deadlock where the belt is full, the slots are full, and the ice block remains unbroken. Think of this as a recipe—steps must be followed in sequence.
Step 1: Mobilize the Right Grid
Start the level by ignoring the left side completely. Do not tap the floating walls or the isolated cups on the left; they are unreachable and useless right now. Focus your eyes entirely on the 3x6 grid of cups on the right side. Tap the top row of these cups. You want to send a stream of Blue, Green, and White cups onto the conveyor belt. These are your "ammunition" for the ice block. Keep tapping until your slots are at 4/5 capacity. Never let them hit 5/5.
Step 2: Chip the Ice Methodically
As the cups reach the dispensing mechanism, fire them at the "30 Ice Block." Do not fire them rapidly. Fire them in controlled "bursts" of three cups, then pause. Watch the ice counter drop: 30... 27... 24. Your goal is to rhythmically chip it down without causing a queue jam. If you have a Blue cup, try to save it on the belt if possible (don't fire it immediately), as you will need it for the outline later. However, if space is tight and the belt is backing up, use it. The ice block is color-agnostic; it just needs impacts.
Step 3: The "1 HP" Safety Pause
When the Ice Block counter reaches "1" HP, stop tapping completely. This is the most critical moment in the level. Watch the conveyor belt. Ensure there are no cups currently travelling towards the dispenser. You need an empty belt for the key drop. Wait for the slots to empty and the belt to clear completely. Do not fire the final shot until the board is calm. If you break the ice while the belt is chaotic, the Key will spawn behind other cups and get lost.
Step 4: The Key and Rod Sequence
Fire the final cup to shatter the ice. The Gold Key will fall onto the gray block. Wait for the "clink" sound of it landing. Let the key slide onto the conveyor belt. Once it is clearly on the belt and moving, tap it. The key will fly to the lock, turning it and removing the gray block. The vertical rod vanishes. Now, tap the newly freed Blue 6 cup immediately to secure it for the outline. Do not let it sit on the belt.
Step 5: Clear the Left Alcoves
With the center rod removed, the board opens up. Now you can access the left side. Tap the floating gray walls on the left to drop the hidden Red and Green cups. Send these up immediately. You need to build your Red Branch and Green Snake body now. Do not worry about the White background yet; focus on getting the heavy, dominant colors onto the canvas while you have clear slots and available moves.
Step 6: The Final Background Fill
With the snake and branch mostly complete, turn your attention to the White cups. If the belt is crowded, let the colors settle first. Send the White cups up in pairs. Pour the sand carefully into the negative space. Avoid pouring over the Blue outline or the Snake's Eye. As the paint meter hits 90%, slow down and ensure every drop lands on the unpainted sand areas to maximize your percentage score.
Color Order: The Logic of the Layers
The specific order in which you process colors is vital because of the layering mechanics of the sand. If you process a background color before a foreground object, you might bury the object under pixels that are hard to remove. Follow this hierarchy to ensure clean edges and proper contrast.
1. The Red Branch (Foundation Layer)
The Red Branch is the visual anchor of the image. It sits "behind" the snake body. You should process Red first, specifically targeting the horizontal bar in the center of the canvas. Doing this first ensures that if you have any splash-over (which is common with heavy pours), it will be covered up by the Green Snake body later. Use the Red cups from the right grid initially, then supplement with the high-quality Red from the left side once unlocked.
2. The Dominant Green (The Mass)
Green is the most abundant color, occupying roughly 40% of the canvas. Process Green immediately after the Red Branch is established. The Green Snake body needs to be thick and solid. Pouring Green second allows you to cover any minor errors you made on the Red Branch's edges. It also establishes the boundaries for the "negative space" where the Sandy White background will go, acting as a visual wall.
3. The Sharp Blue (The Boundary)
The Blue Outline acts as a hard barrier on the left edge. Process Blue third. By this stage, the Green body is mostly set, so you can see exactly where the Blue line needs to go to hug the snake's scales. If you pour Blue too early, the Green cup might accidentally fall on it and contaminate the line, turning it teal. A clean blue line requires precision, which is only possible after the bulk paint is down.
4. The Sandy White (The Fill)
Process White fourth. The Sandy White background is the "void" around the snake. If you do this too early, you will waste white cups covering areas that should have been Red or Green. Waiting until the main objects are painted allows you to use White simply to fill the gaps. It is the most economical way to use your paint resources and prevents "bleeding" where light colors get dirty under dark ones.
5. The Snake's Eye (The Finish)
This is a micro-step that requires surgical precision. The Snake's Eye requires a tiny splash of Yellow surrounding a vertical Red slit. Process this last. You cannot use a "full pour" here; you must tap the cup gently or wait for the pour to be almost finished before moving it over the eye spot. If you do this step while the belt is moving fast, you will miss. Save the Yellow cup for the very end when you have total control.
6. Dark Red (The Pupil)
The absolute final touch is the Dark Red vertical slit inside the yellow eye. This is often the final cup of the game. Ensure the Yellow is 100% dry and set before dropping the Dark Red. If you drop it while the Yellow is still wet, the colors will bleed, and the "Eye" check will fail, ruining your score. Patience on this specific pixel is the difference between 95% and 100% completion.
Key Tips: Mastering the Mechanics
Level 474 is unforgiving, but these tips will help you manage the specific mechanics of this stage. Mastering these nuances is what separates a failed run from a 3-star victory.
The "1 HP" Pause Rule
The most important tip is to pause when the Ice Block is at 1 HP. Do not rush the final hit. A common mistake is breaking the ice while the belt is full of random cups. When the key drops, it needs space to move. If the belt is clogged, the key spawns behind other cups, gets delayed, and by the time you use it, the belt has overflowed. Always clear the queue before the final shatter.
Slot Rhythm Management
Do not treat your 5 slots as a bucket to be filled. Treat 4/5 as the "full" limit. Always keep one slot open as an "emergency buffer." This allows you to catch a critical cup (like a falling Key or a released Blue 6) without having to frantically fire a random cup just to make space. If you sit at 5/5 constantly, you are playing roulette with the game logic.
The Right Grid Strategy
Do not try to clear the entire right-side grid. You only need enough cups to break the ice. Once the ice is gone, the right grid becomes less important. Pivot your focus immediately to the left side. Players who obsessively clear the right grid usually run out of time to paint the snake properly. Use the right for ammo, then abandon it.
Eye Dropping Technique
For the Snake's Eye, do not drag the cup. Let the cup fill the dispensing tube, then quickly drag it over the eye and release. The "momentum" of the sand will pour a precise pile. If you drag and hold, you risk the pour becoming too wide and spilling out of the eye socket. The Snake's Eye is small—precision matters more than volume here.
Blue Line Containment
The Blue Outline on the left is pixel-thin. To keep it sharp, avoid pouring Green or White directly next to it while the belt is moving at high speed. The "wobble" of the cup can cause cross-contamination. Approach the Blue Line area slowly, and pour your adjacent colors when the conveyor is in a brief pause or switching direction.
Utilizing the Gray Walls
The floating gray walls on the left are not just obstacles; they are shields. When you tap them to drop the cups, the cups slide down. Sometimes, you can use these walls to temporarily "store" a cup if your slots are full and the belt is jammed. A cup sitting on a gray wall is safe; a cup on the belt is at risk of being fired accidentally.