
Level 479
HARDHow to solve Sand Loop level 479? Get instant solution for Sand Loop 479 with our step by step solution & video walkthrough. Sand Loop 479 tips and guide.
Play Sand Loop Now
Experience the puzzle challenge firsthand
Game Screenshots

Sand Loop Level Guides
Level Overview: The Sunset Stag Challenge
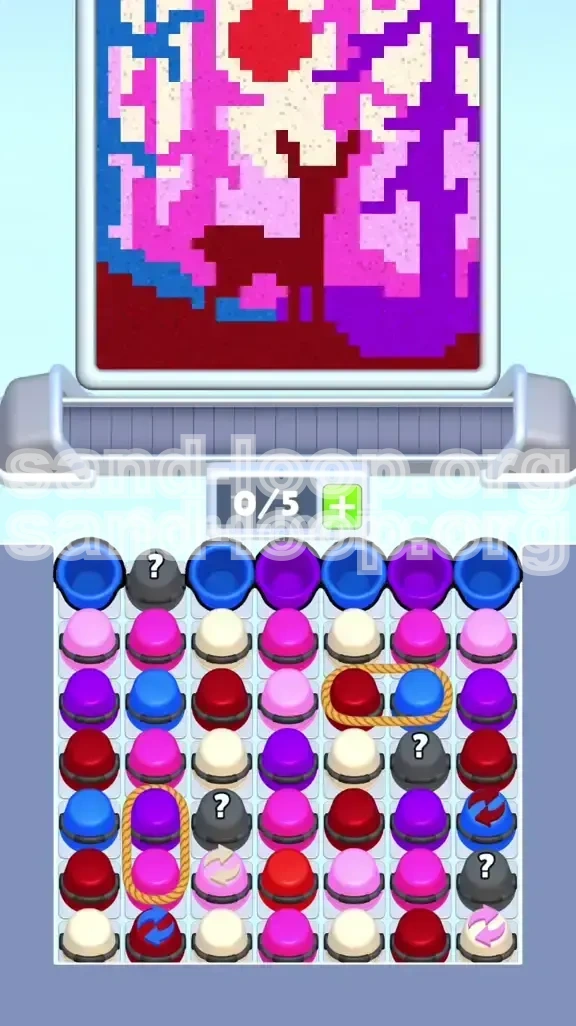
Welcome to Level 479, widely known as the "Sunset Stag." This stage is a significant difficulty spike in Sand Loop, primarily because it abandons the simple "fill the bucket" mechanics for complex supply chain management. The visual is stunning—a pixel-art silhouette of a deer set against a massive, setting sun and a purple gradient sky—but don't let the artistic vibe fool you. This level is a hardcore logic puzzle that requires strict inventory control.
The primary obstacle here is not the timer, but your Conveyor Capacity. You are limited to only 5 active slots on your conveyor belt at any one time. With a complex web of Roped Cups and Mystery items, one wrong tap will fill your belt with useless cups, causing a deadlock that ends your run. You must be strategic, cold-blooded, and precise with every tap to complete the image without locking your board.
Visual Layout Analysis
The target image is divided into three distinct horizontal layers that dictate your filling strategy:
- The Sky (Top 40%): A complex gradient requiring White, Blue, and Pink sands. This is the background layer and is the most "filler-heavy" area.
- The Sun & Stag (Middle 40%): The focal point. This requires massive amounts of Deep Red (the sun) and Dark Purple (the stag). These are your critical resources.
- The Foreground (Bottom 20%): Dark purple ground and rocky outcrops. This anchors the image but uses the same color as the stag.
Primary Difficulty Factors
Unlike previous levels, Level 479 introduces "Dependency Traps." You cannot simply pick colors that match the current empty space. You must tap cups in a specific order to ensure the next *needed* cup is unlocked from the stack.
The Slot Capacity Crisis
Your 5-slot limit is the enemy. A fully loaded belt leaves no room for error. If you have 4 cups and you tap a "Double Rope," you instantly hit 6, triggering a Game Over. You must maintain a "Safe Zone" of at least 1 empty slot at all times, preferably 2, to manage the RNG (Random Number Generation) of the dispensers.
Color Distribution Statistics
The sand distribution is heavily skewed. You will need approximately 40% Deep Red, 30% Dark Purple, 20% White, and only 10% mixed Pinks and Blues. If you run out of Deep Red early, the level is mathematically impossible to finish. Protect your Red cups at all costs.
Clear Objectives and Strategy
To conquer Level 479, you need a clear plan before you even tap the screen. Your goal is not just to fill sand, but to manage the flow of cups onto your conveyor belt efficiently.
Objective 1: Establish the "Core" Structure
Your immediate priority is to deposit the Deep Red and Dark Purple sands. Do not focus on the white sky or the pink gradients yet. If you fill the background first, the "mountain" physics of the sand will make it incredibly difficult to place the Dark Purple stag on top later. You must build the center structures (Sun and Deer) first so they act as a foundation for the lighter sky colors to pile against.
Objective 2: Unlock the Mystery Supply
There are four Mystery Cups (grey cups with question marks) buried in the upper rows. In this level, these are statistically weighted to contain Deep Red or White. You must unlock these early. Leaving them for the end usually results in a shortage of Red sand (about a 15% deficit) that forces a restart.
Objective 3: Manage the Rope Hazards
You must identify and disable the Rope mechanics without clogging your belt. The "Red/Blue" horizontal rope is a capacity trap. Your objective is to separate the useful Red cup from the useless Blue cup without letting the Blue cup sit on your conveyor taking up space for the entire level.
Objective 4: Perfect the Gradient
The final 10% of the level requires finesse. You will be switching between White, Light Pink, and Blue rapidly. The objective here is precision pouring—using "burst pours" rather than continuous streams to color the pixelated sky without overflowing into adjacent zones.
Objective 5: Waste Disposal
You will inevitably pull cups you don't need (like extra Blue cups). You must have a strategy to "waste" these cups—pouring them into already full sections—to get them off your belt and make room for productive colors.
Step-by-Step Walkthrough
Follow this exact sequence to maximize your chances of success. This guide assumes you are playing with standard dispenser speeds.
Phase 1: The Initial Break (0-30 Seconds)
Start: Do not touch anything for 2 seconds. Analyze the top row. You will likely see a Blue cup, a Mystery Cup, and Purples.
Action: Tap the Mystery Cup first. Ideally, it reveals Deep Red or Dark Purple. If it reveals Deep Red, pour it immediately into the center of the top sun area. If it reveals Dark Purple, start the outline of the stag.
Next: Tap the top-row Dark Purple cups. Avoid the Blue cup entirely unless it is needed for a specific sky highlight (which is rare in the first phase). Your goal is to have 2-3 cups active on the belt, no more.
Phase 2: Navigating the Horizontal Rope Trap
The Trap: On the middle-right, you will see a Red Cup and a Blue Cup tied together with a white rope.
The Strategy: Do not tap this rope until you have only 3 or fewer cups on your belt. When you tap it, both cups jump onto the conveyor. Immediately use the Red cup. The Blue cup is now "dead weight."
Disposal: If the Red dispenser is active, pour the Red. If you have no use for the Blue cup, drag it to a dispensing station where the color *doesn't* match (e.g., a Red dispenser), and tap rapidly. Even if it doesn't fill the picture, the act of pouring reduces the cup size, eventually removing it from the belt. Alternatively, pour it into a 100% full section of the Red sun to dispose of it safely.
Phase 3: Unlocking the Vertical Columns
The Lock: A Vertical Rope on the lower-left connects two Pink/Purple shades. This rope blocks access to the bottom rows.
Action: Once your top rows are cleared and you have space, tap the Vertical Rope. This will drop two cups. Clear these quickly. This action is critical because it unblocks the Swap Icons and the bottom row of reserve cups, which are usually high-priority White or Dark Purple cups needed for the final stretch.
Phase 4: The "Burst Pour" Technique (Mid-Game)
At this stage, the sun is half-full and the stag is outlined. You now face the "Speckled Zone"—the area where purple tree branches mix with pink sky.
Technique: Do not hold down the pour button. The pixels are too small. Use a "Tap-Tap-Tap" method. Tap to start the flow, let a small mound fall (about the size of a pea), and release immediately. Let the conveyor shift the cup, then tap again. This prevents the Dark Purple from bleeding into the Bright Pink zones.
Phase 5: The Endgame and Swap Usage
You are likely running low on slots. The Mystery Cups are gone. You have 2 slots open and need White sand, but only Pink is coming.
Action: Look for the Swap Icon (rotating arrows) on the conveyor track. Timing is critical. Tap the cup *just before* it hits the icon to change its color. Use this to convert unwanted Pink or Blue cups into the White sand you need to finish the sky background.
Final Polish: Fill the remaining corners of the sun with Deep Red. Complete the stag's body with Dark Purple. Let the White sand fill the absolute last gaps in the sky.
Color Order and Processing Logic
Understanding the hierarchy of colors is vital for inventory management. Not all colors are equal in Level 479.
Priority Tier 1: Deep Red
This is the currency of the level. It is used for the massive sun. If you see a Red cup, even if you aren't working on the sun right that second, you should consider pulling it to secure the supply. Never waste a Red cup on a disposal move unless absolutely necessary for a belt unlock.
Priority Tier 2: Dark Purple
Structure is key. The Dark Purple creates the stag and the ground. Without this, the image has no frame. Treat Purple with the same respect as Red, but you can be slightly more liberal with it since it is used in thinner lines for the trees.
Priority Tier 3: White
White is the "Filler." It is abundant but takes up huge volume. You don't need to hoard White cups early because they will clog your belt. Only pull White when you have dedicated open slots (2+) or when the Red/Purple supplies are temporarily blocked.
Priority Tier 4: The Gradient Colors (Pink/Blue)
Bright Pink, Light Pink, and Blue are "detail" colors. They are used for the sky gradient and small accents. You should process these last. If you pull them too early, they sit on your belt, taking up space that should be reserved for the critical Red and Purple flows.
The Processing Algorithm
Follow this mental checklist for every tap: Is it Red or Purple? -> Take it. Is it White? -> Take it only if I have 3+ empty slots. Is it Blue/Pink? -> Take it only if I am currently working on the sky section.
Key Tips and Common Mistakes
Even with a strategy, small errors can snowball. Here is how to play perfectly and avoid the pitfalls that plague most players.
Tip 1: The "Tap and Wait" Discipline
The most common reason for failure is tapping too fast. You see a cup, you tap it. Suddenly you have 6 cups. Force yourself to pause. After every tap, count your slots. If you have 4 cups, do not tap anything until one is empty or fully poured. Discipline beats speed in Level 479.
Tip 2: Using the "Full Zone" Dump
If you have a useless Blue cup clogging your belt and you can't swap it, pour it into a section of the image that is already 100% completed and full (like the bottom of the sun). Since the area is already full, the sand won't mess up your progress percentage, but the cup will empty and disappear, freeing up your slot. This is a valid strategy to save a run.
Common Mistake: Ignoring the Swap Icons
Many players focus only on the cups and forget the conveyor belt mechanics. The Swap Icon is a lifesaver. Ignoring it usually leads to being stuck with 3 Blue cups when you need Red. Always keep an eye on the floor of the conveyor belt for the rotating arrows.
Common Mistake: Continuous Pouring on Details
As mentioned in the walkthrough, holding the pour button on the tree branches or the sky gradient is fatal. The sand physics are too fluid for the narrow color boundaries. If you don't use "burst pours," the Dark Purple will contaminate the Pink zones, forcing you to restart the level to get clean lines.
Stuck? What To Do
If you are midway through and the dispensers stop giving you the color you need (e.g., you need Red but only get White), stop tapping the dispenser. Instead, look at your conveyor. Is there a Swap Icon coming up? If yes, save your unwanted cup for the swap. If no, you must waste cups to cycle the dispenser. Pour the unwanted color into a full zone to cycle to the next cup.
Speed Run Tips
Once you have mastered the level, you might want to achieve a faster time. Here is how the pros do it.
The "Pre-Load" Technique
As the level starts, don't wait for the animation of the first cup to finish. If you know the first move is the Mystery Cup, tap it the millisecond the level loads. While that cup is traveling to the dispenser, visually scan the row below it to identify where the Roped Cups are. Pre-planning your next 3 taps while the current animation plays can shave 15% off your time.
Aggressive Slot Management
Speed running requires living dangerously. You will rarely have 2 empty slots. You will operate with 4 or 5 slots constantly full. This requires perfect knowledge of the next cup. To do this, you must memorize the order of the cups in the stack. If you know the stack order, you can tap a cup the instant a slot opens, rather than waiting to see what pops up.
Optimizing the "Burst Pour"
The "Tap-Tap-Tap" method is slow. The speed run optimization is the "Slide-and-Tap." Instead of tapping the cup directly, tap the *destination* on the art. This triggers the pour slightly faster. Additionally, practice the exact amount of time needed to drop a single pixel. Mastering the micro-pour speed is the difference between a 3-star time and a average run.
Skip the Waste Strategy
In a normal run, wasting a Blue cup takes time. In a speed run, you want to never pull the Blue cup at all. This means waiting for the perfect moment to cut the rope, or avoiding that row entirely until the end of the game when you can afford to have the slot occupied. Minimizing "waste actions" is the key to the leaderboards.