
Level 482
HARDHow to solve Sand Loop level 482? Get instant solution for Sand Loop 482 with our step by step solution & video walkthrough. Sand Loop 482 tips and guide.
Play Sand Loop Now
Experience the puzzle challenge firsthand
Game Screenshots
Sand Loop Level Guides
Sand Loop Level 482 Walkthrough: The Ginger Cat Heart Strategy Guide
Understanding the Level Layout
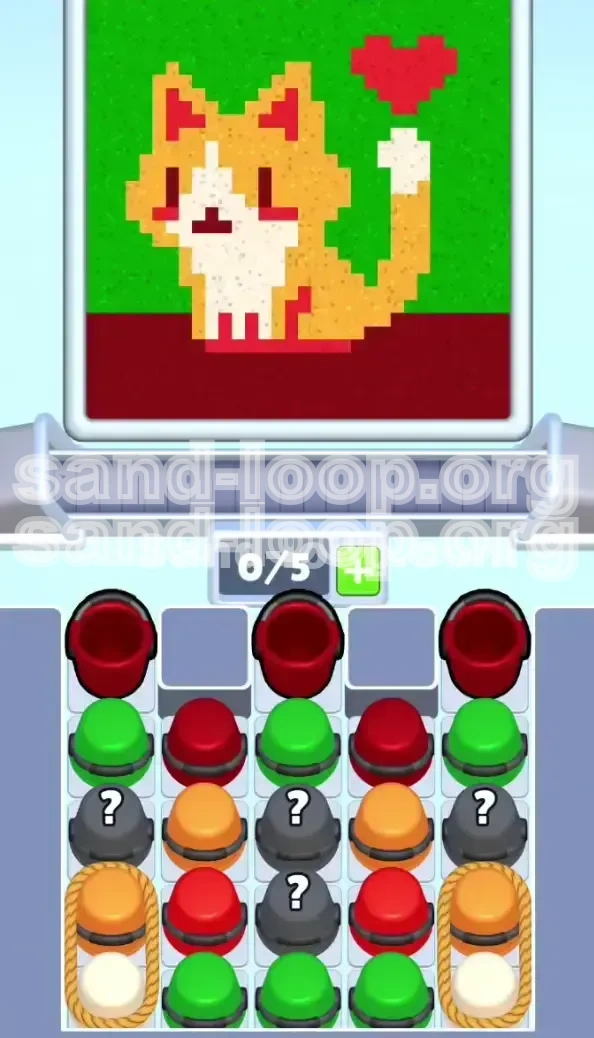
Sand Loop Level 482 presents a deceptively complex challenge disguised as a simple pixel art task. Your objective is to assemble a Ginger and White Cat sitting on a dark red floor, set against a vibrant Neon Green background. The cat holds a red heart on its tail. While the image looks cozy, the level is a strict logistical puzzle. The primary difficulty comes from "Rope Traps" that lock essential colors (Ginger and White) in the bottom corners, buried under layers of other debris. You must manage a highly restricted 5-slot tray capacity while digging for these buried resources. If you tap carelessly, you will fill your tray with useless cups, causing a deadlock that forces a restart before the cat even has a face.
Key Challenges and Obstacles
The core obstacles in Level 482 are the restricted movement logic and the precision required for small details. Unlike previous levels where you could tap freely, this stage requires a strict "First-In, First-Out" mentality. The "Rope Traps" in the bottom left and right corners bind Orange and White cups together. You cannot access them until you clear the three rows of cups sitting above them. Additionally, the "Question Mark Cups" in the center column act as wildcards; tapping them reveals their color only when they reach the top of the stack. If you ignore the center to focus on the corners, you will run out of sand for the background. You must balance clearing the vertical columns across all five lanes to prevent the tray from clogging.
Color Palette and Distribution
Understanding the volume of sand required for each color is crucial for planning your moves:
- Neon Green (Background): Approximately 40% of the total canvas. You will start with several Green Cups, but do not use them all immediately. The background is your "dumping ground" for excess sand, but it requires patience to fill correctly without blocking the tray.
- Ginger Orange (Main Body): The primary color for the cat. These cups are mostly buried in the Rope Traps. You need to prioritize clearing the ropes to access this, or you will have no way to form the cat.
- White (Details): Used for the face, chest, and tail tip. Like the Orange, these are locked in the corners. You must manage these carefully as they are often your most scarce resource.
- Deep Red (Floor & Heart): Used for the floor, ears, eyes, and the heart. You start with three large Red Buckets at the very top. While plentiful, the "Bucket" mechanic (pouring longer than a cup) makes them dangerous for small details like the heart.
Victory Conditions
To achieve 3 stars and complete Level 482, you must satisfy two main conditions: Tray Management and Pixel Precision. First, you must never allow your tray to reach 5/5 capacity unless every single cup in the tray is immediately usable on the current conveyor section. Second, you must avoid "cross-contamination" of pixels. Spilling Green sand into the Red heart or White face will result in a score deduction, making it impossible to max out your star rating. The level ends only when the background is filled, the cat is fully formed, and the heart is distinct.
Strategic Color Processing Order
Phase 1: The Foundation (Red Floor)
The initial moves in Level 482 are critical. You should always start by tapping the Red Buckets located in the top row. Do not touch the Green cups yet. By starting with Red, you lay the floor for the cat. Since the floor is at the "bottom" of the image processing logic, filling it first creates a stable base. Furthermore, tapping the Red Buckets immediately gets the large, clumsy containers out of your tray, freeing up slots for the smaller, more precise cups you will need later for the cat's face.
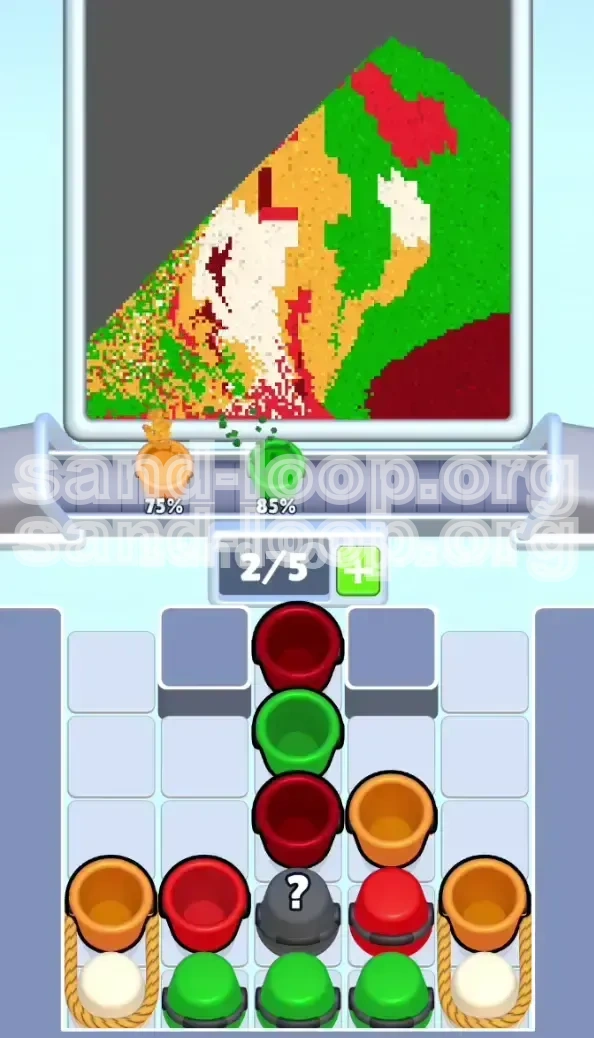
Phase 2: The Dig (Clearing Rows 1 & 2)
Once the Red Buckets are on the conveyor, immediately switch your focus to the rows directly beneath them. Your goal here is not to finish the art, but to "dig" vertically. You need to clear the path to the Rope Traps at the bottom. Tap the Green Cups and mixed Red Cups in the second and third rows. As you tap these, keep a close eye on the center column. If a Question Mark Cup appears, pause and assess if you need that color right now. If not, let it sit. The priority is exposing the trapped Orange and White cups in the corners.
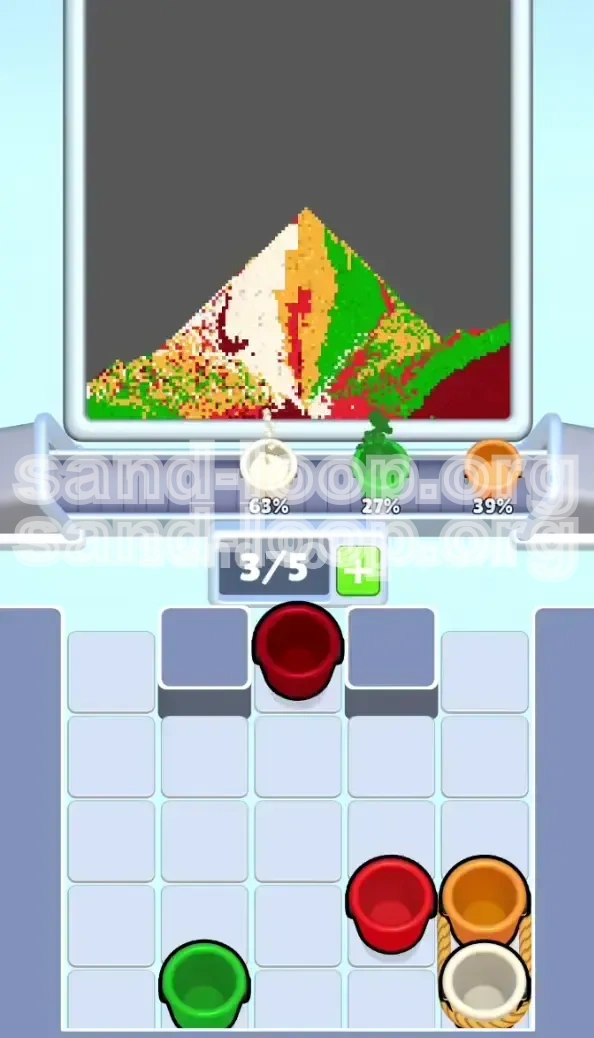
Phase 3: The Rope Break (Unlocking Orange/White)
This is the turning point of the level. Once you have cleared the top two rows, the Rope Traps will be accessible. You will see the Orange and White cups bound together. When you tap these, the rope snaps, and they become individual units in your tray. This is the "Gold Rush" moment. You now have access to the colors needed for the cat's body. However, do not tap them all at once. Release them slowly, one by one, as the conveyor belt enters the "Body Zone" of the canvas. If you release them while the belt is over the Green background area, you will waste precious body-colored sand.
Phase 4: The Background Fill (Green Safety Net)
Only after the cat's body (Orange) and primary details (White) are roughly outlined should you aggressively tap the remaining Green Cups. The Neon Green background is forgiving; it covers large areas and doesn't require pixel-perfect precision. Use the Green cups to "rest" your tray. If you have a full tray and the conveyor is about to enter a Green zone, tap the Green cups to pour them out and free up your slots. This prevents the dreaded 5/5 tray deadlock where you have no moves left.
Phase 5: Precision Finishing (Heart & Face)
The final phase requires micro-management. Save a small amount of Red Sand (ideally from a Cup, not a Bucket) and White Sand for the very end. The conveyor belt will cycle back to the cat's face and tail. This is where you fix the eyes, nose, and the heart on the tail. Do not pour continuously. Use short, sharp taps to release small bursts of sand. It is better to leave a pixel 90% filled and come back later than to overfill and bleed color into the wrong area.
Step-by-Step Walkthrough Instructions
Step 1: Initial Taps and Tray Setup
Start the level by immediately tapping the Left and Right Red Buckets. Do not tap the middle one yet. This sends two large buckets to the conveyor. As soon as they are on the belt, tap the Green Cups directly beneath them. This sequence ensures your tray starts clearing space immediately. Watch the tray count: you want it hovering around 3/5 capacity. This gives you the flexibility to react to the Question Mark cups without getting stuck.
Step 2: Managing the Center Column
As the top rows clear, you will see a column of Question Mark Cups in the center. Do not tap these blindly. Wait until the cup is at the top of the stack to see its color. If it reveals a White or Orange cup, and you are currently in a Red/Green floor zone, let it wait. Only tap it when the conveyor belt is approaching the corresponding color zone on the canvas. If the Question Mark reveals a Green cup, tap it immediately to keep the flow moving and clear the center lane.
Step 3: Breaking the Corner Traps
Once the vertical columns are clear, you will see the Rope Traps in the bottom left and right corners. These are your priority targets. Tap the Left Rope Trap first. This releases a stack of Orange and White Cups. Immediately look at the conveyor. Is the belt about to pass over the cat's body? If yes, tap the Orange cup. If the belt is over the background, tap the Green cup to buy time. Repeat this process for the Right Rope Trap. Do not release both traps at the exact same time, or your tray will overflow with mixed colors you cannot use yet.
Step 4: Constructing the Cat Body
With the traps broken, you now have a steady supply of Ginger Orange. The conveyor belt will cycle through the "Body Zone." This is the largest area of the cat. Pour the Orange sand here to form the cat's back, head, and legs. You can be slightly generous here, as the Orange body is large. However, avoid pouring Orange sand into the "Tail Zone" if the tail is supposed to be White. Stop pouring just as the conveyor exits the Body Zone to prevent bleeding into the background.
Step 5: Detailing the Face and Tail
This step requires the most precision. You should have saved White Cups from the traps. As the belt passes the cat's face, tap the White cup to create the muzzle and chest. Immediately stop. Then, wait for the belt to reach the tail tip. Tap the White cup again to color the tail. Finally, locate a Red Cup (or a partially used Bucket). Wait for the belt to align with the heart on the tail. Tap the Red source for a split second—literally a quick tap—and release. You want a small heart shape, not a blob. If you overfill, the level becomes much harder to fix.
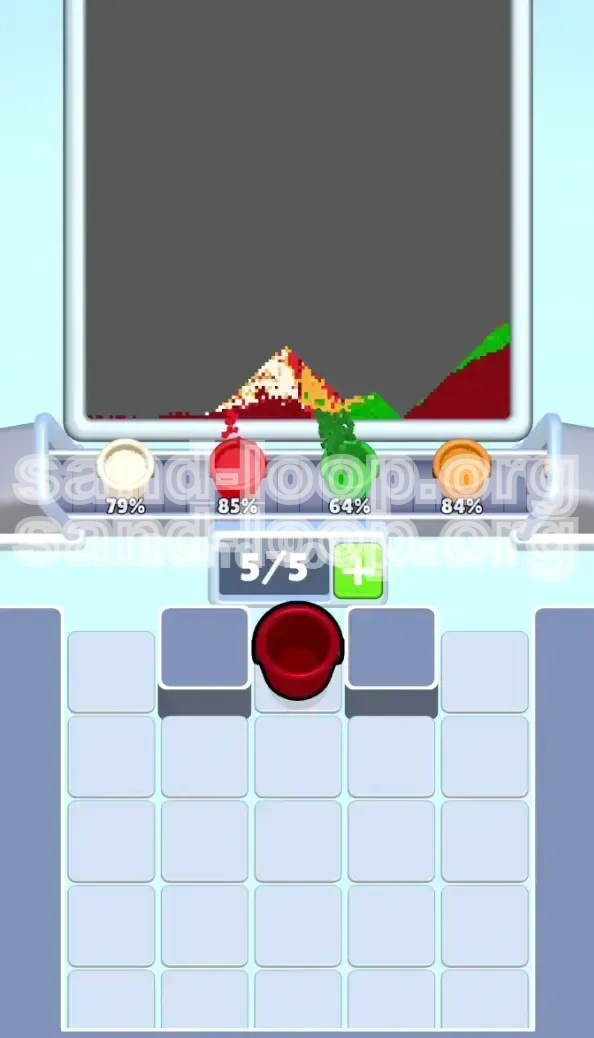
Step 6: Final Background Polish
At this stage, the cat should be fully formed, but the background likely has gaps. Use any remaining Green Cups to fill in the holes. Since the cat is already complete, you don't need to worry as much about precision. Pour the Green sand into any remaining empty pixels. This usually clears your tray completely. Once the background is solid green, the level is complete.
Key Tips for Success
Mastering the "Half-Tap" Technique
For small details like the eyes and the heart, do not hold down your tap. Use a "Half-Tap" or a quick flick. This releases a controlled, small amount of sand. If you hold the tap too long on a Bucket, you will flood the specific pixel zone and ruin the contrast. Practice this rhythm: Tap, Pause, Check. If more sand is needed, tap again. It is always safer to under-fill a pixel in Level 482 than to over-fill it.
Timing Your Conveyor Cycles
Sand Loop 482 operates on a fixed loop. The canvas moves from Right to Left. Memorize the order: Floor -> Background -> Cat Body -> Cat Face/Tail -> Background. Keep this order in your head. If you have a Red cup in your tray but the belt is 5 seconds away from the Red floor zone, do not tap it yet. Use that time to tap a Green cup for the background instead. Always match your active taps to the current or imminent zone, not the past one.
Slot Management Mathematics
Always maintain 1 empty slot in your tray if possible. A 4/5 tray allows you to react if a Rope Trap suddenly releases a prize cup. If you are sitting at 5/5, you are frozen. If you must hit 5/5, ensure every single cup in that tray is for the exact same color zone. Mixing zones in a full tray is the fastest way to fail. For example, having a Green Cup and a White Cup in a full tray while the belt is on the Red Floor is a failure state.
Identifying "Dead Weight" Cups
Learn to identify when a cup is "Dead Weight." A Dead Weight cup is a color that you cannot use in the current or next two zones. For instance, a Red Cup is Dead Weight when the belt is traversing the Green Background. Do not let Dead Weight sit in your tray. If you have a slot open and a Dead Weight cup is available, sometimes it is better to leave it in the stack and tap a different cup to keep your tray fluid for the upcoming zone.
Handling Question Mark Cups
Don't gamble on the center column Question Marks unless you have slot space to spare. If the cup turns out to be a color you don't need (like Red when you are full on Red), it becomes an obstacle blocking other moves. Only tap the Question Marks when you have 3/5 slots or fewer, giving you room to maneuver if the result isn't what you wanted.
Common Mistakes to Avoid
The "Full Clear" Error
Many players try to clear the entire Green background at the very start. This is a fatal mistake in Level 482. If you use all your Green cups immediately, you will have no "filler" cups to use when the belt is in the background zone later. This leads to a situation where you have Orange cups ready but the belt is on Green, forcing you to either waste Orange or wait. Always leave 20-30% of the background unfinished until the end of the level.
Ignoring the Rope Trap Dependencies
Do not focus solely on the center or the top rows. If you ignore the corners, you will not release the Ginger and White cups. Without these, you physically cannot finish the cat's body. If you find yourself with a tray full of Red and Green but no Orange/White in sight, you have neglected the Rope Traps. You must aggressively clear the vertical columns above the traps, even if it means making temporary messes in the background.
Bucket Mismanagement
The three starting Red Buckets are powerful but dangerous. A common mistake is tapping a Red Bucket when the belt is only partially over the Red Floor zone. The Bucket pours a long stream. If the belt moves to the Green Background while the Bucket is still pouring, you will contaminate the background with Red lines. Only tap Buckets when the belt is perfectly centered on the target zone, or use a "tap-and-release" method to get a partial pour.
Over-Precision on the Body
While the Face and Heart require precision, the Cat's Body does not. Don't stress about filling every single pixel of the Ginger Cat perfectly on the first pass. The body is large and robust. It is better to get the sand on the canvas roughly correctly and move on to the next trap than to obsess over one stray pixel in the cat's back. You can fix rough edges later; you cannot fix a full tray deadlock.
Panic Tapping
When the tray gets full (4/5 or 5/5), new players often panic and start tapping randomly. This usually results in pouring the wrong color into the wrong zone. If your tray is full, stop tapping. Watch the conveyor belt. Wait for the current cup to pour out and free up a slot. Patience is the single most important skill for Level 482. The game will not punish you for waiting; it only punishes you for bad moves.
Speed Run and Optimization Strategies
The "Top-Down" Cascade
For a speed run, you want to minimize the time the conveyor spends moving over empty zones. Use the "Top-Down" strategy: Tap the top buckets (Red) and immediately tap the cups directly below them (Green/Red) in a rapid-fire sequence. This creates a cascade of sand that hits the conveyor as soon as the level starts. By front-loading your activity, you ensure the conveyor belt is always receiving sand, maximizing the efficiency of every pixel movement.
Trap-Bursting
Speed runners should aim to "Burst" the traps as early as possible. Instead of clearing the whole top row, focus purely on the vertical columns directly above the Rope Traps (Columns 1 and 5). Use Question Mark cups in the center only if they help clear these vertical paths. Once the traps are snapped, you have access to the full palette, allowing you to finish the level while the conveyor is still on its first or second loop.
Batch Processing Colors
Don't alternate between colors constantly. If you have three Red cups in your tray, pour them all in succession while the belt is on the Red Floor. Then switch immediately to Green. This "Batch Processing" reduces the cognitive load of switching contexts and saves precious milliseconds. It is faster to pour three Red cups in a row than to pour Red, then Green, then Red again.
The "Heart" Shortcut
There is a shortcut for the heart on the tail. Instead of waiting for the belt to perfectly align with the white tail tip to add the heart, you can actually perform the heart step during the body pour if you are fast enough. As the Ginger Cat body pour ends and the belt transitions to the tail, have a Red Cup ready. Tap it immediately as the pixels switch. This overlaps the body and heart phases, shaving off a few seconds from your total time.
Tray Cycling
In a speed run, a full tray is a loss. To keep the tray cycling rapidly, use the background as your "trash can." If you have a cup you don't need right now but need to get rid of to free a slot, check if the background is nearby. If yes, pour a tiny bit of it into the background to clear the slot, then move on. While technically "wasting" sand, the time saved by keeping your tray fluid outweighs the cost of a little extra background sand later.