
Level 485
HARDHow to solve Sand Loop level 485? Get instant solution for Sand Loop 485 with our step by step solution & video walkthrough. Sand Loop 485 tips and guide.
Play Sand Loop Now
Experience the puzzle challenge firsthand
Game Screenshots

Sand Loop Level Guides
Level Overview: Navigating the Vaporwave Skyline
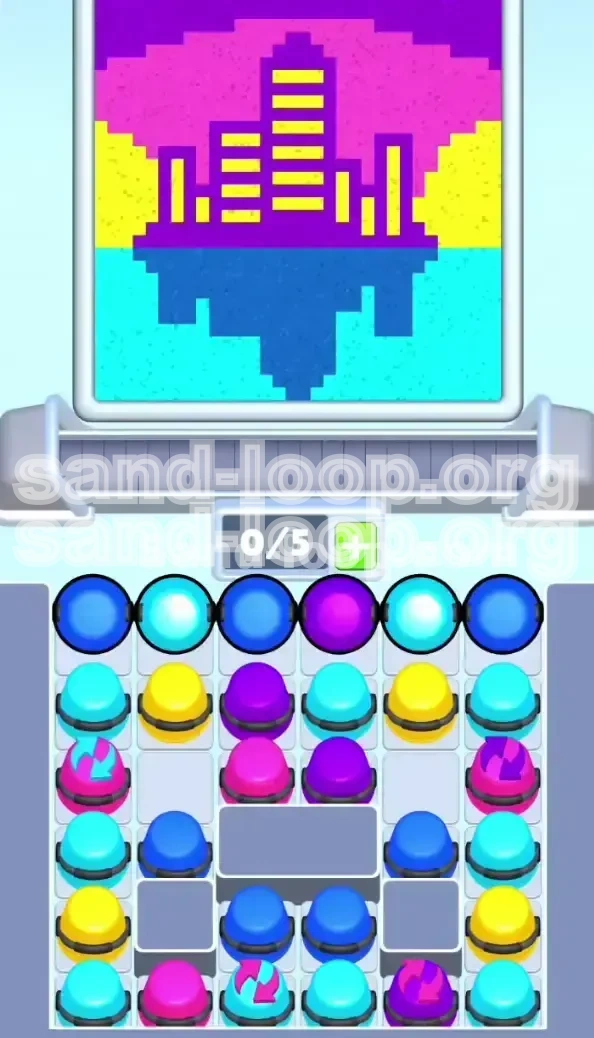
Welcome to Level 485, a stage defined by its aesthetic beauty and logistical complexity. This level presents a "City Skyline Reflection" theme, immersing players in a vaporwave atmosphere featuring a purple metropolis, a pink and magenta sky, and a distinct yellow horizon line. Below this skyline lies a reflection rendered in cyan and dark blue waters. While the visuals are stunning, this level is notoriously difficult due to strict inventory management and a complex color palette. You are not just racing against a timer; you are managing a limited conveyor belt capacity of only 5 slots amidst a chaotic shuffle of Cycle Cups.
Visual Breakdown
The canvas is split into two distinct zones: the upper "Sky and City" zone and the lower "Water Reflection" zone. The upper portion requires heavy usage of Deep Purple and Magenta Pink to construct the buildings and sky. The middle features a razor-thin Bright Yellow horizon line. The bottom half is dominated by Cyan (Light Blue) water and Cobalt Blue shadows.
The Capacity Crisis
The primary difficulty in Level 485 is the 5-slot limit on your conveyor belt. With 5 active colors in play (Purple, Pink, Yellow, Cyan, Dark Blue), your belt will be constantly full. There is almost zero room for error. Holding onto cups for too long will result in a deadlock, forcing you to make suboptimal moves.
The "Cycle Cup" Mechanic
This level introduces Cycle Cups, identified by circular arrows and dual-color icons. These cups alternate between two states (e.g., Pink/Cyan) whenever a row is cleared or a significant board shift occurs. This unpredictability means you cannot rely on a static plan; you must react to the current state of the cup.
Dead Weight Obstacles
Scattered throughout the supply tray are Grey Stone Blocks. These are useless fillers that cannot be poured and take up valuable space on your conveyor belt. They often trap usable cups behind them, forcing you to clear entire columns just to access necessary colors.
Why It's a Logic Puzzle
Unlike earlier levels where you could simply pour whatever was available, Level 485 requires a strict dependency chain. You must clear the top sections to unlock the bottom sections, all while managing a shifting color palette. Filling the bottom "Reflection" too early will leave you with no colors to finish the top "Skyline," resulting in a fail state.
Clear Objectives and Strategy
To conquer Level 485, you must abandon the "fill as you go" mentality and adopt a "Top-Down" strategy. Your primary goal is to secure the skyline before worrying about the water. This section outlines exactly what you need to achieve to clear the stage without running out of moves.
Secure the Top Section First
Your immediate priority is the Deep Purple buildings and Magenta Pink sky. Do not be tempted by the abundant Cyan and Blue cups at the start of the level. If you waste your early moves on the water reflection, you will run out of belt space when the Pink and Purple cups start cycling in.
Manage the Horizon Line
The Bright Yellow horizon is the most critical structural element. It acts as a seal between the sky and the water. If you accidentally mix Cyan into the Yellow horizon before it is fully sealed, you will create "dirty" pixels that are impossible to clean up without a restart. Ensure the Yellow line is 100% complete before touching any water colors.
Identify Cycle Cup States
Before you tap any Cycle Cup, pause and check its color. If you need Pink for the sky but the cup is showing Cyan, you must wait. Do not pour the Cyan just to "move the cup along." This is the most common cause of failure. You must wait for the cycle to align with your current target zone.
Optimize Slot Usage
Keep your belt slots open as much as possible. Ideally, you want to operate with 3 or 4 cups on the belt, leaving 1 or 2 empty slots for new cups to slide in from the tray. If you let the belt hit 5/5 capacity, you lose the ability to manipulate the tray, leading to a stuck board.
Clear the Reflection Efficiently
Once the skyline and horizon are set, the level becomes a race to fill the bottom. The reflection is smaller than the city above it, meaning you actually need less sand than it appears. Be conservative with your Dark Blue usage; save enough to finish the jagged shadow edges at the very end.
Step-by-Step Walkthrough
This section provides the exact sequence of moves required to beat Level 485. Follow these steps in order to navigate the "Trap" of the initial setup and the "Swap" of the mid-game.
Phase 1: The Initial Setup (Ignoring the Bait)
When the level starts, the tray presents a "bait" configuration. The top row is loaded with Cyan and Dark Blue cups.
- Action: Ignore the Blue/Cyan cups in the top row for now.
- Action: Locate and tap the single Deep Purple cup available. This starts the city foundation.
- Action: Pull one Dark Blue and one Cyan cup onto your belt, but do not pour them yet. You are holding these to prevent them from blocking new spawns.
- Target: Focus entirely on pouring Purple into the center buildings until the cup is empty.
Phase 2: Navigating the Cycle Cups
As you clear the first rows, the tray will shift, revealing the Cycle Cups.
- Action: Identify the Pink/Cyan Cycle Cup. This is your most dangerous obstacle.
- Action: If the cup is currently Pink, tap it immediately and pour into the upper sky.
- Action: If the cup is currently Cyan, do not tap it. Instead, look for other Purple cups or the Magenta Pink standard cups.
- Tip: You can force a Cycle Cup to switch colors by clearing a completely separate row on the board. Use this to your advantage if you are stuck waiting for a Pink.
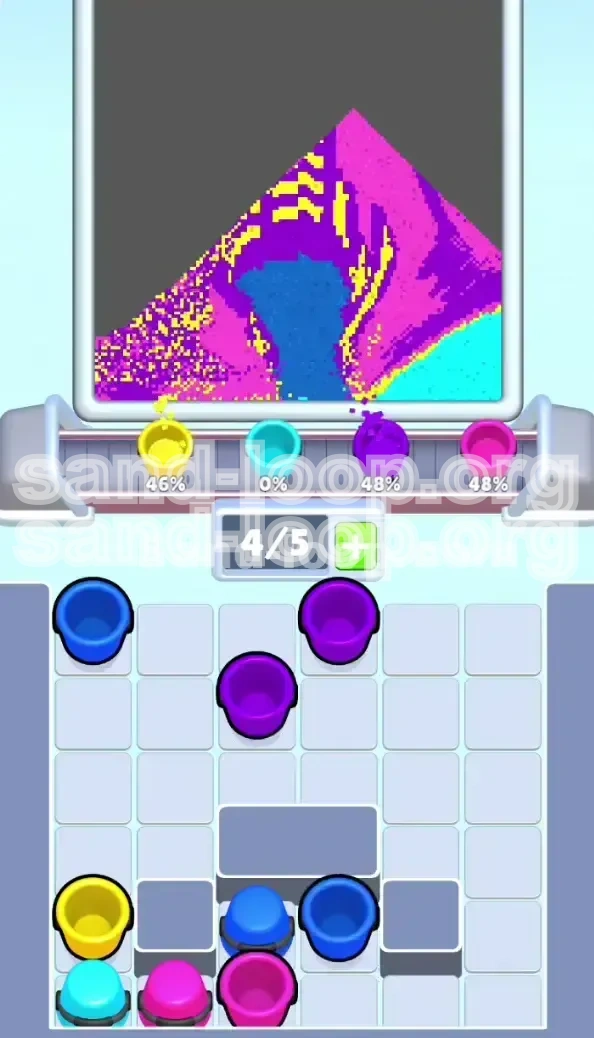
Phase 3: The Yellow Horizon Lock
This is the precision phase. The Yellow cups are usually buried in the middle or bottom-left of the tray.
- Action: Clear out the left column of the tray (using Dark Blue on the reflection edges if needed) to reach the Bright Yellow cups.
- Action: Pour Yellow strictly across the middle horizontal line.
- Warning: Do not over-pour. The Yellow line is thin. If you see the percentage for Yellow hit 100% or the visual line is solid, stop immediately.
- Transition: Once Yellow is done, the "Sky" and "Water" are effectively separated. You can now work on the bottom.
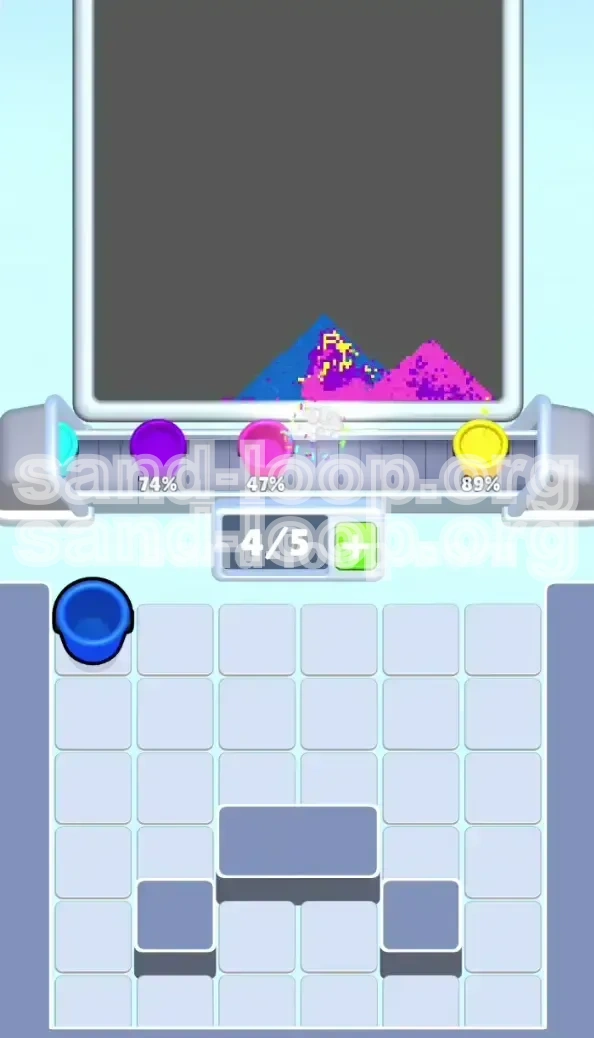
Phase 4: The Reflection Rush
With the top sealed, dump your inventory.
- Action: Pour all held Cyan cups into the water section.
- Action: Use the Cobalt Blue (Dark Blue) for the shadowy reflections of the buildings.
- Action: Keep an eye on the Purple reflection. It is smaller than the top buildings. Stop pouring Purple Reflection when it hits about 85-90% to avoid overflow.
- Finale: The last 5% of the level is usually a tiny patch of water or a missing window. Use whatever Cycle Cups remain to finish these pixel-perfect gaps.
Color Order and Processing Guide
Success in Level 485 depends on processing colors in a specific hierarchy. Processing them out of order (e.g., doing the bottom before the top) is the mathematical reason why players get stuck. Follow this priority list to ensure your conveyor belt flows smoothly.
Priority 1: Deep Purple (The Foundation)
Purple is the anchor. It occupies roughly 35% of the total canvas volume between the buildings and their reflection. Because it is needed early and often, you must secure Purple cups the moment they appear. If you pass up a Purple cup to grab a Blue one, you will likely run out of Purple later when the board is complex.
Priority 2: Magenta Pink (The Sky)
The Pink sky takes up about 20% of the upper canvas. This color is often trapped inside Cycle Cups. You must prioritize "farming" these cups—clearing other rows just to force the Cycle Cups to refresh—until you have enough Pink to finish the sky. Do not start the water until the sky is at least 80% full.
Priority 3: Bright Yellow (The Seal)
Although Yellow has a low total volume (less than 5%), it has the highest strategic priority because it acts as a dam. Once Yellow is placed, you no longer have to worry about accidentally dropping water colors into the sky zone. Treat the acquisition of Yellow cups as a "mini-boss" battle.
Priority 4: Cyan (The Water Base)
Cyan is abundant (about 25% of the canvas) but acts as a "belt clogger." Because it appears so frequently in the top rows of the tray, it is easy to accidentally fill your belt with Cyan. You must actively avoid tapping Cyan until Phase 4. If you must pick it up to unblock a column, pour it immediately into a "safe" corner of the water zone.
Priority 5: Cobalt Blue (The Shadows)
Dark Blue is used sparingly for the reflection shadows (about 15% of the canvas). It is the "cleanup" color. Use it to fill the gaps when your main colors (Pink/Purple) are reloading. It is generally safe to keep a Dark Blue cup on the belt for long periods as a backup.
Key Tips and Common Mistakes
This section focuses on the nuances that separate a clear from a "Game Over." By understanding the common pitfalls, you can adjust your playstyle to be more efficient.
Tip: The "3-Slot" Rule
Try to keep your maximum belt occupancy at 3 cups. Why? Because in Level 485, new cups enter from the bottom. If you have 4 or 5 cups, the new cups cannot spawn properly, or they might spawn behind the Grey Blocks, making them inaccessible. Keeping 3 slots open gives you the flexibility to grab a good cup the moment it appears.
Mistake: Over-pouring the Reflection
The reflection at the bottom is not a mirror image in terms of volume; it is often smaller. Many players fail because they treat the bottom half as a 1:1 mirror of the top and run out of Cyan/Blue sand for the final corners. Stop pouring when the visual looks "mostly done" (around 90%) and switch to a different color to finish the edges.
Tip: Cycle Cup Patience
Do not treat Cycle Cups like normal cups. A Cycle Cup showing the wrong color is effectively a "Stone Block" until it swaps. Do not waste a pour on the wrong color just to move it off the belt. It is better to have a full belt and wait for a row clear to swap the cup than to ruin your pixel art with misplaced sand.
Mistake: Ignoring the Grey Blocks
The Grey Stone Blocks are not just obstacles; they are indicators of tray flow. If you see a Grey Block in the top row, it means the tray will not shift vertically until that block is moved (by clearing the row below it) or moved horizontally. Don't try to force cups "past" a Grey Block; you must clear the adjacent columns to create a path.
Tip: The "Emergency Pour"
If you are absolutely stuck and the belt is full, look for the "Emergency Pour." This is a small, non-critical area of the canvas (usually a corner of the sky or water) that can accept a "wrong" color without ruining the main image. Pouring here might just give you the split second you need to clear a row and shuffle the tray.
Stuck Solutions and Speed Run Tips
If you find yourself in a deadlock or if you are aiming for a three-star rating, these advanced strategies will help you optimize your gameplay.
Solution: The "Soft Lock" Recovery
A "Soft Lock" happens when you have 5 cups on the belt, none of which match the available canvas areas.
- Step 1: Identify the color you have the most of on the belt (e.g., Cyan).
- Step 2: Find the largest possible area for that color, even if it overlaps slightly with another (e.g., pouring Cyan over the edge of the Blue reflection).
- Step 3: Pour until the cup is empty. The goal is not to fill the art perfectly, but to free up the slot and trigger the tray shuffle.
- Step 4: Once the tray shuffles, a useful cup (like Purple) should slide into reach.
Speed Run Tip: Pre-Loading Colors
While the tip is usually to keep the belt empty, for speed running, you can "Pre-Load." If you know the next 3 moves require Purple, try to have two Purple cups on the belt before you even finish the current section. This minimizes the time spent waiting for the tray to slide.
Speed Run Tip: Rapid Cycle Swapping
You can force a Cycle Cup to swap colors faster by clearing small, insignificant rows quickly. Instead of perfectly filling a complex building window, just fill the easy corners of a row to trigger the "Row Complete" animation. This forces the Cycle Cups to swap immediately without wasting precise sand.
Stuck Solution: The Bottom-Right Corner
Often, the last cup you need (Yellow or Pink) is trapped in the bottom-right corner of the tray behind a Grey Block. To get this:
- Clear the entire top row of the canvas (Sky/City).
- Use the empty space to dump "garbage" sand (colors you don't need) to force the tray to shift left.
- Once the tray shifts, the bottom-right cup will move to the middle, becoming accessible.
Speed Run Tip: Ignore Perfection
For a speed run, you do not need 100% pixel perfection. You can leave the tiny "window" pixels in the Purple buildings empty until the very end. Focus on filling the large color blocks (Sky mass, Water mass) first. You can come back with a fine-point cup at the last second to dab the windows. Trying to paint every window as you go will slow you down significantly.