
Level 495
HARDHow to solve Sand Loop level 495? Get instant solution for Sand Loop 495 with our step by step solution & video walkthrough. Sand Loop 495 tips and guide.
Play Sand Loop Now
Experience the puzzle challenge firsthand
Game Screenshots
Sand Loop Level Guides
Level 495 Overview: The Burning Candle Challenge
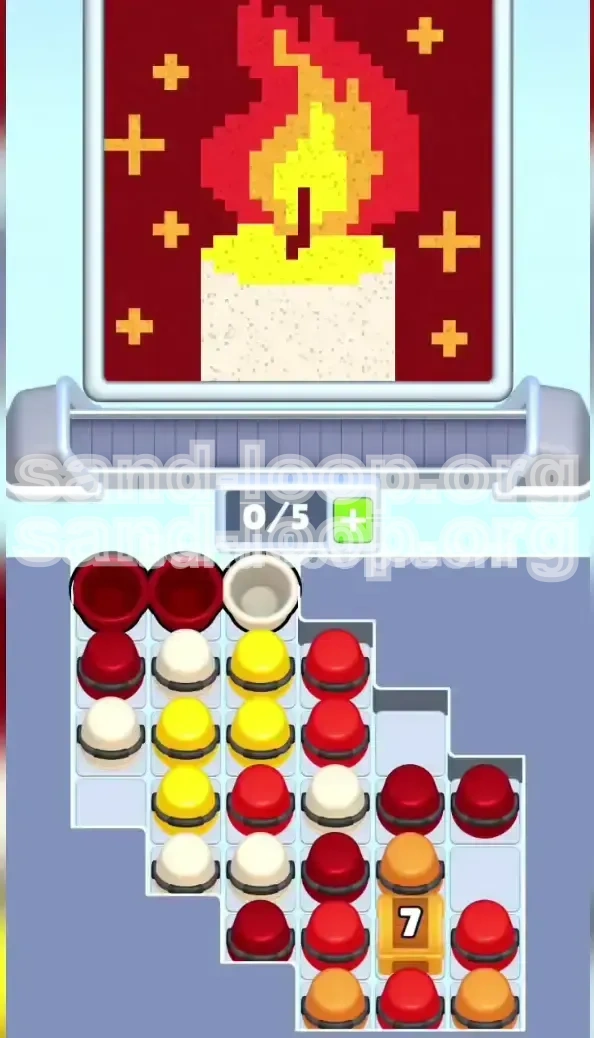
Level 495, known as the "Burning Candle" challenge, represents a significant difficulty spike in Sand Loop. Unlike previous levels that may rely on quick reflexes or simple color matching, this stage is a pure logic puzzle disguised as an action game. The core mechanic revolves around a strict dependency chain where your early moves determine your fate ten steps later. The visual aesthetic is dominated by warm, aggressive tones—specifically five distinct colors: Dark Red, Bright Red, White, Blazing Yellow, and Orange. The challenge is compounded by a limited 5-slot capacity and a physical blocker that restricts access to essential supplies. Players must treat this level less like a game of speed and more like a game of Chess; every move must be calculated to avoid capacity overflow and untimely deadlocks.
The 5-Slot Capacity Constraint
The most immediate threat in Level 495 is the strict 5-slot limit on your conveyor belt. You cannot simply load up all available colors and hope for the best. If you fill all five slots before the necessary crates are destroyed or specific dispensers are unlocked, the game enters a "Gridlock" state where no new cups can enter the belt. This forces you to watch helplessly as your timer runs out or your flow is broken. Managing these slots—keeping at least one or two open at all times—is the secondary objective behind simply solving the puzzle.
The Color Palette Breakdown
Success in this level depends on understanding the hierarchy of the color palette. There are five active colors in play, but they are not equal in volume or importance.
- Dark Red (High Volume): Used for the massive background and the wick. This is your "filler" color that consumes about 40% of your total resources.
- Bright Red (Medium Volume): Used for the outer flame layer. It is distinct from the background and must be kept separate to avoid color contamination.
- White (Medium Volume): The base of the candle. Crucial for early game stability.
- Orange (Medium Volume): The middle flame layer. Often blocked by crates.
- Yellow (Low Volume/High Precision): The core and floating sparks. This color is the "run killer" because it is easy to access early but necessary only at the very end.
The Dependency Chain Mechanic
This level introduces a "Dependency Chain." You cannot access the bottom half of the supply tray (where the Orange and Bright Red cups are located) until you destroy a specific blocker. To destroy that blocker, you must process cups from the top half. This creates a linear progression: Top Left → Middle → Crate Break → Bottom Right. Attempting to bypass this chain is impossible. Understanding this flow prevents the frustration of trying to click locked cups and wondering why nothing is happening.
Visual Analysis of the Canvas
Take a moment before your first tap to analyze the canvas. The image is a stark contrast between a massive dark void (Dark Red background) and a bright, multi-layered flame. The flame is constructed from the outside in: Red outer edge, Orange middle, Yellow core. The base is White. The background also features deceptive "floating sparks" in Yellow. Visually, the Yellow looks urgent, but strategically, it is a trap. The canvas demands that you fill the largest areas (Background and Base) first to build up the rhythm needed to handle the intricate details of the flame later.
Why Speed Kills Your Run
A common misconception in Sand Loop is that faster tapping equals better results. In Level 495, speed is the enemy. The logic traps here require pauses. You need to wait for the sand to pour, for the cups to empty, and for the belt to clear. Rushing the "7-Count" sequence at the start is the number one reason players fail. Patience allows the 0/5 capacity counter to reset, giving you the buffer you need to survive the crate explosion that follows.
Primary Objectives and Strategy
To conquer Level 495, you must shift your mindset from "filling the board" to "managing the queue." Your primary goal is not just to paint the candle, but to engineer the opening of the supply tray without causing a traffic jam on your conveyor belt. This section breaks down exactly what you need to achieve to clear the stage.
Objective 1: Destroy the 7-Count Crate
The singular most important objective of the first half of the level is the destruction of the Wooden Crate located in the bottom right quadrant of the supply tray. This crate has a bold "7" stamped on it, indicating that it requires exactly 7 valid cup pours to shatter. While this crate sits on the belt, it physically blocks access to the cups underneath it—primarily the Orange and Bright Red cups essential for the flame. If you do not break this crate within the first minute, you will run out of moveable cups and face a deadlock.
Objective 2: Prevent Early Yellow Overflow
You must actively resist the urge to fill the Yellow sections of the canvas until the late game. The Yellow cups are often available in the top-left columns early on. However, the Yellow sections of the canvas (the core and the sparks) represent less than 15% of the total fill area. If you tap Yellow cups early, you will flood your limited 5 slots with a color you barely need, leaving no room for the Dark Red and White cups required to break the crate. Your objective is to ignore Yellow completely until the background is 80% full.
Objective 3: Establish a Rhythm Flow
Sand Loop is rhythm-based. The sand dispensers operate on timers. Your third objective is to establish a "pour and wait" rhythm. This involves loading 2 or 3 cups, watching them fill, and then immediately replacing them as they empty. You want to avoid "burst loading," where you fill all 5 slots at once. A steady rhythm ensures that the sand is constantly flowing into the canvas without exceeding your slot capacity. This rhythm is crucial when dealing with the massive amount of Dark Red sand required for the background.
Objective 4: Isolate the Flame Layers
The candle flame consists of three distinct layers (Red, Orange, Yellow). These layers must be filled in a specific order to avoid color bleeding. The outer Red layer acts as a container for the inner layers. If you fill the center Yellow before the outer Red is dry, you risk muddying the colors. Your objective is to secure the perimeter (Bright Red) and the middle (Orange) before worrying about the core (Yellow).
Objective 5: Manage the "0/5" Limit
Throughout the entire level, the "0/5" counter in the UI is your lifeline. Reaching 5/5 stops the game. Your goal is to keep this number fluctuating between 2/5 and 4/5. Never let it sit at 5/5 for more than a second. This requires you to stop tapping new cups the moment the belt is full and wait for the dispensers to drain. This discipline is what separates a failed run from a successful one.
Step-by-Step Walkthrough: The Opening Sequence
The first 30 seconds of Level 495 are the most critical. This is where the "Burning Candle" either burns steady or burns out. Follow these steps precisely to navigate the opening bottleneck and destroy the crate.
Step 1: The Initial Scan and Pause
As the level loads, do not tap anything immediately. Look at the top-left quadrant of your supply tray. You will see a stack of Dark Red cups and White cups. Look at the bottom right. You will see the Crate. Now, locate the Yellow cups. They are likely accessible. Make a mental note: Do not touch the Yellow cups. Take a deep breath. Your conveyor is empty. You have 5 slots. You are about to fill them.
Step 2: Tapping the First Two Dark Reds
Locate Column 1 (the far left column). You should see Dark Red cups exposed. Tap the top Dark Red cup. It moves to the belt. Tap the second Dark Red cup. It moves to the belt. Status Check: You have 2 cups processing. You have 3 empty slots. The Dark Red is pouring into the background. This is correct. You are chipping away at the crate count (currently at 2/7).
Step 3: The White Cup Transition
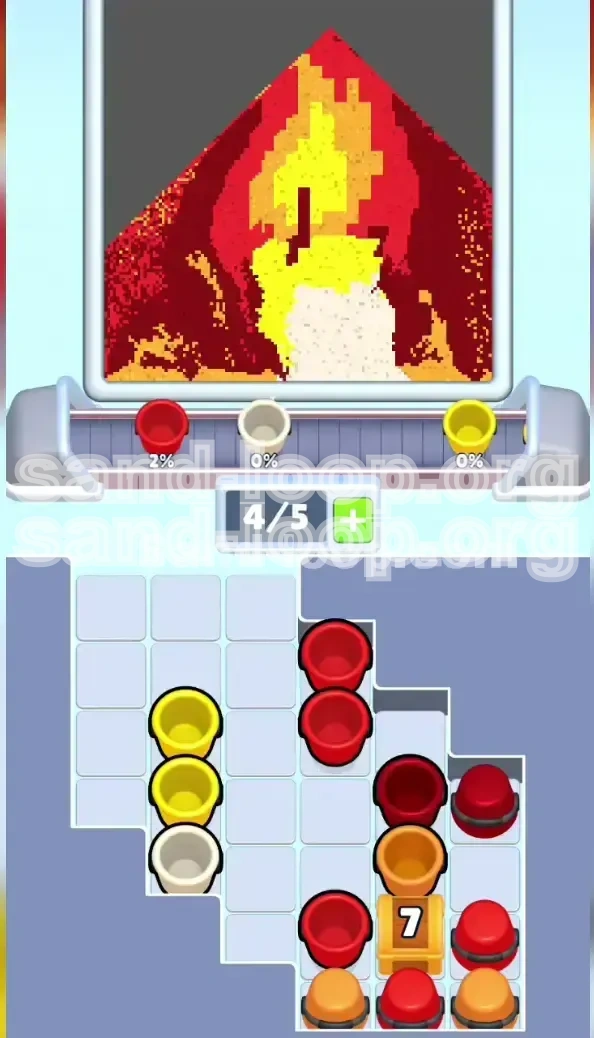
Move your eyes to Column 2. You should see a White cup. Tap it. Move to Column 3. Tap the White cup there. Status Check: You now have 4 cups on the belt (2 Dark Red, 2 White). You have 1 empty slot. The crate counter is now at 4/7. You are halfway there. At this point, stop tapping. Watch the sand flow. Wait for the first Dark Red cup to finish pouring. As soon as it disappears from the belt, you will have 2 open slots.
Step 4: The "Trap" Avoidance
While waiting for those cups to drain, you will see Yellow cups becoming available in the top rows. You might also see the Yellow core on the canvas looking unfilled. Do not tap them. If you tap a Yellow cup now, you fill your last slot. When the Dark Red cups finish draining, new Dark Red cups will try to enter, but they will be blocked by the Yellow cup you just added. This creates a jam. Ignore the Yellow. Focus entirely on the Dark Red and White stacks.
Step 5: Breaking the Crate
Once you have 2 open slots again, return to Column 1. Tap the next available Dark Red cup. Then, grab another White cup from the middle columns. Count check: You have now processed 7 cups (4 Dark Red, 3 White). The Wooden Crate in the bottom right will shatter with a satisfying crash. Congratulations! The dependency chain has broken. The Orange and Bright Red cups are now yours to command.
Step 6: Post-Crate Belt Management
The moment the crate breaks, the game tries to flood your belt with the newly unlocked cups. Do not panic. You might still have White or Dark Red cups finishing up. Let them finish. Do not immediately spam the new Bright Red cups. If you fill all 5 slots now, you will stall. Keep the rhythm: Send up one Bright Red, wait. Send up one Orange, wait. Keep the belt moving like a snake, not a clogged drain.
Advanced Color Logic: Processing Order
Now that the crate is broken and you have access to the full palette, the challenge shifts from "access" to "execution." This section details the exact order in which you should process the remaining colors to ensure a 100% fill rate without contamination.
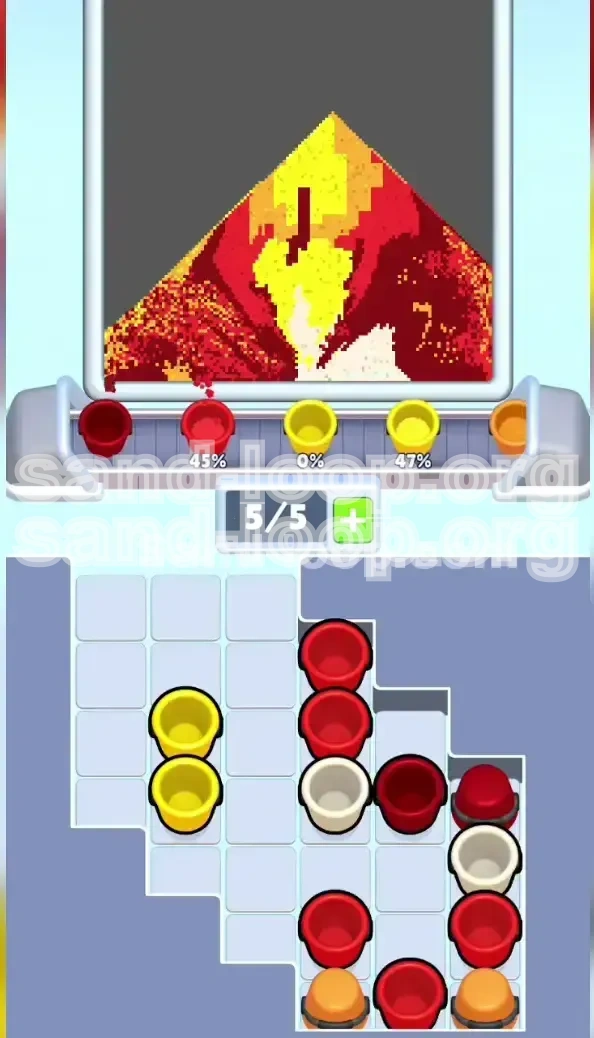
Phase 1: The Background Flush (Dark Red)
Even after the crate breaks, Dark Red remains your priority. The background is the largest area of the canvas. You want to get this to about 90% completion before moving to the flame details. Strategy: Keep tapping Dark Red cups in pairs. Two on the belt, wait for them to drain, tap two more. Why pairs? Because the background is huge. Single cups take too long. Triple cups risk overflow. Pairs are the sweet spot for maintaining the 0/5 balance while rapidly filling the void.
Phase 2: The Outer Flame (Bright Red)
Once the background is mostly dark, look at the candle flame. The outer layer is Bright Red. This color acts as a "wall" for the other colors. Tip: Do not fill the entire outer ring at once. Fill about 70% of the Bright Red outer layer. This creates a reservoir. If you fill it 100%, you risk overfilling the thin edges when you go for the center later. By leaving 10-20% headroom, you give yourself room for error when the sand physics get bouncy near the end of the level.
Phase 3: The Middle Layer (Orange)
Orange is your bridge color. It sits between the Red and the Yellow. You should tap Orange cups immediately after you have established a good flow of Bright Red. The Orange layer is smaller than the Red but larger than the Yellow. Timing Tip: Try to time your Orange cups so they pour while your Dark Red cups are draining. This overlaps your "down time" (waiting for sand) with your "up time" (active pouring), maximizing efficiency.
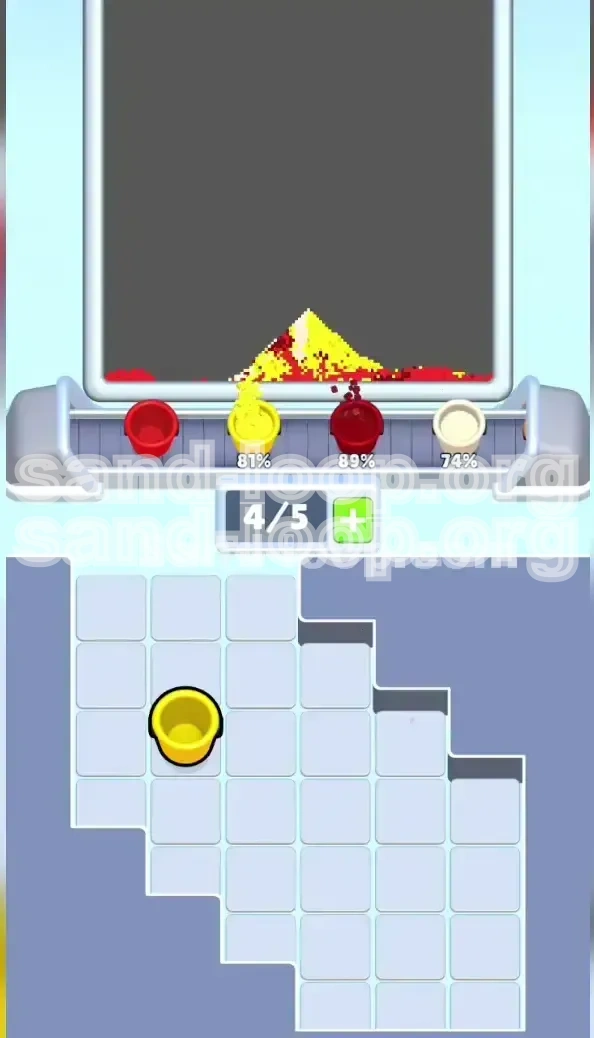
Phase 4: The Core and Sparks (Yellow)
Finally, we address Yellow. This is last for a reason. The Yellow core is small, and the sparks are tiny details. If you have followed the previous steps, your belt should be relatively clear of big heavy colors. Now you can spam the Yellow cups. Since the Yellow areas are small, they will fill up fast. You might need to tap 3 or 4 Yellow cups in quick succession to finish the job. Since this is the end of the level, you don't need to worry as much about saving slots—just get that color on the board and seal the victory.
Handling the "Wick" Anomaly
Remember the Dark Red wick in the center of the flame? Even though you are focusing on the flame colors now, keep an eye on it. If it runs dry while you are doing Yellow, pause your Yellow tapping and drop one Dark Red cup on the belt. It is better to top off the wick immediately than to let it sit empty while you hunt for the last Yellow spark.
Key Tips and Common Mistakes
To truly master Level 495, you must avoid the pitfalls that trap 90% of players. These tips are born from hundreds of test runs and analyze the specific failure points of the level.
Key Tip: The "Tap-Wait-Tap" Cadence
Develop a metronome in your head. Tap. Wait 2 seconds. Tap. Wait 2 seconds. This cadence prevents the "conveyor belt gridlock." If you tap-tap-tap-tap-tap rapidly, you fill the slots. The sand pours slowly. By the time the 5th cup starts pouring, the 1st cup is only half done. You are now stuck. Slowing down your tapping actually speeds up your level completion because it prevents downtime.
Common Mistake: The "Yellow Spark" Trap
This is the #1 killer in Level 495. Players see the Yellow sparks on the dark background and instinctively fill them. This feels productive because you are "completing" parts of the canvas. However, the background is 80% of the level. If you use your valuable early slots on Yellow (which is only 10% of the level), you run out of space for the Dark Red cups you need to break the crate. Rule of Thumb: If it's small and yellow, ignore it until the end.
Common Mistake: Ignoring the Crate Counter
Some players are so focused on the canvas that they forget the supply tray. They tap random cups from the top, not realizing they aren't contributing to the crate count. If you tap 10 cups but they are the wrong cups (or you overfill the belt), the crate never breaks. Always keep a mental counter: "I need 3 more for the crate." Every tap should serve that purpose until the crate is gone.
Common Mistake: Overfilling the White Base
The White candle base is sturdy, but it's not infinite. Some players dump every White cup they see immediately. This overfills the base, causing the sand to spill over into the Dark Red background areas. This creates "color pollution" that makes the background look messy and can sometimes trigger level failure logic if the game detects overflow. Fill the White base to 95%, then stop. Let it settle.
Common Mistake: Late-Game Deadlock
You broke the crate! You are doing great! You tap 5 Bright Red cups in a row because they are finally available. Deadlock. You are now stuck waiting for 5 cups to drain while the timer ticks. Correction: After the crate breaks, treat the game like it's level 1 again. Slow down. The cups aren't going anywhere. Tap 2 Bright Reds, wait, tap 2 Oranges, wait.
Key Tip: Visualizing the Flow
Look at the sand pouring out of the cup. Is it a thin stream or a thick glob? Thick globs (Dark Red) take longer to drain. Thin streams (Yellow) drain faster. Adjust your tapping speed based on the viscosity of the current color. Dark Red requires slower tapping. Yellow allows for faster tapping. Adapting to the physics of the sand is the mark of a pro player.
Troubleshooting and Speed Run Strategies
You have read the guide, but maybe you are still stuck. Or perhaps you are a veteran looking to optimize your time. This section covers the "What ifs" and the "How fasts."
Solution: "I ran out of moves before the crate broke."
If you find yourself with no cups left to tap and the crate is still sitting there at 6/7 or 5/7, you were likely too impatient with the Yellow cups. You burned your slots on low-priority colors. The Fix: Restart the level. As soon as it starts, identify the White and Dark Red cups and pretend the other colors don't exist. Force yourself to wait for the specific colors needed for the crate. It might feel boring to ignore easy taps, but it's the only way to clear the blocker.
Solution: "My belt is full and nothing is happening."
You are in a deadlock. You have 5 cups on the belt, likely a mix of Red, Orange, and Yellow. The Fix: Put the device down. Literally. Wait for the cups to drain. Do not try to tap faster or click the screen frantically. The game mechanics are frozen until space is made. Watch the sand levels in the cups decrease. Once one cup disappears, you can resume. If this happens frequently, you are tapping 5 cups at once. Reduce your max active cups to 3.
Solution: "The colors keep bleeding into each other."
If your candle flame looks muddy instead of crisp, you are filling the colors in the wrong order. You likely filled the center Yellow before the outer Red was fully established. The Fix: The Red layer creates a dam. You must fill the dam before the water (Yellow) goes in. On your next run, strictly follow the Outer → Middle → Inner order. Do not touch the core until the ring is done.
Speed Run Tip: Pre-Loading the Queue
For experienced players looking to shave seconds off: As the last cup for the crate is pouring (the 7th cup), you can visually predict when the crate will break. Hover your finger over the Bright Red cups in the now-unlocked bottom right. The moment the crate vanishes, tap the Bright Red cup immediately. This skips the animation delay of the crate settling and gets the next color pouring instantly.
Speed Run Tip: The "Yellow Sweep"
In a normal run, we advise patience. In a speed run, you can "Yellow Sweep" at the end. Since you have saved all your Yellow cups for the end, you can rapidly tap 3 or 4 Yellow cups in a row. Because the Yellow areas are so small, they will fill quickly, and the level will end before the belt gridlocks. This is a calculated risk: you intentionally clog the belt right as the level completes, sacrificing clean management for pure speed.
Speed Run Tip: Ignoring the 100% Background
The Dark Red background is forgiving. You do not need it to be literally 100% full to pass the level. Usually, 95-96% coverage is enough for the game logic to register it as "complete." If you are chasing a time record, stop pouring Dark Red the moment the visual gaps are small and hard to see. Switch to the flame colors immediately. That extra 4% of Dark Red takes a disproportionately long time to squeeze out of the cups.