
Level 497
EXPERTHow to solve Sand Loop level 497? Get instant solution for Sand Loop 497 with our step by step solution & video walkthrough. Sand Loop 497 tips and guide.
Play Sand Loop Now
Experience the puzzle challenge firsthand
Game Screenshots

Sand Loop Level Guides
Sand Loop Level 497: Complete Walkthrough & Strategy Guide
Welcome to the ultimate guide for conquering Sand Loop Level 497. If you have found yourself stuck on the "Two Trees" challenge, frustrated by gridlocked trays and bleeding colors, you are in the right place. This level is less about reflex and more about strict resource management and understanding the physics of sand deposition. In this guide, we will dismantle the level's logic, providing you with a step-by-step blueprint to secure that victory.
1. Level Overview & Analysis
Level 497 is a high-difficulty logic puzzle disguised as a casual sorting game. It introduces a severe constraint on your inventory space while demanding a complex, multi-layered color application process. The visual goal is to paint two distinct trees against a background, but the gameplay goal is to manage your "Tray Economy" under pressure.
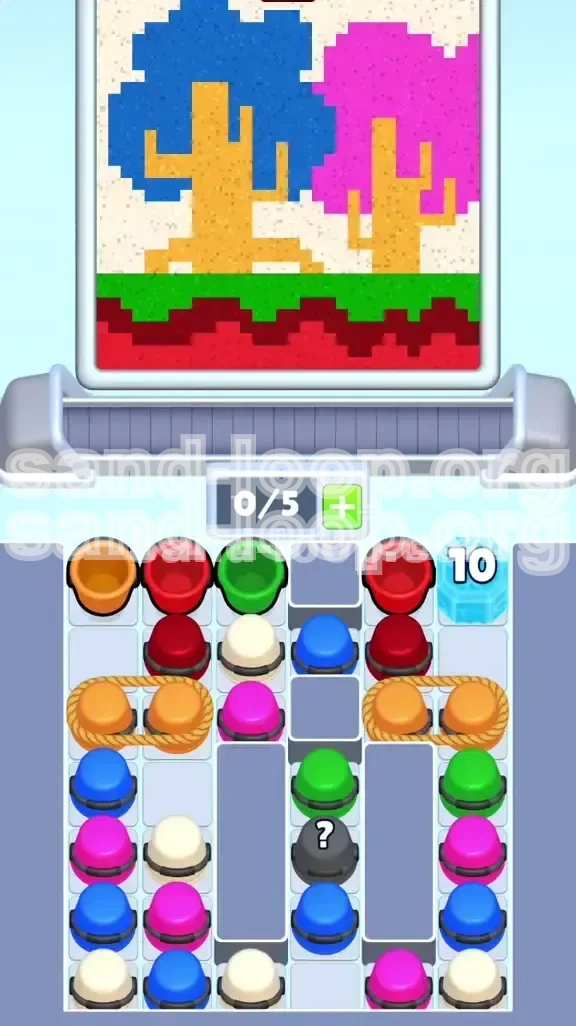
The Visual Challenge: The Two Trees
The objective image is deceptively simple: two trees with blue and pink canopies, orange trunks, sitting on red dirt and green grass, backed by a white sky. However, in Sand Loop, thin lines and intricate borders are your enemy. The orange roots interlock with the green grass in a jagged pattern. If the sand physics are not handled with care, the orange sand will bleed into the green zones, turning your crisp grass into a muddy brown mess. You are not just painting; you are engineering a sedimentary rock formation.
Inventory Constraints: The 0/5 Tray Lock
This is the core stressor of the level. Your tray capacity is locked at a maximum of 5 units. While this sounds standard for the genre, Level 497 throws "Roped Cups" and "Ice Blocks" at you that force you to hold multiple units simultaneously. A single mistake—such as pulling a rope when you have 4 units in your tray—will result in an immediate deadlock. You must maintain a "Safe Zone" of 2 empty slots at all times to handle the game's mechanics.
The Gridlock Mechanic
Unlike earlier levels where you can tap cups to free up space, tapping here is often a trap. The layout features "deadlock columns." Tapping the wrong cup drops a color into a slot where it cannot be processed yet, effectively clogging your machine. You must fight the instinct to clear the board immediately and instead focus on the sequence of operations.
Hazard Distribution
- Top Right: A massive 10-hit Ice Block pinning critical Red components.
- Left/Right Flanks: Roped Cup pairs that require 2 empty slots to activate.
- Center Bottom: A Mystery Cup that acts as a wildcard for your strategy.
Why Players Fail
95% of failed attempts on Level 497 happen because players rush the "Sky" (White) or the "Canopies" (Blue/Pink) before the "Foundation" (Red/Green/Orange) is set. Sand is heavy; it flows downward. If you paint the sky first, the subsequent layers of heavy dirt and grass will simply slide off the glass and fail to adhere, or they will crush the white layer beneath, causing color contamination.
Success Metrics
To beat this level, you need to achieve a specific flow state: 40% foundation management, 30% inventory clearing, and 30% careful layering. Expect the run to take 3-5 minutes if done correctly. Do not rush.
2. Clear Objectives & Preparation
Before you tap a single cup, you must understand your mission hierarchy. Your goal is not just to "empty the board," but to construct the image in the correct order.
Primary Objective: Establish the Foundation
Your first and most critical goal is to secure the bottom 20% of the canvas. This consists of the Dark Red dirt and the Bright Green grass. Without these solid layers, the trees have nothing to root into. You must prioritize the Red and Green cups above all others. Do not touch Blue, Pink, or White cups until the dirt line is fully drawn.
Secondary Objective: Clear the Ice Block
The 10-hit Ice Block in the top right is a timer bomb. It blocks access to essential Red cups needed for the foundation. Your secondary objective is to chip away at this block using adjacent matches as early as possible. Ignoring it until the late game will cause a traffic jam that you cannot recover from.
Tertiary Objective: Manage the Mystery Cup
Located in the center bottom, the Mystery Cup (?) is a variable. It can be a shortcut or a game-ender. Your objective regarding this cup is to delay revealing it until you have maximum inventory flexibility. Do not tap it when your tray is full.
Quaternary Objective: The Trunk Barrier
Once the dirt and grass are laid, you must build the orange trunks. Think of these as a "dam" or "barrier." The trunks must be solid to catch the falling leaves (Blue and Pink). If the trunks are thin or incomplete, the canopy colors will slide right past them and ruin the grass below.
Final Objective: The Flood Fill
The final 10% of the level is a race to fill the negative space (White Sky) and the bulk volumes (Blue/Pink Canopies) without causing a "Sand Overflow" error. This requires rapid, precise tapping to empty your remaining tray capacity.
Mental Preparation
Prepare to restart. You will likely fail on your first few tries as you learn the specific location of the roped cups. Patience is your greatest tool. If the board looks cluttered, stop and look for the one color that can move forward without blocking another.
3. The Correct Color Sequence
In Sand Loop physics, order is everything. You cannot paint a tree from the top down. Here is the strict processing order you must adhere to in order to generate a valid clear.
Phase 1: The Sub-Layer (Dark Red)
Priority: Critical. Dark Red forms the "dirt" beneath the grass. It is the heaviest and lowest layer. You must process Dark Red cups first. If you process Green first, it will mix with the Red background and create a dark, muddy sludge that fails the level's color purity check. Secure the Red dirt at the absolute bottom of the canvas.
Phase 2: The Ground Line (Bright Green)
Priority: High. Once the red dirt is roughly 50% filled, you introduce the Bright Green. This forms the grass line. The green sand must settle *on top* of the red. Be careful: the pixel art requires a sharp line. If you pour Green too fast, it will disperse into the Red zone. Pour it slowly, allowing the Green to mound up against the Red boundary.
Phase 3: The Skeleton (Vivid Orange)
Priority: Medium. The Orange roots and trunks are next. This is the most dangerous phase because the orange roots are jagged and interlock with the green grass. You must overfill the orange slightly so it digs into the green layer, creating a solid lock. This prevents the next layers from sliding.
Phase 4: The Canopies (Cobalt Blue & Hot Pink)
Priority: Low (but High Volume). These are the "heavyweights." There are usually more Blue and Pink cups than any other color. You cannot process these until the Orange trunks are fully cured. Once the trunks are solid, you can dump Blue and Pink simultaneously. These are wide, forgiving areas, so this is the "safe zone" where you can clear your tray rapidly.
Phase 5: The Negative Space (Off-White)
Priority: Last. The White Sky is filler. It touches every other color. If you pour White too early, it acts as a lubricant, causing your Green and Orange layers to slip and slide into the wrong positions. Save White for the very end, when the heavy structures are locked in place.
Sequence Logic Summary
Red -> Green -> Orange -> (Blue/Pink Simultaneous) -> White. Memorize this chain. Any deviation from this order increases the difficulty coefficient by approximately 200%.
4. Step-by-Step Walkthrough
Follow these actionable steps to navigate the board. We assume a standard starting position with a full tray of random colors.
Step 1: Inventory Triage & The First Tap
At the start, your tray will likely be cluttered with unusable colors (Blue/White). Look at the "Next" queue. Do you see Red or Green? If yes, tap them. If no, look for any cup that can be matched on the board without disturbing the Ice Block corners. Your goal is to free up 3 slots in your tray immediately. Do not touch the Roped Cups on the left yet.
Step 2: The Ice Block Breaker
Focus your eyes on the top right. That 10-ice block is your primary target. Tap any Red or Green cups that are adjacent to this block. You need to reduce the counter from 10 to 0. Every time you clear a cup near the ice, the board shifts, potentially bringing new Red/Green cups into play. Ignore the rest of the board until this block shatters.
Step 3: Managing the Ropes (The Slot Economy Test)
Once the ice shatters, a column will drop, likely exposing a pair of Roped Cups (likely Orange). You need exactly 2 empty slots to pull these. If your tray is at 4/5 or 5/5 capacity, stop tapping everything else and process your current queue until you have 2/5 slots free. Pull the rope to send the Orange cups to the conveyor.
Step 4: The Mystery Cup Protocol
With the ice gone, the board settles, revealing the Mystery Cup (?) in the bottom center. Before you tap it, ensure your tray is at 3/5 capacity or lower. Tap it. If it reveals Blue or Pink, leave it there! Do not add it to your tray yet. If it reveals Red, Green, or Orange, pull it immediately. If it's a color you aren't ready for (Blue/Pink), treat it as a roadblock and work around it.
Step 5: Layering the Roots
You should now have Red, Green, and Orange flowing into the machine. Monitor the canvas. Are the orange roots digging into the green grass? If the orange is just sitting on top, you may need to pause adding green and focus purely on orange to build up the pressure. You want the colors to interlock like puzzle pieces.
Step 6: The Great Flood (Canopy Deployment)
Once the trunks (Orange) are visible and the grass (Green) is a solid line, your tray is probably overflowing with Blue and Pink. This is the "Speed Run" phase. You can now tap Blue and Pink aggressively. The trunks will catch them. Dump your tray. Let the conveyor belt run dry. You are clearing space for the final act.
Step 7: The White Sky Finale
The board should now look mostly complete, with only White cups remaining (often buried at the bottom of columns). Dig them out. Now that the heavy sand is settled, you can pour the White rapidly. It will flow around the trees and fill the sky. Since the structures are heavy and set, the white sand won't disrupt them. Clear the final cups to trigger the victory animation.
5. Key Tips, Mistakes & Stuck Solutions
Even with a plan, things go wrong. Here is how to troubleshoot the most common failure points in Level 497.
Key Tip: The "Buffer" Strategy
Always keep a mental buffer of 1 slot. If the tray says 4/5, act as if it is 5/5 (Full). This prevents you from accidentally locking yourself out when a Roped Cup pair drops. Discipline with your slot count is more important than speed.
Common Mistake: The Early Sky
The most tempting trap is the White cups at the bottom of the screen. They look easy to grab. Do not grab them. If you fill the sky with white before the trees are planted, the tree sand will slide down the white "hill" and pool at the bottom, ruining the level. Wait for the texture of the trees to provide friction for the white sand.
Common Mistake: Ignoring the "Next" Preview
The "Next" column shows what is coming. If you see a Roped Cup pair coming up in 2 turns, start clearing your tray *now*. Most players get stuck because they react to the Roped Cup only after it arrives, at which point it is too late to clear the necessary slots.
Stuck Solution: The Color Jam
If you are stuck with a full tray and no moves, look at the Ice Block area again. Is there a single pixel of a cup you can tap? Often, chipping away one hit on the ice will shift the board just enough to align a match for you. If not, you may have to restart, as a deadlock with 5/5 full non-matching colors is usually unrecoverable.
Stuck Solution: Mystery Cup Anxiety
If the Mystery Cup is blocking a column you need, and you are too scared to tap it, look for alternative moves on the opposite side of the board. Often, clearing the left side will drop the right side low enough that the Mystery Cup is no longer blocking the critical path.
Speed Run Tip: Combo Tapping
Once you reach the "Canopy Phase" (Step 6 above), you can speed up significantly. Since Blue and Pink are distinct and don't interact with each other or the finished ground layers, you can tap them as fast as your fingers allow. This is the time to regain any time lost during the slow Ice Breaking phase.
6. Advanced Speed Run Strategies
For players looking to achieve 3-star rankings or top the leaderboards, efficiency is key. This section outlines how to shave seconds off your time.
Pre-Loading the Tray
During the initial layout scan, identify where the Ice Block will fall. Try to manipulate your tray *before* the block breaks so that the cups falling from the broken block match the colors you already have queued. This allows for instant processing without re-sorting.
Chained Rope Pulling
If you have two sets of Roped Cups (one on left, one on right), try to synchronize their release. Clear your tray to 1/5 (leaving 4 empty slots). Pull the first rope, process immediately, then pull the second. Managing ropes in a batch is faster than dealing with them individually as they appear.
Minimizing Conveyor Travel Time
The conveyor belt has a delay. Try to group your taps so that you send a "wave" of cups (e.g., 3 Reds in a row) rather than alternating (Red, Green, Red, Green). Keeping the conveyor processing a single color type is slightly faster due to animation compression.
The "Ghost Tap" Technique
This is a pro-move for the Ice Block. You can tap the ice block itself sometimes to trigger a sound or visual cue, but in Sand Loop, you must tap the *cups* adjacent to it. Learn the exact hitboxes of the cups surrounding the ice so you don't miss-tap and waste a millisecond.
Optimizing the Final Flood
When doing the final White Sky fill, don't wait for the sand to settle perfectly. As long as the trees are 90% filled, you can start dumping the white sand. The physics engine will handle the final settling while the animation for the "Level Complete" screen starts. This can save 1-2 seconds on the final countdown.