
Level 500
HARDHow to solve Sand Loop level 500? Get instant solution for Sand Loop 500 with our step by step solution & video walkthrough. Sand Loop 500 tips and guide.
Play Sand Loop Now
Experience the puzzle challenge firsthand
Game Screenshots


Sand Loop Level Guides
Level Overview: The 500th Milestone
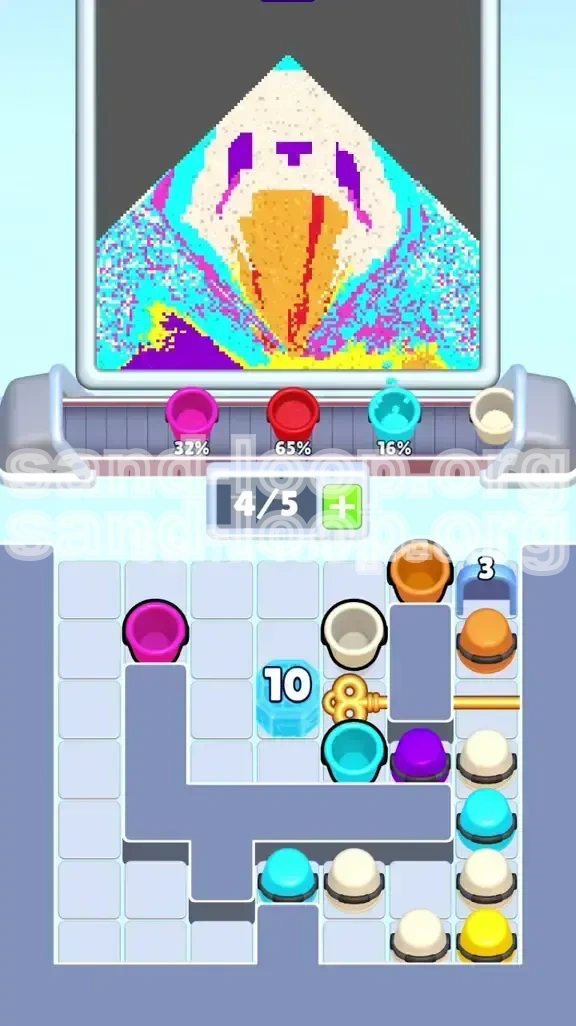
Welcome to Level 500, "The White Bunny Cake." This is not just another stage; it is a comprehensive examination of your logic and resource management skills in Sand Loop. While many levels rely on rapid reflexes, this specific level is a rigid puzzle that demands a methodical approach. The visual goal is to construct a vibrant scene featuring a pristine White Bunny sitting on an Orange and Red cake against a Cyan sky.
However, the difficulty lies in the strict constraints imposed by the board layout. You are dealing with a heavily segmented environment divided by unbreakable walls and massive Ice Blocks that restrict movement. Unlike standard levels where you can tap freely, tapping the wrong color here—even if it matches—can contaminate your White Bunny or clog your tray irreversibly. You must navigate color dependencies, manage a 5-slot tray capacity, and solve a specific locking sequence to achieve victory.
The Three-Silo Architecture
The board is split into three vertical columns (Left, Center, Right) separated by thick grey barriers. This layout prevents cups from moving horizontally between sections. You must treat each silo as an independent puzzle that feeds into a central resource pool (your tray). The Left Silo holds your starting materials, the Center Silo is blocked by Ice Blocks, and the Right Silo contains critical reserves locked behind a key.
The "Purity" Mechanic
The most critical technical aspect of this level is the physics of the White sand. In Sand Loop, lighter colors are easily overwritten by darker ones if poured in the wrong order. To get a pristine White Bunny, you cannot pour White first. You must build the foundation (the cake) and the background (the sky) to act as barriers. If you pour White before the cake is built, it will simply disperse into the empty void below the canvas, wasting your resources.
The Ice Block Dam
Progression is gated by two massive counters: Ice Block '26' and Ice Block '16'. These function as dams. Until you clear these, the Right Silo is inaccessible. The '26' block requires a high volume of specific colors to clear, acting as a "tax" before the real challenge begins. Failing to manage these counters efficiently will leave you stuck with a full tray and no moves.
The Tray Management Crisis
With 7 colors in play (Cyan, White, Red, Orange, Purple, Yellow, Pink) and only 5 slots in your tray, you will face a "Tray Crisis" every 20-30 seconds. The game is designed to flood you with unusable colors (like Purple early on) to test your ability to prioritize. You must learn to discard or hold specific cups to maintain flow.
Visual Complexity vs. Logical Simplicity
While the final image looks complex—a detailed bunny, hearts, and a layered cake—the logic to build it is linear. The complexity comes from the *execution*, not the *strategy*. You must follow the "Bottom-Up" construction rule strictly: Cake (Bottom) -> Sky (Background) -> Bunny (Middle) -> Details (Top). Deviating from this order results in visual corruption.
Milestone Difficulty Spike
Expect a significant difficulty spike compared to Level 499. The margin for error is slim. A single mistaken tap on a Purple cup in the first 10 seconds can force a restart. This guide is designed to give you the exact sequence to avoid these pitfalls and secure your 100% completion.
Primary Objectives and Strategic Goals
To clear Level 500 with a 3-star rating, you cannot simply pour sand randomly. You must adhere to a strict construction timeline. The level is divided into four distinct phases, each with its own critical success factor. Ignoring these objectives is the most common reason players fail.
Objective 1: Foundation Construction (0% - 30%)
Your immediate goal is to build the "floor" of the image. In Sand Loop physics, sand falls indefinitely until it hits a surface or previously poured sand. If you try to pour the White Bunny first, the sand will fall off the screen. You must prioritize Orange and Red cups first to create a solid base layer at the bottom 30% of the canvas. This is non-negotiable.
Objective 2: The Ice Block Breakthrough (30% - 50%)
The mid-game revolves entirely around reducing the counters on the Ice Blocks. You must focus fire on clearing adjacent cups to these blocks. Specifically, you need to generate enough "points" to shatter the '26' and '16' blocks. This phase is about resource generation—clearing cups not just for the art, but to unblock the board's layout.
Objective 3: Unlocking the Right Silo (50% - 70%)
The right side of the board holds a massive reserve of Cyan sand, which is essential for the sky background. This section is locked behind a physical mechanism that triggers only when the '16' Ice Block is destroyed. You must prepare your tray capacity *before* breaking this block to prevent a deadlock when the new cups flood in.
Objective 4: The White Bunny Isolation (70% - 90%)
Once the background and cake are established, you must isolate the White sand. This means clearing your tray of all dark colors (Red, Purple, Orange) to ensure they don't mix with the White. You need a "clean" tray to successfully pour the Bunny's body and ears without contaminating it with grey or brown smudges.
Objective 5: The High-Contrast Finish (90% - 100%)
The final 10% of the level is about details. You must reserve the Purple (for eyes/nose) and Pink (for hearts) for the very end. These colors are "finishing touches." If poured early, they become buried under subsequent layers, rendering them invisible and wasting your color meter progress.
Objective 6: Tray Optimization
Throughout all phases, your hidden objective is to maintain tray fluidity. Never let your tray sit at 5/5 full unless you are executing a specific combo. An empty slot is an opportunity to fetch the color you need next. Constant cycling is the key to preventing the game from locking up.
Step-by-Step Walkthrough: Phase 1 - The Foundation
The first 30 seconds of Level 500 are the most critical. Do not rush. The board will present you with many immediate options, but most of them are traps. Follow this exact sequence to secure your early game advantage.
Step 1: The Purple Ban
When the level loads, look at the top row. You will likely see Purple cups mixed in with Red and Orange. Do not tap the Purple cups. Purple is the heaviest, rarest color in this level and is needed only for the bunny's eyes at the very end. If you tap it now, it sits in your tray taking up a valuable slot that you need for Red or Orange. Ignore Purple completely until the end-game.
Step 2: The Red/Orange Priority
Locate the Red and Orange cups in the left and center silos. Tap these immediately. Send them up the conveyor belt. Your goal is to start filling the bottom of the canvas with these warm colors to create the "cake" base. Aim to get the Red and Orange meters to at least 15% before you do anything else. This ensures the floor is solid.
Step 3: Clearing the Left Silo Rope
In the left column, you will notice a brown rope binding a stack of Pink cups. Beneath that rope are essential Cyan cups. To break the rope, you must clear the cups adjacent to the trapped ones. Focus on clearing the Cyan cups above the rope first. Once the rope breaks, the Cyan is freed, giving you the ammunition needed to start working on the Ice Blocks.
Step 4: Targeting the '26' Ice Block
Shift your focus to the massive '26' Ice Block in the center. You cannot clear it yet, but you can start the counter. Clear Cyan cups aggressively. Cyan is the primary weapon against this block. Don't worry if the Cyan meter goes over 50% early; you need the sky color eventually anyway. Keep clearing Cyan until the counter drops below 20.
Step 5: Managing the "Yellow" Distraction
Yellow cups will appear sporadically. Yellow is used for a very thin ground line. You only need to clear about 3-5 Yellow cups total. Do not hoard Yellow. Tap it once to satisfy the ground line requirement, then ignore it. A tray full of Yellow is a death sentence in this level because its volume requirement is so low compared to the others.
Step 6: Tray Capacity Check
After about 45 seconds of play, pause and assess your tray. You should have a mix of Red, Orange, and maybe one Cyan. If your tray is full (5/5), stop tapping the board immediately. Look at the conveyor belt. Pour the sand from your tray into the canvas to free up slots. You must always have 1 or 2 empty slots to prepare for the upcoming "Key Unlock" event.
Step-by-Step Walkthrough: Phase 2 - The Mid-Game Crisis
This phase begins once the '26' Ice Block is shattered. The board state will change drastically, and you must be prepared for a flood of new resources. The Golden Key mechanic is the make-or-break moment here.
Step 1: The Golden Key Protocol
As you chip away the last of the '16' Ice Block, you will see a Golden Key adjacent to it. This is a danger zone. When the key frees, it slides right and unlocks the right silo, dumping a massive amount of new cups into the tray. If your tray is full (5/5) when this happens, the new cups get blocked, and you will likely lose.
Step 2: Preparing the Tray Vacuum
When the '16' counter is at "2" or "3", stop tapping the board entirely. Focus 100% on the conveyor belt. Pour everything out of your tray. Get your tray down to 0 or 1 cup maximum. This intentional "vacuum" ensures that when the key unlocks, the new cups have a place to go, preventing a logjam.
Step 3: The Right Silo Flood
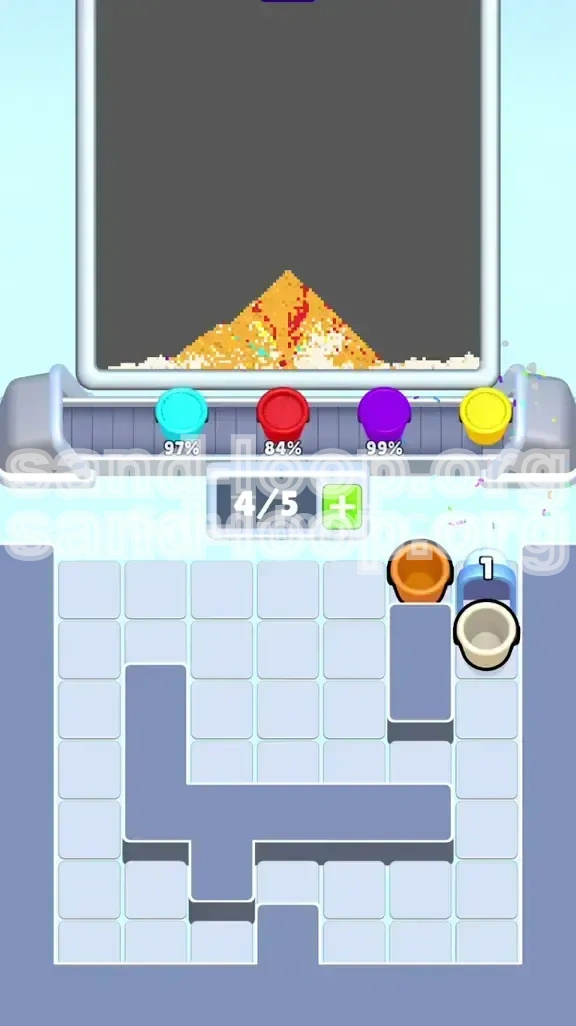
Trigger the final break on the '16' block. Watch as the Right Silo unlocks. You will likely see a massive influx of Cyan and White cups. Since you emptied your tray in the previous step, you can now collect these high-value colors. Immediately send these new cups up the belt to start building the sky (Cyan) and preparing for the bunny (White).
Step 4: Dealing with the Lock Box '3'
With the board open, look at the top right corner. There is a blue Lock Box with a '3' on it trapping an Orange cup. Now that you have free movement and tray space, clear the cups beneath this box. Opening it gives you a burst of Orange, which is perfect for reinforcing the cake layers that might be thin.
Step 5: The 50% Transition
At this point, your canvas should look like this: The bottom is solid Red/Orange (Cake), and the sides are filling with Cyan (Sky). The center is likely still empty or low. This is correct. You are now entering the transition phase where you must stop pouring dark colors and prepare for the White Bunny.
Step 6: Purging Dark Colors
Start avoiding Red and Orange taps. Even if they are available, ignore them if you have other options. You need to clear the remaining Red/Orange from your tray to make room for the "White Phase." If you leave Red in your tray during the White phase, you risk pouring it into the bunny's face.
Step-by-Step Walkthrough: Phase 3 - The White Bunny
The White Bunny is the centerpiece of the level, but it is also the most fragile element. This phase requires patience. Do not rush the pour. The White sand must land perfectly on the cake and in front of the sky.
Step 1: Establishing the White Base
Start sending White cups up the belt. Do not pour them until the cake is high enough. The White sand needs a platform. If you pour it too early, it spreads over the Red cake and turns pink. Pour only when the Red/Orange cake is substantial enough to act as a pedestal.
Step 2: Building the Body and Ears
Focus on the center of the canvas. The White sand will form the bunny's head and body. You will see the ears taking shape against the Cyan background. Keep a steady stream of White going. If you run out of White cups on the board, dig into the right silo where you unlocked the reserve earlier.
Step 3: The "Clean Tray" Rule
During this phase, your tray should ideally contain only White and Cyan cups. If you have a Purple cup sitting in your tray, you are at risk of accidentally dumping it into the White body. Try to keep your tray composition "clean" (Light colors only) to avoid accidental contamination.
Step 4: Monitoring the Cyan Sky
While pouring the White bunny, don't forget the Cyan background. The sky needs to reach the top of the canvas. If the bunny is complete but the sky is only half-full, the level won't end. Alternate taps: One White cup, one Cyan cup. This keeps both meters rising evenly.
Step 5: Avoiding the "Grey" Mix
If you accidentally pour a dark color (like Red) onto the White bunny, do not panic. You can sometimes "overwrite" it by pouring more White on top immediately. However, if the Red spreads too much, it turns the bunny grey. If this happens, you may have to restart the level to get the pristine white look required for 100% completion.
Step 6: Preparing for Details
Once the White and Cyan meters are above 90%, stop pouring them. You need to leave a tiny bit of room at the top for the details. If you overfill the White, the bunny's eyes (Purple) won't have a distinct place to land. Precision is key here.
Advanced Tips, Common Mistakes, and Speed Run Strategies
Now that you understand the core sequence, these advanced strategies will help you optimize your playstyle, avoid the most common failure points, and potentially speed-run the level for a better time score.
Common Mistake: The "Purple Premature Ejaculation"
The number one mistake in Level 500 is clearing Purple too early. Players see a Purple cup and tap it out of habit. This floods the tray with a color that cannot be used until the very last second. It sits there, taking up space, preventing you from picking up White or Cyan. Rule of thumb: Purple is radioactive until the bunny is 100% white.
Common Mistake: The "Full Tray" Lock
Many players get stuck when the Right Silo unlocks because their tray was full. They stare at the screen, unable to pick up the new cups. Fix: If you see a cutscene or a major block breaking (like the Ice Blocks), immediately stop tapping and check your tray. Visualizing the "Key Drop" before it happens is the sign of a pro player.
Speed Run Tip: Pre-Loading for the Flood
Advanced players know exactly what cups are inside the Right Silo (mostly Cyan/White). Before breaking the '16' block, try to have your tray set up with complementary colors. If you have an empty slot, you can instantly grab a Cyan cup as soon as it unlocks, saving precious seconds.
Stuck Solution: The "Negative Space" Fix
If you are stuck at 99% completion with a few cups left and no matches, look for "negative space" in your art. Is there a small hole in the sky or a gap in the cake? Pour the leftover sand into the deepest part of the existing sand piles. Sometimes the game physics just need a final nudge to register the "full" status.
Speed Run Tip: Ignoring the Lock Box
In a speed run context, the blue Lock Box '3' in the top right is a low-priority objective. The Orange cup inside is not essential for beating the level, only for 100% color saturation. If you are struggling for time, you can ignore the Lock Box entirely and focus on the main silos. The game will usually give you enough Orange from the main spawn to pass.
Advanced Tip: Chaining Combos
Look for opportunities to clear the Rope, the Ice Block, and the Lock Box in rapid succession. If you can clear the last cups holding the Rope, then immediately clear the Ice Block, you create a "cascade" effect that clears the board faster than tapping individually. This requires holding your cups and waiting for the perfect moment to strike.