
Level 505
HARDHow to solve Sand Loop level 505? Get instant solution for Sand Loop 505 with our step by step solution & video walkthrough. Sand Loop 505 tips and guide.
Play Sand Loop Now
Experience the puzzle challenge firsthand
Game Screenshots

Sand Loop Level Guides
Level Overview: The Meteor Dino Challenge
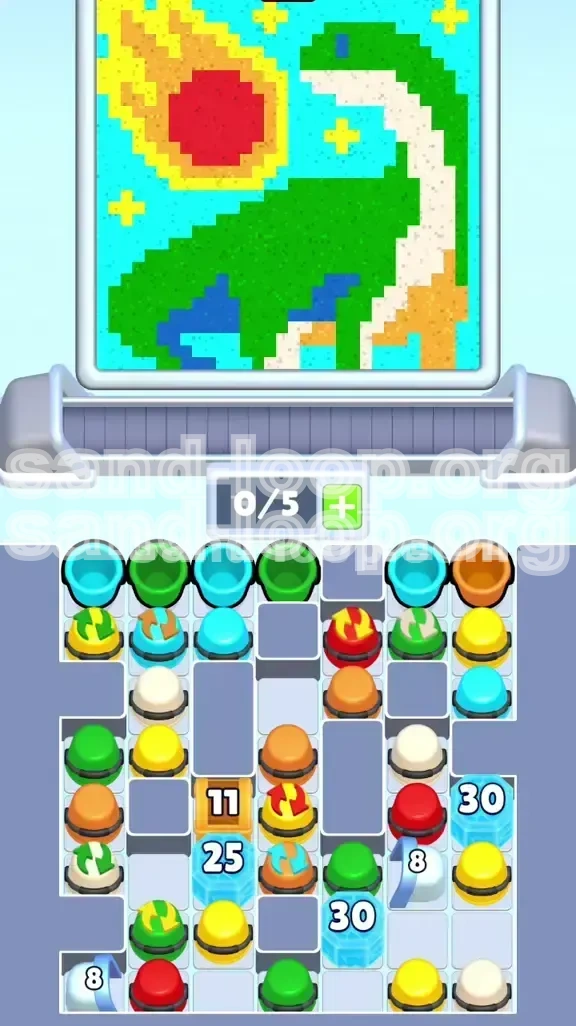
Welcome to Level 505, widely known in the community as the "Meteor Dino" stage. This level represents a significant difficulty spike in Sand Loop, shifting from simple relaxation to a test of logic and resource management. You are presented with a prehistoric scene: a towering Brachiosaurus composed primarily of green and cream pixels, set against a vast cyan sky. The focal point is the giant red meteor descending from the top-left corner, threatening the dinosaur below.
Unlike previous stages where you could simply pour colors at random, Level 505 is strictly strategic. The board is cluttered with obstacles, specifically Ice Blocks with high durability and a stubborn Wooden Crate. Your tray space is limited to 5 slots, and mismanaging these slots by holding onto useless cups will lead to an immediate deadlock. The level requires you to balance precise pixel art skills with the logic of a match-3 game.
The Dinosaur Composition
The Brachiosaurus is the main subject, and it is structurally complex. The body is a massive heap of Green pixels, but the neck poses a challenge. It is a narrow, vertical strip requiring Cream (Off-White) sand. The difficulty lies in the proximity of these colors; a single slip of the finger with the Green sand can ruin the White neck, forcing you to restart the section or waste precious ice-melting cups to fix it.
The Meteor Threat
Occupying the top-left quadrant, the meteor is not just background art; it is a priority task. It requires a deep Red sand that is scarce on the board. The meteor also features a Yellow and Orange flame trail. Ignoring the meteor until the end is a common mistake; if your tray is full of sky colors when the meteor arrives, you won't have the space to catch the Red cups, causing a bottleneck.
Environmental Obstacles
The grid is rigged. You have a 30-count Ice Block on the right side guarding essential Yellow and White cups, and a 25-count Ice Block in the center hiding Cyan options. Additionally, a 11-count Wooden Crate blocks the path to a critical Rotation Cup. You cannot play this level passively; you must aggressively attack these blockers using specific colors to unlock the cups buried underneath.
Tray Management Dynamics
In Level 505, your 5-slot tray is your most valuable resource. The conveyor belt delivers cups in a mixed order. If you pick up every cup you see, you will fill your tray with colors you don't need (like Dark Blue for the ground) while the colors you do need (Red for the meteor) pass by. Learning to reject cups is just as important as using them.
Color Scarcity and Distribution
The distribution is uneven. You will be flooded with Cyan (Sky) and Green (Dino Body), but starved for Red (Meteor) and Cream (Neck). The game hides the rare colors behind the Ice Blocks. This creates a dependency loop: you need common colors to break ice, to get rare colors, to finish the art. Breaking this loop efficiently is the key to a 3-star rating.
The Logic Puzzle Element
Think of this level as a math problem. Every Ice Block has a specific HP value. The Ice 25 block requires 25 "hits" of any sand to break. If you use high-demand colors like Red to break ice, you are subtracting from your completion percentage. You must use "excess" colors like Green or Cyan to do the dirty work of breaking blocks, preserving your rare Red and White sand for the actual artwork.
Clear Objectives: Your Path to Victory
To complete Level 505, you cannot simply color by numbers. You must adhere to a specific set of goals that prioritize unlocking the board over filling the canvas. Your primary objective is to clear the physical barriers (Ice and Wood) before the visual barriers (the empty sky) can be addressed.
Destroy the Crate 11 Immediately
The Wooden Crate (11 hits) is the first choke point. It sits in the upper-middle section, blocking a Rotation Cup that switches between Red and Yellow. Since the meteor requires Red immediately, clearing this path is your #1 priority. Do not focus on the dinosaur's feet or the sky until this crate is splintered.
Melt the Ice 25 and Ice 30
The two Ice Blocks are the gatekeepers of the late game. The Ice 30 on the right holds the White and Yellow cups essential for the stars and the neck. The Ice 25 in the center guards additional Cyan flows. Your objective is to chip these down constantly throughout the level, never letting a full tray stop you from dumping sand into them.
Complete the Meteor First
While the dinosaur is the biggest object, the Meteor is the most urgent. It is small, isolated, and uses a color (Red) that has low spawn rates later in the level. Filling the meteor early frees up your tray to handle the large volume of Green and Cyan sand that comes later. Treat the meteor as a "prologue" task.
Isolate the Dino's Neck
The most delicate part of this level is the Brachiosaurus's neck. It is a thin Cream line surrounded by Green body pixels. Your objective here is precision. You must fill the neck without "bleeding" Green sand into it. This requires waiting for specific cups and avoiding "hold-to-pour" mechanics, opting instead for micro-taps.
Flood the Sky (Cyan)
The Cyan sky makes up approximately 40% of the screen's pixel count. However, it is the easiest part of the level. Your objective is to save Cyan cups for the "clean up" phase. Once the dinosaur and meteor are solid blocks of color, you can aggressively dump Cyan to fill the voids without worrying about complex edges or overlaps.
Utilize Rotation Cups Wisely
There are Rotation Cups on the board (indicated by circular arrows). Your objective with these is timing. You must not pull them until they display the color you currently lack. If you pull a Green/White rotator when it shows Green, but you need White for the neck, you have wasted a move. Wait for the cycle to align.
Step-by-Step Instructions: The Winning Strategy
Follow this exact sequence to maximize your efficiency. This walkthrough assumes you are starting with a fresh board and an empty tray.
Phase 1: The Crate and The Meteor (Start - 20% Completion)
As soon as the level starts, scan the top row for the Red Cup. You will likely see a Rotation Cup (Red/Yellow) trapped behind the Wooden Crate. Use your initial Green or Cyan cups to attack the Wooden Crate. It takes 11 units of sand. As soon as it breaks, tap the Rotation Cup when it is Red. Pour this Red sand immediately into the meteor core. Do not save it. Get the meteor about 50% filled, then pause. We will finish it after clearing more ice.
Phase 2: The Ice Assault (20% - 40% Completion)
Once the crate is gone and the meteor is started, shift your focus to the Ice 30 block on the right. This is blocking your path to White and Yellow cups. You need to generate 30 units of "waste" sand. Use Green cups here. The dinosaur body is huge, so you won't run out of space for Green. Pour Green sand into the Dinosaur's back and the Ice 30 block simultaneously. Every time you pour Green on the dino, check if you can spare a tap on the Ice. Once Ice 30 breaks, grab the Yellow and White cups but do not use them yet. Keep them in your tray to reserve the slots.
Phase 3: The Dinosaur's Neck and Body (40% - 70% Completion)
Now that the Ice 30 is gone, you should have access to White (Cream) cups. The dinosaur body (Green) should be roughly half-full. Now, focus on the neck. Stop pouring Green entirely. Wait for the White cups (or the White phase of Rotation Cups). Tap the neck area with short, 1-second bursts to fill the vertical strip. If you accidentally get Green on the neck, you will need a White cup to overwrite it, which is expensive. Once the neck is pristine white, resume filling the main body of the Brachiosaurus with Green until it is 90% complete.
Phase 4: The Sky Cleanup (70% - 90% Completion)
Your tray should now be holding mostly Cyan and maybe some Dark Blue/Orange. The Meteor and Dino are done. Now, flood the top of the screen. The Cyan sky is contiguous, meaning it touches the meteor and the dino. Pour Cyan in long streams. The physics engine will slide the sand into the empty corners. This is the "Zen" phase where you just clear your tray. If you have Rotation Cups left, use them to top off any Yellow pixels in the meteor tail or stars.
Phase 5: The Ground Details (90% - 100% Completion)
The bottom of the screen usually requires Orange and Dark Blue. These colors often clog the tray early on. Now that the sky is full, you have no choice but to use them. Pour these into the bottom corners. If you run out of space and the game asks you to clear slots, look for small 1-pixel mistakes in the sky or ground to fix. Usually, by this point, the level "auto-completes" the last few pixels due to the large volume of sand you've poured.
Color Order: Processing the Palette
The order in which you process colors is the difference between a smooth run and a frustrating failure. This hierarchy dictates which colors demand your attention immediately and which can be ignored.
Priority 1: Red (Meteor Core)
Status: Critical. Red is the bottleneck of this level. It is only used for the meteor, and it is locked behind the crate initially. If you see Red, use it. Do not store it in your tray. The meteor is a small area, so it fills up fast. If you fill the meteor too early with other colors, you won't be able to fit the Red sand in later without wasting cups clearing space.
Priority 2: Cream/White (Dino Neck)
Status: High. This color is scarce. It is often found in Rotation Cups or under the Ice 30 block. You need it for the neck and possibly the underbelly. If you have a tray full of Green and Cyan, and a White cup appears, you must make room for it. A missed White cup can stall your progress for minutes while you wait for the cycle to return.
Priority 3: Green (Dino Body)
Status: Medium. Green is abundant. You will see more Green cups than you can count. While the dinosaur is big, you don't need to prioritize Green over breaking Ice. Use Green as your "fuel" for melting the Ice 25 and Ice 30 blocks. Only focus on pure Green filling when your tray is full of it and no Ice is available to hit.
Priority 4: Yellow (Stars/Tail)
Status: Low/Medium. Yellow is tricky. It is needed for the meteor trail and the background stars. These are small areas. Do not fill your tray with Yellow cups early on. Keep them flowing on the conveyor. Only pick up Yellow when the Meteor is ready for the trail or the stars are the only thing left in the sky.
Priority 5: Cyan (Sky)
Status: Low. Cyan is the "filler" color. It makes up the background. Because it is the background, it is very forgiving. You can pour Cyan almost anywhere and it will find a gap. Only process Cyan when you have absolutely no Red, White, or Ice-breaking priorities left. It is your "clean up" batter.
Priority 6: Dark Blue/Orange (Ground)
Status: Ignore. These colors are at the very bottom. They are tray poison. If you pick up a Dark Blue cup early, you lose a slot for a Red cup. Ignore the ground completely until the end of the level. Let the conveyor belt pass these by; do not let them clutter your tray.
Key Tips & Common Mistakes
Mastering Level 505 requires you to internalize a few advanced techniques. These tips will help you avoid the common pitfalls that plague new players.
The "Short Tap" Technique
For the stars and the meteor tail, continuous pouring is disastrous. The sand builds a heap and slides into the wrong color zones. Instead, use the "Short Tap" method. Tap the cup icon, release immediately, wait for the sand to settle, then tap again. This places pixels precisely where you want them, preventing color bleeding between the meteor and the sky or the dino's neck and body.
Tray Slot Management
Never let your tray reach 5/5 slots unless you are 100% sure of what you are doing. A full tray means you are at the mercy of the next cup that appears. If your tray is full and a Rotation Cup cycles to the color you need, you are stuck. Keep 1 slot open as an "emergency buffer" to swap cups or grab a sudden critical color.
The Rotation Trap
Rotation Cups (e.g., Red/Yellow) are tempting but dangerous. The biggest mistake is pulling a Rotation Cup just because it has a color you *might* need later. Only pull it if the color is active *now*. For example, if the cup shows Yellow but you need Red, wait. Watch the animation. As soon as it turns Red, tap it. If you tap it while Yellow, you fill your tray with junk you have to pour into the stars (which you might not be ready for).
Don't "Pre-Fill" the Sky
It feels satisfying to clear the big blue sky first, but it's a trap. Once the sky is full, you lose your "dumping ground" for excess sand. If you fill the sky early, you'll be forced to make precise pours on the dinosaur with a full tray, increasing your stress and error rate. Keep the sky empty until the final 20% of the level.
Ignoring the Crate Count
The Wooden Crate (11) and Ice Blocks (25/30) have specific HP. A common mistake is tapping them once and then forgetting about them. You need to chip away at them constantly. Treat the Ice Blocks as a secondary task. Every time you pour a cup of Green on the Dino, ask yourself: "Could I have poured 10% of this on the Ice Block instead?"
Mixing the Neck Colors
This is the most frequent restart point. The neck is Cream. The body is Green. They touch. If you pour Green too fast, it spills into the neck. If you try to fix it by pouring Cream on top, you might not have enough Cream to finish the neck. Tip: Complete the neck *before* the body is fully saturated. It's easier to keep a small area clean than to fix a mess in a crowded canvas.
Stuck Solutions & Speed Run Tips
If you find yourself stuck or the conveyor belt seems to be giving you nothing but junk, use these advanced tactics to recover. For those aiming for the leaderboard, the Speed Run section will help you shave seconds off your time.
Stuck Solution: The "Tray Flush"
If your tray is full of useless colors (e.g., 3 Dark Blue cups) and you are waiting for a Red cup, you are stuck. To unstick yourself, you must force the game to cycle. Look at your artwork. Find a small area that *can* take the Dark Blue (like the very bottom corner). Pour it there, even if it's not perfect. This clears the slot. If the corner is already full, you may have to restart. The key lesson: never hold onto a cup "just in case" unless it's Red or White.
Stuck Solution: Breaking Deadlocks with Rotation
Sometimes the Ice Block won't break because you don't have a matching cup, but you have a Rotation Cup that is stuck on the wrong color. For example, you have a Green/White rotator, but you need Green to break ice, and it's showing White. Strategy: Pour the White somewhere valid (like the neck) even if the neck isn't your priority. This forces the cup to cycle back to Green, allowing you to use it for the Ice Block. It wastes a little sand, but it unblocks the flow.
Speed Run Tip: Pre-Loading
Speed runners utilize the pause function or the start-up delay. As the level loads, memorize the location of the first Red cup and the first Green cup. Have your finger hovering over the first move before the animation finishes. You can save 2-3 seconds just by reaction time.
Speed Run Tip: Bulk Pouring
While precision is needed for the neck, speed is needed for the body and sky. During the "Sky Cleanup" phase, do not tap. Hold the pour button. The physics engine allows you to overflow the canvas slightly. If you pour 100 units of Cyan into an 80-unit hole, the excess just disappears or settles in corners. Don't aim for 100% precision on the sky; just flood it.
Speed Run Tip: Ignoring Small Details
The stars and the meteor tail details are often not required for 100% completion logic (depending on the game's strict hitboxes). If you are speed running, focus on the big shapes: Dino Body, Meteor Core, Sky. If a few star pixels are missing, the level might still "pop" the completion flag if the main volume is filled. Test this to see if you can skip the tedious micro-tapping on stars.
Speed Run Tip: The Ice-Sand Ratio
Calculate your pours. If an Ice Block has 25 HP and you have a cup that pours 5 units per second, you know exactly how long to hold it. Don't guess. Count "one mississippi" for every 5 units. This precision prevents over-pouring, which wastes time and creates messes you have to clean up later. Efficiency is speed.