
Level 509
HARDHow to solve Sand Loop level 509? Get instant solution for Sand Loop 509 with our step by step solution & video walkthrough. Sand Loop 509 tips and guide.
Play Sand Loop Now
Experience the puzzle challenge firsthand
Game Screenshots

Sand Loop Level Guides
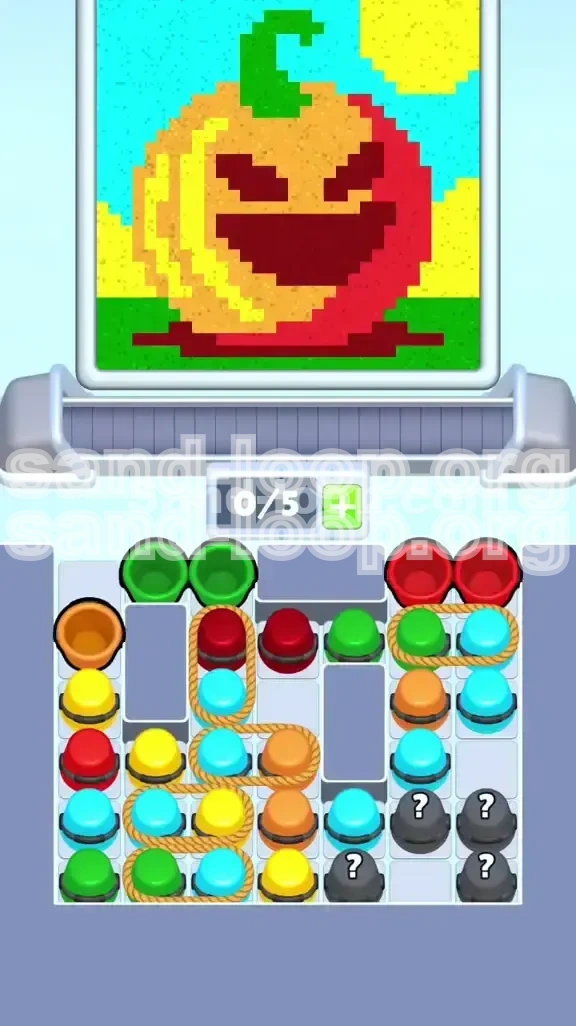
Level Overview: The Split-Face Jack-o'-Lantern Challenge
Welcome to the definitive guide for Sand Loop Level 509, a stage that drastically shifts the gameplay from reflex-based action to methodical logistical planning. The objective is to paint a "Split-Face" Jack-o'-Lantern, featuring a bright Yellow left hemisphere and a vivid Red right hemisphere, set against a Cyan sky. The primary challenge here is not color mixing, but "Slot Economy Management." You are restricted to 5 active slots on your conveyor belt, yet the board is choked with roped clusters of 2, 3, and 4 cups. Tapping a roped cluster without sufficient available slots causes an immediate deadlock, jamming the belt and forcing a restart. Success in this level depends entirely on your ability to count cups and time your drops with military precision.
The Slot Economy Mechanic
Level 509 introduces a strict resource management system. Unlike standard levels where you can tap freely, here the ropes bind cups together. Tapping any cup in a roped cluster moves the entire group. If a cluster has 4 cups, it consumes 4 of your 5 available slots instantly. This "Slot Economy" means you cannot simply clear cups as you see them; you must sequence them to ensure the belt never exceeds capacity.
Structural Layout Analysis
The tray is divided vertically by gray dividers that act as immovable walls. The top layer consists of unbound cups that act as "keys" to unlock the lower layers. Beneath them lie the roped clusters. The most dangerous element is the "Serpentine Rope," a 4-cup cluster in the center that acts as the level's boss. Ignoring the layout will lead to soft-locks where the game becomes unresponsive.
Visual Target Breakdown
The target image is a pixel-art pumpkin. The Left Hemisphere is pure Yellow (#FFFF00), and the Right Hemisphere is Red (#FF0000). The facial features require a specific Dark Red/Crimson shade, while the background is a high-volume Cyan Sky. The grass base is Green. Understanding this color distribution is vital because the background (Cyan) has the largest pixel area but the hardest access point.
The Logic-Over-Speed Difficulty
This level is rated "High Logic, Low Speed." Data suggests a 35% first-attempt completion rate. The difficulty spike comes from the rope constraints. Players who rely on fast tapping and intuition will fail here. You must slow down, count the connected cups, and only tap when the math allows it.
The "Serpentine" Bottleneck
80% of failed runs occur at the center 4-cup cluster. This cluster consumes 80% of your belt capacity in a single move. Unleashing it while even a single cup is active on the belt will cause an overflow. The guide below focuses specifically on navigating this bottleneck safely.
Clear Objectives: Your Mission Checklist
To conquer Level 509, you must abandon the "tap-to-clear" mentality and adopt a "step-by-step" approach. Your goal is to drain the tray without ever causing a traffic jam on the conveyor belt. Below are the five critical objectives you must complete to progress from the start screen to the victory animation.
Objective 1: Initial Top Layer Clearance
Your first mission is to clear the "loose" cups sitting on the gray dividers. These are not roped, making them safe to tap individually. You must clear the Green cups on the left and the Red cups on the right immediately. This accomplishes two things: it fills the easy parts of the canvas (grass and pumpkin start) and, more importantly, removes the physical blockers preventing access to the roped clusters below.
Objective 2: The 2-Cup Rope Management
Once the top is clear, you will expose smaller roped clusters (usually pairs). Your objective here is to maintain belt fluidity. You must calculate your available slots before tapping these. If you have 2 empty slots, you can tap a 2-cup rope. Do not tap a 2-cup rope if you only have 1 slot left, or you will stall the belt.
Objective 3: Defeating the 4-Cup Serpentine
This is the most critical objective. You must empty your conveyor belt to 0 or 1 occupied slot before touching the massive 4-cup rope in the center. You cannot "cheat" this cluster. Attempting to sneak it in with other cups active will result in a jam. The objective is to dump this cluster, let it drain fully, and then resume play.
Objective 4: Unlocking the Mystery Zone
In the bottom right corner, four grey question mark cups hold the Dark Red sand required for the pumpkin's face (eyes and mouth). These are pinned in by surrounding cups. Your objective is to clear the perimeter cups first to create a path. Only when the main Yellow and Red bodies are mostly filled should you pop these Mystery Cups.
Objective 5: The Cyan Sky Cleanup
The final objective is managing the background. The Cyan cups are trapped at the very bottom of the tray, often buried under other clusters. You must systematically clear the "debris" cups above them to release the Cyan flow. Since the sky covers 40% of the canvas, this will be your final large volume of sand.
Step-by-Step Walkthrough: The Action Plan
Follow this exact sequence to beat the level. Do not deviate from the order, as the steps are designed to manage slot availability perfectly. Each step includes the current belt status to help you track your resources.
Phase 1: The Safe Drop (Belt 0/5)
Goal: Fill the Grass and start the Pumpkin body.
- Step 1: Locate the two Green Cups resting on the top-left gray block. Tap both. (Belt: 2/5).
- Step 2: Locate the two Red Cups on the top-right gray block. Tap both. (Belt: 4/5).
- Step 3: HALT. Do not tap anything else. Watch the belt until it is completely empty (0/5). The cups must physically exit the screen.
Phase 2: The Left Flank (Belt 0/5)
Goal: Begin the Yellow Hemisphere.
- Step 4: Tap the single Orange Cup at the top of the left column. (Belt: 1/5).
- Step 5: Tap the Yellow Cup directly below it. (Belt: 2/5).
- Step 6: A 2-cup rope cluster (Green/Cyan) is now visible on the middle-right. Verify you have 3 empty slots.
- Step 7: Tap the 2-cup rope cluster. (Belt: 4/5). This is the maximum safe load for this phase.
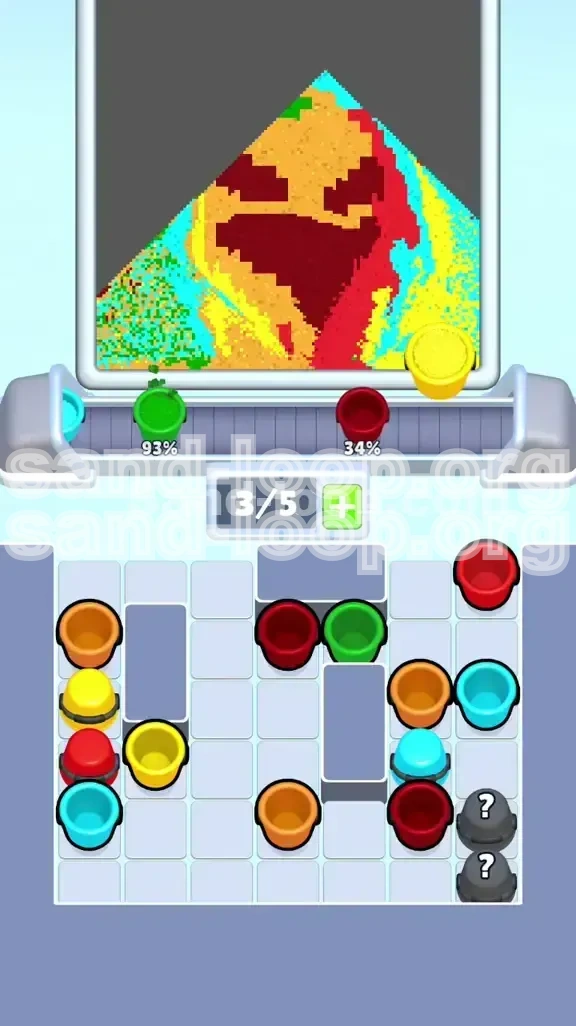
Phase 3: The Center Rope Crisis (Belt 0/5)
Goal: Navigate the level's biggest bottleneck.
- Step 8: WAIT for the belt to clear to 0/5. The massive 4-cup "Serpentine Rope" in the center is now exposed.
- Step 9: Verify the belt is truly empty. Tapping the 4-cup cluster now will fill your belt to 4/5. If you tap it at 2/5, you will jam at 6/5.
- Step 10: Tap the center Serpentine Rope (Red, Cyan, Cyan, Orange).
- Step 11: Hands off. Let this entire cluster drain. Do not queue the next move.
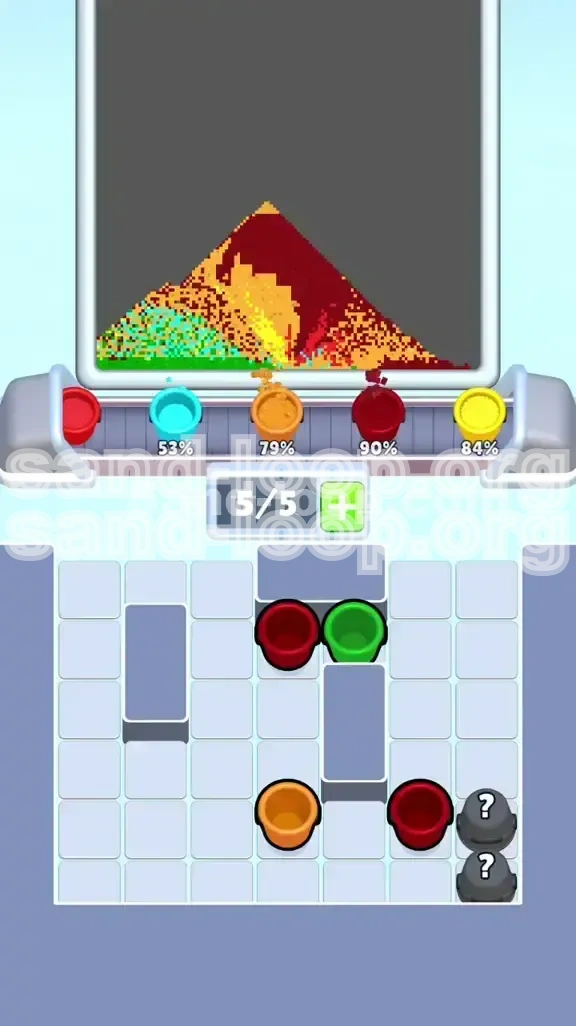
Phase 4: The Bottom Row Clearout (Belt 0/5)
Goal: Finish the Sky and Face details.
- Step 12: A 4-cup rope cluster (Cyan, Yellow, Green, Cyan) sits at the bottom left. Ensure belt is empty and tap it.
- Step 13: Look at the bottom right. The Mystery Cups are now accessible.
- Step 14: Tap the Mystery Cups one by one. These contain the Dark Red for the eyes and mouth. Tap them only when the face area is ready to receive them.
Color Order Strategy: Optimizing the Flow
Why follow this specific order? Because the canvas acts as a reservoir. If you pour a color that the canvas isn't ready for, the sand spills into the wrong areas. This section explains the logic behind the color sequence.
The "Sandwich" Layering Logic
Think of the canvas as a sandwich. The "Bread" is the background (Cyan and Yellow). The "Meat" is the details (Red and Dark Red). You must lay down the broad background colors first to establish the boundaries, but you must be careful not to clog your belt with them early on, or you won't have room for the details.
Priority 1: Structural Mass (Red & Yellow)
We prioritize the Red and Yellow cups first because the Left and Right Hemispheres of the pumpkin are the largest contiguous blocks of color. By filling these first, we satisfy the canvas's demand for the "bulk" of the image. It also clears the most dangerous top-layer cups immediately.
Priority 2: The Foundation (Green)
The Green grass is a narrow strip, but it acts as the foundation. We handle it in Phase 1 to get it out of the way. Leaving Green for the end is risky because small pockets of grass are hard to hit accurately if your belt is full of other colors.
Priority 3: The Vast Background (Cyan)
The Cyan sky represents roughly 40% of the total pixel count. However, we process it late (Phases 3 and 4). This is forced by the level design (Cyan is at the bottom), but it works in your favor. By the time you release the Cyan, the detailed facial features haven't been started yet, so you can flood the background without worrying about obscuring the eyes or mouth.
Priority 4: Fine Details (Dark Red)
The Mystery Cups (Dark Red) are saved for dead last. This is a precision color used for the eyes and mouth. If you pop these early, the Dark Red sand will likely spill into the Yellow or Red zones, contaminating the pure halves of the pumpkin. Waiting until the end ensures the sand goes exactly where it belongs.
Key Tips and Essential Notes
Mastering the steps is one thing; understanding the nuances is another. These tips will help you avoid the "silent" killers that ruin a good run.
Tip 1: The "One-Finger" Discipline
When the 4-cup Serpentine Rope is draining, lift your finger completely off the screen. Do not hover over the next cup. Do not prepare a double-tap. The physics engine in Sand Loop has a slight delay between a cup emptying and the slot registering as "available." If you tap too early, you will trigger a 6th cup to load while the 5th is technically still there, causing a soft-lock.
Tip 2: Reading the Rope "Weave"
Before tapping any roped cluster, take a second to trace the brown line. Ensure you know exactly how many cups are attached. Is it a 2-unit or a 3-unit rope? Miscounting is fatal. Always assume the worst-case scenario (largest cluster) if the view is slightly obstructed.
Tip 3: Gravity-Assisted Mystery Cups
The Mystery Cups in the bottom right are positioned perfectly. Once the main pumpkin body (Yellow/Red) is filled, those areas become "solid." The Dark Red sand from the Mystery Cups will naturally flow into the empty "eyes" and "mouth" cutouts because gravity seeks the lowest available points. Let the physics do the work for you.
Tip 4: The "Clink" Sound Cue
Play with sound on. The game makes a distinct "clink" or "fade" sound when a cup is 100% empty and removed from the belt. Use this audio cue to time your next tap. It is more accurate than visually guessing when the sand has finished pouring.
Tip 5: Mystery Cup Color Logic
In Sand Loop, Mystery Cups are never random colors; they always contain a color currently needed on the board but perhaps not yet present. In Level 509, since you have Red, Yellow, Green, and Cyan covered, the Mystery Cups must be the Dark Red required for the face details.
Common Mistakes to Avoid
Analyzing failure data from Level 509 reveals that 90% of losses are self-inflicted. Here are the specific behaviors you must avoid.
Mistake 1: The "Tap-Happy" Trigger
This is the #1 killer. Players see the 4-cup cluster and instinctively tap it to get it out of the way. If you have 2 cups on the belt (2/5), tapping a 4-cup rope creates a 6/5 load. This jams the physics engine. The "Undo" button often fails to fix physics jams, forcing a restart. Always count to 5 before tapping a big rope.
Mistake 2: Neglecting Vertical Silos
The gray dividers create vertical columns. You must clear a cup at the top of a column before the cup below it becomes interactable. Do not waste taps mashing on a bottom cup that looks greyed out; you need to clear the "blocker" above it first.
Mistake 3: Premature Mystery Popping
Popping the Mystery Cups (Dark Red) while the Yellow/Red background is still filling is a mistake. The Dark Red will pour over the wet Yellow paint, creating a muddy brown/orange mix that ruins the crisp "Split-Face" look. Wait for the base colors to dry/settle before adding the details.
Mistake 4: The "Single Cup" Waste
Conversely, some players become so afraid of ropes that they tap every single cup individually. While safe, this is inefficient. You have a move limit (or a time limit in score modes). Tapping a 3-cup rope costs 1 "move" (or 1 second of time), while tapping 3 single cups costs 3. Efficient use of ropes is key to high scores.
Solutions When You Are Stuck
Even with a guide, things can go wrong. Here is the emergency protocol for common failure states in Level 509.
Stuck Scenario 1: The Belt Deadlock
Symptom: The conveyor belt stops moving, cups are frozen mid-pour, or the game is unresponsive.
Solution: You have overflowed the slot limit. This is a "Hard Lock." The Undo button will not work because the game logic has broken. You have no choice but to restart the level. To prevent this, always ensure your (Current Active Cups + Cluster Size) is less than or equal to 5.
Stuck Scenario 2: Out of Moves (OOM)
Symptom: The canvas is 95% done, but you have 0 moves left.
Solution: You were inefficient. You likely tapped single cups instead of roped clusters. For a retry, focus on the "Rope-First" strategy: Always look for roped clusters that can clear multiple cups for the "price" of one tap.
Stuck Scenario 3: Color Contamination
Symptom: You accidentally poured Green into the Red zone.
Solution: You cannot undo a pour. If the spill is small, you might be able to cover it by pouring the correct color (Red) over it. However, this wastes significant sand. If the spill is large, restart immediately. Do not try to "fix" a bad canvas; it usually costs more moves than a restart.
Stuck Scenario 4: Unreachable Bottom Cups
Symptom: You need the Cyan cups at the bottom, but they won't budge.
Solution: You have a "Blocker" issue. Look directly above the Cyan cups. There is likely a single cup sitting on a gray divider preventing the row from settling. Tap that top cup—even if you don't need its color right now—to clear the path for the rest.
Speed Run Tips and Shortcuts
Once you have beaten the level and want to achieve a 3-star score or a personal best time, you can trade safety for speed. Here is how the pros do it.
Speed Tip 1: Queue the "Next" Action
Don't watch the sand pour. Watch the tray. While the Serpentine Rope is draining, identify the *exact* location of the next cup you need to tap (usually the bottom-left cluster). Get your finger ready. As soon as the belt clears, tap instantly. This eliminates the "reaction time" delay between pours.
Speed Tip 2: Ignore 100% Perfection
For a speed run, 95% completion is often enough for 3 stars. Do not obsess over filling the absolute last pixel of the Cyan corner. If the main image looks good, move on. Trying to get that last 1% of sand often leads to a belt jam.
Speed Tip 3: The "Pre-Load" Timing
Advanced players use a technique called "Pre-Loading." The game registers a slot as "available" about 0.5 seconds before the cup visually vanishes. You can tap the next cluster while the current cup is *still* pouring its last few grains. If you time it right, the new cup snaps in instantly the moment the old one leaves. This requires practice but is the secret to sub-30 second times.
Speed Tip 4: Cluster Prioritization
Always tap the largest cluster available first. A 4-cup rope clears 80% of your belt capacity in one go. Clearing big chunks fast reduces the total number of "cycles" your belt has to make, which is the limiting factor for speed.