
Level 64
HARDHow to solve Sand Loop level 64? Get instant solution for Sand Loop 64 with our step by step solution & video walkthrough. Sand Loop 64 tips and guide.
Play Sand Loop Now
Experience the puzzle challenge firsthand
Game Screenshots
Sand Loop Level Guides
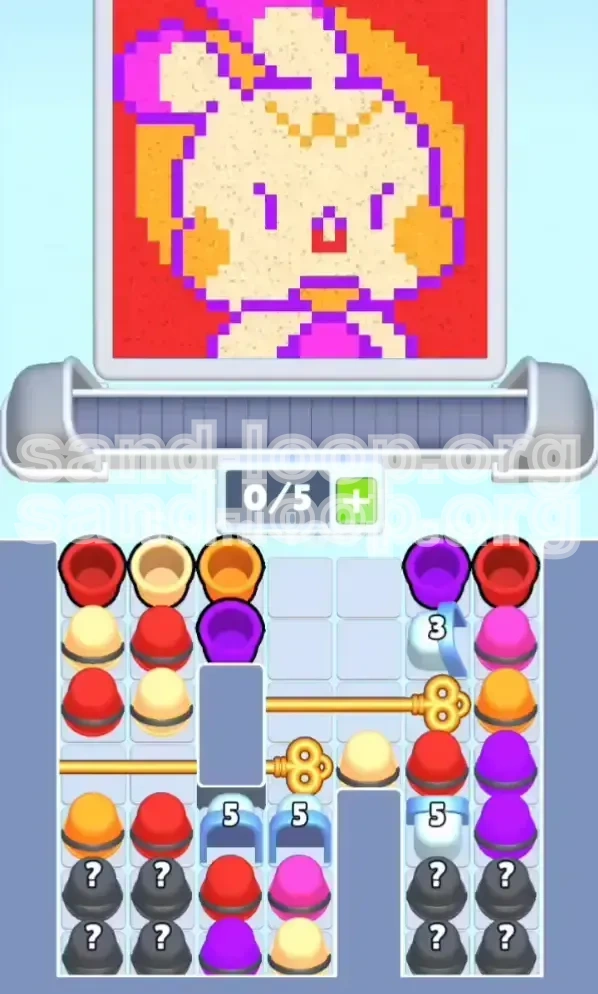
Level 64 Overview: The "Golden Bunny" Logic Test
Level 64, often referred to as the "Golden Bunny" stage, is a significant difficulty spike in Sand Loop. Unlike previous levels that relied on pure reflexes or simple color matching, this stage is a strict resource management puzzle disguised as a painting game. The visual complexity is high, featuring a pixel-art character composed of Cream, Orange, Purple, Magenta, and Red. However, the real challenge lies not in the art, but in the restrictive board layout.
The level introduces a "Crossed-Key" mechanic that effectively cuts your usable inventory in half. You are given a meager 5-slot conveyor capacity, which fills up instantly. If you treat this like a standard level and spam taps, you will soft-lock your board within the first 30 seconds. Success here requires discipline, specifically the ability to ignore easy moves in favor of necessary moves to unlock the board's flow.
The 5-Slot Inventory Constraint
The most critical statistic for this level is your inventory limit: 5 slots. In most levels, this feels like a generous amount. In Level 64, it feels like a cage. Because the vertical drop is blocked by Gold Keys, new cups cannot enter the screen from the top until you clear specific obstruction cups.
This means if you fill 4 slots with the wrong colors (e.g., loading up on Red while the game demands Cream), you have only 1 slot left to maneuver. This effectively prevents you from digging down to the cups you actually need. You must maintain a "Flexible Inventory" mindset, never committing more than 50% of your tray to a single color unless you are certain of the next 3 moves.
The Crossed-Key Mechanism
The board is divided horizontally by two Gold Keys.
- Top Gold Key: Blocks the right column.
- Bottom Gold Key: Blocks the left column.
This creates a "staggered" release pattern. You cannot simply work on the left side and then move to the right. You are forced to alternate your attention. If you focus purely on the left side to clear the bottom key, the right side will pile up, potentially causing a deadlock if a "Mystery Cup" or "Ice Gate" appears. Understanding this alternating rhythm is the only way to clear the level without using a restart.
Visual Complexity and Pixel Density
The Golden Bunny image is visually "noisy." It features:
- High-Density Zones: The face uses Cream and Orange in a checkerboard pattern.
- Low-Density Zones: The Purple outline is a single pixel wide in many places.
- Background Noise: A massive Red background surrounds the character.
The density difference is a trap. Your eyes are drawn to the large Red background, making you want to grab Red cups. However, the game logic often prioritizes the thin, hard-to-place Purple outlines or the specific Cream facial features first. Ignoring the background to focus on the "hard" pixels is counter-intuitive but necessary for survival.
Countdown Gates and Ice Blocks
Scattered throughout the board are Blue Arches (Countdown Gates) and Ice-covered Mystery Cups.
- Blue Arches: These require 3 to 5 adjacent clears to break. They act as hard walls, preventing cups from dropping.
- Ice Blocks: These hide random colors and usually sit in the most inconvenient positions (e.g., right on top of a Gold Key).
These elements turn the level into a tactical battle. You must calculate whether to use a valuable cup slot to chip away at a gate's HP or to save that slot for a required color. A common rule of thumb is: if a Gate has 1 HP left, clear it immediately, even if it means wasting a color match slightly.
Why This Level Causes Deadlocks
90% of failed runs on Level 64 end in a "Soft Lock." This occurs when your conveyor is full (5/5), and the available colors on the board do not match the pixels you need to fill. Because the Keys block new cups from falling, you have zero way to get rid of the cups in your tray.
The psychological trigger for this is usually the "Mystery Cup." When a ? cup drops, players instinctively pull it to see what it is. In Level 64, pulling a Mystery Cup that turns out to be a color you don't need (e.g., pulling Magenta when you need Purple) can instantly fill a slot and doom your run. Restraint is your greatest weapon.
Primary Objectives and Victory Conditions
To achieve a 3-star rating and complete Level 64 without burning your items, you must adhere to a specific set of goals that differ from standard levels. Your primary metric here is Efficiency, not speed.
Unlock the Vertical Flow
Your first and most urgent objective is to clear the Gold Keys. Do not focus on filling in the bunny's ears or the background until the keys are gone.
- Goal 1: Clear the specific cups holding the Top Gold Key (usually located in the upper-right quadrant).
- Goal 2: Clear the cups holding the Bottom Gold Key (usually in the mid-left quadrant).
Until these keys slide out of the board, you are playing with half a deck. The "flow" of new cups is essential to replenish your supply of Cream and Orange, which are the rarest resources on the board.
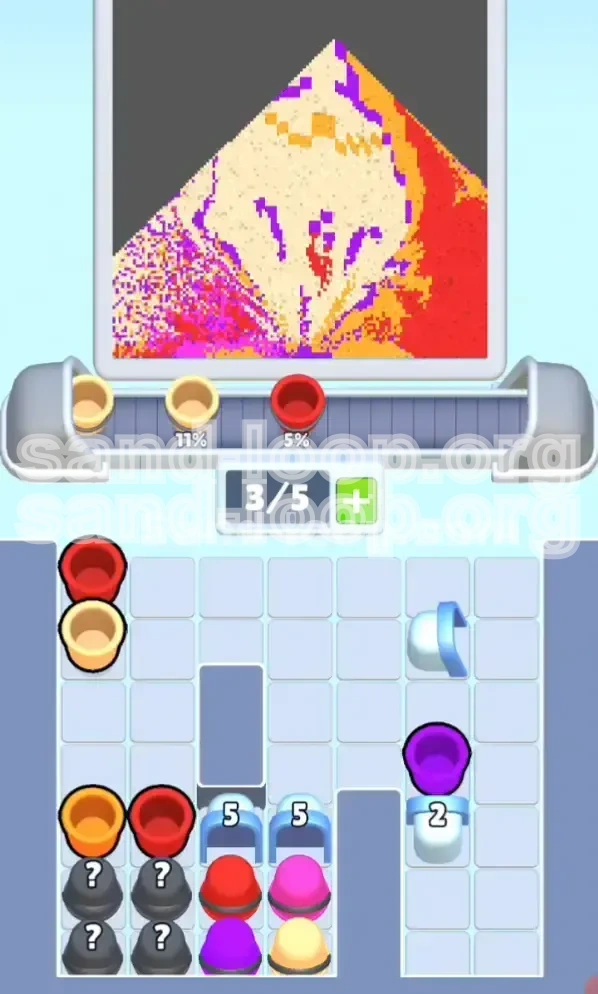
Maintain the 2-Slot Buffer
Set a personal rule: never let your tray fill beyond 3/5.
- 3/5 Full: Safe. You have room to shuffle.
- 4/5 Full: Danger. You are one wrong tap away from a lock.
- 5/5 Full: Critical. You must make a match immediately, even if it's not the optimal color.
By maintaining a 2-slot buffer, you ensure that if a "bad" color drops (e.g., Magenta when you need Red), you can pull it to the tray without blocking the entire machine. This flexibility is the difference between a win and a loss.
Isolate and Process "Hard" Colors
The level contains colors that are structurally difficult to place. You must identify and process these early.
- Purple (Outlines): Hardest to place. Requires precision.
- Magenta (Bow/Clothes): Medium difficulty.
- Cream/Orange (Face): High volume, high urgency.
Do not leave the Purple outlines for the end. If you wait until the board is a mess of half-finished pixels, placing a single-pixel wide Purple line without touching the adjacent Cream pixels is nearly impossible. Clear the outlines while the board is still relatively empty.
Manage Countdown Gates Proactively
Do not view the Blue Arches as obstacles; view them as "Priority Targets."
- Targeting: If a cup adjacent to a Blue Arch matches the pixel you need, take that move even if it's not the perfect aesthetic choice.
- HP Tracking: Keep a mental count of the Gate's health (e.g., "The top-right gate needs 2 more hits").
Breaking a Gate releases a cascade of new cups. This "refresh" is often the only way to get out of a bad color RNG (Random Number Generation) streak. If you are low on Cream, breaking a Gate is your best bet to find more.
Eliminate the Background Last
The Red background is the easiest part of the puzzle but the most dangerous trap.
- The Trap: Red cups are plentiful. It is easy to fill 3 slots with Red and start spamming the background.
- The Risk: The Bunny's mouth and eyes are also Red. If you paint over the mouth pixels while trying to fill the background, you create a "corruption" that is very hard to fix later.
Objective: Ignore the background until the face, hood, and outlines are 100% complete. Treat the background as "trash cleanup" at the end of the level.
Step-by-Step Walkthrough: The Golden Bunny
This section details the exact moves and strategies for the three phases of Level 64. Follow this sequence to navigate the logic puzzle safely.
Phase 1: The Key Break (Moves 1-20)
The start of the level is a race against your own inventory. The board is static, and nothing moves until you make space.
Action 1: Scan for Gate-Adjacent Cups. Look at the cups immediately touching the Blue Arches or Gold Keys. Prioritize these colors above all else. Even if the game highlights a pixel on the bunny's ear, ignore it if there is a cup that can chip a Gate.
Action 2: Clear the Top-Right Cluster. The Top Gold Key is usually trapped by a mix of Red and Purple cups. Pull these into your tray. Pour Purple only if you can hit the outline cleanly. If not, pour Red into the background or mouth area, but be careful not to overfill.
Action 3: Unlock the Bottom-Left. Once the top-right begins to flow, immediately switch focus to the bottom left. The Bottom Gold Key usually blocks the flow of Cream and Orange. You need these colors desperately. Clear the cups sitting on top of this key.
Action 4: The "Mystery Cup" Gamble. If a Mystery Cup (?) appears under an Ice Block, check your slot count. If you are at 4/5 slots, do not touch the Ice Block. Wait until you have cleared space. Breaking ice early and getting a color you don't need is the #1 cause of Phase 1 failures.
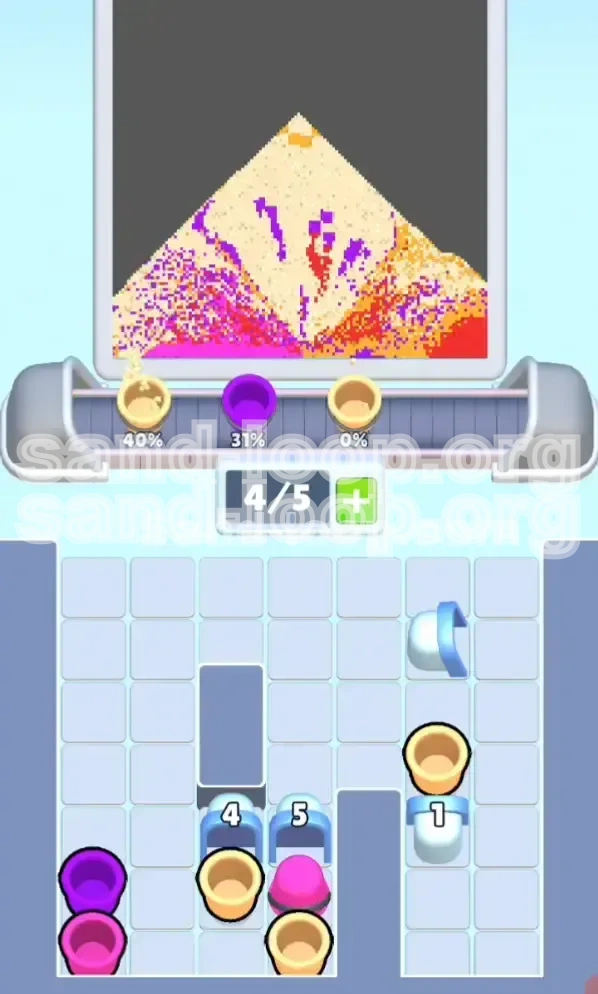
Phase 2: The Facial Features (Moves 21-50)
Once the keys are gone, the board starts to breathe. New cups drop from the top. Now you must assemble the bunny.
Action 1: Secure Cream and Orange. With the vertical flow open, aggressively pull Cream and Orange cups. Do not let them sit in the conveyor where they might get buried under Red or Magenta.
Action 2: Fill the Eyes and Mouth. The bunny has Red eyes and a Red mouth. These are small, isolated clusters. Use a single Red cup to fill them precisely. Do not drag the Red pour across the face. Tap, release, check. Tap, release, check. This prevents "bleeding" into the Cream face.
Action 3: The Bow and Hood. The Magenta Bow and Orange Hood usually interlock. This requires careful switching. Fill the Magenta bow first, as it is smaller. Once the Magenta is gone, you have open space to maneuver the large Orange Hood blocks without risking the Magenta pixels.
Action 4: Inventory Purge. By now, your tray might be cluttered with Red cups (background color). You need to clear them to make room for more detailed work. Pour Red into the large background areas. Do this quickly to free up 2-3 slots. An empty tray is essential for the final phase.
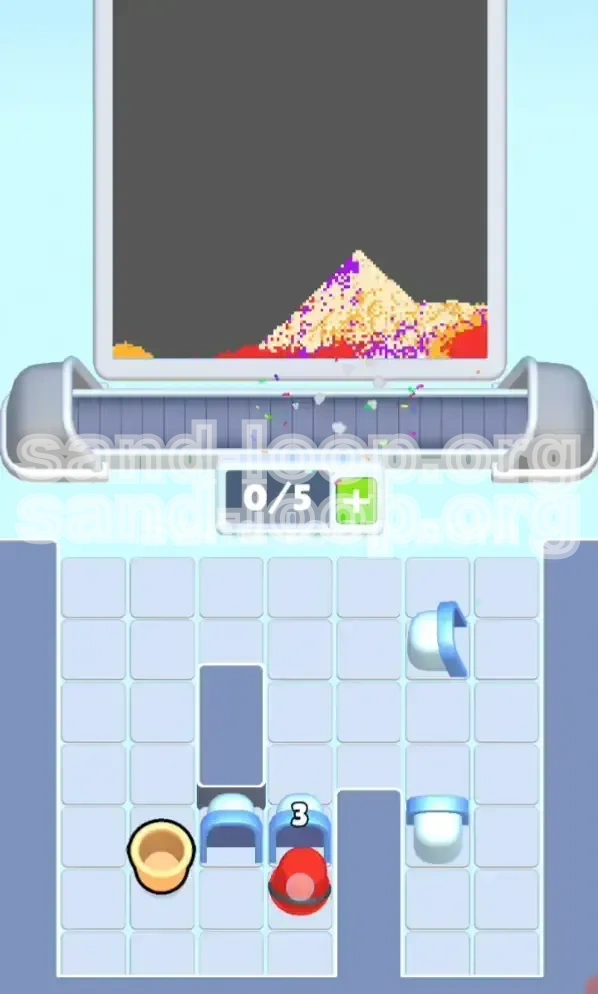
Phase 3: The Clean-Up (Moves 51-Finish)
The endgame is about risk management. The picture is mostly done, but the remaining pixels are awkward.
Action 1: The Final Outlines. You will likely have scattered Purple pixels left. These are the hardest to place because the surrounding Cream/Orange is already filled. Use your "Zoom" function (if available on your platform) or just tap very carefully. It is better to leave a Purple pixel empty than to accidentally pour Cream over it.
Action 2: The Background Fill. Now, and only now, do you spam Red. Load up your tray with Red cups. You don't need precision anymore; the detailed parts of the bunny are safe. Fill the remaining red background space rapidly.
Action 3: Dealing with Stragglers. Sometimes, one specific cup gets stuck at the bottom of a column. If you have 3 slots of Red and 1 slot of Cream, and the game demands Cream, use a Hammer power-up (if you have one) on the obstruction, or deliberately pour Red into a "safe" waste zone (if any exists) to cycle the conveyor.
Action 4: The Final 5%. The last 5% of this level is often slow. Don't panic. Keep 2 slots open. Wait for the specific colors you need to drop from the top. Rushing the final fill usually leads to a full tray and a loss.
Color Order and Priority Guide
Knowing which color to use when is the core strategy of Level 64. The game's algorithm will suggest moves based on pixel position, but you must override these suggestions based on inventory logic.
Priority Tier 1: The Structural Colors (Purple & Magenta)
Why High Priority? Purple and Magenta are used for outlines and small details (the bow). They are dangerous because they are surrounded by "flood" colors (Cream/ange).
- Purple Strategy: Process Purple immediately when a cup is available. Do not save Purple cups in your tray. If you hold a Purple cup for too long, you might be forced to use it later when you don't need it, wasting a slot.
- Magenta Strategy: The bow is small. Clear it early to remove Magenta from the pool of possible drops. This increases the probability of getting the high-volume Cream and Orange cups later.
Priority Tier 2: The Feature Colors (Cream & Orange)
Why Medium Priority? These colors make up the bulk of the bunny. You need a lot of them, but they are forgiving because they cover large areas.
- The Checkerboard Trap: The Cream face and Orange hood often touch. The game might highlight a Cream pixel right next to an Orange pixel.
- Wrong Move: Pouring Cream when you actually need Orange for the next pixel.
- Right Move: Look at the ratio of pixels. If there are 10 Orange pixels and 2 Cream pixels, prioritize Orange, even if Cream is highlighted first. This reduces the number of color switches needed.
- Stockpiling: It is acceptable to hold 1 Cream and 1 Orange cup in your tray simultaneously as "reserves," provided you have 3 empty slots left.
Priority Tier 3: The Background Color (Red)
Why Low Priority? Red is the "trash" color of this level. It is abundant but low-value strategically.
- The "Red Wall": If you pull Red cups too early, they create a wall in your inventory. You will have 3 Red cups and 2 empty slots. The game will demand Cream. You have no Cream. You are stuck.
- The Delay: Unless Red is required for the Eyes/Mouth, ignore Red cups entirely until Phase 3. Let them stack up in the conveyor columns if necessary, but do not pull them into your active tray.
- Exception: Use Red cups only to break Countdown Gates if no other colors are available. Red is excellent fodder for breaking gates because it is so plentiful.
The "Color Lock" Danger Zone
This occurs when your tray contains: Red, Red, Red, Purple, Magenta.
- Current Pixel Need: Cream.
- Outcome: You have 0 Cream cups. You are full. You lose.
Advanced Strategies and Speed Run Tips
Once you understand the basic logic, you can optimize your playstyle for faster completion times and higher scores.
The "Ping-Pong" Technique
Because of the Crossed Keys, you cannot focus on one side of the screen. Use the Ping-Pong strategy.
- The Move: Make a move on the Left side (e.g., clear a cup). Immediately scan the Right side for a valid move. Alternate Left-Right-Left-Right.
- The Benefit: This ensures both columns are dropping at an equal rate. If you focus only on the Left, the Right side will stagnate, and the "Gold Key" lock will re-engage metaphorically by creating a height disparity that prevents efficient clearing.
Speed Run: The "Gate Break" Opening
For speed runners, the first 10 seconds determine the final time. Do not paint pixels.
- Strategy: Ignore the bunny completely. Use the first 5-6 cups exclusively to break the Blue Arches (Countdown Gates) and the Ice blocks covering the Gold Keys.
- Result: You enter Phase 2 with a fully open board and a full inventory of useful colors. This sets up a "speed chain" where you never have to wait for cups to drop.
Mistake Prevention: The "Undo" Discipline
Most players use Undo only when they make a mistake. In Level 64, use Undo proactively.
- The Scenario: You pour a color, and it fills 3 pixels perfectly, but then slightly bleeds into a 4th pixel that needs a different color.
- The Fix: Hit Undo immediately. Do not try to "fix" the pixel by overpainting. In Level 64, "correction" painting wastes inventory slots. Undo and wait for a better cup configuration.
Stuck? The "Trash Pixel" Solution
If you are stuck with a full tray and the wrong colors:
- Identify a "Trash Pixel": Find a pixel that is already the correct color (e.g., a Red background pixel that is already Red).
- Pour Over It: Pour one of your unwanted cups onto this correct pixel.
- The Result: The pixel changes to the wrong color, but you used up a cup.
- Fix It: Now, use the correct color cup to fix that single pixel.
Why do this? It uses 2 cups to effectively remove 1 unwanted cup from your tray, buying you a vital slot slot. This is an advanced technique to get out of a soft-lock.
Power-Up Usage
If you have power-ups saved, Level 64 is the time to use them.
- Best Use: The Hammer is the most valuable here. Use it on the Ice Blocks or the cups directly holding the Gold Keys. This bypasses the need to find matching colors, instantly opening your board flow.
- Worst Use: The Shuffle power-up. In a level defined by strict key positions, shuffling the board can often mess up your carefully planned "Ping-Pong" strategy. Only use Shuffle if you are 100% soft-locked.