
Level 72
HARDHow to solve Sand Loop level 72? Get instant solution for Sand Loop 72 with our step by step solution & video walkthrough. Sand Loop 72 tips and guide.
Play Sand Loop Now
Experience the puzzle challenge firsthand
Game Screenshots
Sand Loop Level Guides
Sand Loop Level 72 Complete Walkthrough Guide
Level Overview: The Cityscape Constraint
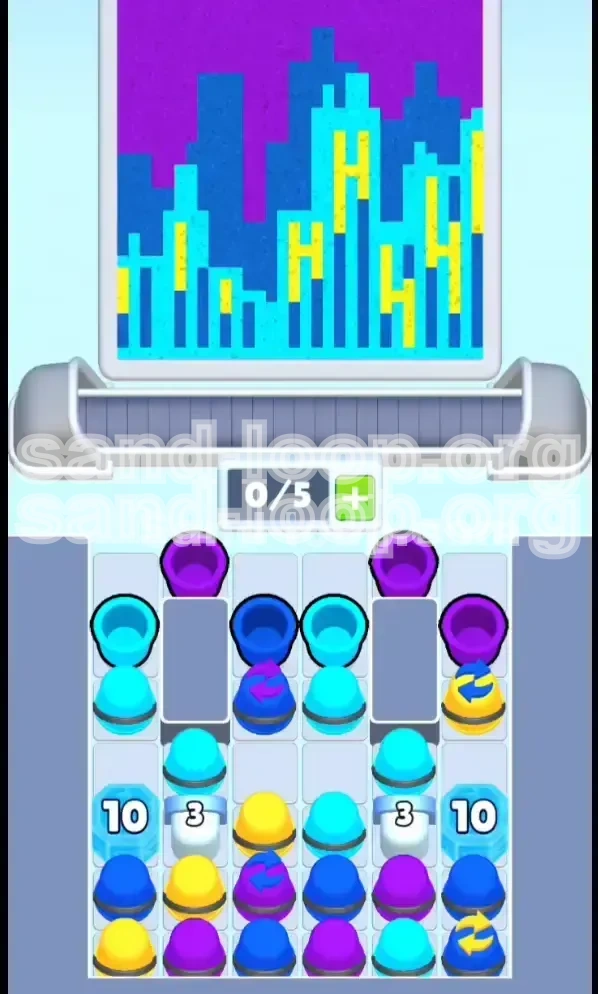
Sand Loop Level 72 is a high-stakes puzzle defined by severe inventory constraints. You are tasked with filling a vibrant cityscape silhouette composed of four specific color channels: Purple, Blue, Cyan, and Yellow. The visual aesthetic is dominated by deep magenta and navy backgrounds, requiring you to fill large areas with darker shades while using Cyan and Yellow as precise accents. The primary difficulty spike in this level is the strict "0/5" slot capacity on your conveyor belt. Unlike previous levels where you could load multiple cups in advance, Level 72 forces a rhythmic, "just-in-time" inventory management style. You cannot simply queue up your shots; you must constantly cycle the belt to access buried resources.
Win Condition Analysis
To clear Level 72, you must max out the progress meters for all four colors (Purple, Blue, Cyan, Yellow) simultaneously without causing an overflow. Overflowing a color turns its progress bar red, typically leading to a failed run. The challenge lies in the fact that the "primary" colors (Purple and Blue) have significantly larger fill areas than the "secondary" colors (Cyan and Yellow). However, your cup supply is mixed, with Cyan cups being the most abundant and Purple cups being physically blocked in the tray. You fail if you run out of belt space while key colors remain inaccessible in the stack.
Core Difficulty: The Resource Jam
The specific bottleneck in Level 72 is the physical arrangement of the cup tray. Purple cups, which are essential for the background, are buried at the bottom of the stack. To retrieve them, you must process the cups sitting on top of them (mostly Cyan and Blue). This creates a timing conflict: you need to process the top cups to free the bottom ones, but processing too many top cups at once will fill your conveyor belt and create a deadlock, leaving you with no space to actually load the Purple cups once they are freed.
Strategy in a Nutshell
The winning strategy relies on the "Load-Pause-Load" rhythm rather than continuous flooding. You must maintain a "Gap" of at least one empty slot on your conveyor belt at all times. This gap acts as a buffer, allowing the belt to cycle and bringing buried cups forward without jamming the machine. You will prioritize loading cups in a specific sequence (Cyan-Blue-Purple) rather than by color group, ensuring you keep the inventory flowing smoothly.
Step-by-Step Execution Guide
Phase 1: The Cold Start (0% - 20% Fill)
Your immediate goal is to establish a flow and free up the blocked inventory. Do not flood the belt.
Action Sequence:
- Load 1 Cyan Cup. It is the most accessible.
- Load 1 Blue Cup. Place this immediately after the Cyan.
- Tap to Pour. Do not wait. Let the first cup hit the canvas immediately.
- Load 1 Cyan Cup. Add this third cup to the belt.
- Wait. Let the belt cycle for 2-3 seconds. Do not load a 4th cup yet.
This 1-1-1 opening fills 3 of your 5 slots. The remaining 2 slots are your "Buffer Zone." Pouring immediately as the first cup hits the dispenser ensures you are creating physical space on the belt for the next rotation.
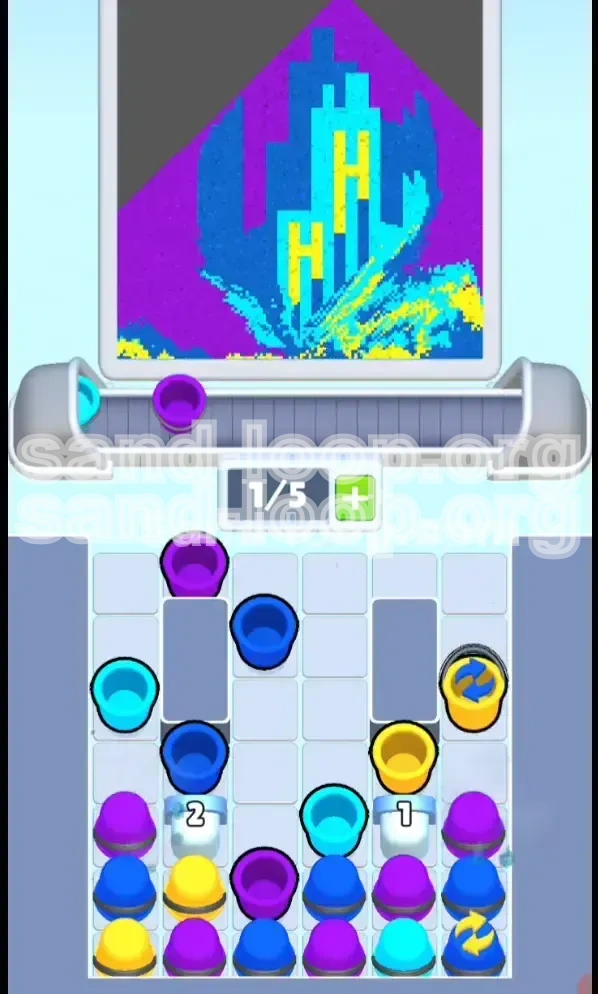
Phase 2: The Unblocking Rotation (20% - 40% Fill)
At this stage, your initial cups have moved, and the Purple cups in the tray are shifting but likely still blocked.
Action Sequence:
- Load 1 Purple Cup. As soon as one becomes visible in the tray, grab it.
- Stop Loading. Do not load a second Purple cup immediately.
- Pour Active Cups. Clear the dispenser.
- Monitor the Belt. Ensure there is always a visual gap between the last cup and the dispenser.
By loading a single Purple cup and then stopping, you force the game to cycle the entire tray mechanism. This movement usually slides the remaining blocked Purple cups into the "available" zone. The "gap" you maintained prevents the belt from stalling while the tray reshuffles.
Phase 3: The Mid-Game Balance (40% - 75% Fill)
The tray is now mostly unblocked. The challenge shifts from unblocking to meter management. You are now in a rhythm of cycling through the color spectrum.
Action Sequence:
- Check Meters. Look at the progress bars. Purple and Blue should be nearly equal. Cyan should be slightly behind. Yellow should be trailing.
- Load Deficit Colors. If Blue is lagging behind Purple by 10%, load Blue cups exclusively for one cycle.
- Maintain the 1-Slot Buffer. Never let the belt reach 5/5 capacity. If you have 4 cups loaded, wait until one pours before loading the 5th.
- Locate the Yellow Cup. Find the Yellow cup in the tray (usually far right) and plan a path to it.
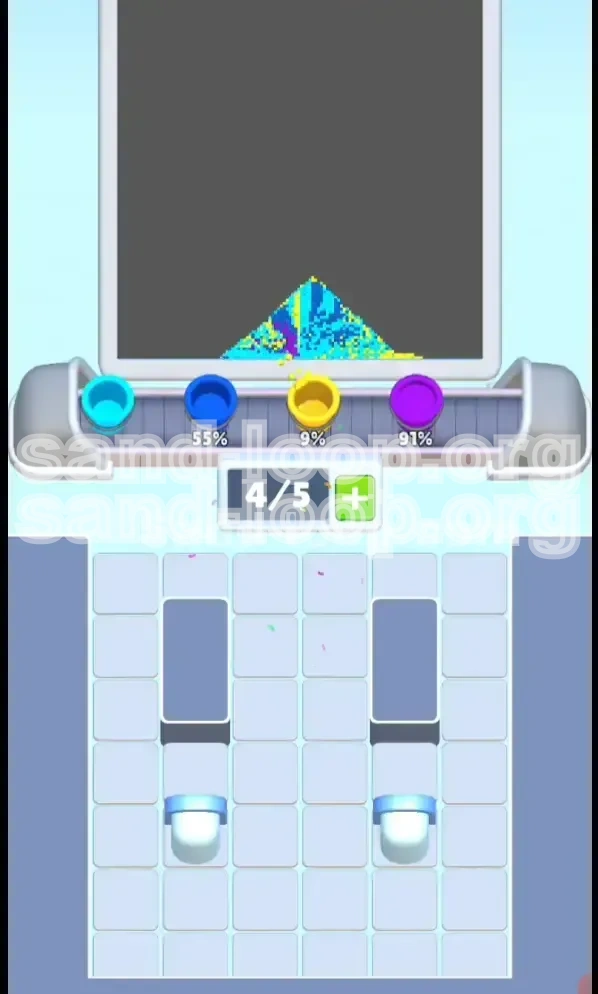
Phase 4: The End-Game Precision (75% - 100% Fill)
This is the danger zone. The canvas is saturated, and colors can turn red (overflow) with a single over-pour.
Action Sequence:
- Slow Down. Reduce your tapping speed. Do not chain-load.
- Load One Cup at a Time. Load a cup, pour it completely, wait for the belt to clear, then assess.
- Prioritize Yellow. If Yellow is below 80%, load it now. Do not wait for the last 5%.
- Use Micro-Pours. If a meter is close to 100%, tap the pour button briefly instead of holding it, to squeeze out the last few drops of paint without overshooting.
Color Order and Prioritization
Primary Tier: Purple and Blue
Purple and Blue constitute the "backbone" of the cityscape image. They cover approximately 60-70% of the canvas area combined. Your strategy must prioritize these two colors for the first 50% of the level. Because they are needed in such high volumes, running out of them due to poor inventory management is the most common cause of failure. Always ensure you have a steady stream of Purple or Blue cups cycling through the dispenser.
Secondary Tier: Cyan
Cyan is an "accent" color but is deceptively abundant in the cup tray. It acts as a filler. You should use Cyan to fill the gaps when your belt is empty and you are waiting for Purple/Blue to unblock. However, you must avoid the temptation to pour Cyan aggressively. If the Cyan meter hits 100% before Blue and Purple are at 90%, you have created a deadlock where you can no longer use the abundant Cyan cups to clear space on your belt.
Tertiary Tier: Yellow
Yellow is the "bottleneck" color. It has the smallest fill area but the least accessible cup placement. It is often wedged in a corner or blocked by a stack of Cyan. You need to identify the Yellow cup's location within the first 10 seconds of the level. You generally only need to pour Yellow 2-3 times in the entire level, but those pours must happen before the canvas gets too crowded.
The Correct Processing Order
To maximize efficiency, follow this psychological order of operations:
- Unblock Purple/Blue (Use Cyan to clear the tray).
- Saturate Background (Alternate Purple and Blue pours).
- Insert Accents (Sprinkle Cyan pours to keep balance).
- Final Polish (Deploy Yellow and meter-topping colors).
Key Tips for Success
Tip 1: The "Gap" Strategy
Never fill your conveyor belt to the maximum (5/5 slots). Always keep at least one slot empty. This empty slot allows the mechanical "arm" or physics of the belt to cycle the cups in the tray. If the belt is physically full of cups, the tray cannot rotate or shuffle, meaning buried Purple cups will never become accessible. That one empty slot is the difference between a flowing level and a stuck screen.
Tip 2: Pre-Loading Awareness
The game has a built-in delay between when you tap a cup in the tray and when it actually arrives at the dispenser. This delay is roughly 2-3 cup lengths. You must account for this "travel time." If you wait until the dispenser is empty to look for a new cup, you will lose precious seconds. Always have the "next" cup in transit while your current cup is pouring. Think of it as driving; you don't look at the car right in front of you, you look two cars ahead.
Tip 3: Meter Watching vs. Canvas Watching
Stop looking at the art. In the final 30% of the level, ignore the pretty city skyline and focus entirely on the progress bars at the top (or side) of the screen. The canvas can be deceptive—it might look "blue enough" but actually need 10% more fill. The progress meters are the absolute truth. If a bar is yellow (almost full), stop pouring that color immediately, even if the picture looks unfinished.
Tip 4: The Reset Rhythm
If you feel like the level is going wrong—your belt is jammed, or you can't find the Yellow cup—stop loading. Just stop. Let the current belt clear out. It takes about 8 seconds for a full belt to cycle. Letting it run dry is better than forcing a jam. A dry belt gives you a fresh slate to re-assess the tray and pick the right cups without panic.
Common Mistakes to Avoid
Mistake 1: The "Cyan Flood"
Players see Cyan cups readily available on the left and load three of them in a row. This floods your belt with a low-priority color. Suddenly, your Purple and Blue meters are at 40%, but your Cyan is at 80%. You now have to awkwardly manage the belt to avoid pouring Cyan while you wait for Purple to unblock, which wastes valuable time.
Mistake 2: Ignoring the "Booster" Yellow
In Sand Loop Level 72, the Yellow cup often has a booster icon (like a star or lightning bolt) or is positioned distinctly. Players often save this "special" cup for the very end, thinking it's a bonus. However, in this level, the Yellow booster is just a necessary component. If you wait until 95% completion to use it, you might find you needed it earlier to balance the fill rate. Use it when the Yellow meter is around 50-60%.
Mistake 3: Panic-Pouring on Red Meters
When a meter turns red (indicating you've over-filled slightly), the instinct is to frantically tap to "fix" it. This usually makes it worse. If a meter goes red, immediately switch to a completely different color (e.g., if Purple is red, switch to Cyan or Yellow). Pouring the *opposite* color creates contrast and stops the bleeding on the overflowing color.
Mistake 4: Speed-Running the First 10 Seconds
The opening moments are the most critical for unblocking the tray. If you play the first 10 seconds at 2x speed, you will likely jam the belt before the Purple cups are freed. Play the first 10 seconds at 0.5x speed. Deliberate, slow movements in the setup phase pay off with a fast, friction-free endgame.
Solutions for When You Are Stuck
Stuck Scenario 1: The Belt Jam
Symptom: All 5 slots are full, the dispenser is blocked, and the cup you need (Purple) is buried in the tray.
Solution: The "Hard Wait." Do not tap any tray cups. Watch the belt. As soon as a cup pours and a slot opens, do not fill it immediately. Wait for the belt to move one more cycle. Often, the tray will shift the moment a slot opens, revealing the Purple cup. If it doesn't, load a Cyan cup to force a cycle, pour it immediately, and try again.
Stuck Scenario 2: The Yellow Lock
Symptom: You are at 90% completion, but Yellow is at 30% and the Yellow cup is physically blocked by a stack of other cups.
Solution: You must "sacrifice" your current belt load. Pour out all current cups on the belt, even if they are colors you don't strictly need. You need to clear the belt entirely to force the game to refresh the tray layout. Once the belt is empty, the tray usually does a hard reset or shuffle, bringing the Yellow cup into play.
Stuck Scenario 3: The 1% Shortage
Symptom: All meters are at 98-99%, but you have no cups left on the belt or in the tray that seem to fit.
Solution: Look for the "dregs." You likely have a cup of a color you thought was full (e.g., Cyan) sitting on the belt. Load it. Pour it in tiny, micro-taps. Sometimes the game needs a fraction of a percent to register the finish, and a "wrong" color cup actually has the right paint mix to nudge you over the line.
Speed Run Tips
Shortcut 1: The Pre-emptive Load
While the level is loading the "Start" animation, hover your finger over the first Cyan cup. You can tap it literally a millisecond after the game starts. This saves about 0.5 seconds, which in a speed run is significant. It gets the conveyor moving immediately.
Shortcut 2: Chaining Colors
Once you reach the 40% mark and the tray is unblocked, you can speed up by "Chaining." Load Purple, Blue, Cyan in rapid succession (3 slots). While those three are traveling to the dispenser, load the next Purple. You are essentially creating a production line where you are constantly loading 3, pouring 3, loading 3. This minimizes the "downtime" of the belt.
Shortcut 3: Ignoring Perfection
In a standard run, you keep your meters balanced. In a speed run, you let Purple and Blue hit 100% early (even turning red slightly) while you focus on clearing the tray of Yellow. It is faster to slightly over-fill the background and waste a few seconds recovering than it is to perfectly micro-manage every drop. The risk-reward calculus shifts towards aggression.