
Level 91
HARDHow to solve Sand Loop level 91? Get instant solution for Sand Loop 91 with our step by step solution & video walkthrough. Sand Loop 91 tips and guide.
Play Sand Loop Now
Experience the puzzle challenge firsthand
Game Screenshots

Sand Loop Level Guides
Sand Loop Level 91: Complete Strategy Walkthrough
Level Introduction and Core Mechanics
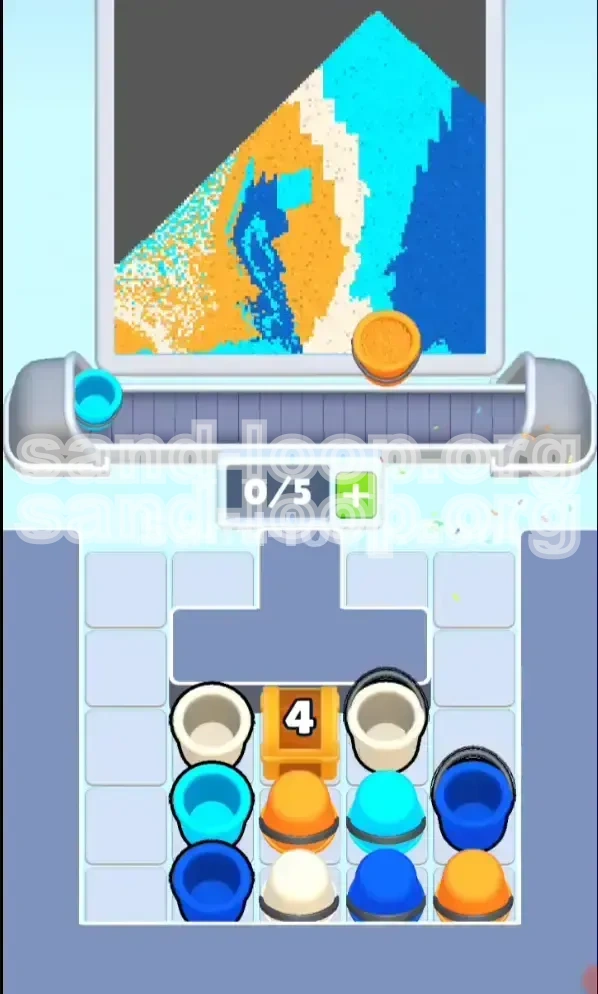
Level 91 in Sand Loop serves as a critical turning point in the game, introducing players to the complexities of multi-stage resource management. Unlike previous levels where you could focus on a single color stream, this stage requires you to coordinate four distinct color channels simultaneously. The layout is a geometric grid split between Cyan, Navy Blue, Orange, and Cream White. The dark gray background aesthetic provides high contrast, but don't let the clean visuals fool you; the margin for error is extremely narrow.
Primary Objectives and Victory Conditions
Your goal is clear: achieve 100% saturation on all four color progress bars without causing a conveyor belt deadlock. You must balance the fill rates, ensuring that the larger zones (Cyan and Navy) do not steal resources from the smaller accent zones (Orange and Cream). The level is lost if the conveyor belt jams completely or if you run out of specific color cups due to poor early-game planning.
Difficulty Analysis: Why It’s Hard
The difficulty spike in Level 91 comes from the "Resource Burial" mechanic. Two of your essential colors, Navy Blue and Cream, are not immediately accessible. They are trapped beneath a stack of four other cups in the supply tray, marked clearly by a "4" icon. This forces you to play a mini-game of "Tetris" with your inventory just to get the materials you need to start painting the canvas.
Inventory and Slot Management
You start with a standard 5-slot conveyor capacity. This represents your total "working memory." If you fill all 5 slots with the wrong colors, you cannot unblock the trapped Navy and Cream cups underneath. The challenge is maintaining a flow of 3 active processing cups while keeping 2 slots open for logistics and unblocking moves.
The Optimal Color Order and Processing Logic
The Priority Hierarchy
To maximize efficiency, you must abandon the idea of "first come, first served." You need to process colors in a specific hierarchy based on their accessibility and zone size. The correct processing order is: Cyan (High Priority) -> Orange (Medium) -> Navy (High but Buried) -> Cream (Low Volume).
Phase 1: The Cyan Foundation
Cyan covers approximately 40% of the canvas. It is your primary structure. You must prioritize Cyan immediately. However, you must cap Cyan at 50% completion. Do not aim for 100% Cyan right away, or you will run out of conveyor space to unblock the other colors.
Phase 2: The Navy Integration
Navy Blue is the "boss" of this level. It covers another 40% of the canvas but is the hardest to retrieve. Once unblocked, Navy becomes your secondary priority. You will alternate heavily between Cyan and Navy during the mid-game.
Phase 3: Accent Balancing (Orange & Cream)
Orange and Cream are "filler" colors that occupy the remaining 20% of the level. These are used to bridge gaps when your Cyan or Navy supplies are momentarily blocked or reloading. Pour these only when your main color meters are stalled or when you have an excess of slots.
The Rhythm Game Aspect
Level 91 is also a test of rhythm. There is a roughly 2-second delay between loading a cup and it reaching the pour point. You must develop a rhythm of Load -> Wait 1 Beat -> Pour -> Load Next. Breaking this rhythm leads to missed pours and wasted slots.
Step-by-Step Walkthrough: From Start to Finish
The Opening Sequence (Moves 1-5)
Start the level by immediately loading two Cyan cups into slots 1 and 2. Do not fill the belt yet. Grab one Orange cup from the front row and load it into slot 3. This leaves slots 4 and 5 empty. Start the conveyor. As the first Cyan cup reaches the pour point, tap to pour. Your meters should now show Cyan at roughly 15-20% and Orange at 5%.
Unblocking the "4" Stack (Moves 6-10)
This is the most critical phase. Look at the stack marked "4". The top cup is blocking your access to Navy and Cream. Load the top cup from this stack into slot 4. Immediately load the next top cup into slot 5. Your belt is now full (Cyan-Cyan-Orange-Blocker-Blocker). As the cups pour and clear slots 1 and 2, do not refill them with Cyan. Instead, use the empty slots to pull the remaining cups from the "4" stack. Your goal here is purely logistical: clear the stack until you see the Navy Blue and Cream cups appear in the tray.
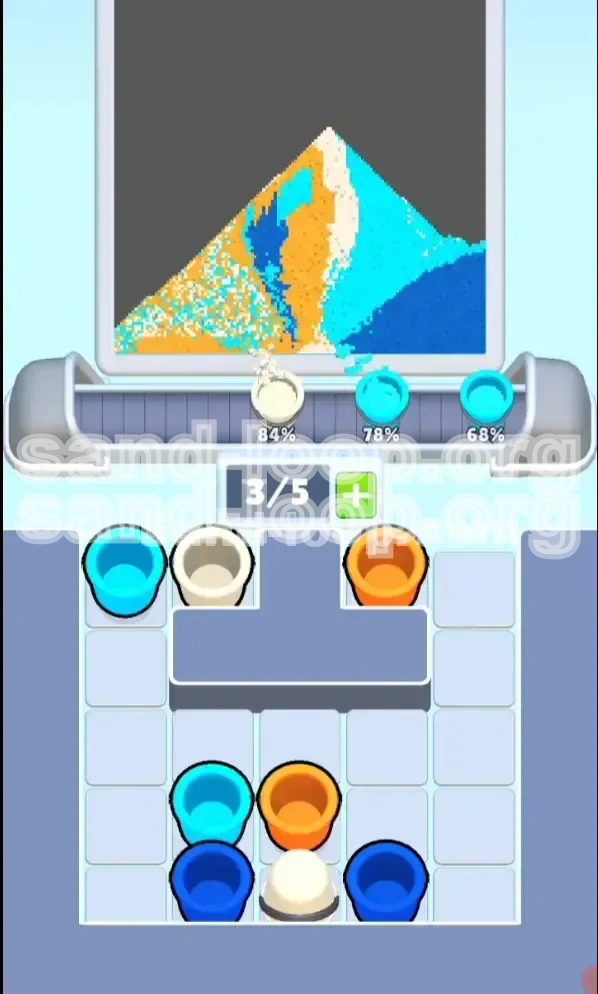
Mid-Game Balancing: The 40% Rule
Once Navy and Cream are visible, reset your loading strategy. You should aim for the following meter distribution before entering the final phase:
- Cyan: 45% Complete
- Navy: 35% Complete
- Orange: 15% Complete
- Cream: 5% Complete
Keep alternating Cyan and Navy loading. Use the "One Empty Slot" rule: always leave one slot open on the conveyor to prevent jamming while you hunt for the next specific color cup in the tray.
The End-Game Sprint (80% to 100%)
When all meters are above 80%, the game changes from resource management to precision filling. Stop loading cups in bulk. Load one single cup, pour it, check the meters, and then decide on the next color. Avoid "chain loading" here. If Cyan is at 95% and Navy is at 88%, load only Navy cups, even if it means waiting a few seconds for the Navy cup to travel from the tray to the slot. Patience wins the race here.
Handling the Final Cups
In the last 5%, you will likely face a situation where you need 1 Cyan, 1 Navy, and 0 Orange. Do not accidentally load an Orange cup. If you load a wrong cup now, you risk jamming the belt with a color you don't need, causing a timeout failure. If a wrong cup enters the slot, simply let it pass through the pour point without tapping to pour (wasting it is better than jamming).
Common Mistakes and How to Avoid Them
The "Cyan Only" Trap
Many players see that Cyan is the most available color and load 4 or 5 Cyan cups immediately. Why this fails: You max out your Cyan meter early, but the Navy zone remains empty. Since your belt is full of Cyan, you cannot unblock the Navy cups underneath the stack, resulting in a soft lock where you must waste cups.
The "Full Belt" Syndrome
Filling all 5 slots feels productive, but it reduces your flexibility to zero. The Fix: Treat 4 slots as your operational maximum. Keeping the 5th slot empty acts as a "buffer" that allows you to instantly grab a Navy or Cream cup the second it becomes available, without waiting for a current cup to finish pouring.
Ignoring the Pour Timing
Tapping frantically to pour often results in "dry pours" where the liquid hasn't reached the spout yet. The Fix: Watch the physical animation. Wait for the cup to center itself under the dispenser before tapping. A consistent, rhythmic tap is faster than a frantic, random tap.
Mid-Game Color Imbalance
Letting Orange or Cream get too far ahead of Cyan and Navy. The Risk: Accent colors have smaller fill targets. If you fill Orange to 100% while Cyan is only at 60%, you lose the ability to use Orange cups to bridge gaps later. You will be forced to waste every Orange cup you see, which clutters your tray and makes finding Cyan/Navy harder.
Panicking at the "4" Stack
Players often try to clear the "4" stack all at once by loading all 4 cups sequentially. The Result: Your belt becomes clogged with unneeded colors. Correct Strategy: Clear the stack gradually. Take one cup, let it process, take the next. Integrate these blockers into your flow rather than dumping them all at once.
Speed Run Tips and Advanced Shortcuts
Pre-loading Technique
While the game is fading in from the "Level Start" screen, you can often tap the supply tray before the conveyor fully starts moving. Hover your finger over the Cyan cups and tap immediately as the level begins to shave 0.5 seconds off your time.
The "Instant Pour" Cancel
If you accidentally load a cup you don't need (e.g., an Orange cup when you need Cyan), you can sometimes tap it immediately to "dump" it if it's still in the early loading phase, allowing you to load the correct color faster than waiting for it to cycle through the belt.
Queue Prediction
Don't watch the cup that is currently pouring. Watch the cup behind it. If you see the cup behind the current one is the wrong color, use that time to look at your supply tray and locate your next target. Effective queue management separates 3-star players from 1-star players.
Optimal Slot Placement
Always place your most critical color (usually Navy in the late game) into the first slot (closest to the pour). Place your least critical color (or a cup you plan to waste/dump) in the last slot (furthest away). This gives you maximum time to correct mistakes or swap cups before the critical color reaches the pour point.
Booster Usage for High Scores
If you have the "Extra Slot" booster, use it. A 6th slot turns this level from a hard puzzle into a manageable flow state. The extra slot effectively eliminates the "Full Belt" mistake mentioned earlier, allowing you to hold your logistics cups (unblockers) while still processing your main colors.
Memorizing the Stack Layout
The "4" stack layout is static (it doesn't change if you restart the level). Memorize the order of cups in that stack. For example, if you know the Navy cup is the 3rd one down, you know you only need to clear 2 cups before you hit the jackpot. This allows you to plan your exact move count for the unblocking phase.