
Level 94
HARDHow to solve Sand Loop level 94? Get instant solution for Sand Loop 94 with our step by step solution & video walkthrough. Sand Loop 94 tips and guide.
Play Sand Loop Now
Experience the puzzle challenge firsthand
Game Screenshots
Sand Loop Level Guides
Level Overview: The Sunset Endurance Challenge
Welcome to the guide for Sand Loop Level 94. This stage is a significant departure from the speed-based levels you may have encountered earlier. It is designed as a methodical endurance test, combining a high-volume logic puzzle with resource management mechanics.
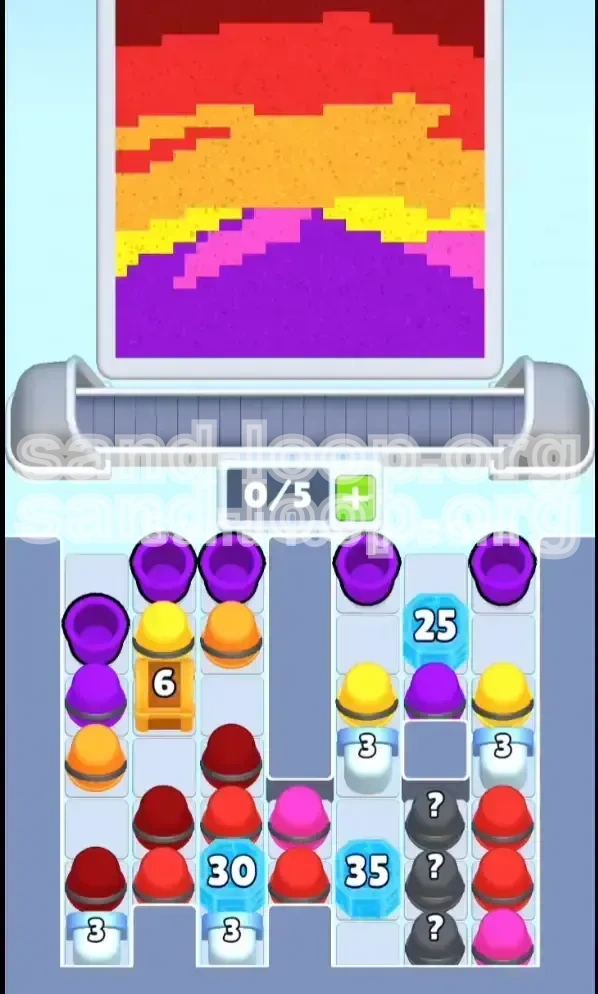
The visual theme is a "Pixelated Sunset," characterized by horizontal sedimentary layers. Unlike levels with complex shapes or isolated pixels, Level 94 is mostly about filling large horizontal bands. However, the difficulty spike comes from the restricted board space and the "High-HP Ice Blocks" that govern the game's economy.
In this level, you cannot rely on quick reflexes alone. You must manage your conveyor belt slots carefully to avoid a deadlock. The game forces you to follow a strict color order while simultaneously fulfilling a "pour quota" to unlock the rest of the board.
The Visual Structure
The canvas is divided into four distinct horizontal zones. Understanding this geography is crucial because painting outside of these zones creates "unrecoverable holes" that waste your paint supply.
- Foundation (Bottom 40%): This is the largest area and is filled entirely with Deep Purple.
- Hills (Lower Middle 25%): A jagged layer consisting of a mix of Hot Pink and Yellow.
- Transition (Upper Middle 20%): A thin band of Orange that acts as a bridge.
- Sky (Top 15%): The final capstone layer of Dark Red.
The Primary Obstacle
The biggest challenge in Level 94 is not the painting itself, but the Countdown Ice Blocks. These are hexagonal blocks labeled 25, 30, and 35 located at the bottom of the screen.
These function as "Global Pour Counters." They do not break when you make matches; they only decrease by 1 point every time you successfully complete a pour action. Because these blocks occupy valuable space in your cup tray, they reduce your carrying capacity from the standard 5 slots down to effectively 2 or 3 usable slots for the first half of the level.
Why Speed Matters Here
Although this is an endurance level, "efficiency speed" is critical. You have a limited number of cups available on the screen at any given time. If you pour slowly, the conveyor belt will jam with unusable colors, stopping new cups from spawning. You must pour as soon as a cup is viable to keep the flow moving.
The Risk of Deadlock
The "2/5 Trap" is the most common reason for failure in this stage. If you fill your tray with Red cups (which are needed last) while you still need to paint the bottom Purple layer, you will have no space to pick up the Purple cups. The game will stall, and you will be forced to restart.
Clear Objectives: Your Mission Goals
To conquer Level 94, you need to move beyond just "filling the picture." You need to approach it with a strategic mindset, treating it as a resource management game.
Objective 1: Execute the Bottom-Up Fill
Your primary directive is to complete the colors in a strict sedimentary order. You cannot paint the sky before the ground. Attempting to pour higher colors (like Red or Pink) before the lower layers (Purple) are solid will result in pixels leaking into the wrong layers. This creates "islands" of white pixels that are extremely difficult to fix later without overfilling.
Objective 2: Manage Slot Economy
Because of the Ice Blocks, you have very limited tray space. You must actively maintain at least 2 empty slots in your tray at all times during the early and mid-game. This ensures that when the necessary Yellow or Orange cups spawn, you have room to pick them up.
Objective 3: Satisfy the Pour Quota
You must generate 25 to 35 successful pours to shatter the Ice Blocks. This means you cannot be picky; you must use every available cup of the current correct color to chip away at these blockers. Efficiently pouring small amounts is better than waiting for a "perfect" large pour.
Objective 4: Preserve Mystery Cups
There are Mystery Cups (marked with a ?) located in the bottom right corner behind the Ice Blocks. Do not use these for general filling. These are your emergency "band-aids" for the final 1-2% of the level when you need specific colors to fix tiny pixel gaps.
Step-by-Step Instructions: The Complete Walkthrough
Follow this exact sequence to navigate the level without getting stuck. This walkthrough assumes you are playing with the standard tray size and difficult spawn rates.
Phase 1: The Purple Foundation (Start)
As soon as the level starts, ignore everything else. Your conveyor belt will likely spawn Purple cups in the top left and right corners.
- Identify Purple Cups: Look for the dark purple paint cups. They are the only ones you need right now.
- Clear the Top Layer: Immediately pull Purple cups and pour them onto the bottom-most section of the canvas.
- Don't Wait for Full Loads: Even if a Purple cup only has 20-30% paint, pour it. The goal here is twofold: fill the purple and reduce the Ice Block counters.
- Avoid the Left Crate: You will see a wooden crate labeled "6" on the left. Do not focus on it yet. It traps Yellow cups that you are not ready for.
Phase 2: Cracking the "6" Crate
Once you have poured enough Purple (about 10-15 pours), the board state will shift slightly. You will notice the "6" crate is blocking the flow of the left column.
- Expose the Crate: Continue pouring Purple until the cups above and around the "6" crate are cleared.
- Trigger the Drop: As the cups above are removed, the crate will settle or become accessible.
- Beware of Yellow: Breaking this crate will likely release Yellow cups. Do not pull them yet if the Purple layer below isn't at least 90% complete.
- Check the Horizon: Look at the boundary between the Purple hills and the Pink layer. If the Purple is solid, you can proceed. If there are gaps, keep hunting for Purple cups.
Phase 3: The Pink and Yellow Mix
With the crate gone and the Purple mostly solid, you move into the "Hills" zone. This is the most dangerous part of the level for slot management.
- Prioritize Pink: Hot Pink usually appears first or is more abundant. Pour Pink to establish the base of the hills.
- Integrate Yellow: Yellow cups will spawn from the left column. Pour these to fill the middle pixels of the hill layer.
- Maintain 2 Empty Slots: You will see Red cups spawning deep in the stacks. Ignore them. If you pick up Red, your belt jams. Keep 2 slots open so you can cycle through Pink and Yellow quickly.
- The "Island" Check: If you see a single pixel of white floating above your Pink/Yellow mix, leave it. Fixing it now might waste a cup. Come back for it in the late game.
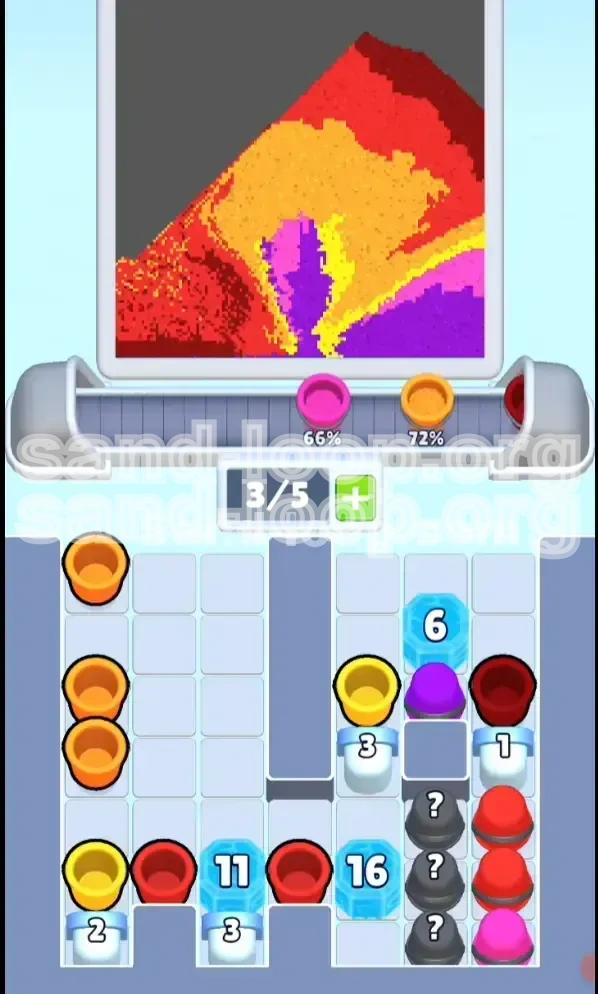
Phase 4: The Orange Bridge
As you approach 20-25 pours, the countdown on the Ice Blocks will be nearing zero. The next layer is Orange.
- Locate Orange Cups: These are often buried or spawn less frequently. You may need to clear existing Pink/Yellow cups to find them.
- Pour Carefully: The Orange band is thin. Overpouring here can spill into the Red sky above.
- Monitor the Blocks: Your pours on Orange should be the final hits needed to break the 25/30/35 blocks.
- Prepare for Expansion: Once the blocks break, your tray will suddenly have more space. Be ready for a flood of new resources.
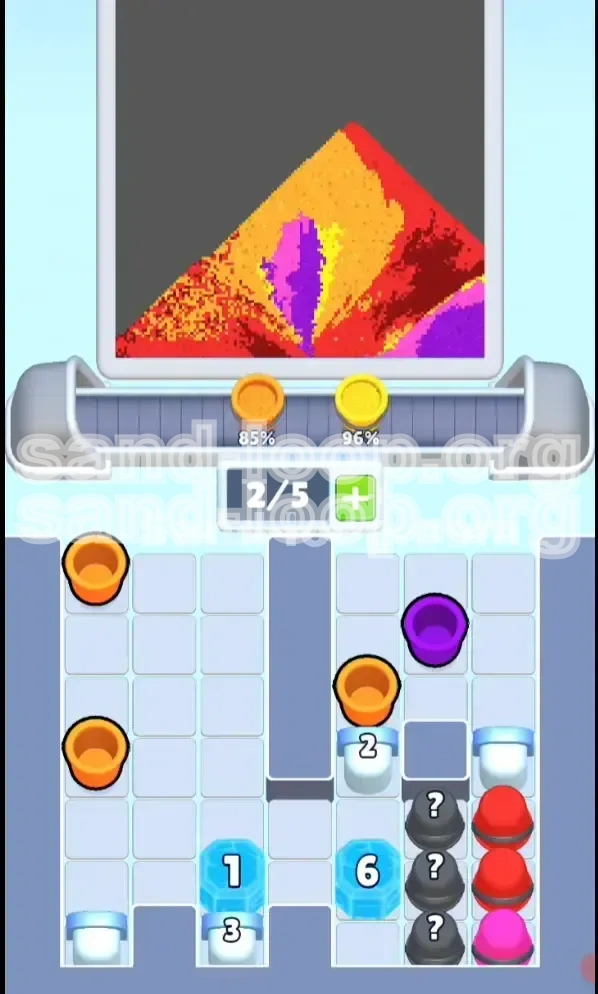
Phase 5: The Late-Game Unlock
This is the "Phase Shift" moment. The Ice Blocks shatter, revealing the Generators (White Pipes) at the bottom.
- Assess the Tray: You now have access to the bottom generators.
- Pull the Red Cups: Now, and only now, should you start pulling the Dark Red cups you ignored earlier.
- Fill the Sky: Pour Red onto the top 15% of the canvas.
- Use Generators: The white pipes at the bottom generate paint rapidly. Use them to top off your Red pours.
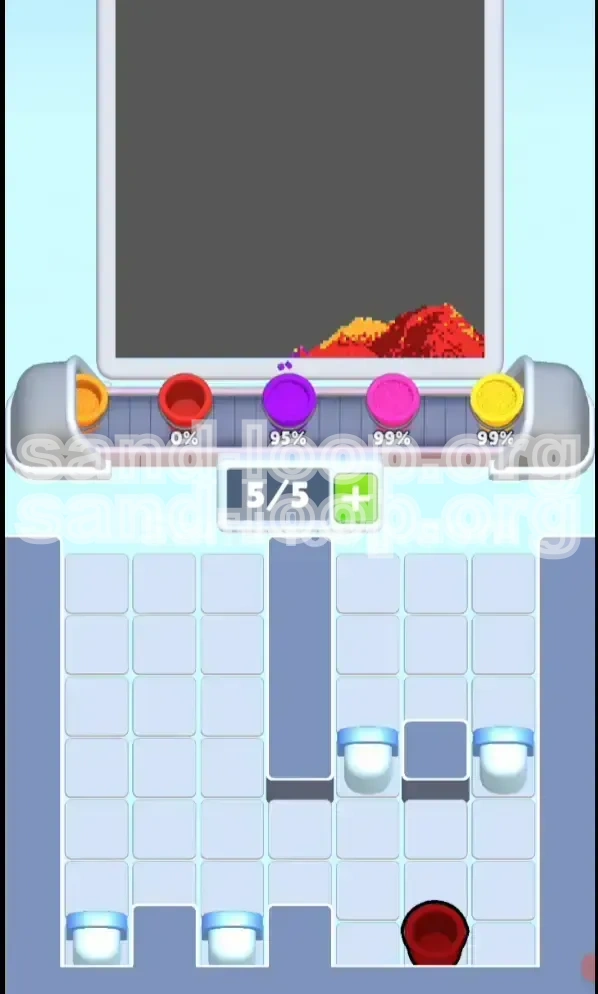
Phase 6: The Cleanup (Final 3%)
The picture looks done, but the level won't end. You are likely missing 1-5 pixels scattered across the layers.
- Scan for White: Look for static white dots, especially near the jagged edges between Purple and Pink.
- Reveal Mystery Cups: Go to the bottom right corner where the Ice Blocks were. Click the Mystery Cups one by one.
- Patch Holes: Use the specific colors from the Mystery Cups to fill the final stubborn pixels.
- Final Pour: The level should complete as soon as the last pixel is colored.
Key Tips & Analytical Breakdown
These tips are derived from analyzing the level's generation logic and spawn rates. Applying these will drastically reduce your retry count.
Tip 1: The 90% Rule for Layers
Never move to the next color until the previous layer is 90% filled.
Why? The game's hit detection for colors is generous but overlapping. If you have a 10-pixel gap in your Purple layer and you pour Pink, the Pink will fill that gap to reach the bottom. Now you have a pink hole at the bottom of a purple ocean. You cannot fix this without pouring Purple again, which wastes a cup. Wait until the layer is solid.
Tip 2: Avoiding the Slot Jam
The most effective strategy for tray management is the Churn Method.
- Keep picking up cups of the current target color.
- Pour them immediately, even if the amount is small.
- This keeps the conveyor belt moving. A moving belt spawns new cups. A static belt (full of useless Red cups) spawns nothing.
Tip 3: The "Countdown" Math
The Ice Blocks require roughly 35 pours total to clear.
You will likely need about 10-15 pours for Purple, 10-15 for Pink/Yellow, and 5-10 for Orange. This means you should not rely on the Red phase to clear the blocks; they should be gone by the time you start painting the sky. If you reach Red and the blocks aren't broken, you didn't pour enough in the earlier phases.
Tip 4: Handling Mystery Cups
The Mystery Cups (???) are a double-edged sword.
They contain a random color from the palette. In the early game, they are useless because they might give you Red when you need Purple. However, in the final 3% of the level, they are invaluable. They act as a "wildcard" to fix that one single pixel you can't seem to get a spawn for. Do not click them until the very end.
Tip 5: Visualizing the Flow
Think of the paint as water flowing downhill. The Purple layer is the bucket. The Pink/Yellow layers are floating on top. If the bucket (Purple) has holes, the water (Pink) will leak through. Ensure your "container" is watertight before adding the next layer.
Tip 6: The Left Column Crate
The "6" crate on the left is a choke point. It limits your access to the Yellow cups.
Don't waste cups trying to break it randomly. It usually breaks via collateral damage from clearing the cups above it. Focus on the Purple cups adjacent to it, and it will pop open naturally.
Common Mistakes to Avoid
Players often fail Level 94 not because they lack skill, but because they fall into specific traps designed by the level creator.
Mistake 1: Premature Red Pickup
This is the number one cause of failure. You see a Red cup spawn, and out of habit, you pick it up.
The Consequence: The Red cup sits in your tray. You can't pour it (Red is the top layer). You can't drop it (no space). Your tray is now effectively size 4. You pick up another useless cup. Size 3. Eventually, you have a tray full of Red/Pink but need Purple, and you can't pick it up. You are soft-locked.
Mistake 2: Ignoring the Ice Block Mechanics
Some players treat the Ice Blocks like standard obstacles and wait for them to break naturally.
The Reality: They never break naturally. They only break when you pour. If you are staring at the blocks waiting for them to crack, you are wasting time. You must be actively painting to reduce the countdown.
Mistake 3: Overfilling the Orange Layer
The Orange layer is thin and sandwiched between Yellow and Red.
The Error: Using a large cup (50%+) to paint a thin layer. The physics engine often overflows the paint into the layer above. If you spill Orange into the Red sky, you create a hard boundary that Red paint cannot easily cross. Always use smaller cups or partial pours for the thin middle layers.
Mistake 4: Spam-Clicking Mystery Cups
At the start, the ? cups look tempting.
The Risk: They are random. You might need Purple, but the ? cup gives you Pink. You now have a Pink cup taking up space that you can't use. You have effectively wasted a slot. Only use ? cups when you have slots to burn or in the end-game.
Mistake 5: Not Checking the Bottom
Players often look at the top of the screen where the action is.
The Issue: The Ice Blocks are at the bottom. If you don't monitor the countdown numbers (25, 30, 35), you won't know how close you are to the "Phase Shift." You might think you are struggling, but you are actually only 5 pours away from clearing half the board. Always keep an eye on the countdown.
Stuck Solutions & Speed Run Tips
If you are currently stuck on Level 94 or trying to beat your best time, these advanced strategies will help you push through.
Solution: I'm stuck with no usable colors!
This is the "Soft Lock" scenario. Your tray is full of Red/Pink, but the canvas needs Purple/Yellow.
The Fix: You cannot "save" this state easily. You must waste the current cups.
- Find a spot on the canvas that can accept the color you are holding (even if it's 99% full).
- Pour the cup there to empty it.
- This frees up the slot.
- Immediately pull the correct color cup that spawns.
- This is slow, but it's the only way to reset your tray economy.
Solution: The Last Pixel Won't Fill
You have 99% completion, but one pixel remains white.
The Fix: This is usually a "depth" issue. The pixel is technically "under" another layer visually. Use a Mystery Cup. The Mystery Cup paint has a slightly larger "splash" radius or priority logic that can often hit these glitched or obscured pixels. If that fails, try pouring the color above it and letting it drip down.
Speed Run Tip: The "Pre-Load" Strategy
To minimize time, you must predict spawns.
As you are pouring your last Purple cup, look ahead at the conveyor belt. If you see a Yellow cup entering the screen, hover your mouse over it. The moment you release the Purple cup, click the Yellow one. Eliminating the travel time of your mouse saves seconds over the course of 30 pours.
Speed Run Tip: Bulk Pouring
Don't pour cup-by-cup for the Purple layer.
If you have two Purple cups, pick up both. Pour one, and while the sand is falling, immediately grab the second and pour it. You can queue up the falling sand animations. This overlaps the animation time, significantly speeding up the "Purple Rush" phase.
Speed Run Tip: Ignoring Perfection
For a speed run, 100% accuracy is not required for the middle layers.
It is faster to leave the Pink/Yellow layer at 85% completion and move to Orange/Red, then use a large Red pour at the end to "cap" the holes. Red is the final layer, so if it spills slightly, it's less risky than spilling Orange. Use the final layer's gravity to fix small mistakes in the lower layers.