
Level 2
HARDHow to solve Sand Loop level 2? Get instant solution for Sand Loop 2 with our step by step solution & video walkthrough. Sand Loop 2 tips and guide.
Play Sand Loop Now
Experience the puzzle challenge firsthand
Game Screenshots


Sand Loop Level Guides
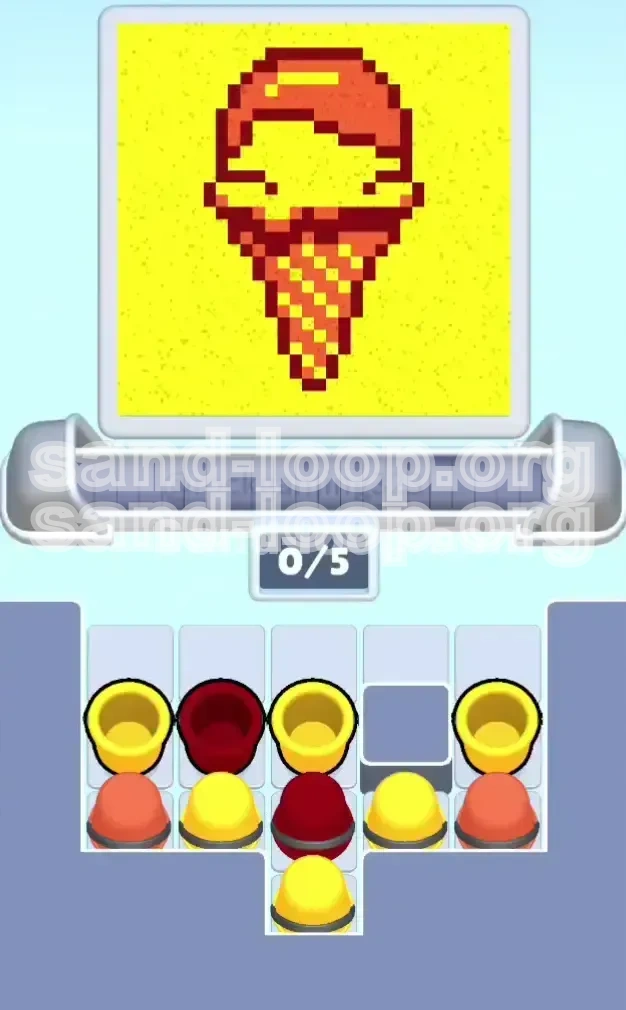
Level Overview: The Ice Cream Cone Challenge
Welcome to Level 2, widely known in the community as the "Ice Cream Cone" challenge. If Level 1 was a gentle tutorial on holding your device, Level 2 is the game's way of telling you to fasten your seatbelt. This stage introduces a massive difficulty spike, moving away from simple color blocks to a complex, pixel-perfect reconstruction of a classic dessert. The visual complexity of the cone's checkerboard pattern combined with strict supply limitations turns this into a high-stakes logic puzzle.
The core challenge here is not just identifying colors, but managing the rigid queue of the conveyor belt. You are dealing with three distinct color zones that must be filled in a specific, non-negotiable order. The game's fill algorithm is strict: it prioritizes the intricate patterns of the cone before it allows you to touch the background. This level will test your ability to look ahead, manage a limited inventory of 5 slots, and suppress the instinct to simply fill colors from top to bottom. One wrong tap—specifically sending a Dark Red cup too early—can clog your machine beyond repair.
The Pixel Structure
The image is divided into three strict zones. First, the Dark Red Scoop sits at the top, acting as a solid color anchor. Second is the Checkered Cone, the nightmare zone featuring a tight 1:1 grid alternating between Bright Yellow and Burnt Orange. Finally, the Bright Yellow Background surrounds everything. The difficulty arises because the nozzle jumps between these zones rapidly, requiring you to have specific colors ready at exact moments, or risk a stall.
The 5-Slot Constraint
Your conveyor belt capacity is capped at 5 units. In this level, space is your most expensive currency. You cannot hoard colors. You must maintain a fluid state where cups enter the belt and are consumed by the nozzle almost immediately. Allowing the belt to fill up with "future" colors while the nozzle needs "current" colors is the quickest way to fail.
The "Grey Box" Obstacle
A new feature in this level is the immovable "Grey Box" located in the fourth column of your supply tray. This isn't just a visual nuisance; it is a hard blocker that reduces your maneuverability. It effectively splits your tray into a left and right section. If a critical color is trapped behind this box, you cannot retrieve it until you clear the cups in front of it, adding a layer of logistical planning to every tap.
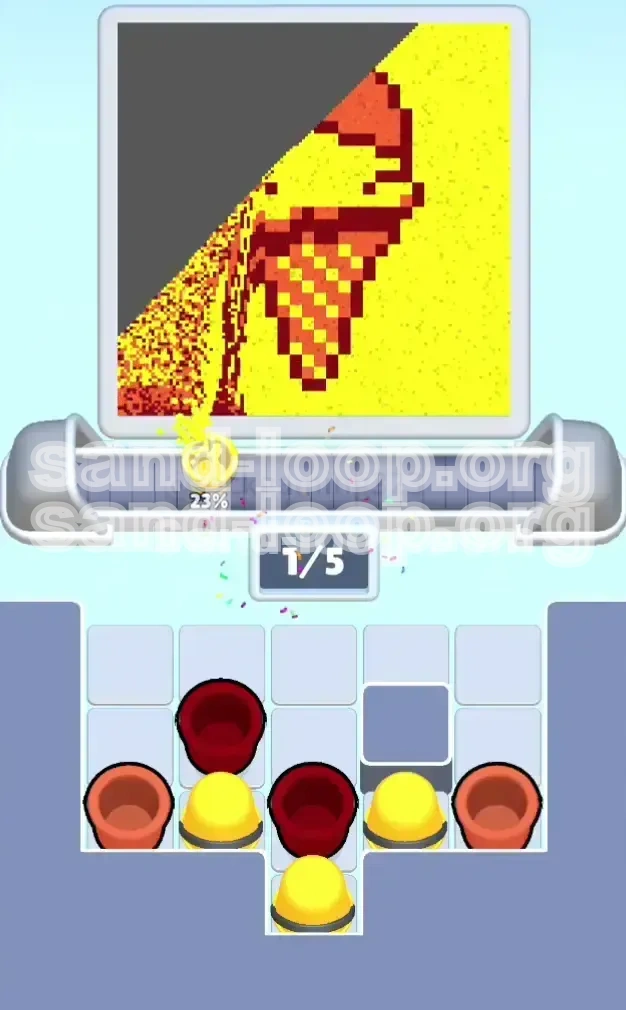
The Fill Algorithm
Unlike a coloring book where you can choose where to start, Sand Loop forces a specific path. The algorithm prioritizes the most complex patterns first. This means the nozzle will aggressively target the Checkered Cone before it even considers the Scoop or the Background. Attempting to fight this logic by feeding it background colors first will result in a jam. You must align your inputs with the nozzle's strict hierarchy.
Victory Conditions
Success in Level 2 is defined by a 100% fill rate with zero stalled time. To achieve the three-star rating, you must complete the level without ever letting the conveyor belt reach maximum capacity while the nozzle waits for a color. This requires a rhythm of alternating taps for the cone and a sudden switch to mass-tapping for the scoop and background.
Clear Objectives: Your Mission Plan
Before you tap a single cup, you need to internalize the objectives. This level cannot be beaten by reaction time alone; it requires anticipation. Your primary goal is to clear the complex patterns first to unlock the simpler background fills.
Objective 1: Master the Alternating Pattern
Your first major hurdle is the cone. The nozzle will alternate between Bright Yellow and Orange (or Light Brown) for every single pixel of the cone. Your objective is to establish a rhythm of "Yellow-Orange-Yellow-Orange" without breaking the chain. If you feed two Yellows in a row, the nozzle will reject the second one, clogging your belt with a cup that cannot be used until the cone is finished.
Objective 2: Strict Color Segregation
You must mentally segregate your colors. Dark Red is strictly forbidden until the cone is 100% complete. Bright Yellow and Orange are strictly forbidden once the scoop starts. Mixing these phases will result in "dead cups" occupying valuable slots on your belt. Your goal is to phase out the old colors as the nozzle transitions to the new zone.
Objective 3: Manage the Queue Gap
Keep a mental buffer of 1 empty slot on your conveyor belt at all times. This buffer gives you the split-second needed to shuffle your supply tray if the next required color is buried in the back columns. If you let the belt hit 5/5 capacity, you lose the ability to maneuver, and the game effectively ends.
Objective 4: Navigate the Grey Box
You need to plan your moves around the static obstacle in column 4. If your required colors are on the right side of the box, you must ensure you have enough clearance to fetch them without stalling the left side. Treat the Grey Box as a pivot point for your supply management strategy.
Objective 5: The Final Flood
Once the detailed work is done, your objective shifts to speed. The background phase is a volume test. You must be prepared to tap rapidly to clear the remaining Yellow cups and finish the level before the timer or patience runs out.
Step-by-Step Walkthrough
This is the tactical execution of the plan. Follow these phases precisely to navigate the level without getting stuck. We will break the run down into four distinct operational phases.
Phase 1: The Checkered Start (Cone Only)
As the level loads, the nozzle will immediately drop to the cone area. Do not be distracted by the Red scoop or the Yellow background.
- Scan Immediately: Look at the bottom tray. Locate your Bright Yellow and Orange sources. Ignore any Dark Red cups you see.
- Start the Rhythm: Tap one Yellow, wait for it to process, then tap one Orange. Do not spam. The pattern is strict.
- Avoid Red Traps: If you see a Red cup in the front row of your tray, do not tap it to "move it out of the way." Tapping it moves it to the belt, where it will block the flow. Let it sit in the tray until the cone phase is over.
- Watch the Nozzle: As the cone fills, the nozzle will dance in a zig-zag pattern. Follow its movement. If it moves to a row that requires Orange, have your finger hovering over the Orange cup.
Phase 2: The Critical Transition
This is the most dangerous 5 seconds of the level. The cone is nearly full, and the nozzle is preparing to jump to the scoop.
- Stop Tapping Early: When the cone has about 10% remaining, stop tapping new cups unless absolutely necessary. Let the belt clear out.
- Identify the Jump: The moment the cone pixels disappear and the nozzle moves upward, the requirement changes instantly.
- Purge the Belt: Ensure no Yellow or Orange cups are waiting on the conveyor line. You need empty slots for the incoming Red cups.
- Locate the Reds: Glance at your tray. Identify where the Dark Red cups are clustered so you can tap them immediately the second the nozzle settles on the scoop.
Phase 3: The Red Scoop Execution
The nozzle is now locked onto the scoop. This is a single-color phase, which is easier but requires speed.
- Spam Red: Now you can tap rapidly. Fill the belt with Dark Red cups. Since the scoop is a large block, it will consume them quickly.
- Drain the Tray: Check columns 1, 2, 3, and 5 (avoiding the Grey Box) for any remaining Red cups. Get them all onto the belt.
- Monitor Completion: Watch for the scoop to lose its outline or turn solid. Once it's full, be ready to stop tapping Red immediately.
Phase 4: The Yellow Background Flood
With the main objects gone, the nozzle will retreat to fill the vast empty space.
- Tap Remaining Yellows: You should have a large reserve of Bright Yellow cups left.
- Clear Stragglers: If you have any non-Yellow cups left (perhaps an Orange you missed), tap them. The nozzle is in "mop up" mode and will handle them, then return to Yellow.
- Volume Fill: The background is thirsty. Keep tapping until the level completion screen triggers.
Key Tips for Efficiency
To achieve a high score or a fast time, you need to optimize your movements. These tips focus on minimizing the time between the nozzle requesting a color and the cup reaching it.
The "Rear-View" Technique
Don't watch the nozzle constantly. Spend 60% of your time watching the Supply Tray. If you know the nozzle is alternating, you should be looking for where the next Yellow cup is coming from while the current one is processing. This proactive scanning prevents the "no cup ready" stall.
The "Ghost Fill" Rhythm
The game allows a tiny bit of input buffering. If you tap a cup exactly 0.5 seconds before the nozzle is ready, it queues instantly. Learn to listen to the audio cue of the paint hitting the canvas. Tap on the "beat" of the previous shot to keep the conveyor belt in perpetual motion.
Grey Box Navigation
Since you cannot use the 4th column, try to keep your active colors in columns 3 and 5. If you have a critical Red cup in column 5, don't let column 3 get clogged with useless colors, or you won't be able to slide the Red over. Treat the Grey Box like a pillar in a racing game; always steer clear of it.
Calculated Wastage
Sometimes you have to lose a battle to win the war. If you need a Yellow cup and it's blocked by an Orange cup, and your belt is empty, tap the Orange. Yes, it will sit on the belt and clog it for a second. But once it processes (or cycles), the path is clear for the Yellow. It is faster to cycle one bad cup than to wait for the columns to shift naturally.
Queue Management
Never let the belt sit at 0 cups. An empty belt is wasted potential energy. Keep 1-2 cups queued up at all times. This ensures that if you look away to check the tray, the nozzle keeps firing. A full belt is a crisis, but an empty belt is a time-waster.
Common Mistakes to Avoid
Level 2 is filled with traps that bait new players into failing. Avoiding these specific errors is the difference between a retry and a victory.
The "Premature Red" Error
This accounts for 80% of failed runs. Players see a Dark Red cup in the tray and tap it to clear space, thinking they can save it for later. The game puts it on the belt, but the nozzle is still on the cone. The Red cup blocks the Yellow/Orange flow, the belt fills up, and you lose. Rule: Never tap Dark Red until the cone is gone.
The "Background First" Fallacy
New players instinctively try to fill the large Yellow background first because it looks easiest. The game's physics prevent this. The nozzle will ignore background commands while the cone exists. Trying to force Yellow cups for the background while the nozzle wants Orange for the cone will result in an instant jam.
Alternation Breaks
The cone pattern is a strict grid. If you accidentally send two Yellow cups in a row, the nozzle will paint one pixel and then stall on the second Yellow cup because the next pixel requires Orange. This stall ruins your rhythm and fills your belt with useless paint. Always count: 1 (Yellow), 2 (Orange).
Ignoring the Transition
Many players fail to clear their queue between the Cone and the Scoop. If you enter the Red phase with 2 Orange cups still on the belt, you only have 3 slots for Red. You will likely run out of space and stall before the scoop is finished.
Panic Tapping
When the belt gets full (4 or 5 cups), panic sets in. Players start tapping randomly to "fix" it. This only adds more chaos. If the belt is full, stop. Look at the cup at the very front of the belt (closest to the nozzle). That cup is the problem. Wait for the nozzle to accept it (even if it takes a second) before you do anything else.
Solutions for When You Are Stuck
Even with a plan, the RNG (Random Number Generator) of the cup supply can put you in a bind. Here is how to recover from specific bad scenarios.
Scenario 1: The Full Belt Jam
Situation: Your belt has 5 cups. The nozzle is stalled because the front cup is Dark Red, but it's currently on the Yellow Cone.
Fix: STOP TAPPING. You cannot add more cups. You must wait. Look at the front cup. Is it Red? Wait for the nozzle to realize it can't use it (it won't consume it immediately, or if it does, it wastes time). The game will eventually cycle the belt if you wait, or you must wait until the cone is finished (if the Red is stuck at the front). Actually, if a wrong color is at the front, the nozzle usually won't consume it. You are stuck until you clear space. Wait for the current pixel to finish. If the nozzle refuses the front cup, you are in a hard lock. To prevent this, keep 1 slot open. If you are already locked, you have to hope the game's cycler moves the belt (some versions auto-cycle after a few seconds of stall).
Scenario 2: The Trapped Color
Situation: You need Bright Yellow, but the only Yellow cup is in the far right column, trapped behind two Grey Box columns or other cups.
Fix: You have to feed the cups blocking it. If an Orange cup is blocking your Yellow, tap the Orange. It will go to the belt. This might temporarily clog the belt, but once that Orange cycles through or gets used, the Yellow is freed. It is better to have a momentary clog than a permanent shortage.
Scenario 3: The Empty Tray Crisis
Situation: You are tapping colors, but your tray is running low on the specific color you need (e.g., you are on the cone but running out of Orange).
Fix: Slow down. By tapping slower, you give the game time to "spawn" or shuffle new columns into view. If you tap frantically, you drain your visible supply faster than the game can refresh the columns. Patience allows the supply tray to regenerate.
Scenario 4: Post-Cone Confusion
Situation: You finished the cone, but the nozzle isn't moving to the scoop, or you aren't sure if the cone is 100% done.
Fix: Zoom in (if possible) or look closely at the cone area. There is likely one single pixel remaining, often a "straggler" at the bottom tip. The nozzle will not transition until that last pixel is filled. Find that one missing pixel and feed it the required color manually.