
Level 4
HARDHow to solve Sand Loop level 4? Get instant solution for Sand Loop 4 with our step by step solution & video walkthrough. Sand Loop 4 tips and guide.
Play Sand Loop Now
Experience the puzzle challenge firsthand
Game Screenshots
Sand Loop Level Guides
Sand Loop Level 4: The Pixel Duck - Complete Walkthrough
Level Overview: The Pixel Duck Strategy
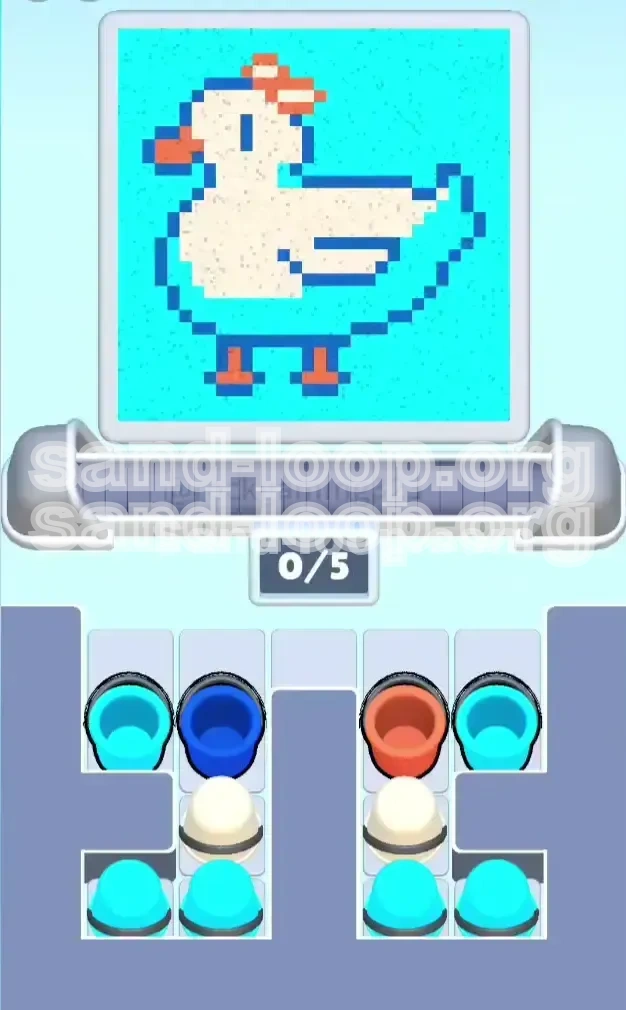
Sand Loop Level 4, commonly referred to as the "Pixel Duck" stage, serves as the introductory gate for advanced color management mechanics. Unlike the first three levels where players could largely rely on visual estimation, Level 4 introduces a strict dependency system known as "Layer Locking." The visual target is simple: a white duck silhouette with an orange beak and feet, floating against a cyan background.
The "Forgiveness" Trap
The primary psychological trap in this level is the disparity between zone size and strictness. The cyan background accounts for approximately 85% of the total pixel area (approx. 4,200 lbs of sand capacity) and is extremely forgiving. In contrast, the orange beak and feet occupy less than 5% of the canvas (approx. 250 lbs) but have a zero-tolerance policy for error. A single misplaced pour of white or cyan over the beak will fail the level, regardless of your overall completion percentage.
Mechanic: Dependency Locking
This level features a specific mechanic called "Dependency Locking." You cannot physically access the necessary White cups until you clear the obstructing Dark Blue and Orange cups from the supply tray. This forces the player to adhere to the correct painting order (Outline before Fill) simply by virtue of the UI layout. Understanding that the tray is not just a storage space, but a puzzle lock, is the first step to mastering this stage.
The Volume vs. Precision Balance
Success in Level 4 requires balancing high-volume tasks (filling the background) with high-precision tasks (drawing the outline). The difficulty spike occurs because the "supply tray" logistics force you to deal with precision items first. If you panic and flood the belt with background colors (Cyan) to clear space, you will block the mechanism and prevent the duck from being formed, leading to a timeout.
Validation System Mechanics
The validation algorithm in this level scans for color purity. It checks the "Red" channel for the Orange beak and the "Blue" channel for the outline before it even looks at the total fill percentage. If the outline is breached (white sand touching cyan background), the validation fails instantly. You must treat the Dark Blue outline not as paint, but as a physical dam that must hold back the subsequent floods of white and cyan sand.
Primary Objective: Establish the Perimeter
Your immediate goal when the level starts is to secure the Dark Blue outline. This is not just about aesthetics; it is about containment. The outline acts as a barrier that separates the "White Zone" (the duck) from the "Cyan Zone" (the water). If the perimeter is not solid, the white sand will bleed out, causing a critical failure. You must prioritize the Dark Blue cup above all other resources.
Secondary Objective: Resolve Small Features
Before you can begin filling the large areas, you must resolve the "islands" of detail—the beak and feet. These Orange zones are small and vulnerable. If they are not established early, they will be buried by the massive volume of White and Cyan sand that follows. Think of the Orange color as "reservations" of space that must be staked before the land rush begins.
Tertiary Objective: The Fill Operation
Once the perimeter and details are locked in, the objective shifts to volume management. You must fill the interior of the duck (White) without overflowing the dam you just built. This requires timing your pours to match the sensor's position over the duck's body. You are aiming for high-speed delivery of a specific color to a specific zone.
Final Objective: The Background Flood
The final phase is a resource dump. With the duck complete and protected by its outline, your goal is to empty the remaining Cyan cups as fast as possible to fill the background. This phase has no precision requirements; it is purely a test of how quickly you can cycle the conveyor belt to clear the remaining sand volume.
Step 1: Unlock the Tray (The Dark Blue Maneuver)
Upon loading the level, do not tap the White cups, as they are physically blocked. Locate the Dark Blue cup at the top-left of the tray. Tap it immediately. This sends the outline material to the conveyor belt. Crucially, removing this cup shifts the tray contents, unlocking the first of the two blocked White cups. Do not queue anything else yet; let the Dark Blue travel alone to ensure it hits the pouring sensor first.
Step 2: Clear the Right Flank (The Orange Maneuver)
With the Dark Blue dispatched, immediately tap the Orange cup located at the top-right of the tray. This serves two purposes: first, it queues up the critical detail color needed for the beak and feet; second, it removes the right-side obstruction, fully liberating the White cups in the center of the tray. Your belt should now look like this: [Dark Blue] -> [Orange].
Step 3: The Strategic Spacer
Do not tap the White cups immediately. You need a delay to allow the Dark Blue outline to set (approx. 40-50% completion). Tap one Cyan cup. This acts as a "spacer" in your conveyor queue. It prevents the White cups from arriving at the pouring station too early. Your desired queue is now: [Dark Blue] -> [Orange] -> [Cyan (Spacer)].
Step 4: Execute the White Fill
Watch the progress monitor. When the Dark Blue outline is approximately 60% complete and the Orange features are placed, rapidly tap two White cups. These should queue behind the Cyan spacer. As the spacer leaves the pouring station, the White cups will enter. The sensor should now be moving over the body of the duck. The white sand will flow inside the blue boundary you created in Step 1.
Step 5: Monitor and Adjust
As the White sand pours, observe the edges. If the white stays strictly inside the blue lines, you are safe. If you see the white spilling over the beak, your Orange timing was late (or the sensor missed it). If it spills into the background, your Blue outline was too thin. Assuming success, let the White cups drain until the duck body is roughly 80% filled.
Step 6: The Cyan Endgame
Once the duck is distinct and mostly white, the precision phase is over. Look at your supply tray. It should be full of Cyan cups. Rapidly tap all of them. Fill the conveyor belt to its maximum capacity (5 slots). The pouring station will now cycle through Cyan continuously. Since the duck is already "painted" and "outlined," this flood of blue sand will only affect the background, safely pushing you to 100% completion.
Phase 1: Dark Blue (The Container)
Priority: Critical / Timing: Immediate.
Dark Blue is the absolute first priority. It defines the shape of the duck and creates the physical barrier necessary for the rest of the level. If you miss any segment of the outline, the level becomes nearly impossible to recover because the white sand will permanently contaminate the background zone. Ensure the Dark Blue cup is the first item on the belt.
Phase 2: Orange (The Details)
Priority: High / Timing: Second.
Orange must be processed immediately after Blue. The beak and feet are small pixel clusters that are easily overwritten. If you process White before Orange, the white sand will cover the beak zone, and you will likely run out of Orange cups to fix it later. Orange acts as the "mask" that preserves the duck's features against the white body fill.
Phase 3: White (The Subject)
Priority: Medium / Timing: Mid-Game.
White is the bulk of the puzzle, but it is also the most dangerous if released early. It requires a "container" (the Blue outline) to be effective. Process White only after the outline is established and the Orange details are safe. This is a high-volume phase, requiring multiple cups to be cycled quickly.
Phase 4: Cyan (The Background)
Priority: Low / Timing: Endgame.
Cyan is the "cleanup" color. It is abundant and covers the largest area, but it serves no purpose until the duck is formed. Processing Cyan too early clogs your belt and wastes time. Treat Cyan as the final step—a flood to wash away the empty space once the artistic work is done.
The "70% Completion" Rule
A common mistake is abandoning a color layer too soon. Never switch to the next color until the current one is visually "solid" or at the estimated 70% completion mark. For example, if you start pouring White while the Blue outline is only 40% done, the White will inevitably find a gap in the wall and bleed out. Patience on the first two layers saves time on repairs later.
Supply Tray "FIFO" Management
Treat your supply tray like a queue: First In, First Out. Do not let cups pile up. When you unlock the White cups, clear them as soon as the belt allows. A cluttered tray makes it difficult to tap the specific colors you need during a crisis. Keeping the tray organized ensures you can instantly find the Orange cup if you need a quick fix.
Sensor Pathing Prediction
The pouring sensor moves in a predictable loop (usually Top-Left -> Top-Right -> Center -> Bottom). Use this knowledge to time your releases. If the sensor is at the Top-Left (Background), do not release a White cup (Duck Body). Wait the 2-3 seconds for the sensor to drift towards the Center (Duck) before releasing the White. This minimizes waste and prevents "dry spells" where the sand misses the target.
The "Cyan Spacer" Tactic
Use Cyan cups as deliberate spacers to create gaps in your production line. If you need to wait for an outline to dry but want to keep the belt moving, send a Cyan cup. It acts as a buffer, buying you 5-10 seconds of time without risking the integrity of your duck. This keeps the flow steady without forcing the next critical color too early.
High-Volume vs. Low-Volume Handling
Distinguish your handling style based on volume. "Precision Colors" (Blue, Orange) should be sent one at a time to ensure accuracy. "Volume Colors" (White, Cyan) can be "spammed" or tapped in rapid succession once the target zone is locked. Mixing these strategies—spamming Blue or tapping White one by one—will lead to inefficiency and likely failure.
Mistake #1: The "White Rush" Failure
This is the most common error. Players see the large White cups and immediately tap them to clear the tray. Without the Dark Blue outline, the White sand spreads across the entire canvas, contaminating the background and beak instantly. If you pour White first, you have essentially lost the level; restart immediately.
Mistake #2: Ignoring the "Orange" Micro-Zones
It is easy to focus on the big duck body and forget the beak. If you finish the duck (White) and the background (Cyan) but haven't processed the Orange cup, you will fail at 95% completion. The Orange beak is small and hard to hit with the sensor if it's surrounded by other colors. Always prioritize Orange early while the sensor is still fresh and the canvas is clean.
Mistake #3: Conveyor Belt Jamming
Overloading the belt with Cyan before the Duck is finished. The belt only holds 5 cups. If you fill 4 slots with Cyan, you have blocked yourself from sending White or Blue for a long duration. This usually results in the background being 100% blue while the duck remains unpainted, leading to a timeout. Never let Cyan occupy more than 1 slot until the endgame.
Mistake #4: Pouring Over Wet Layers
Sand stacking physics can be unforgiving. If you pour a heavy volume of White immediately after a delicate Orange pour, the force of the White sand can blow the Orange sand out of the beak zone. Always leave a small gap (the Cyan Spacer) between Precision pours and Volume pours to let the details settle.
Mistake #5: Late-Game Resource Starvation
Using up all your White cups on inefficient pours early on. If you waste White sand while the sensor is in the wrong position, you may run out of White cups just as the duck is 90% filled. You will then be forced to wait for the sensor to drift, wasting precious seconds. Conserve your high-value colors by timing them perfectly.
Scenario: Stalled at 90% Completion
Symptom: The duck looks complete, but the percentage is stuck at 90%.
Diagnosis: You are likely missing the background fill or have small gaps in the outline.
Solution: Check the corners of the image. If the background is not fully blue, spam Cyan cups. If the background is done but you are stuck, check the outline for small breaks where white might be touching the edge. If you are out of sand, you failed to clear the tray efficiently earlier.
Scenario: "Contaminated" Beak (Yellow/White Beak)
Symptom: The beak is yellow or white instead of orange.
Diagnosis: You poured White or Cyan before the Orange was fully established, or you poured Orange when the sensor wasn't over the beak.
Solution: Prevention is the only cure. Ensure Orange is the second cup tapped (after Blue, before White). If this happens mid-game, try to dump a specific Orange cup directly on the beak if the sensor passes over it, but usually, this requires a restart.
Scenario: White Bleeding into Background
Symptom: The duck has fuzzy white edges or white "snow" in the blue water.
Diagnosis: The Dark Blue outline was incomplete or too thin when you started the White pour.
Solution: In future runs, wait for the Blue outline to reach 100% in critical areas before tapping White. You can try to fix this by flooding Cyan to lower the contrast, but the validation system will likely still detect the white pixels. Restart is recommended.
Scenario: Supply Tray Gridlock
Symptom: You cannot tap a cup because another cup is physically on top of it or blocking it.
Diagnosis: This is the "Dependency Locking" mechanic.
Solution: Identify the obstructing cup. It is usually Dark Blue or Orange. You must tap and use that obstructing color first, even if you don't want to. You cannot bypass the lock. Tapping the obstruction clears the path to the cups behind it (usually White).
Scenario: Running Out of Time
Symptom: Timer is under 30 seconds, duck is only half done.
Diagnosis: You spent too much time micromanaging or waiting for the sensor.
Solution: Enter "Panic Mode." Stop caring about precision. Spam all remaining White and Cyan cups. Fill the belt to capacity. Even if the edges are messy, a 95% full duck with messy edges scores higher than a perfect outline with no body. Quantity over quality is the only way to save a timeout run.
Pre-Loading the Conveyor Queue
Speed runs are won and lost in the first 10 seconds. Do not wait for a cup to finish pouring before tapping the next one. Ideally, you should have the next cup ready to enter the belt the millisecond the previous one leaves. Keep the belt full (4-5 items) at all times to maximize your Sand Per Second (SPS) throughput.
The "Skip-Perfect" Outline Method
In a normal run, you wait for the Blue outline to be perfect. In a speed run, you only need it to be "good enough." As soon as the Blue outline creates a closed loop (even if thin), immediately switch to tapping White. A little bit of bleeding is acceptable if you are fast enough to flood the zone with the correct color before the validation checks. This saves 5-10 seconds of waiting.
Two-Finger Tray Clearing
During the "Cyan Endgame" phase, do not tap cups one by one. Use two fingers (or multi-touch) to tap 3-4 Cyan cups simultaneously. This queues them instantly. Since the background is large and forgiving, accuracy doesn't matter—speed does. This technique can clear the tray in seconds rather than minutes.
Sensor Path Exploitation
Memorize the sensor's movement pattern: it typically swings in a figure-8 or a box pattern. If the sensor is currently over the Background (Top-Left), that is the perfect time to tap your Duck colors (White/Orange). By the time the cups travel the belt and reach the pourer, the sensor will have swung back to the Center (Duck zone). Always predict where the sensor will be, not where it is.
Immediate Reset on Failure
If you realize you have messed up the order (e.g., you poured White first), do not wait for the level to fail. Hit the Reset button immediately. In a speed run context, watching the slow-motion failure of a contaminated duck is wasted time. Develop the discipline to recognize a "dead run" instantly and restart.
Ignore the Background Until Last
Do not be tempted to "clean up" the background with Cyan while waiting for the belt to clear. Every slot on the belt occupied by Cyan is a slot NOT occupied by White or Blue. Maintain total focus on the Duck (Blue -> Orange -> White) until the Duck is 100% complete. Only then pivot to the background. This compartmentalization prevents belt clogging.