
Level 5
HARDHow to solve Sand Loop level 5? Get instant solution for Sand Loop 5 with our step by step solution & video walkthrough. Sand Loop 5 tips and guide.
Play Sand Loop Now
Experience the puzzle challenge firsthand
Game Screenshots
Sand Loop Level Guides
Level Overview: The Vertical Gauntlet
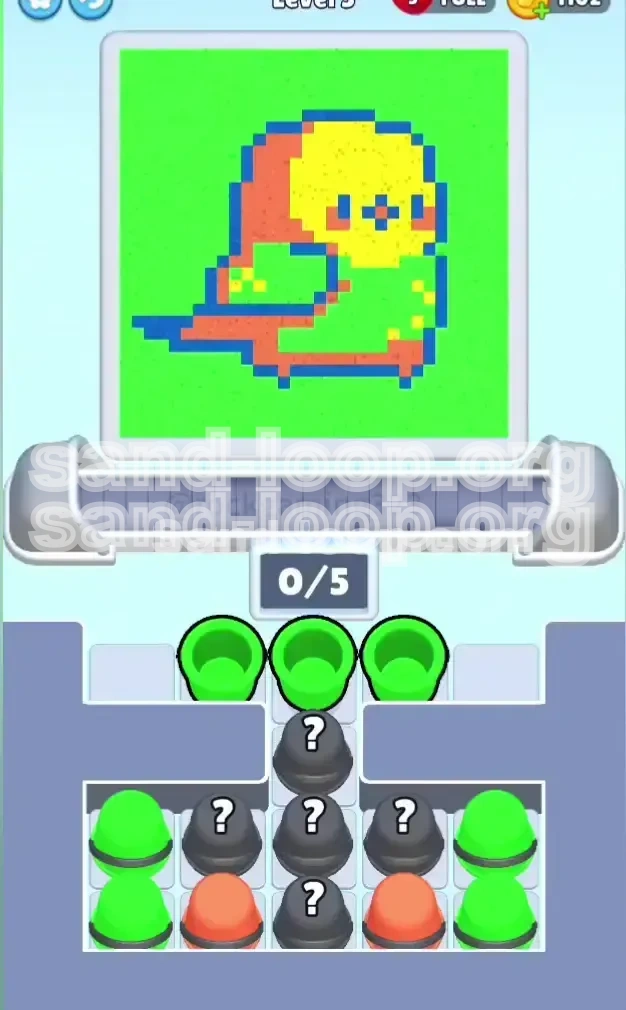
Welcome to the most deceptively difficult stage in Sand Loop so far. Level 5, the "Pixel Parakeet," introduces a verticality mechanic that changes how you must think about sand physics. Unlike previous levels where the canvas felt like an open field, this level introduces the "Mystery Spine"—a rigid column of unknown buckets in the center of the tray that acts as a gatekeeper.
The challenge here is two-fold: managing the unknown elements of the Mystery Spine and battling against the specific gravity of the sand. In the real world, sand piles up. In this game, the first sand you pour hits the bottom of the glass container. Since the Parakeet's tail is located at the bottom of the image but requires Blue sand (which is scarce and blocked), you cannot simply pour from top to bottom. You must build the image in reverse layers, ensuring the tail is seated before the body arrives.
The "Mystery Spine" Bottleneck
The defining feature of this level is the vertical column of 4 Mystery Buckets (?) positioned dead center. This is not just an obstacle; it is a timer. The side pockets containing the critical Orange and Blue buckets are physically locked behind this spine. You cannot access the corners until you dismantle the center. This forces a "Blind Commit" scenario where you must pull triggers without knowing the outcome, risking your belt capacity on RNG (Random Number Generation).
Gravity and Layer Inversion
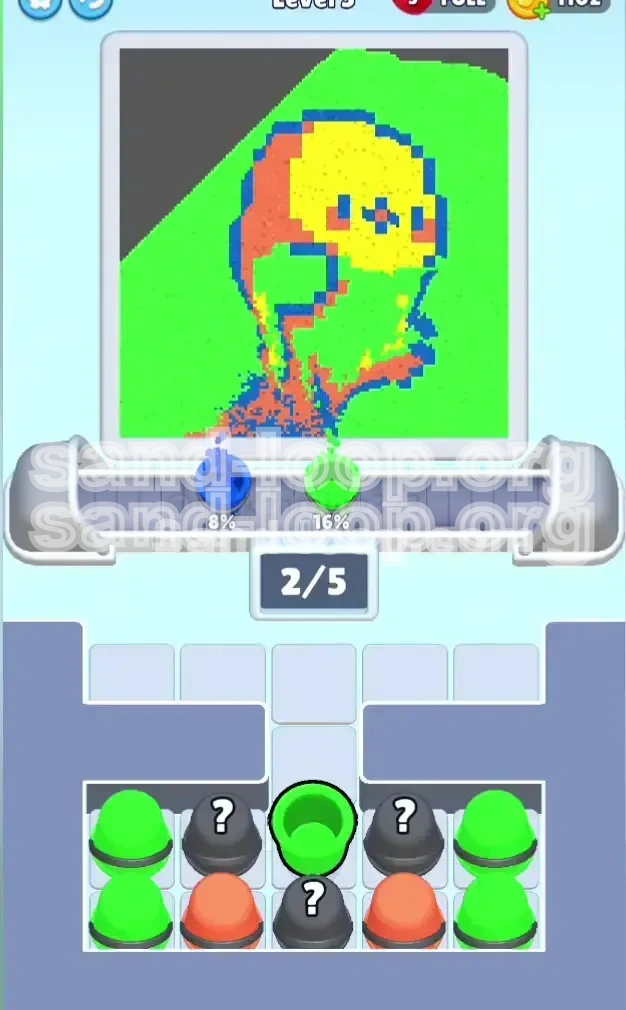
Standard art logic suggests painting the background first, then the details. Sand Loop physics dictate the opposite. The bottom of the container fills up first. The Parakeet's tail is at the bottom. If you paint the Green background first, the Blue tail will float on top of the Green pile, looking detached. You must execute a "Foundation Pour"—getting the Blue into the bottom cracks *before* the Green waves arrive.
The Queue Management Crisis
Your conveyor belt is limited to 5 slots. In this level, filling all 5 is a death sentence. If you load 5 buckets and the first one is a slow-pouring Green, but you suddenly see a Blue bucket unlock in the corner, you have no space to grab it. By the time your belt clears, that Blue bucket might have shifted back into the darkness of the tray. Keeping 4/5 or 3/5 capacity is not just a tip; it is a survival mechanic.
The Color Ratio Problem
Analyzing the target image reveals a dangerous ratio: approximately 60% Green, 15% Yellow, 15% Orange, and 10% Blue. The tray, however, is flooded with Green. The game tempts you with easy Green taps, but giving in to this temptation will bury the scarce Blue and Orange under a mountain of emerald sludge. You must actively suppress the urge to tap Green and hunt for the minority colors.
Clear Objectives: Strategic Goals
To secure the 3-star rating on the Pixel Parakeet, you must move beyond "painting by numbers" and engage in "resource management." Your primary goal is not just to finish the image, but to finish it without the colors contaminating each other. Here are your four concrete objectives for this level.
Secure the Foundation (Blue Tail)
Your immediate, non-negotiable goal is to get Blue sand to the bottom of the glass container. The Blue tail feathers are the root of the image. If they are not the first thing to hit the bottom (or mixed intimately with the very first layer of Green), the bird will look like it is hovering. You must prioritize unlocking the corners to get the Blue flowing before the container hits 30% capacity.
Dismantle the Mystery Spine
The vertical column is blocking your path to the corners. You must treat the center column as a "gacha" mechanic—pulling levers until you get the result you need. However, your objective is not just to clear it, but to clear it *without* clogging your belt with unwanted colors (specifically Yellow). You need to clear enough space to allow the side pockets to slide into the "pick-up zone."
Isolate the Wing (Orange Layering)
The Orange wing and belly sit in the middle of the sprite. If you pour Green, then Blue, then more Green, the Orange will never sit correctly. Your objective is to create a "sandwich": pour a base of Green, add the Orange, and then cap it with Green. This requires precise timing; you cannot pour all your Green at the start.
Cap with the Head (Yellow Priority)
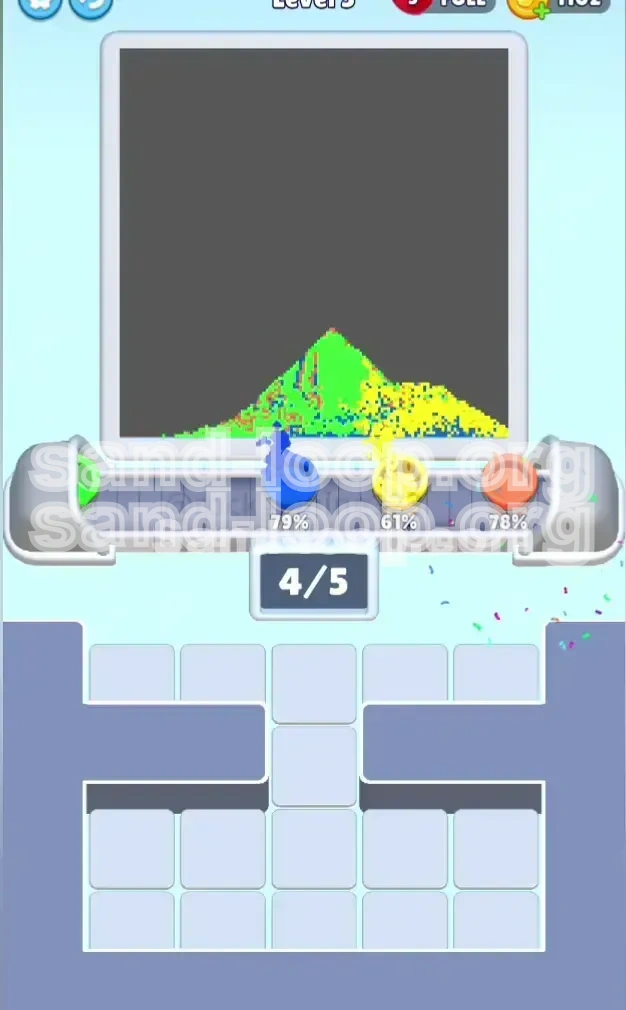
The Yellow head is the highest point of the sprite. In sand physics, the highest point is poured last. Your objective is to hoard every single Yellow bucket you encounter until the very end of the level. If you pour Yellow with 50% of the level remaining, it will be buried by subsequent sand pours, resulting in a decapitated parakeet.
Step-by-Step Instructions: Execution Guide
Do not rely on intuition. Follow this operational sequence to navigate the level safely. We have broken this down into time-blocked phases to help you maintain rhythm.
Phase 1: The Initial Drop (0-10 Seconds)
At the start, the top row usually offers 2-3 Green buckets. Action: Tap them immediately. This is your "primer." Let them pour. While they are pouring, scan the center column. Critical: Do not tap anything else yet. Let the Green establish the bottom 15% of the container. This creates a shallow bed for the Blue to rest on.
Phase 2: The Spine Gamble (10-25 Seconds)
Once the initial Green clears, look at the Mystery Spine (the center column). Action: Tap the top bucket of the spine.
- If it's Blue or Orange: Great! Let it pour immediately.
- If it's Green: Accept it, but keep an eye on the fill level.
- If it's Yellow: DO NOT POUR. Leave it sitting on your belt (taking up 1 slot) to "jail" it. This prevents it from clogging your pour order.
Phase 3: The Corner Rush (25-40 Seconds)
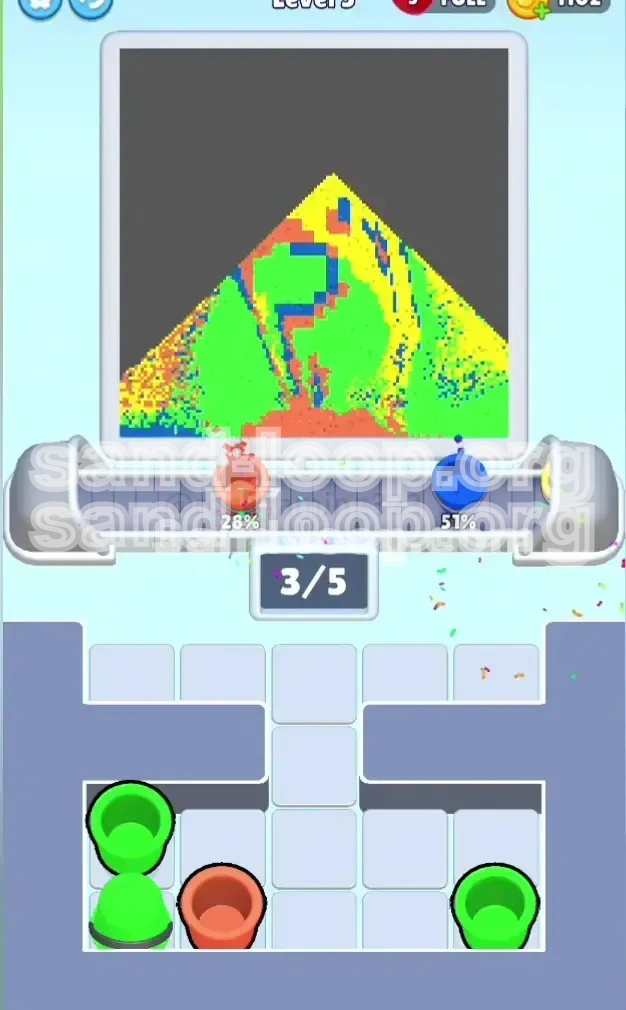
Once you clear 2-3 buckets from the spine, the tray will shift. The side pockets (Bottom-Left and Bottom-Right) will slide inward, revealing the locked Orange and Blue buckets. Action: Ignore the center. Immediately tap the Orange and Blue buckets in the corners. This is the "Critical Window." If you hesitate, the tray might shift again and lock them away. Get these colors on the belt immediately.
Phase 4: The Body Builder (40-55 Seconds)
Now that the details are in place (or currently pouring), the tray will fill with more Green. Action: Aggressively tap Green buckets. You want to build the body of the bird and fill the background. The Orange and Blue should already be in the container, settling beneath the incoming Green wave. Do not worry about being perfect; just ensure the Green covers the background and builds the body shape.
Phase 5: The Head Cap (Final 10 Seconds)
The level is nearly full. Action: Tap every single Yellow bucket you have been saving. Because the container is almost full, the Yellow sand will land on the very top surface of the pile, perfectly positioning it for the bird's head. If you have any Yellow left on the belt, pour it now to finish the level.
Color Order: The Processing Priority
This level is a test of patience. You will see colors you want to use, but you must wait. Here is the strict hierarchy of color processing. Deviating from this list is the primary cause of failure.
Priority 1: Blue (The Anchor)
Blue is the bottleneck color. It appears least frequently and is blocked by the level layout. You must process Blue the moment it becomes available. Do not wait for "a better time." If you see Blue in the corner or spine, and you have belt space, you take it. The physics of the game require Blue to be at the bottom layer. Delaying Blue guarantees a messy, floating tail.
Priority 2: Orange (The Connector)
Orange acts as the bridge between the dark tail and the bright body. If you pour Green before Orange, the Orange will float on top of the Green body, looking like a stain rather than a wing. Orange must be poured while the Green level is low (around 30-40% full). Process Orange as soon as the Blue is secured.
Priority 3: Green (The Filler)
Green is deceptive. It is the most abundant color, making you feel productive when you pour it. However, it is just filler. Process Green only when you have no Blue or Orange available, or when you need to bury the Orange details to create the 3D body shape. Never process Green if it means missing a chance to grab Blue.
Priority 4: Yellow (The Finisher)
Yellow is the "trophy" color. It should be the very last sand you pour. Process Yellow only when the container is 90% full. If you process Yellow early, you are essentially throwing it into the middle of the pile where it will never be seen. Treat Yellow buckets like explosives—handle them only at the very end.
Key Tips and Notes for Mastery
Understanding the 'why' is just as important as the 'what.' These tips explain the mechanics behind the strategy so you can adapt when RNG throws you a curveball.
The "Jailing" Technique
This is an advanced strategy for managing unwanted colors. If you tap a Mystery Bucket and get a Yellow you don't want, but you have 2/5 slots filled, pick up the Yellow anyway. Let it sit on your belt. Why? Because it removes the bucket from the tray, potentially allowing the buckets *behind* it to slide forward. You are using your belt slots as temporary storage to manipulate the tray layout.
Visualizing the Sand Pile
Don't look at the sprite; look at the pile height. If the sand in the glass container is level with the "wing" area of the image, you are running out of time to pour Orange. Once the Green pile passes that height, any Orange you pour will sit on top of the body. Use the physical pile height as your timer, not the clock.
The "Conveyor Shuffle"
If your belt is full (5/5) and you see a critical Blue bucket slide into the corner, you are in trouble. Tip: You can tap the Blue bucket *while* your current sand is pouring. It will queue up instantly. As soon as the current pour finishes, the Blue loads. Practice tapping your next target 1 second before the current pour finishes to minimize downtime.
Understanding RNG Patterns
While the Mystery Spine is random, it is weighted. There are typically only 2-3 Blue buckets in the entire level. If you have already poured 2 Blues, stop gambling on the Mystery Spine hoping for a third. Shift your focus to clearing Green to make room for the remaining Oranges. Don't chase ghosts; play the probabilities.
Common Mistakes to Avoid
Every player loses their first few times here. Learn from the errors that plague 90% of attempts.
The "Premature Greening" Error
This happens when a player gets nervous seeing the empty tray and taps all available Green buckets in the first 15 seconds. The container fills to 50% with Green. At this point, it is physically impossible to place the Blue tail correctly. The tail will always float. You must resist the urge to fill the screen. Leave the top half empty until you have secured the details.
The "Yellow Spill" Tragedy
You see a Yellow bucket early. You think, "I'll just pour it quickly to get it out of the way." Don't. That Yellow will pour into the center of your container. Later, when you pour Green to finish the body, that Green lands *on top* of the Yellow. The bird loses its head. Unless you want a headless parakeet, never pour Yellow before the body is finished.
Ignoring the "Shift"
The tray moves in columns. When you clear the center, the sides don't just sit there; they slide. A common mistake is clearing the center, then staring at the sand while the side pockets (containing the corners) slide *out* of reach. You must tap the side buckets the instant the center column disappears.
Stuck Solutions: Troubleshooting Guide
If the bird looks like a mutant, use these diagnostics to fix the problem or decide if a restart is faster.
Problem: The Tail is Floating or Green
Diagnosis: You poured too much Green before finding the Blue. Solution: If the container is less than 40% full, stop pouring Green immediately. Spam tap the Mystery Spine to find Blue. If the container is >60% full, the run is likely dead mathematically. You cannot force heavy Blue sand to sink through light Green sand. Restart.
Problem: The Head is Green/Dark
Diagnosis: You poured Yellow too early. Solution: This is salvageable. You need to build the "body" up higher. Pour Green aggressively until the pile reaches the top 10% of the container. Then, pour your remaining Yellow. This will create a "Yellow Cap" on top of the Green, restoring the head shape.
Problem: Belt Full of Junk, Need Blue
Diagnosis: You have 5 buckets on the belt (none are Blue), and a Blue just appeared in the corner. Solution: Let the current junk pour. As the *last* bucket is finishing its pour (about 90% done), tap the Blue bucket. The game will register the tap the instant a slot opens, snagging the Blue before it slides away. It requires frame-perfect timing, but it's the only way to save the run.
Speed Run Tips and Shortcuts
Once you can beat the level consistently, here is how to shave your time down to under 45 seconds.
The "Pre-Load" Input Buffer
The game allows you to tap your next bucket before the current one has even landed on the belt. As soon as you tap a bucket, look at the tray and tap the next one you want. Your inputs will queue up. This allows you to process the tray while walking away to check the canvas, saving precious seconds of downtime.
Risking the "Spine Rush"
Speedrunners often ignore the "safe" play of tapping one-by-one. If you are confident in your start, tap the entire Mystery Spine (all 4 buckets) in rapid succession immediately after the initial Green drop. This forces the RNG to reveal itself instantly. If you get lucky and find Blue/Orange, you save 20 seconds. If you get unlucky and get Yellow/Green, you restart immediately. High variance, high reward.
The "Good Enough" Pixel Art
Perfectionism kills speed. If the bird's belly has a few Green pixels on it, let it go. If the background has a splash of Blue, ignore it. Focus only on the major silhouettes: The Blue tail, the Green body mass, and the Yellow head. Fine-tuning the edges costs too much time. A messy 3-star is better than a perfect restart.