
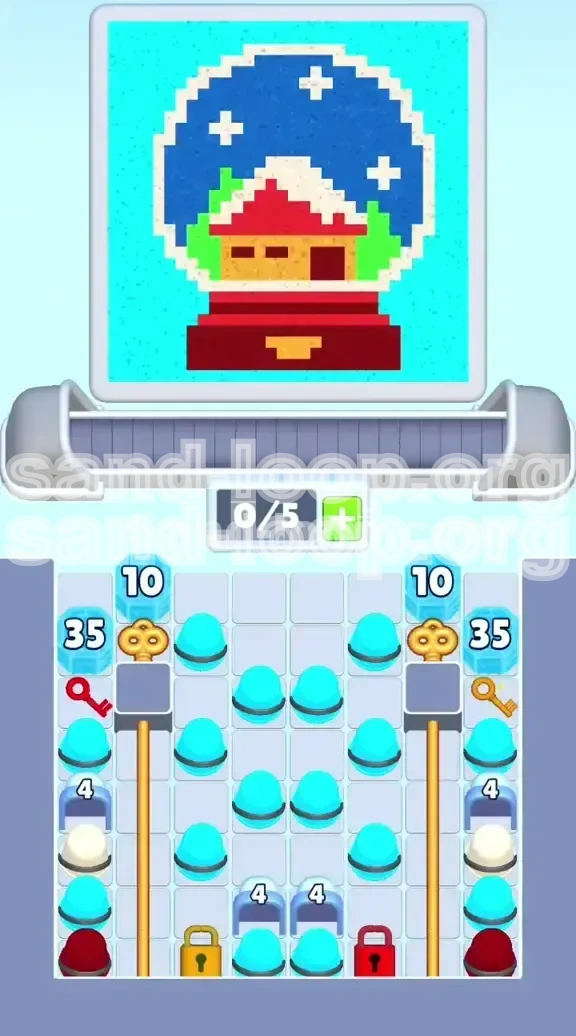
Level 189
HARDHow to solve Sand Loop level 189? Get instant solution for Sand Loop 189 with our step by step solution & video walkthrough. Sand Loop 189 tips and guide.
Play Sand Loop Now
Experience the puzzle challenge firsthand
Game Screenshots


Sand Loop Level Guides
Level Overview: The Snow Globe Trap
Welcome to the deceptive calm of Stage 189. On the surface, this appears to be a simple, festive painting task involving a snowy house scene encapsulated in a glass globe. However, beneath this charming aesthetic lies a rigorous logistics puzzle that tests your inventory management skills more than your reflexes. This level is classified as a Hard Logistics Challenge, primarily due to the severe restriction on conveyor belt space combined with an aggressive spawn rate for non-essential colors.
The central conflict of this stage is the discrepancy between the volume of "filler" colors (Cyan) and the critical necessity of "detail" colors (Red, White, Dark Blue). The board is designed to flood your limited 5-slot tray with background colors, effectively locking you out of the game if you react impulsively. To succeed, you must ignore the urge to paint the largest areas first and instead focus on the tedious, micro-management of the side columns to unlock the board's true potential.
Core Mechanics and Layout
The level layout is symmetrical but functionally segmented. You are presented with a standard 5-slot conveyor belt. Above the belt, the canvas is divided into the Sky (Cyan/Dark Blue), the House (Red/Yellow/White), and the Base (Red). The critical failure point is the "Cyan Flood" in the center of the tray. If these are tapped indiscriminately, they will occupy 100% of your belt capacity, preventing you from picking up the necessary Red or White cups when they briefly appear.
The Ice Block Hierarchy
Progression is gated by three layers of obstructions. Understanding this hierarchy is crucial for planning your opening moves:
- Layer 1 (Top Sides): 10-HP Ice Blocks guarding Gold Keys.
- Layer 2 (Middle Sides): 35-HP Ice Blocks guarding the Color Keys (Red/Yellow).
- Layer 3 (Bottom): The Red and Yellow Padlocks that control the flow of the base and window colors.
Primary vs. Secondary Colors
Do not treat all colors as equal. In this level, Cyan is a utility color, not a primary objective for the first 30% of the game. Your primary focus must be on Red and Dark Blue. Red is required to break the initial ice and to form the foundation of the house. Dark Blue is needed to clear the path to the Gold Keys. Treat Cyan cups as space-fillers only when your belt is empty, never as a priority.
Conveyor Belt Strategy
Your 5-slot belt is your most valuable resource. A "soft lock" occurs when you fill the belt with 5 cups of a color you don't currently need (e.g., 5 Cyan cups when the canvas requires Red). To maintain flexibility, you must adopt a 3-Slot Rule: never fill more than 3 slots with a single color type unless you are 100% certain of the immediate next 3 moves. Always keep 2 slots open for "emergency" cups that spawn unexpectedly.
Clear Objectives: Unlocking the Flow
The win condition for Stage 189 is not just filling the canvas, but successfully managing the unlocking sequence. You cannot simply paint what you see; you must actively engineer the board to allow the necessary colors to flow. Your objectives are split into three distinct phases: The Unlock Phase, The Foundation Phase, and The Detail Phase.
Phase 1: The Key Release
Your immediate goal is to clear the 10-HP Ice Blocks located in the top corners of the side columns. These blocks are the bottlenecks preventing access to the Gold Keys. Unlike standard levels where you focus on the center, here you must focus your fire on the extreme left and right edges. Success in this phase unlocks the generators, allowing a steady stream of Red and Yellow cups to enter the tray.
Phase 2: Breaking the Cross-Lock
Once the generators are active, you will encounter the "Cross-Lock" mechanic. The Red Key is located on the left, under a 35-HP block, but it unlocks the Red Padlock on the right. Conversely, the Yellow Key is on the right but unlocks the left side. You must clear the 35-HP blocks to retrieve these keys. Failing to do so leaves the board in a semi-locked state where critical colors (like the Red for the base) are unavailable.
Phase 3: The Base and Sky Construction
With the board unlocked, the objective shifts to volume painting. You must complete the Red Base of the snow globe before the sky. Why? Because the base is a large, solid block of color that can absorb the "junk" Red cups that might spawn while you are hunting for Whites or Greens later. Establishing the base early stabilizes your resource management.
Phase 4: Precision Detailing
The final objective is the application of White (Snow) and Green (Trees). These colors are high-risk because their target areas are small (thin lines of snow, small trees). Over-producing these colors will clog your belt. The objective here is patience: tap only when the specific target zone is exposed and ready to receive the color.
Step-by-Step Instructions: The Opening Sequence
The first 20 moves of Level 189 are scripted. If you deviate from this path, you will likely run out of moves or soft-lock your belt. Follow this sequence to enter the mid-game with a stable board.
Step 1: Ignore the Center
As the level starts, you will see a massive cluster of Cyan cups in the center of the tray. Do not tap them. Tapping these now will fill your belt with low-priority sky color. Instead, visually scan the far left and far right columns. Look for the 10-HP Ice Blocks at the top. These are your only targets for the first 10 taps.
Step 2: Targeted Ice Breaking
Look for Red or Dark Blue cups that spawn near the bottom. These are your "hammers." Tap these to send them to the canvas. They will chip away at the HP of the Ice Blocks. It takes approximately 3-4 correctly colored cups to break a 10-HP block. Prioritize the side that has the most immediate "Hammer" cups available. If you have a choice, prioritize the Left Side to free up the Red Key path first.
Step 3: Securing the Gold Keys
Once the 10-HP blocks shatter, Gold Keys will drop. These keys automatically unlock the generator slots directly beneath them. You will notice a sudden shift in the spawning patterns—more Reds and Yellows will begin to appear. Do not switch targets yet. Finish clearing any remaining Ice Blocks on the opposite side to ensure both generators are online. Symmetry in the opening moves is key to preventing a resource shortage later.
Step 4: Drilling to the Color Keys
With the generators open, you now have access to heavier ammunition. Continue feeding Red cups to the left side to break the 35-HP Ice Block guarding the Red Key. Simultaneously, use Yellow/Orange cups on the right side to drill down to the Yellow Key. This phase requires about 15-20 taps of pure resource generation. Do not worry about painting the canvas perfectly yet; your only goal is mining those keys.
Step 5: Executing the Cross-Unlock
Retrieve the Red Key from the left. Tap the corresponding Red Padlock on the bottom right. Retrieve the Yellow Key from the right. Tap the Yellow Padlock on the bottom left. This cross-action is the climax of the opening sequence. Upon completing this, the "floodgates" open, and the level transitions from a logistics puzzle to a painting challenge.
Step-by-Step Instructions: The Mid-Game Strategy
Now that the board is fully unlocked, the challenge shifts to efficient painting. The risk of soft-locking remains high, but now it is driven by the volume of cups required to fill the large background areas.
Step 6: Establishing the Red Foundation
Immediately fill the base of the snow globe (Red) and the body of the house (Red). Doing this now serves two purposes: it completes a large visual chunk of the level, and it allows you to clear any excess Red cups from the tray without penalty. If you wait until the end to do the Red base, you will find yourself frustrated by single Red cups spawning when you need Green or White.
Step 7: Managing the Cyan Sky
Now you can address the Cyan cups in the center. The sky is large, so it can accept a high volume of color. However, the sky also contains the Dark Blue "night" elements. Alternate between Cyan and Dark Blue. Pro Tip: Do not fill the entire sky at once. Leave a small corner or section of the sky unpainted (about 10-15%). This "buffer zone" acts as a trash can for unwanted Cyan cups later in the level, preventing them from clogging your belt when you are hunting for Whites.
Step 8: The Window Detailing
The windows and door require Yellow and Orange. These colors are generally low-risk because the spawn rate for Yellow is moderate compared to Cyan. Fill the windows now. The bright contrast of the windows against the Red house and Dark Blue sky will begin to bring the image into focus. Ensure you do not accidentally spill Yellow onto the roof; precision is required here as the targets are small rectangles.
Step 9: Preparing for the Finish
At this stage, your board should be roughly 70% complete. The remaining items are the Green trees and the White snow. Before you proceed, clear your conveyor belt. Try to empty it completely or fill it only with colors you absolutely need for the final steps (Green/White). Entering the final phase with a belt full of Cyan/Red is a common recipe for failure.
Step-by-Step Instructions: The End Game
The final stretch is a test of patience and precision. The targets are small, and the penalty for missing is high because you cannot easily "waste" White or Green cups elsewhere on the board.
Step 10: Painting the Pine Trees
Target the Green areas on the flanks of the house. These trees have jagged edges. Use short, controlled taps. If you have a Green cup, use it immediately. Do not hoard Green cups on the belt, as Green is not a color you can easily "dump" into other areas without ruining the grass or sky contrast. Completing the trees first is usually safer than saving them for last.
Step 11: The White Snow Application
This is the most dangerous step. The White cups are needed for the roof snow and the reflection on the glass. These targets are very thin lines.
- Wait for a White cup to spawn.
- Check your belt: Do you have space? If the belt is full, make a move elsewhere to create a slot.
- Tap the White cup only when the brush is aligned with the roof line.
Step 12: Finalizing the Glass Reflection
The final touch is the "glint" on the glass globe. This is a tiny sliver of White. Ensure the main snow on the roof is 100% finished before attempting this. There is nothing worse than needing 1% more White on the roof but having your belt blocked by other colors because you rushed the glass reflection.
Step 13: Cleanup and Victory
Once the trees and snow are done, return to the "buffer zone" in the sky you left in Step 7. Fill the remaining Cyan and Dark Blue gaps. With the belt empty and the canvas full, the level is complete.
Color Order: Processing the Palette
The order in which you process colors is the single biggest factor in your success rate. Processing them in the wrong order (e.g., painting the sky first) leads to an unwinnable state. Follow this priority hierarchy.
Priority 1: Red (The Keymaker)
Red is your currency. It breaks the ice, unlocks the padlocks, and builds the base. It must be processed constantly throughout the first half of the level. Even if the Red part of the picture is full, if you have a Red cup and a slot open, consider sending it to keep the flow moving and prevent tray jams.
Priority 2: Dark Blue (The Enabler)
Dark Blue serves a dual purpose: it is part of the night sky and a crucial tool for breaking the initial ice blocks. Process Dark Blue immediately whenever it appears in the early game to ensure you can reach the Gold Keys. In the late game, it becomes a standard background color.
Priority 3: Yellow/Orange (The Details)
Yellow is a "medium priority" color. It is essential for the cross-unlock (Yellow Key) and the windows. It is not as abundant as Cyan, so you don't need to worry about it clogging your belt as much, but you also can't afford to miss it when it spawns, or the cross-unlock will stall.
Priority 4: Cyan (The Filler)
Cyan is your "dump" color. Process Cyan only when you have no other moves available, or when you have 2+ empty slots on your belt. If you process Cyan while your belt is full of other colors, you create a bottleneck. Use the large sky area to your advantage to burn off excess Cyan cups when you are stuck.
Priority 5: Green (The Finisher)
Green is a late-game color. The trees are distinct and don't touch the Red house much, so they can be done safely in the mid-to-late game. However, do not leave Green for the very last if the spawn rate is low, as you might run out of moves hunting for the last Green cup.
Priority 6: White (The Risk)
White is the lowest priority for processing but the highest priority for precision. Process White last. The areas it covers are too small to absorb mistakes. If you process White early, you risk filling your belt with White cups that you can't place, effectively ending your run.
Key Tips and Notes
Here is a collection of specific tips to help you navigate the trickier aspects of Level 189. These notes are derived from countless test runs and highlight the subtle mechanics of the Snow Globe stage.
The "2-Slot Buffer" Rule
Never let your conveyor belt fill up with 4 or 5 of the same color unless you are doing a "paint dump" into a large area. Ideally, keep 2 slots empty at all times. This gives you the flexibility to grab a Key or a Hammer color the instant it appears. If you are holding 3 Cyan cups and a Red Key spawns, you are already too late.
The "Gold Key" Timing
The Gold Keys do not stay on the board forever if there is extreme congestion, though usually they are permanent until tapped. However, the blocks guarding them regenerate their visual clarity, making it hard to see progress. Focus fire on one side at a time. It is better to fully unlock one generator than to half-unlock two. A fully unlocked generator feeds you the specific colors you need to finish the other side.
Visual Clutter Management
As the level progresses, the tray will visually fill up with cups. It can be hard to see the colors underneath. Practice "color fishing"—don't just look at the top layer. Be ready to tap a stack of Cyan if you suspect a Red or Yellow is buried underneath it (you can often see the edges of the cups underneath).
The "Snowflake" Risk
The snowflakes in the sky are tiny White circles. They are deceptive. Many players try to fill them early. Do not do this. They are extremely small targets. Wait until the very end when you have zero other distractions. Trying to hit a moving snowflake while managing the Red base is a guaranteed way to mess up your rhythm.
Ice Block HP Tracking
Keep a mental counter of how many hits you have landed on the 35-HP blocks. They take roughly 7-8 direct hits from standard cups. If you stop hitting them at 30 HP, they will regenerate or simply remain there, mocking you. Commit to the break. Once you start drilling a 35-HP block, don't stop until it shatters.
Utilizing the "Red Base" as a Dump
If you have an excess of Red cups in the late game (which happens often), you can always overfill the Red Base or the House Walls slightly. The hitboxes for these areas are generous. If you are stuck with 4 Red cups and need a Green, dump the Reds into the base area to clear your belt immediately. This is better than waiting for the belt to cycle.
Common Mistakes to Avoid
Awareness of these common pitfalls will save you from restarting the level. 90% of failed runs on Stage 189 are caused by one of the following errors.
Mistake 1: Tapping the Center Cyan Cluster First
This is the number one killer. The game starts with a tempting pile of Cyan in the middle. It feels satisfying to clear it. But doing so fills your belt with Cyan, leaving you helpless when the Red/Dark Blue spawn on the sides. You sit there watching the timer tick or your moves drain, unable to pick up the tools you need to actually play the level.
Mistake 2: Ignoring the Cross-Lock
Many players unlock the Left side (Red Key) and then immediately try to paint the left side of the canvas. They forget that the Red Key unlocks the Right Padlock. You must carry the key across the board logic. If you unlock the key but don't use it on the padlock immediately, you bottleneck your own color supply.
Mistake 3: Painting the Sky Completely
Filling the sky 100% early seems like progress, but it removes your "dumping ground" for excess Cyan. Later in the level, when you are hunting for that last Green cup, Cyan cups will keep spawning. If the sky is full, you have nowhere to put them, and your belt jams. Always leave 5-10% of the sky unpainted until the very end.
Mistake 4: Overproducing White
White cups have a "clumping" spawn mechanic. They often come in pairs or triples. If you tap all three, and the snow target is only 10% filled, you now have two useless White cups blocking your belt. You have to waste moves clearing them. Only tap White one cup at a time.
Mistake 5: Neglecting the 35-HP Blocks
Players often clear the top 10-HP blocks, get the Gold Keys, and then get distracted by painting the house. They leave the 35-HP blocks half-chipped. Later, when the board shifts or colors run dry, they realize they never unlocked the secondary generators and have no way to get the necessary colors to finish. Clear the blocks, then paint.
Stuck Solutions: What to Do When You Hit a Wall
Sometimes, despite your best efforts, the RNG (Random Number Generation) of the cup spawns works against you. Here is how to recover from specific sticky situations.
Problem: The Belt is Full of Cyan, and I Need Red.
Solution: You are in a "Soft Lock." Do not panic. Look at your canvas. Is the Sky 100% full? If not, send 1 Cyan cup to the sky. This clears 1 slot. Did a Red cup spawn? No? Send another Cyan cup. You must burn the Cyan inventory to create space. Eventually, the game will spawn the Red you need, but you must have an empty slot ready to receive it.
Problem: I Can't Break the 35-HP Ice Block.
Solution: You are likely out of ammo (Red/Dark Blue cups). Look at the generator you unlocked. Is it blocked? Sometimes a cup gets stuck "behind" another color visually. Tap the area around the generator to dislodge the flow. If the generator is truly empty, you must use whatever is in your tray—even if it's not the perfect color—to chip away 1 HP at a time. Every bit counts.
Problem: I Missed the Snowflake with a White Cup.
Solution: Do not tap another White cup immediately. Wait. The game has a cooldown. Let the White cup sit on your belt (taking up space) for a moment while you clear other colors or fix other parts of the image. Once you feel the rhythm return, try the snowflake again. Alternatively, if you have a "snow" area on the roof that is low, dump the White there instead of the tiny snowflake.
Problem: No More Moves/Keys Spawning.
Solution: This usually means you missed a hidden Ice Block or didn't fully unlock a generator. Scan the edges of the screen. Is there a sliver of Ice remaining? Is a Padlock still locked? You cannot finish the level if the mechanical locks are still engaged. Put down the brush and pick up the pickaxe.
Speed Run Tips
For players looking to 3-star this level or achieve a high leaderboard time, efficiency is paramount. You cannot afford to wait for the perfect rotation.
Pre-Loading the Belt
As you finish the Ice Breaking phase, try to have your belt pre-loaded with 2 Red and 1 Dark Blue cup before the final unlock happens. This allows you to immediately slam the Base and Sky as soon as the cross-lock is removed, shaving seconds off your time.
The "Swipe" Technique
Instead of tapping individual cups for the large areas (like the Red Base or the Sky), use a swiping motion if your device supports it, or tap rhythmically in the center of the cluster. This processes the cups faster than waiting for individual tap animations. However, stop swiping the moment you enter the Detail Phase (White/Green) to avoid over-filling.
Ignoring the Sky Buffer
In a speed run, you can ignore the advice to leave a sky buffer. Instead, rely on pure speed. If you process colors fast enough, you will create your own gaps. If the belt fills up, immediately dump 3 cups into the nearest large area to clear the jam instantly, rather than managing the 2-slot rule.
Knowing the "Spawn Points"
Memorize where the Red and Yellow keys drop. The Red Key always drops to the left of the board. Position your finger/cursor near the Red Padlock on the right *before* you even break the final bit of ice. As soon as the key drops, tap the padlock. This saves the 1-2 seconds of looking around and significantly improves your rhythm.